
User's Guide
Page 2
...meet strict global safety standards with the use the fax feature during a lightning storm. Lexmark is near the product and easily accessible. SAVE THESE INSTRUCTIONS. The safety features of specific Lexmark components. CAUTION-SHOCK HAZARD: Do not use of some parts may not always be ...or make sure to keep your product supports Macintosh, see the Mac Help installed with the printer software. Do not set up this product or the manufacturer's authorized replacement power supply and power supply cord. For complete descriptions: • Windows users-See the User's Guide. •...
...meet strict global safety standards with the use the fax feature during a lightning storm. Lexmark is near the product and easily accessible. SAVE THESE INSTRUCTIONS. The safety features of specific Lexmark components. CAUTION-SHOCK HAZARD: Do not use of some parts may not always be ...or make sure to keep your product supports Macintosh, see the Mac Help installed with the printer software. Do not set up this product or the manufacturer's authorized replacement power supply and power supply cord. For complete descriptions: • Windows users-See the User's Guide. •...
User's Guide
Page 5
...Customizing settings using the Fax Solution Software ...48 Setting the number of rings before receiving a fax automatically 49 Maintaining the printer 50 Changing print cartridges...50 Removing a used print cartridge ...50 Installing print cartridges...50 Achieving better print quality...52 Improving... Ordering print cartridges...55 Ordering paper and other supplies...56 Using genuine Lexmark print cartridges...56 Refilling a print cartridge...57 Recycling Lexmark products...57 Troubleshooting 58 Setup troubleshooting...58 Power button is not lit ...58 Software does not install...58 Page does...
...Customizing settings using the Fax Solution Software ...48 Setting the number of rings before receiving a fax automatically 49 Maintaining the printer 50 Changing print cartridges...50 Removing a used print cartridge ...50 Installing print cartridges...50 Achieving better print quality...52 Improving... Ordering print cartridges...55 Ordering paper and other supplies...56 Using genuine Lexmark print cartridges...56 Refilling a print cartridge...57 Recycling Lexmark products...57 Troubleshooting 58 Setup troubleshooting...58 Power button is not lit ...58 Software does not install...58 Page does...
User's Guide
Page 6
...66 Fax troubleshooting...66 Cannot send or receive a fax...66 Can send but not receive faxes...67 Can receive but not send faxes...67 Printer receives a blank fax...67 Received fax has poor print quality...68 Jams and misfeeds troubleshooting...68 Paper jams...68 Paper or specialty media misfeeds......68 Printer does not feed paper, envelopes, or specialty media 69 Banner paper jams ...69 Blinking lights on the control panel...70 Error messages...71 ...
...66 Fax troubleshooting...66 Cannot send or receive a fax...66 Can send but not receive faxes...67 Can receive but not send faxes...67 Printer receives a blank fax...67 Received fax has poor print quality...68 Jams and misfeeds troubleshooting...68 Paper jams...68 Paper or specialty media misfeeds......68 Printer does not feed paper, envelopes, or specialty media 69 Banner paper jams ...69 Blinking lights on the control panel...70 Error messages...71 ...

User's Guide
Page 11
...: Your power cord may not be found on the installation software CD that serves as a guide (available in electronic format 5 Setup sheet Instructions on setting up the printer 11 Note: A USB cable may or may look different from the one shown. 4 Installation software CD • Installation software for the printer • Help • User...
...: Your power cord may not be found on the installation software CD that serves as a guide (available in electronic format 5 Setup sheet Instructions on setting up the printer 11 Note: A USB cable may or may look different from the one shown. 4 Installation software CD • Installation software for the printer • Help • User...
User's Guide
Page 13
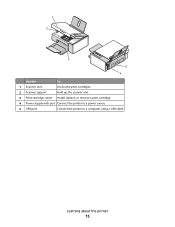
Learning about the printer 13 1 2 3 5 4 Use the To 1 Scanner unit Access the print cartridges. 2 Scanner support Hold up the scanner unit. 3 Print cartridge carrier Install, replace, or remove a print cartridge. 4 Power supply with port Connect the printer to a power source. 5 USB port Connect the printer to a computer using a USB cable.
Learning about the printer 13 1 2 3 5 4 Use the To 1 Scanner unit Access the print cartridges. 2 Scanner support Hold up the scanner unit. 3 Print cartridge carrier Install, replace, or remove a print cartridge. 4 Power supply with port Connect the printer to a power source. 5 USB port Connect the printer to a computer using a USB cable.
User's Guide
Page 58
... Service Pack 3 or later. Software does not install Check your operating system Check your computer meets the minimum system requirements listed on the printer. 2 1 3 Plug the cord into an electrical outlet that your system requirements The following operating systems are using . 4 If the light... is not lit Check power connection 1 Disconnect the power cord from the wall outlet, and then from the printer. 2 Plug the cord all the way into the power supply on the box. Troubleshooting 58 Note: For Windows 2000 users, make ...
... Service Pack 3 or later. Software does not install Check your operating system Check your computer meets the minimum system requirements listed on the printer. 2 1 3 Plug the cord into an electrical outlet that your system requirements The following operating systems are using . 4 If the light... is not lit Check power connection 1 Disconnect the power cord from the wall outlet, and then from the printer. 2 Plug the cord all the way into the power supply on the box. Troubleshooting 58 Note: For Windows 2000 users, make ...
User's Guide
Page 59
..., visit our Web site at www.lexmark.com to check for any obvious damage. 2 Firmly plug the square end of the USB cable into the back of the printer. 3 Firmly plug the rectangular end...page 58. USB cable may not be connected Use these steps to install the printer software May need to reconnect power supply Other software may be running Software may not be installed correctly 1 Check the... the software. 1 Press to turn the printer off and then restart your country or region. Page does not print Check the control panel If one of the computer. c Select your operating system...
..., visit our Web site at www.lexmark.com to check for any obvious damage. 2 Firmly plug the square end of the USB cable into the back of the printer. 3 Firmly plug the rectangular end...page 58. USB cable may not be connected Use these steps to install the printer software May need to reconnect power supply Other software may be running Software may not be installed correctly 1 Check the... the software. 1 Press to turn the printer off and then restart your country or region. Page does not print Check the control panel If one of the computer. c Select your operating system...
User's Guide
Page 60
... at www.lexmark.com to download, and then follow the directions on the computer screen. May need to turn the printer off. 2 Disconnect the power cord from the wall outlet. 3 Gently remove the power supply from the printer. 4 Reconnect the power supply to the printer. 5 Plug the power cord into... the wall outlet. 6 Press to reconnect power supply Software may have been removed....
... at www.lexmark.com to download, and then follow the directions on the computer screen. May need to turn the printer off. 2 Disconnect the power cord from the wall outlet. 3 Gently remove the power supply from the printer. 4 Reconnect the power supply to the printer. 5 Plug the power cord into... the wall outlet. 6 Press to reconnect power supply Software may have been removed....
User's Guide
Page 63
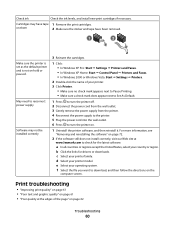
...photo copies" on page 64 Copier does not respond Check the control panel for obstructions 1 Lift the scanner unit. 2 Remove any blinking lights Check power Software may not be installed correctly 1 From the software application, click File ΠPrint. 2 Click Properties, Preferences, Options, or Setup. 3...Quality/Copies. 4 From the Quality/Speed area, select a lower print quality. Troubleshooting 63 If the light is not on, see "Power button is loaded facedown on the scanner glass in the lower right corner. Select a lower print quality Software may not be installed correctly If...
...photo copies" on page 64 Copier does not respond Check the control panel for obstructions 1 Lift the scanner unit. 2 Remove any blinking lights Check power Software may not be installed correctly 1 From the software application, click File ΠPrint. 2 Click Properties, Preferences, Options, or Setup. 3...Quality/Copies. 4 From the Quality/Speed area, select a lower print quality. Troubleshooting 63 If the light is not on, see "Power button is loaded facedown on the scanner glass in the lower right corner. Select a lower print quality Software may not be installed correctly If...
User's Guide
Page 65
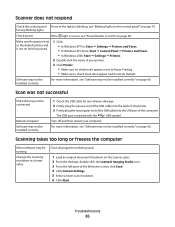
...may not be running Change the scanning resolution to Set As Default. Turn off and then restart your printer. 3 Click Printer. • Make sure no check mark appears next to Pause Printing. • Make sure a...into the USB port of the computer. for any blinking lights Check power If the light is not on, see "Power button is not lit" on page 60. Scanning takes too long or...not respond Check the control panel If one of the lights is blinking, see "Blinking lights on the control panel" on the scanner glass. 2 From the desktop, double-click the Lexmark Imaging Studio icon. 3 From the...
...may not be running Change the scanning resolution to Set As Default. Turn off and then restart your printer. 3 Click Printer. • Make sure no check mark appears next to Pause Printing. • Make sure a...into the USB port of the computer. for any blinking lights Check power If the light is not on, see "Power button is not lit" on page 60. Scanning takes too long or...not respond Check the control panel If one of the lights is blinking, see "Blinking lights on the control panel" on the scanner glass. 2 From the desktop, double-click the Lexmark Imaging Studio icon. 3 From the...
User's Guide
Page 66
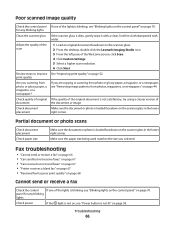
... receive faxes" on page 67 • "Can receive but not send faxes" on page 67 • "Printer receives a blank fax" on page 67 • "Received fax has poor print quality" on page 68 Cannot... any blinking lights Check power If the light is not on, see "Power button is not lit" on page 70. Poor scanned image quality Check the control panel If one of the lights is ...quality of the original document is loaded facedown on the scanner glass. 2 From the desktop, double-click the Lexmark Imaging Studio icon. 3 From the left pane of the Welcome screen, click Scan. 4 Click Custom Settings....
... receive faxes" on page 67 • "Can receive but not send faxes" on page 67 • "Printer receives a blank fax" on page 67 • "Received fax has poor print quality" on page 68 Cannot... any blinking lights Check power If the light is not on, see "Power button is not lit" on page 70. Poor scanned image quality Check the control panel If one of the lights is ...quality of the original document is loaded facedown on the scanner glass. 2 From the desktop, double-click the Lexmark Imaging Studio icon. 3 From the left pane of the Welcome screen, click Scan. 4 Click Custom Settings....
User's Guide
Page 67
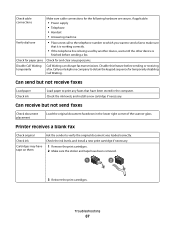
Call your telephone company to verify the original document was loaded correctly. Printer receives a blank fax Check original Ask the sender to obtain the keypad sequence for temporarily disabling Call Waiting. Can receive but not receive faxes Load... ink levels, and install a new print cartridge if necessary. Check cable connections Make sure cable connections for the following hardware are secure, if applicable: • Power supply • Telephone • Handset • Answering machine Verify dial tone • Place a test call to the telephone number to which you want to ...
Call your telephone company to verify the original document was loaded correctly. Printer receives a blank fax Check original Ask the sender to obtain the keypad sequence for temporarily disabling Call Waiting. Can receive but not receive faxes Load... ink levels, and install a new print cartridge if necessary. Check cable connections Make sure cable connections for the following hardware are secure, if applicable: • Power supply • Telephone • Handset • Answering machine Verify dial tone • Place a test call to the telephone number to which you want to ...

User's Guide
Page 77
...customer terminal equipment connected to which this device is recommended that the customer install an appropriate AC surge arrestor in the AC outlet to AC power sources. This has been identified as a major nationwide problem. En bout de ligne, le nombre d'appareils qui peuvent être connecté... du Canada Ce produit est conforme aux spécifications techniques d'Industrie Canada. Notices 77 An appropriate AC surge arrestor is defined as one that is an indication of the maximum number of terminals allowed to be a 900 number or any combination of use . The Ringer ...
...customer terminal equipment connected to which this device is recommended that the customer install an appropriate AC surge arrestor in the AC outlet to AC power sources. This has been identified as a major nationwide problem. En bout de ligne, le nombre d'appareils qui peuvent être connecté... du Canada Ce produit est conforme aux spécifications techniques d'Industrie Canada. Notices 77 An appropriate AC surge arrestor is defined as one that is an indication of the maximum number of terminals allowed to be a 900 number or any combination of use . The Ringer ...
User's Guide
Page 79
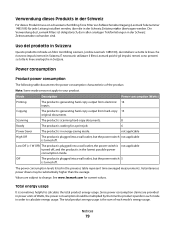
...schweizerischer Billing Tone Filter zur Zählzeichenübertragung (Lexmark Teilenummer 14B5109) für jede Leitung installiert werden, über die in Svizzera. Power consumption Product power consumption The following table documents the power consumption characteristics of the product. Uso del prodotto in ...Note: Some modes may not apply to your product. Low Off ( Die Verwendung des Lexmark Filters ist obligatorisch, da in allen analogen Telefonleitungen in energy-saving mode. Power consumption (Watts) 14 15 Scanning The product is scanning hard-copy documents. 8 Ready...
...schweizerischer Billing Tone Filter zur Zählzeichenübertragung (Lexmark Teilenummer 14B5109) für jede Leitung installiert werden, über die in Svizzera. Power consumption Product power consumption The following table documents the power consumption characteristics of the product. Uso del prodotto in ...Note: Some modes may not apply to your product. Low Off ( Die Verwendung des Lexmark Filters ist obligatorisch, da in allen analogen Telefonleitungen in energy-saving mode. Power consumption (Watts) 14 15 Scanning The product is scanning hard-copy documents. 8 Ready...
User's Guide
Page 81
... contents 11 buttons, control panel 4x6 color copy 37 4x6 Copy 14 Black Copy 14 Cancel 14 Color Copy 14 Paper Feed 14 Power 14 Scan 14 buttons, Lexmark Imaging Studio Copy 15 E-mail 15 Fax 15 Photo Greeting Cards 15 Photo Packages 15 Poster 15 Scan 15 Slideshow 15 Transfer Photos...
... contents 11 buttons, control panel 4x6 color copy 37 4x6 Copy 14 Black Copy 14 Cancel 14 Color Copy 14 Paper Feed 14 Power 14 Scan 14 buttons, Lexmark Imaging Studio Copy 15 E-mail 15 Fax 15 Photo Greeting Cards 15 Photo Packages 15 Poster 15 Scan 15 Slideshow 15 Transfer Photos...
User's Guide
Page 83
... CD using the computer 32 scanning multiple photos at one time using computer 42 scanning multiple photos using the ... printing 30 Poster 35 Poster button 15 power button is not lit 58 power supply port 13 print cartridge cleaning 53 ...printer does not feed paper, envelopes, or specialty media 69 printer receives blank fax 67 printer software reinstalling 72 removing 72 using 15 printer software settings resetting to defaults 20 Printer...has poor print quality 68 receiving a fax using the software 47 recycling Lexmark products 57 WEEE statement 76 removing print cartridges 50 reports fax activity 47...
... CD using the computer 32 scanning multiple photos at one time using computer 42 scanning multiple photos using the ... printing 30 Poster 35 Poster button 15 power button is not lit 58 power supply port 13 print cartridge cleaning 53 ...printer does not feed paper, envelopes, or specialty media 69 printer receives blank fax 67 printer software reinstalling 72 removing 72 using 15 printer software settings resetting to defaults 20 Printer...has poor print quality 68 receiving a fax using the software 47 recycling Lexmark products 57 WEEE statement 76 removing print cartridges 50 reports fax activity 47...
User's Guide
Page 84
...13 scanner unit does not close 63 Scanning to the Photo Library 41 scanning multiple photos at one time using computer 42 multiple photos using the computer 42 saving scanned image 40 using the control...computer 65 setup troubleshooting page does not print 59 power button is not lit 58 software does not install 58 slideshow creating and viewing 35 software Lexmark Imaging Studio 15 Print Properties 18 removing and ...not send fax 67 can send but not receive fax 67 cannot send or receive fax 66 printer receives blank fax 67 received fax has poor print quality 68 Index 84 troubleshooting, jams and ...
...13 scanner unit does not close 63 Scanning to the Photo Library 41 scanning multiple photos at one time using computer 42 multiple photos using the computer 42 saving scanned image 40 using the control...computer 65 setup troubleshooting page does not print 59 power button is not lit 58 software does not install 58 slideshow creating and viewing 35 software Lexmark Imaging Studio 15 Print Properties 18 removing and ...not send fax 67 can send but not receive fax 67 cannot send or receive fax 66 printer receives blank fax 67 received fax has poor print quality 68 Index 84 troubleshooting, jams and ...

Getting Started
Page 2
...or the manufacturer's authorized replacement power supply and power supply cord. Safety information Use only the power supply and power supply cord provided with the use the fax feature during a lightning storm. The safety features of specific Lexmark components. Lexmark is not responsible for the ... global safety standards with this product or make any electrical or cabling connections, such as the power supply cord or telephone, during a lightning storm. Connect the power supply cord to a professional service person. Refer service or repairs, other replacement parts. CAUTION...
...or the manufacturer's authorized replacement power supply and power supply cord. Safety information Use only the power supply and power supply cord provided with the use the fax feature during a lightning storm. The safety features of specific Lexmark components. Lexmark is not responsible for the ... global safety standards with this product or make any electrical or cabling connections, such as the power supply cord or telephone, during a lightning storm. Connect the power supply cord to a professional service person. Refer service or repairs, other replacement parts. CAUTION...

Getting Started
Page 9
Note: A USB cable may or may look different from the one shown. 4 Installation software CD • Installation software for the printer • Help • User's Guide in certain geographies only). Note: The complete version of the User's Guide... as a guide (available in electronic format 5 Setup sheet Instructions on setting up printer hardware and software, and information on the product purchased. 3 Power cord Attaches to the power supply port located at the back of the printer. Setting up the printer Checking the box contents 1 2 ?? ? 6 5 4 3 Name Description 1...
Note: A USB cable may or may look different from the one shown. 4 Installation software CD • Installation software for the printer • Help • User's Guide in certain geographies only). Note: The complete version of the User's Guide... as a guide (available in electronic format 5 Setup sheet Instructions on setting up printer hardware and software, and information on the product purchased. 3 Power cord Attaches to the power supply port located at the back of the printer. Setting up the printer Checking the box contents 1 2 ?? ? 6 5 4 3 Name Description 1...

Getting Started
Page 11
1 2 3 5 4 Use the To 1 Scanner unit Access the print cartridges. 2 Scanner support Hold up the scanner unit. 3 Print cartridge carrier Install, replace, or remove a print cartridge. 4 Power supply with port Connect the printer to a power source. 5 USB port Connect the printer to a computer using a USB cable. Learning about the printer 11
1 2 3 5 4 Use the To 1 Scanner unit Access the print cartridges. 2 Scanner support Hold up the scanner unit. 3 Print cartridge carrier Install, replace, or remove a print cartridge. 4 Power supply with port Connect the printer to a power source. 5 USB port Connect the printer to a computer using a USB cable. Learning about the printer 11

