
User's Guide
Page 3
... the control panel 5 Understanding the software 5 Using the Lexmark All-In-One Center 5 Using Print Properties 7 Using the Lexmark Solution Center 8 Using the Lexmark Photo Editor 9 Using the All-In-One 9 Printing 9 Scanning 11 Copying 12 Faxing 12 Creating fun projects 13 Replacing print cartridges 13 Troubleshooting 14 Troubleshooting checklist 14 Setup troubleshooting 14 Printing troubleshooting...
... the control panel 5 Understanding the software 5 Using the Lexmark All-In-One Center 5 Using Print Properties 7 Using the Lexmark Solution Center 8 Using the Lexmark Photo Editor 9 Using the All-In-One 9 Printing 9 Scanning 11 Copying 12 Faxing 12 Creating fun projects 13 Replacing print cartridges 13 Troubleshooting 14 Troubleshooting checklist 14 Setup troubleshooting 14 Printing troubleshooting...
User's Guide
Page 4
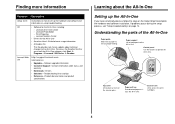
..." on the Setup Sheet to complete the hardware and software installation. Print Properties - Paper exit tray Extend to ensure proper feeding. Lexmark All-In-One Center - To access the Readme file after you have not already done so, follow the steps on page 14. Understanding the parts... guide Slide next to paper to hold paper as it exits the All-In-One. Control panel Use the buttons to access the print cartridges. 4 Scanner unit Lift to operate the All-In-One. http://support.lexmark.com Information on: • Upgrades-Software upgrade information • Customer Support-Contact ...
..." on the Setup Sheet to complete the hardware and software installation. Print Properties - Paper exit tray Extend to ensure proper feeding. Lexmark All-In-One Center - To access the Readme file after you have not already done so, follow the steps on page 14. Understanding the parts... guide Slide next to paper to hold paper as it exits the All-In-One. Control panel Use the buttons to access the print cartridges. 4 Scanner unit Lift to operate the All-In-One. http://support.lexmark.com Information on: • Upgrades-Software upgrade information • Customer Support-Contact ...

User's Guide
Page 5
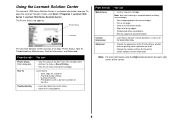
... (scanning, copying, and faxing) • Print Properties (printing) • The Lexmark Solution Center (troubleshooting, maintenance, and cartridge ordering information) • The Lexmark Photo Editor (editing graphics) Using the Lexmark All-In-One Center Use the Lexmark 1200 Series All-In-One Center software to scan, copy, and fax documents.There are three ways to make copies. The...
... (scanning, copying, and faxing) • Print Properties (printing) • The Lexmark Solution Center (troubleshooting, maintenance, and cartridge ordering information) • The Lexmark Photo Editor (editing graphics) Using the Lexmark All-In-One Center Use the Lexmark 1200 Series All-In-One Center software to scan, copy, and fax documents.There are three ways to make copies. The...
User's Guide
Page 8
.... • Learn tips about the current status. • Solve All-In-One problems. From this tab: Printer Status (Main dialog box) How To Troubleshooting You can : • Install a new print cartridge. To open the Lexmark Solution Center, click Start Programs Lexmark 1200 Series Lexmark 1200 Series Solution Center. From this tab: Maintenance Contact Information Advanced You...
.... • Learn tips about the current status. • Solve All-In-One problems. From this tab: Printer Status (Main dialog box) How To Troubleshooting You can : • Install a new print cartridge. To open the Lexmark Solution Center, click Start Programs Lexmark 1200 Series Lexmark 1200 Series Solution Center. From this tab: Maintenance Contact Information Advanced You...
User's Guide
Page 13
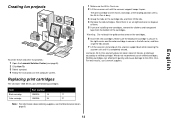
...or damage caused by a refilled cartridge. Make sure the black print cartridge is secure in the right carrier and the color cartridge is secure in an air-tight container or dispose of them in the left carrier, and then snap the lids closed . Lexmark's All-In-One warranty does not cover repair of... refilled cartridges. The print cartridge carrier moves and stops at the loading ...
...or damage caused by a refilled cartridge. Make sure the black print cartridge is secure in the right carrier and the color cartridge is secure in an air-tight container or dispose of them in the left carrier, and then snap the lids closed . Lexmark's All-In-One warranty does not cover repair of... refilled cartridges. The print cartridge carrier moves and stops at the loading ...
User's Guide
Page 14
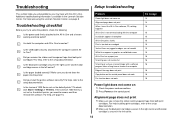
... carrier and the color cartridge is too dark or smudged Vertical lines are jagged or edges are not smooth White lines appear in the left carrier. 14 Is the Lexmark 1200 Series set as the default printer? For help installing print cartridges, refer to the All-In-One and a known ...working electrical outlet? Did you remove the sticker and transparent tape from both the computer and All-In-One turned on the control panel...
... carrier and the color cartridge is too dark or smudged Vertical lines are jagged or edges are not smooth White lines appear in the left carrier. 14 Is the Lexmark 1200 Series set as the default printer? For help installing print cartridges, refer to the All-In-One and a known ...working electrical outlet? Did you remove the sticker and transparent tape from both the computer and All-In-One turned on the control panel...
User's Guide
Page 15
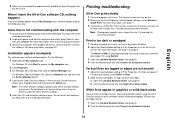
... did not force the paper into the All-In-One. Print is set on Normal or Quick Print. Vertical lines are jagged or edges are any Lexmark items unless they are present. For best print quality, select Better or Best. 2 Align the print cartridges. White lines appear in use. For more information, see...
... did not force the paper into the All-In-One. Print is set on Normal or Quick Print. Vertical lines are jagged or edges are any Lexmark items unless they are present. For best print quality, select Better or Best. 2 Align the print cartridges. White lines appear in use. For more information, see...
User's Guide
Page 19
... paper 7 see more printing ideas 7 I Want To menu 7 ink cartridges viewing ink levels of 8 ink levels viewing 8 inkjet paper 9 19 iron-on transfers 9 printing 7 L labels 9 Lexmark All-In-One Center 5 opening 5 using 5 Lexmark Solution Center 8 Advanced tab 8 Contact Information tab 8 How To tab 8 Maintenance tab 8 opening 8 Printer Status tab 8 Troubleshooting tab 8 loading paper 9 M Maintain/Troubleshoot...
... paper 7 see more printing ideas 7 I Want To menu 7 ink cartridges viewing ink levels of 8 ink levels viewing 8 inkjet paper 9 19 iron-on transfers 9 printing 7 L labels 9 Lexmark All-In-One Center 5 opening 5 using 5 Lexmark Solution Center 8 Advanced tab 8 Contact Information tab 8 How To tab 8 Maintenance tab 8 opening 8 Printer Status tab 8 Troubleshooting tab 8 loading paper 9 M Maintain/Troubleshoot...
User's Guide
Page 20
parts of your All-In-One 4 photo paper 9 photos printing 7 scanning 11 poor quality printing 15 posters printing 7 Preview Now button 11 Preview section Preview Now button 11 Print/Copy preview 6 Scan preview 6 print cartridges viewing ink levels of 8 Print Layout tab 7 Print ...7 envelopes 7 photos 7 posters 7 Printing Status window changing appearance of 8 Q Quality/Copies tab 7 R reinstalling software 16 removing software 16 replacing print cartridges 13 S Save Settings menu 7 saved images viewing 6 scan settings 6 scanner unit 4 scanning 11 placing an item on or off 8 20 section 6...
parts of your All-In-One 4 photo paper 9 photos printing 7 scanning 11 poor quality printing 15 posters printing 7 Preview Now button 11 Preview section Preview Now button 11 Print/Copy preview 6 Scan preview 6 print cartridges viewing ink levels of 8 Print Layout tab 7 Print ...7 envelopes 7 photos 7 posters 7 Printing Status window changing appearance of 8 Q Quality/Copies tab 7 R reinstalling software 16 removing software 16 replacing print cartridges 13 S Save Settings menu 7 saved images viewing 6 scan settings 6 scanner unit 4 scanning 11 placing an item on or off 8 20 section 6...

