
User's Guide
Page 1
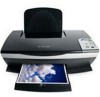
1200 Series All-In-One User's Guide
1200 Series All-In-One User's Guide

User's Guide
Page 2
... accessible. UNITED STATES GOVERNMENT RIGHTS This software and any accompanying documentation provided under this product or the manufacturer's authorized replacement power supply and power cord. • Connect the power supply cord to an electrical outlet that product, program, or service may be used instead. Safety Information • Use only the power supply and power cord provided with this agreement are periodically made at www.lexmark.com. Changes...
... accessible. UNITED STATES GOVERNMENT RIGHTS This software and any accompanying documentation provided under this product or the manufacturer's authorized replacement power supply and power cord. • Connect the power supply cord to an electrical outlet that product, program, or service may be used instead. Safety Information • Use only the power supply and power cord provided with this agreement are periodically made at www.lexmark.com. Changes...

User's Guide
Page 3
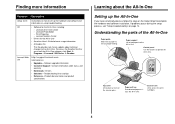
... All-In-One 4 Setting up the All-In-One 4 Understanding the parts of the All-In-One 4 Using the control panel 5 Understanding the software 5 Using the Lexmark All-In-One Center 5 Using Print Properties 7 Using the Lexmark Solution Center 8 Using the Lexmark Photo Editor 9 Using the All-In-One 9 Printing 9 Scanning 11 Copying 12 Faxing 12 Creating fun projects 13 Replacing print cartridges 13 Troubleshooting 14 Troubleshooting checklist 14 Setup troubleshooting 14 Printing troubleshooting 15 Scanning, copying, and faxing troubleshooting ........16 Removing and reinstalling...
... All-In-One 4 Setting up the All-In-One 4 Understanding the parts of the All-In-One 4 Using the control panel 5 Understanding the software 5 Using the Lexmark All-In-One Center 5 Using Print Properties 7 Using the Lexmark Solution Center 8 Using the Lexmark Photo Editor 9 Using the All-In-One 9 Printing 9 Scanning 11 Copying 12 Faxing 12 Creating fun projects 13 Replacing print cartridges 13 Troubleshooting 14 Troubleshooting checklist 14 Setup troubleshooting 14 Printing troubleshooting 15 Scanning, copying, and faxing troubleshooting ........16 Removing and reinstalling...
User's Guide
Page 4
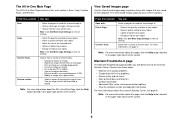
...-In-One. Paper exit tray Extend to operate the All-In-One. http://support.lexmark.com Information on: • Upgrades-Software upgrade information • Customer Support-Contact information, order status, and warranty • Downloads-Drivers • Solutions-Troubleshooting hints and tips • Reference-Product documentation and product specifications Learning about technical changes to load paper into the All-In-One. Top cover Lift to complete the hardware and software installation. Lexmark All-In-One Center - Print Properties - Scanner unit Lift...
...-In-One. Paper exit tray Extend to operate the All-In-One. http://support.lexmark.com Information on: • Upgrades-Software upgrade information • Customer Support-Contact information, order status, and warranty • Downloads-Drivers • Solutions-Troubleshooting hints and tips • Reference-Product documentation and product specifications Learning about technical changes to load paper into the All-In-One. Top cover Lift to complete the hardware and software installation. Lexmark All-In-One Center - Print Properties - Scanner unit Lift...

User's Guide
Page 5
...-One software consists of a button. 1 2 1 2 3 USB cable Power cord Using the control panel The All-In-One has a control panel that lets you scan and copy with the press of four main components: • The Lexmark 1200 Series All-In-One Center (scanning, copying, and faxing) • Print Properties (printing) • The Lexmark Solution Center (troubleshooting, maintenance, and cartridge ordering information) • The Lexmark Photo Editor (editing graphics) Using the Lexmark All-In-One Center Use the Lexmark 1200 Series All-In-One Center software to scan, copy, and fax documents...
...-One software consists of a button. 1 2 1 2 3 USB cable Power cord Using the control panel The All-In-One has a control panel that lets you scan and copy with the press of four main components: • The Lexmark 1200 Series All-In-One Center (scanning, copying, and faxing) • Print Properties (printing) • The Lexmark Solution Center (troubleshooting, maintenance, and cartridge ordering information) • The Lexmark Photo Editor (editing graphics) Using the Lexmark All-In-One Center Use the Lexmark 1200 Series All-In-One Center software to scan, copy, and fax documents...
User's Guide
Page 6
... send the scanned image to perform tasks with a photo editor. Print a Copy... • Choose the quantity and color of your copies. • Select a quality setting for your copies. • Adjust the size of the screen. Note: For more information, see page 8. Creative Tasks Select from these topics: • Maintain or fix quality problems • Troubleshoot All-In-One problems • Device status and ink levels • More printing ideas and how to the Lexmark...
... send the scanned image to perform tasks with a photo editor. Print a Copy... • Choose the quantity and color of your copies. • Select a quality setting for your copies. • Adjust the size of the screen. Note: For more information, see page 8. Creative Tasks Select from these topics: • Maintain or fix quality problems • Troubleshoot All-In-One problems • Device status and ink levels • More printing ideas and how to the Lexmark...
User's Guide
Page 7
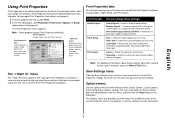
... settings: Quality/Speed - Type - Print Color Images in black and white. Select this to different parts of paper you with direct links to print color images in Black and White - Orientation - Select the layout you can save the current Print Properties settings for future use. item. Save Settings menu From the Save Settings menu, you want to five custom settings. English Using Print Properties Print Properties is the software that controls the All-In-One printing function. Paper Size - Select how you want to the Quality Options...
... settings: Quality/Speed - Type - Print Color Images in black and white. Select this to different parts of paper you with direct links to print color images in Black and White - Orientation - Select the layout you can save the current Print Properties settings for future use. item. Save Settings menu From the Save Settings menu, you want to five custom settings. English Using Print Properties Print Properties is the software that controls the All-In-One printing function. Paper Size - Select how you want to the Quality Options...
User's Guide
Page 8
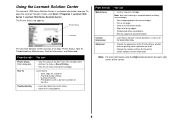
.... To open the Lexmark Solution Center, click Start Programs Lexmark 1200 Series Lexmark 1200 Series Solution Center. The Printer Status tab appears. Using the Lexmark Solution Center The Lexmark 1200 Series Solution Center is complete before installing new cartridges. • View shopping options for new cartridges. • Print a test page. • Clean to fix horizontal streaks. • Align to fix blurry edges. • Troubleshoot other ink problems. • Remove Japanese postcard residue. • Learn how to : • Scan, copy, fax, and print. • Find and change settings...
.... To open the Lexmark Solution Center, click Start Programs Lexmark 1200 Series Lexmark 1200 Series Solution Center. The Printer Status tab appears. Using the Lexmark Solution Center The Lexmark 1200 Series Solution Center is complete before installing new cartridges. • View shopping options for new cartridges. • Print a test page. • Clean to fix horizontal streaks. • Align to fix blurry edges. • Troubleshoot other ink problems. • Remove Japanese postcard residue. • Learn how to : • Scan, copy, fax, and print. • Find and change settings...
User's Guide
Page 9
.... Make sure you select the paper size for your pointer over the tool for basic printing, scanning, copying, and faxing. Touch-up tools to know for a description. Place the paper against the right side of the paper support Load up to print, load the appropriate type of photo/glossy paper • 10 transparencies Note: Since transparencies and photos require more information, see page 7) provides you with printing wizards to help you...
.... Make sure you select the paper size for your pointer over the tool for basic printing, scanning, copying, and faxing. Touch-up tools to know for a description. Place the paper against the right side of the paper support Load up to print, load the appropriate type of photo/glossy paper • 10 transparencies Note: Since transparencies and photos require more information, see page 7) provides you with printing wizards to help you...
User's Guide
Page 10
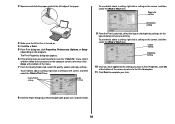
... turned on. 4 Click File Print. 5 From Print dialog box, click Properties, Preferences, Options, or Setup (depending on the screen, and then select the What's This? To see details about a setting, right-click a setting on the computer screen; 2 Squeeze and slide the paper guide to the left edge of the menu. 7 From the Quality/Copies tab, select the quality, speed, and copy settings. Paper size setting Orientation setting 3 Make sure the All-In-One...
... turned on. 4 Click File Print. 5 From Print dialog box, click Properties, Preferences, Options, or Setup (depending on the screen, and then select the What's This? To see details about a setting, right-click a setting on the computer screen; 2 Squeeze and slide the paper guide to the left edge of the menu. 7 From the Quality/Copies tab, select the quality, speed, and copy settings. Paper size setting Orientation setting 3 Make sure the All-In-One...
User's Guide
Page 11
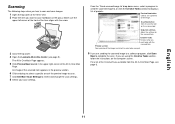
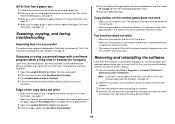
Scan Now button Click to display a list of the image. Make sure the upper left corner of the front of the item aligns with the Preview section scanned item. The All-In-One Main Page appears. 5 Click Preview Now located in the preview section. 6 Click and drag to select a specific area of the preview image to scan. 7 Click See More Scan Settings to review and change the scan settings. 8 Select...
Scan Now button Click to display a list of the image. Make sure the upper left corner of the front of the item aligns with the Preview section scanned item. The All-In-One Main Page appears. 5 Click Preview Now located in the preview section. 6 Click and drag to select a specific area of the preview image to scan. 7 Click See More Scan Settings to review and change the scan settings. 8 Select...
User's Guide
Page 12
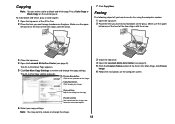
...-white, gray, or color copies: 1 Open the top cover of the All-In-One. 2 Place the item you want to review and change the copy settings. Make sure the upper left corner of the front of the All-In-One Main Page, click Fax an image. 6 Follow the instructions on the control panel. Note: You may want to see page 5). 5 From the Creative Tasks section of the item aligns...
...-white, gray, or color copies: 1 Open the top cover of the All-In-One. 2 Place the item you want to review and change the copy settings. Make sure the upper left corner of the front of the All-In-One Main Page, click Fax an image. 6 Follow the instructions on the control panel. Note: You may want to see page 5). 5 From the Creative Tasks section of the item aligns...
User's Guide
Page 13
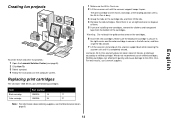
... installing new cartridges, remove the stickers and transparent tape from the bottom of the cartridges. English Creating fun projects To create these and other fun projects: 1 Open the Lexmark Solution Center (see the Maintenance tab on page 8. 1 Make sure the All-In-One is on the cartridge lids, and then lift the lids. 4 Remove the old cartridges. Replacing print cartridges The Lexmark 1200 Series uses the following cartridges: Item: Part number: Black cartridge 10N0016 16 17 Color cartridge...
... installing new cartridges, remove the stickers and transparent tape from the bottom of the cartridges. English Creating fun projects To create these and other fun projects: 1 Open the Lexmark Solution Center (see the Maintenance tab on page 8. 1 Make sure the All-In-One is on the cartridge lids, and then lift the lids. 4 Remove the old cartridges. Replacing print cartridges The Lexmark 1200 Series uses the following cartridges: Item: Part number: Black cartridge 10N0016 16 17 Color cartridge...
User's Guide
Page 14
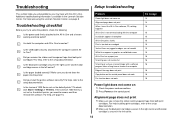
... the setup documentation. 2 Make sure the black print cartridge is secure in the right carrier and the color cartridge is not set as the default printer, you need to remove and then reinstall the software. Make sure you install the printer software correctly? Is the USB cable securely attached to the All-In-One and a known working electrical outlet? For help accessing the Lexmark Solution Center, see page 16. Troubleshooting checklist Before you try to solve the problem, check...
... the setup documentation. 2 Make sure the black print cartridge is secure in the right carrier and the color cartridge is not set as the default printer, you need to remove and then reinstall the software. Make sure you install the printer software correctly? Is the USB cable securely attached to the All-In-One and a known working electrical outlet? For help accessing the Lexmark Solution Center, see page 16. Troubleshooting checklist Before you try to solve the problem, check...
User's Guide
Page 15
... the scanning resolution. For more information, see page 8). For more memory. If the problem continues, remove and then reinstall the software. For more information, see page 16. To align the print cartridges: a Open the Lexmark Solution Center (see page 7. 3 Try printing a smaller file. White lines appear in the All-In-One Center. Note: The Other Devices category appears only when unknown devices are not smooth 1 Adjust the Quality/Speed setting in Print Properties. Let the ink dry...
... the scanning resolution. For more information, see page 8). For more memory. If the problem continues, remove and then reinstall the software. For more information, see page 16. To align the print cartridges: a Open the Lexmark Solution Center (see page 7. 3 Try printing a smaller file. White lines appear in the All-In-One Center. Note: The Other Devices category appears only when unknown devices are not smooth 1 Adjust the Quality/Speed setting in Print Properties. Let the ink dry...
User's Guide
Page 16
... page 15. 2 Follow the instructions on the computer screen to install the software. Scanning or using paper designed for an inkjet printer. To change the scanning resolution: 1 Open the Lexmark All-In-One Center. The computer must be on in memory have been sent, and then send the current fax again. Wait until the faxes in order for faxing to remove, and then reinstall the printer software. 1 From the desktop, click Start Programs Lexmark 1200 Series Uninstall Lexmark...
... page 15. 2 Follow the instructions on the computer screen to install the software. Scanning or using paper designed for an inkjet printer. To change the scanning resolution: 1 Open the Lexmark All-In-One Center. The computer must be on in memory have been sent, and then send the current fax again. Wait until the faxes in order for faxing to remove, and then reinstall the printer software. 1 From the desktop, click Start Programs Lexmark 1200 Series Uninstall Lexmark...
User's Guide
Page 17
... name Machine type Lexmark 1200 Series 4476-005 4476-006 4476-007 4476-008 Electronic emission notices Federal Communications Commission (FCC) compliance information statement This product has been tested and found to comply with the limits for a Class B computing device, use a properly shielded and grounded cable such as Lexmark part number 1021294. Unauthorized changes or modifications could void the user's authority to operate this device...
... name Machine type Lexmark 1200 Series 4476-005 4476-006 4476-007 4476-008 Electronic emission notices Federal Communications Commission (FCC) compliance information statement This product has been tested and found to comply with the limits for a Class B computing device, use a properly shielded and grounded cable such as Lexmark part number 1021294. Unauthorized changes or modifications could void the user's authority to operate this device...
User's Guide
Page 18
ENERGY STAR Waste from Electrical and Electronic Equipment (WEEE) directive 18 Noise emission levels The following measurements were made in accordance with ISO 7779 and reported in conformance with ISO 9296: 1-meter average sound pressure, dBA Printing 44 Scanning 38 Copying 44 Idling 0 Values are subject to change. See www.lexmark.com for current values.
ENERGY STAR Waste from Electrical and Electronic Equipment (WEEE) directive 18 Noise emission levels The following measurements were made in accordance with ISO 7779 and reported in conformance with ISO 9296: 1-meter average sound pressure, dBA Printing 44 Scanning 38 Copying 44 Idling 0 Values are subject to change. See www.lexmark.com for current values.
User's Guide
Page 19
...-In-One Center, see Lexmark All-In-One Center All-In-One Main Page Copy section 6 Creative Tasks section 6 Preview section 6 Scan section 6 All-In-One status 8 B banner printing 7 banner paper 9 banners printing 7 black and white, printing in 7 both sides, printing on, see duplexing C card stock 9 cartridges part numbers 13 viewing ink levels of 8 Contact Information tab 8 control panel 5 copies 7 copy settings 6 copying 12 D duplexing 7 E electronic emission statement 17 emission statement 17 envelopes printing 7 F faxing 12 FCC statement 17 G glossy paper 9 H hardware setup software setup...
...-In-One Center, see Lexmark All-In-One Center All-In-One Main Page Copy section 6 Creative Tasks section 6 Preview section 6 Scan section 6 All-In-One status 8 B banner printing 7 banner paper 9 banners printing 7 black and white, printing in 7 both sides, printing on, see duplexing C card stock 9 cartridges part numbers 13 viewing ink levels of 8 Contact Information tab 8 control panel 5 copies 7 copy settings 6 copying 12 D duplexing 7 E electronic emission statement 17 emission statement 17 envelopes printing 7 F faxing 12 FCC statement 17 G glossy paper 9 H hardware setup software setup...
User's Guide
Page 20
... notification turning on the glass 11 settings, saving for future use 7 setup 4 software reinstalling 16 removing 16 sound, see voice notification Status tab 8 T top cover 4 transparencies 9 troubleshooting copying problems 16 faxing problems 16 scanning problems 16 troubleshooting checklist 14 Troubleshooting tab 8 V View Saved Images page 6 Open with... parts of your All-In-One 4 photo paper 9 photos printing 7 scanning 11 poor quality printing 15 posters printing 7 Preview Now button 11 Preview section Preview Now button 11 Print/Copy preview 6 Scan preview 6 print cartridges viewing ink...
... notification turning on the glass 11 settings, saving for future use 7 setup 4 software reinstalling 16 removing 16 sound, see voice notification Status tab 8 T top cover 4 transparencies 9 troubleshooting copying problems 16 faxing problems 16 scanning problems 16 troubleshooting checklist 14 Troubleshooting tab 8 V View Saved Images page 6 Open with... parts of your All-In-One 4 photo paper 9 photos printing 7 scanning 11 poor quality printing 15 posters printing 7 Preview Now button 11 Preview section Preview Now button 11 Print/Copy preview 6 Scan preview 6 print cartridges viewing ink...


