
Setup Sheet
Page 2
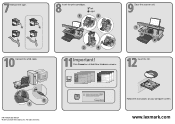
Connect the USB cable. Remove the tape. Click Cancel on your computer screen. Close the scanner unit. 1 3 2 Insert the CD. 2 1 P/N 17M0270 EC 7M0024 © 2003 Lexmark International, Inc. Follow the instructions on all Add New Hardware screens. Insert the print cartridges. 1 2 3 4 Important! All rights reserved. www.lexmark.com
Connect the USB cable. Remove the tape. Click Cancel on your computer screen. Close the scanner unit. 1 3 2 Insert the CD. 2 1 P/N 17M0270 EC 7M0024 © 2003 Lexmark International, Inc. Follow the instructions on all Add New Hardware screens. Insert the print cartridges. 1 2 3 4 Important! All rights reserved. www.lexmark.com
User's Guide
Page 3
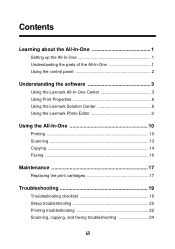
Contents Learning about the All-In-One 1 Setting up the All-In-One 1 Understanding the parts of the All-In-One 1 Using the control panel 2 Understanding the software 3 Using the Lexmark All-In-One Center 3 Using Print Properties 6 Using the Lexmark Solution Center 8 Using the Lexmark Photo Editor 9 Using the All-In-One 10 Printing 10 Scanning 13 Copying 14 Faxing 16 Maintenance 17 Replacing the print cartridges 17 Troubleshooting 19 Troubleshooting checklist 19 Setup troubleshooting 20 Printing troubleshooting 22 Scanning, copying, and faxing troubleshooting 24 iii
Contents Learning about the All-In-One 1 Setting up the All-In-One 1 Understanding the parts of the All-In-One 1 Using the control panel 2 Understanding the software 3 Using the Lexmark All-In-One Center 3 Using Print Properties 6 Using the Lexmark Solution Center 8 Using the Lexmark Photo Editor 9 Using the All-In-One 10 Printing 10 Scanning 13 Copying 14 Faxing 16 Maintenance 17 Replacing the print cartridges 17 Troubleshooting 19 Troubleshooting checklist 19 Setup troubleshooting 20 Printing troubleshooting 22 Scanning, copying, and faxing troubleshooting 24 iii

User's Guide
Page 4
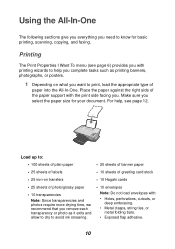
The Lexmark™ X1100 Series All-In-One combines the functionality of an inkjet printer, a scanner, a copier, and a fax machine all into a single, multifunction device, making it one of the most exciting products on your purchase. Removing and reinstalling the software 26 Other help sources 26 Thank you how to perform printing, copying, scanning, and faxing tasks. Congratulations on the market today. This guide tells you for purchasing a Lexmark X1100 Series All-In-One! iv Also included are sections describing the All-In-One software and troubleshooting information.
The Lexmark™ X1100 Series All-In-One combines the functionality of an inkjet printer, a scanner, a copier, and a fax machine all into a single, multifunction device, making it one of the most exciting products on your purchase. Removing and reinstalling the software 26 Other help sources 26 Thank you how to perform printing, copying, scanning, and faxing tasks. Congratulations on the market today. This guide tells you for purchasing a Lexmark X1100 Series All-In-One! iv Also included are sections describing the All-In-One software and troubleshooting information.
User's Guide
Page 5
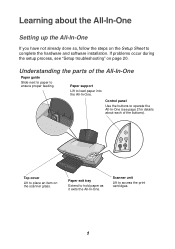
... the buttons). Control panel Use the buttons to operate the All-In-One (see "Setup troubleshooting" on page 20. Paper support Lift to access the print cartridges. 1 Top cover Lift to place an item on the Setup Sheet to hold paper as it exits the All-In-One. Learning about each...
... the buttons). Control panel Use the buttons to operate the All-In-One (see "Setup troubleshooting" on page 20. Paper support Lift to access the print cartridges. 1 Top cover Lift to place an item on the Setup Sheet to hold paper as it exits the All-In-One. Learning about each...
User's Guide
Page 7
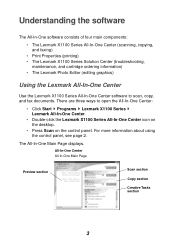
... consists of four main components: • The Lexmark X1100 Series All-In-One Center (scanning, copying, and faxing) • Print Properties (printing) • The Lexmark X1100 Series Solution Center (troubleshooting, maintenance, and cartridge ordering information) • The Lexmark Photo Editor (editing graphics) Using the Lexmark All-In-One Center Use the Lexmark X1100 Series All-In-One Center software to...
... consists of four main components: • The Lexmark X1100 Series All-In-One Center (scanning, copying, and faxing) • Print Properties (printing) • The Lexmark X1100 Series Solution Center (troubleshooting, maintenance, and cartridge ordering information) • The Lexmark Photo Editor (editing graphics) Using the Lexmark All-In-One Center Use the Lexmark X1100 Series All-In-One Center software to...
User's Guide
Page 8
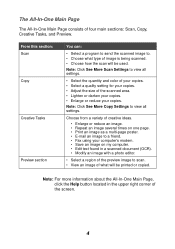
.... • Edit text found in the upper right corner of the screen. 4 Note: Click See More Copy Settings to . • Choose what will be printed or copied. Note: Click See More Scan Settings to view all settings. Note: For more information about the All-In-One Main Page, click the...of the scanned area. • Lighten or darken your copies. • Enlarge or reduce your computer's modem. • Save an image on one page. • Print an image as a multi-page poster. • E-mail an image to scan. • View an image of four main sections: Scan, Copy, Creative Tasks, and...
.... • Edit text found in the upper right corner of the screen. 4 Note: Click See More Copy Settings to . • Choose what will be printed or copied. Note: Click See More Scan Settings to view all settings. Note: For more information about the All-In-One Main Page, click the...of the scanned area. • Lighten or darken your copies. • Enlarge or reduce your computer's modem. • Save an image on one page. • Print an image as a multi-page poster. • E-mail an image to scan. • View an image of four main sections: Scan, Copy, Creative Tasks, and...

User's Guide
Page 9
...... The View Saved Images page consists of the screen. 5 View Saved Images page Use the View Saved Images page to the Lexmark Solution Center. Note: For more information about this page, click the Help button located in the upper right corner of creative ideas... from these topics: • Maintain or fix quality problems • Troubleshoot All-In-One problems • Device status and ink levels • More printing ideas and how to's • Contact information • Advanced (skin, voice, and communication options) • View the software version and copyright information For...
...... The View Saved Images page consists of the screen. 5 View Saved Images page Use the View Saved Images page to the Lexmark Solution Center. Note: For more information about this page, click the Help button located in the upper right corner of creative ideas... from these topics: • Maintain or fix quality problems • Troubleshoot All-In-One problems • Device status and ink levels • More printing ideas and how to's • Contact information • Advanced (skin, voice, and communication options) • View the software version and copyright information For...
User's Guide
Page 10
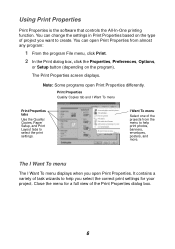
.... 6 Close the menu for your project. Using Print Properties Print Properties is the software that controls the All-In-One printing function. The I Want To menu The I Want To menu Print Properties tabs Use the Quality/ Copies, Paper Setup, and Print Layout tabs to create. You can open Print Properties from almost any program: 1 From the...
.... 6 Close the menu for your project. Using Print Properties Print Properties is the software that controls the All-In-One printing function. The I Want To menu The I Want To menu Print Properties tabs Use the Quality/ Copies, Paper Setup, and Print Layout tabs to create. You can open Print Properties from almost any program: 1 From the...
User's Guide
Page 11
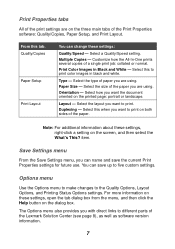
...prints several copies of the Lexmark Solution Center (see page 8), as well as software version information. 7 Select this to print on both sides of the paper. Paper Size - Select this tab: Quality/Copies Paper Setup Print Layout You can change these settings, right-click a setting on the printed...Options menu also provides you are using . Select a Quality/Speed setting. Print Color Images in black and white. Select the size of the Print Properties software: Quality/Copies, Paper Setup, and Print Layout. Note: For additional information about these settings: Quality/Speed - ...
...prints several copies of the Lexmark Solution Center (see page 8), as well as software version information. 7 Select this to print on both sides of the paper. Paper Size - Select this tab: Quality/Copies Paper Setup Print Layout You can change these settings, right-click a setting on the printed...Options menu also provides you are using . Select a Quality/Speed setting. Print Color Images in black and white. Select the size of the Print Properties software: Quality/Copies, Paper Setup, and Print Layout. Note: For additional information about these settings: Quality/Speed - ...
User's Guide
Page 12
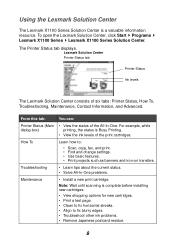
... resource. The Printer Status tab displays. From this tab: You can: Printer Status (Main • View the status of the print cartridges. To open the Lexmark Solution Center, click Start Programs Lexmark X1100 Series Lexmark X1100 Series Solution Center. Troubleshooting • Learn tips about the current status. • Solve All-In-One problems. Maintenance • Install...
... resource. The Printer Status tab displays. From this tab: You can: Printer Status (Main • View the status of the print cartridges. To open the Lexmark Solution Center, click Start Programs Lexmark X1100 Series Lexmark X1100 Series Solution Center. Troubleshooting • Learn tips about the current status. • Solve All-In-One problems. Maintenance • Install...

User's Guide
Page 13
...graphic. The Lexmark Photo Editor displays. To open the Lexmark Photo Editor, click Start Programs Lexmark X1100 Series Lexmark Photo Editor. Lexmark Photo Editor Touch-up tools to edit your pointer over the tool for a description. Using the Lexmark Photo Editor Use the Lexmark Photo Editor software to contact Lexmark by phone,... graphics. Note: For more information, click the Help button located in the lower right corner of the Printing Status window and turn printing voice notification on the World Wide Web. • Change the appearance of the screen. Use the touch-up tools ...
...graphic. The Lexmark Photo Editor displays. To open the Lexmark Photo Editor, click Start Programs Lexmark X1100 Series Lexmark Photo Editor. Lexmark Photo Editor Touch-up tools to edit your pointer over the tool for a description. Using the Lexmark Photo Editor Use the Lexmark Photo Editor software to contact Lexmark by phone,... graphics. Note: For more information, click the Help button located in the lower right corner of the Printing Status window and turn printing voice notification on the World Wide Web. • Change the appearance of the screen. Use the touch-up tools ...
User's Guide
Page 14
...; 20 sheets of banner paper • 25 sheets of labels • 10 sheets of greeting card stock • 25 iron-on what you want to print, load the appropriate type of paper into the All-In-One. For help you complete tasks such as it exits and allow to dry to... avoid ink smearing. • 10 envelopes Note: Do not load envelopes with printing wizards to help , see page 6) provides you with : • Holes, perforations, cutouts, or deep embossing. • Metal clasps, string ties, or metal folding bars. •...
...; 20 sheets of banner paper • 25 sheets of labels • 10 sheets of greeting card stock • 25 iron-on what you want to print, load the appropriate type of paper into the All-In-One. For help you complete tasks such as it exits and allow to dry to... avoid ink smearing. • 10 envelopes Note: Do not load envelopes with printing wizards to help , see page 6) provides you with : • Holes, perforations, cutouts, or deep embossing. • Metal clasps, string ties, or metal folding bars. •...
User's Guide
Page 15
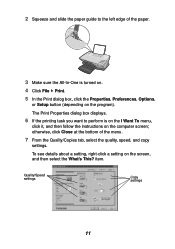
... dialog box displays. 6 If the printing task you want to the left edge of the menu. 7 From the Quality/Copies tab, select the quality, speed, and copy settings. To see details ...about a setting, right-click a setting on the computer screen; 2 Squeeze and slide the paper guide to perform is turned on. 4 Click File Print. 5 In the Print dialog box, click the Properties, Preferences, Options, or Setup button (depending on the program). otherwise, click Close at the bottom of the paper. 3 Make...
... dialog box displays. 6 If the printing task you want to the left edge of the menu. 7 From the Quality/Copies tab, select the quality, speed, and copy settings. To see details ...about a setting, right-click a setting on the computer screen; 2 Squeeze and slide the paper guide to perform is turned on. 4 Click File Print. 5 In the Print dialog box, click the Properties, Preferences, Options, or Setup button (depending on the program). otherwise, click Close at the bottom of the paper. 3 Make...
User's Guide
Page 16
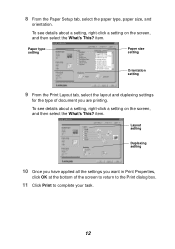
...the screen, and then select the What's This? item. Layout setting Duplexing setting 10 Once you have applied all the settings you are printing. Paper type setting Paper size setting Orientation setting 9 From the Print Layout tab, select the layout and duplexing settings for the type of document you want in... Print Properties, click OK at the bottom of the screen to return to the Print dialog box. 11 Click Print to complete your task. 12 8 From the Paper Setup tab, select the paper type, paper size, and...
...the screen, and then select the What's This? item. Layout setting Duplexing setting 10 Once you have applied all the settings you are printing. Paper type setting Paper size setting Orientation setting 9 From the Print Layout tab, select the layout and duplexing settings for the type of document you want in... Print Properties, click OK at the bottom of the screen to return to the Print dialog box. 11 Click Print to complete your task. 12 8 From the Paper Setup tab, select the paper type, paper size, and...
User's Guide
Page 21
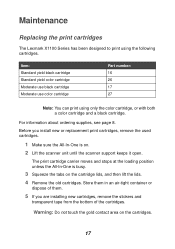
Maintenance Replacing the print cartridges The Lexmark X1100 Series has been designed to print using only the color cartridge, or with both a color cartridge and a ...the cartridges. Store them in an air-tight container or dispose of them. 5 If you install new or replacement print cartridges, remove the used cartridges. 1 Make sure the All-In-One is busy. 3 Squeeze the tabs on ...the gold contact area on the cartridge lids, and then lift the lids. 4 Remove the old cartridges. The print cartridge carrier moves and stops at the loading position unless the All-In-One is on. 2 Lift the ...
Maintenance Replacing the print cartridges The Lexmark X1100 Series has been designed to print using only the color cartridge, or with both a color cartridge and a ...the cartridges. Store them in an air-tight container or dispose of them. 5 If you install new or replacement print cartridges, remove the used cartridges. 1 Make sure the All-In-One is busy. 3 Squeeze the tabs on ...the gold contact area on the cartridge lids, and then lift the lids. 4 Remove the old cartridges. The print cartridge carrier moves and stops at the loading position unless the All-In-One is on. 2 Lift the ...

User's Guide
Page 22
If you are installing a black print cartridge, make sure that it is secure in the left carrier and then snap the lid closed . Lexmark's All-In-One warranty does not cover repair of refilled cartridges. We do not recommend use Lexmark supplies. 18 For best results, use of failures or damage... caused by a refilled cartridge. Make sure the color print cartridge is secure in the right carrier, and then snap the lid closed. 7 ...
If you are installing a black print cartridge, make sure that it is secure in the left carrier and then snap the lid closed . Lexmark's All-In-One warranty does not cover repair of refilled cartridges. We do not recommend use Lexmark supplies. 18 For best results, use of failures or damage... caused by a refilled cartridge. Make sure the color print cartridge is secure in the right carrier, and then snap the lid closed. 7 ...
User's Guide
Page 23
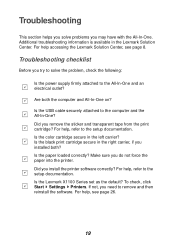
Troubleshooting checklist Before you install the printer software correctly? Is the color cartridge secure in the Lexmark Solution Center. Is the Lexmark X1100 Series set as the default? To check, click Start Settings Printers. Are both ? Is the paper loaded correctly? Did you try to solve the problem,...the computer and the All-In-One? Make sure you remove the sticker and transparent tape from the print cartridge? Did you do not force the paper into the printer. Is the black print cartridge secure in the right carrier, if you installed both the computer and All-In-One on? ...
Troubleshooting checklist Before you install the printer software correctly? Is the color cartridge secure in the Lexmark Solution Center. Is the Lexmark X1100 Series set as the default? To check, click Start Settings Printers. Are both ? Is the paper loaded correctly? Did you try to solve the problem,...the computer and the All-In-One? Make sure you remove the sticker and transparent tape from the print cartridge? Did you do not force the paper into the printer. Is the black print cartridge secure in the right carrier, if you installed both the computer and All-In-One on? ...
User's Guide
Page 24
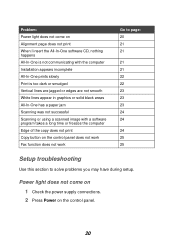
... 25 25 Setup troubleshooting Use this section to solve problems you may have during setup. Power light does not come on Alignment page does not print When I insert the All-In-One software CD, nothing happens All-In-One is not communicating with the computer Installation appears incomplete All-In-One... prints slowly Print is too dark or smudged Vertical lines are jagged or edges are not smooth White lines appear in graphics or solid black areas All-In...
... 25 25 Setup troubleshooting Use this section to solve problems you may have during setup. Power light does not come on Alignment page does not print When I insert the All-In-One software CD, nothing happens All-In-One is not communicating with the computer Installation appears incomplete All-In-One... prints slowly Print is too dark or smudged Vertical lines are jagged or edges are not smooth White lines appear in graphics or solid black areas All-In...
User's Guide
Page 25
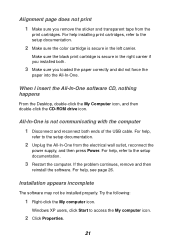
...: 1 Right-click the My computer icon. All-In-One is secure in the left carrier. For help installing print cartridges, refer to the setup documentation. 2 Unplug the All-In-One from the print cartridges. For help , refer to the setup documentation. 2 Make sure the color cartridge is secure in the right... carrier if you loaded the paper correctly and did not force the paper into the All-In-One. Make sure the black print cartridge is not communicating with the computer 1 Disconnect and reconnect both . 3 Make sure you installed both ends of the USB cable. For help , refer...
...: 1 Right-click the My computer icon. All-In-One is secure in the left carrier. For help installing print cartridges, refer to the setup documentation. 2 Unplug the All-In-One from the print cartridges. For help , refer to the setup documentation. 2 Make sure the color cartridge is secure in the right... carrier if you loaded the paper correctly and did not force the paper into the All-In-One. Make sure the black print cartridge is not communicating with the computer 1 Disconnect and reconnect both . 3 Make sure you installed both ends of the USB cable. For help , refer...
User's Guide
Page 26
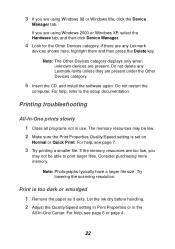
... paper as it exits. Note: Photographs typically have a larger file size. Let the ink dry before handling. 2 Adjust the Quality/Speed setting in Print Properties or in use. For help, see page 6 or page 4. 22 If the memory resources are using Windows 98 or Windows Me, click the... set on Normal or Quick Print. If there are present under the Other Devices category. 5 Insert the CD, and install the software again. Do not delete any Lexmark items unless they are any Lexmark devices shown here, highlight them and then press the Delete key. Try lowering the scanning resolution. ...
... paper as it exits. Note: Photographs typically have a larger file size. Let the ink dry before handling. 2 Adjust the Quality/Speed setting in Print Properties or in use. For help, see page 6 or page 4. 22 If the memory resources are using Windows 98 or Windows Me, click the... set on Normal or Quick Print. If there are present under the Other Devices category. 5 Insert the CD, and install the software again. Do not delete any Lexmark items unless they are any Lexmark devices shown here, highlight them and then press the Delete key. Try lowering the scanning resolution. ...


