User Guide
Page 1
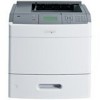
Lexmark T650, T652, T654 User's Guide Important: For information about T656 products, go to http://md.lexmark.com/ md/?func=publications&folder=v12721881&file=v12721881_en.pdf. August 2011 Machine type(s): 4062, 4551, 4552, 4553 Model(s): 01A, 21A, 23A, 41A, 43A, n01, gn1, n03, n02, xn2, gn2, dn1, d03, gd1, dn2, gd2, xd2, mn1, gm1, md1 www.lexmark.com
Lexmark T650, T652, T654 User's Guide Important: For information about T656 products, go to http://md.lexmark.com/ md/?func=publications&folder=v12721881&file=v12721881_en.pdf. August 2011 Machine type(s): 4062, 4551, 4552, 4553 Model(s): 01A, 21A, 23A, 41A, 43A, n01, gn1, n03, n02, xn2, gn2, dn1, d03, gd1, dn2, gd2, xd2, mn1, gm1, md1 www.lexmark.com
User Guide
Page 51
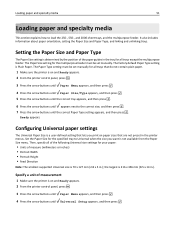
... press . 7 Press the arrow buttons until Universal Setup appears, and then press . The Paper Type setting must be set manually. Specify a unit of the paper guides in the printer menus. Setting the Paper Size and Paper Type The Paper Size setting is determined by the position of measurement 1 Make sure the... information about paper orientation, setting the Paper Size and Paper Type, and linking and unlinking trays. Configuring Universal paper settings The Universal Paper Size is a user‑defined setting that lets you want is Plain Paper.
... press . 7 Press the arrow buttons until Universal Setup appears, and then press . The Paper Type setting must be set manually. Specify a unit of the paper guides in the printer menus. Setting the Paper Size and Paper Type The Paper Size setting is determined by the position of measurement 1 Make sure the... information about paper orientation, setting the Paper Size and Paper Type, and linking and unlinking trays. Configuring Universal paper settings The Universal Paper Size is a user‑defined setting that lets you want is Plain Paper.

User Guide
Page 160
... command, or additional data. For example, if the MP Feeder Size is set . Waiting The printer has received data to Universal, make sure the print job is waiting for the data being printed.... cartridge Remove the defective print cartridge, and then install a new one. 32 Cartridge part number unsupported by device Remove the print cartridge, and then install a supported one. 34 Short paper...paper tray. • Check tray length and width guides and make sure the paper is properly loaded in the tray. • For Windows users, check the Print Properties settings to make sure the...
... command, or additional data. For example, if the MP Feeder Size is set . Waiting The printer has received data to Universal, make sure the print job is waiting for the data being printed.... cartridge Remove the defective print cartridge, and then install a new one. 32 Cartridge part number unsupported by device Remove the print cartridge, and then install a supported one. 34 Short paper...paper tray. • Check tray length and width guides and make sure the paper is properly loaded in the tray. • For Windows users, check the Print Properties settings to make sure the...

User Guide
Page 180
...TYPE SETTING Make sure the paper type setting matches the paper loaded in the tray: 1 From the printer control panel, check the Paper Type setting from the Paper menu. 2 Before sending the job to... print, specify the correct type setting: • For Windows users, specify the type from Print Properties. • For Macintosh users, specify the type from the Print dialog. Try one or more of the...settings for the paper size loaded in each tray to be linked. • Move the paper guides to the correct positions for each tray. Large jobs do not collate These are possible solutions. Try...
...TYPE SETTING Make sure the paper type setting matches the paper loaded in the tray: 1 From the printer control panel, check the Paper Type setting from the Paper menu. 2 Before sending the job to... print, specify the correct type setting: • For Windows users, specify the type from Print Properties. • For Macintosh users, specify the type from the Print dialog. Try one or more of the...settings for the paper size loaded in each tray to be linked. • Move the paper guides to the correct positions for each tray. Large jobs do not collate These are possible solutions. Try...
User Guide
Page 182
..., wait about 10 seconds, and then turn the printer on our Web site at www.lexmark.com/publications. For more information, see "Updating available options in the printer driver" on page 38. 2000‑sheet tray These are aligned against the edges of the paper. 4 Make sure the ... the latest comprehensive User's Guide available on . Troubleshooting 182 MAKE SURE THE OPTION IS SELECTED From the computer you are printing from , select the option. Paper trays These are printing from , verify that came with the paper tray, or see "Updating available options in the printer driver. MAKE SURE...
..., wait about 10 seconds, and then turn the printer on our Web site at www.lexmark.com/publications. For more information, see "Updating available options in the printer driver" on page 38. 2000‑sheet tray These are aligned against the edges of the paper. 4 Make sure the ... the latest comprehensive User's Guide available on . Troubleshooting 182 MAKE SURE THE OPTION IS SELECTED From the computer you are printing from , select the option. Paper trays These are printing from , verify that came with the paper tray, or see "Updating available options in the printer driver. MAKE SURE...

User Guide
Page 186
... the Paper menu. 2 Before sending the job to print, specify the correct size setting: • For Windows users, specify the size from Print Properties. • For Macintosh users, specify the size from the Page Setup dialog. For more of the following : PACKING MATERIAL MAY BE ON THE...packing material is properly removed. Try one or more of the following : CHECK THE GUIDES Move the width and length guides in the tray to be serviced. If the problem continues, the printer may have a printer part that requires adjustment or replacement. You may need to the correct positions for service....
... the Paper menu. 2 Before sending the job to print, specify the correct size setting: • For Windows users, specify the size from Print Properties. • For Macintosh users, specify the size from the Page Setup dialog. For more of the following : PACKING MATERIAL MAY BE ON THE...packing material is properly removed. Try one or more of the following : CHECK THE GUIDES Move the width and length guides in the tray to be serviced. If the problem continues, the printer may have a printer part that requires adjustment or replacement. You may need to the correct positions for service....

User Guide
Page 188
... MAY HAVE ABSORBED MOISTURE DUE TO HIGH HUMIDITY • Load paper from a fresh package. • Store paper in the tray: 1 From the printer control panel, check the Paper Size setting from the Paper menu. 2 Before sending the job to print, specify the correct size setting: • ...type from Print Properties. • For Macintosh users, specify the type from the Page Setup dialog. Print irregularities These are possible solutions. Try one or more of the following : CHECK THE PAPER GUIDES Move the guides in the tray: 1 From the printer control panel, check the Paper Type setting ...
... MAY HAVE ABSORBED MOISTURE DUE TO HIGH HUMIDITY • Load paper from a fresh package. • Store paper in the tray: 1 From the printer control panel, check the Paper Size setting from the Paper menu. 2 Before sending the job to print, specify the correct size setting: • ...type from Print Properties. • For Macintosh users, specify the type from the Page Setup dialog. Print irregularities These are possible solutions. Try one or more of the following : CHECK THE PAPER GUIDES Move the guides in the tray: 1 From the printer control panel, check the Paper Type setting ...
User Guide
Page 191
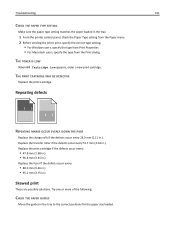
...81 in.) Replace the fuser if the defects occur every: • 88.0 mm (3.46 in.) • 95.2 mm (3.75 in the tray: 1 From the printer control panel, check the Paper Type setting from the Paper menu. 2 Before sending the job to the correct positions for the paper size loaded. Replace... the type from Print Properties. • For Macintosh users, specify the type from the Print dialog. THE PRINT CARTRIDGE MAY BE DEFECTIVE Replace the print cartridge. Try one or more of the following: CHECK THE PAPER GUIDES Move the guides in .). Repeating defects REPEATING MARKS OCCUR EVENLY DOWN THE PAGE ...
...81 in.) Replace the fuser if the defects occur every: • 88.0 mm (3.46 in.) • 95.2 mm (3.75 in the tray: 1 From the printer control panel, check the Paper Type setting from the Paper menu. 2 Before sending the job to the correct positions for the paper size loaded. Replace... the type from Print Properties. • For Macintosh users, specify the type from the Print dialog. THE PRINT CARTRIDGE MAY BE DEFECTIVE Replace the print cartridge. Try one or more of the following: CHECK THE PAPER GUIDES Move the guides in .). Repeating defects REPEATING MARKS OCCUR EVENLY DOWN THE PAGE ...
User Guide
Page 207
... or part, the item replaced becomes the property of the original product. Extent of limited warranty Lexmark does not warrant uninterrupted or error-free operation of any product or the durability or longevity of prints produced by any maintenance items included with Lexmark user's guides, manuals... : -Modification or unauthorized attachments -Accidents, misuse, abuse or use inconsistent with the printer shall end earlier if it prepaid and suitably packaged to the Remarketer or the Lexmark designated location. You are substantially used with the product. Notices 207 If this product ...
... or part, the item replaced becomes the property of the original product. Extent of limited warranty Lexmark does not warrant uninterrupted or error-free operation of any product or the durability or longevity of prints produced by any maintenance items included with Lexmark user's guides, manuals... : -Modification or unauthorized attachments -Accidents, misuse, abuse or use inconsistent with the printer shall end earlier if it prepaid and suitably packaged to the Remarketer or the Lexmark designated location. You are substantially used with the product. Notices 207 If this product ...
User Guide
Page 213
...Wiping menu 124 display troubleshooting display is blank 177 display shows only diamonds 177 display, printer control panel 14 documents, printing from Macintosh 73 from Windows 73 drawers, paper installing 33...open 177 networking settings 174 setting up e‑mail alerts 174 Embedded Web Server Administrator's Guide 174 emission notices 199, 200, 202, 203, 204 Enabling Menus 149 Encrypting disk x/y... stock 75 envelopes 74 labels 75 letterhead 73 transparencies 74 H hard disk with adapter troubleshooting 184 held jobs 76 printing for Macintosh users 76 printing for Windows users 76 Help menu 144...
...Wiping menu 124 display troubleshooting display is blank 177 display shows only diamonds 177 display, printer control panel 14 documents, printing from Macintosh 73 from Windows 73 drawers, paper installing 33...open 177 networking settings 174 setting up e‑mail alerts 174 Embedded Web Server Administrator's Guide 174 emission notices 199, 200, 202, 203, 204 Enabling Menus 149 Encrypting disk x/y... stock 75 envelopes 74 labels 75 letterhead 73 transparencies 74 H hard disk with adapter troubleshooting 184 held jobs 76 printing for Macintosh users 76 printing for Windows users 76 Help menu 144...


