User Guide
Page 4
... jams 82 Avoiding jams...82 Understanding jam numbers and locations 83 200 and 201 paper jams...83 202 and 203 paper jams...84 230 paper jam...85 231-239 paper jams (optional external duplex unit 87 241-245 paper jams...89 250 paper jam...89 260 paper jam...90 271-279 paper jams...91 280 paper jams...91 281 paper jam...92 282 paper jam...92 283 staple jam...93 Understanding printer menus 95 Menus list...95 Paper...
... jams 82 Avoiding jams...82 Understanding jam numbers and locations 83 200 and 201 paper jams...83 202 and 203 paper jams...84 230 paper jam...85 231-239 paper jams (optional external duplex unit 87 241-245 paper jams...89 250 paper jam...89 260 paper jam...90 271-279 paper jams...91 280 paper jams...91 281 paper jam...92 282 paper jam...92 283 staple jam...93 Understanding printer menus 95 Menus list...95 Paper...

User Guide
Page 7
... ...184 Flash memory card ...184 Hard disk with adapter ...184 Internal Solutions Port...184 Solving paper feed problems...184 Paper frequently jams...184 Paper jam message remains after jam is cleared 185 Page that jammed does not reprint after you clear the jam 185 Solving print quality problems...185 Isolating print quality problems...185 Blank pages ...186 Clipped...
... ...184 Flash memory card ...184 Hard disk with adapter ...184 Internal Solutions Port...184 Solving paper feed problems...184 Paper frequently jams...184 Paper jam message remains after jam is cleared 185 Page that jammed does not reprint after you clear the jam 185 Solving print quality problems...185 Isolating print quality problems...185 Blank pages ...186 Clipped...
User Guide
Page 52
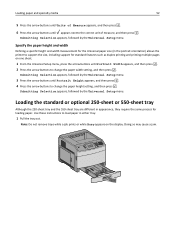
... the Universal Setup menu. Specify the paper height and width Defining a specific height and width measurement for the Universal paper size (in the portrait orientation) allows the printer to change the paper width setting, and then press . Doing so may cause a jam. Loading the standard or optional 250&#... duplex printing and printing multiple pages on the display. Use these instructions to the correct unit of measure, and then press . Loading paper and specialty media 52 5 Press the arrow buttons until Units of Measure appears, and then press . 6 Press the arrow buttons until...
... the Universal Setup menu. Specify the paper height and width Defining a specific height and width measurement for the Universal paper size (in the portrait orientation) allows the printer to change the paper width setting, and then press . Doing so may cause a jam. Loading the standard or optional 250&#... duplex printing and printing multiple pages on the display. Use these instructions to the correct unit of measure, and then press . Loading paper and specialty media 52 5 Press the arrow buttons until Units of Measure appears, and then press . 6 Press the arrow buttons until...

User Guide
Page 66
... jams. For best performance, use paper between 150 and 250 Sheffield points produces the best print quality. Note: For detailed information on card stock and labels, see the Card Stock & Label Guide available on the Lexmark Web site at its edges. Moisture content The amount of moisture in a sheet of the printer to curl at www.lexmark...
... jams. For best performance, use paper between 150 and 250 Sheffield points produces the best print quality. Note: For detailed information on card stock and labels, see the Card Stock & Label Guide available on the Lexmark Web site at its edges. Moisture content The amount of moisture in a sheet of the printer to curl at www.lexmark...
User Guide
Page 83
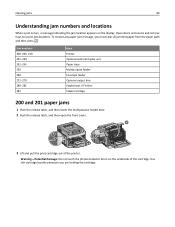
...the photoconductor drum on the display. To resolve any paper jam message, you are holding the cartridge. Jam numbers 200-203, 230 231-239 241-245 250 260 271-279 280-282 283 Area Printer Optional external duplex unit Paper trays Multipurpose feeder Envelope feeder Optional output bins StapleSmart... II Finisher Staple cartridge 200 and 201 paper jams 1 Push the release latch, and then lower the multipurpose feeder door. ...
...the photoconductor drum on the display. To resolve any paper jam message, you are holding the cartridge. Jam numbers 200-203, 230 231-239 241-245 250 260 271-279 280-282 283 Area Printer Optional external duplex unit Paper trays Multipurpose feeder Envelope feeder Optional output bins StapleSmart... II Finisher Staple cartridge 200 and 201 paper jams 1 Push the release latch, and then lower the multipurpose feeder door. ...
User Guide
Page 84
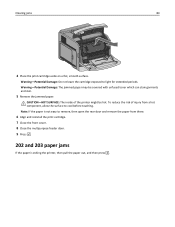
... print cartridge. 7 Close the front cover. 8 Close the multipurpose feeder door. 9 Press . 202 and 203 paper jams If the paper is exiting the printer, then pull the paper out, and then press . Warning-Potential Damage: The jammed paper may be hot. Note: If the paper is not easy to remove, then open the rear door and remove the...
... print cartridge. 7 Close the front cover. 8 Close the multipurpose feeder door. 9 Press . 202 and 203 paper jams If the paper is exiting the printer, then pull the paper out, and then press . Warning-Potential Damage: The jammed paper may be hot. Note: If the paper is not easy to remove, then open the rear door and remove the...
User Guide
Page 85
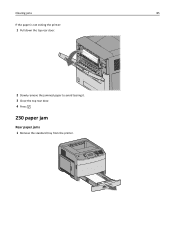
Clearing jams 85 If the paper is not exiting the printer: 1 Pull down the top rear door. 2 Slowly remove the jammed paper to avoid tearing it. 3 Close the top rear door. 4 Press . 230 paper jam Rear paper jams 1 Remove the standard tray from the printer.
Clearing jams 85 If the paper is not exiting the printer: 1 Pull down the top rear door. 2 Slowly remove the jammed paper to avoid tearing it. 3 Close the top rear door. 4 Press . 230 paper jam Rear paper jams 1 Remove the standard tray from the printer.
User Guide
Page 87
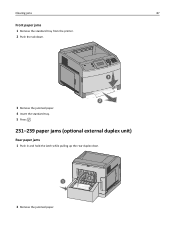
Clearing jams 87 Front paper jams 1 Remove the standard tray from the printer. 2 Push the tab down. 1 2 3 Remove the jammed paper. 4 Insert the standard tray. 5 Press . 231-239 paper jams (optional external duplex unit) Rear paper jams 1 Push in and hold the latch while pulling up the rear duplex door. 2 1 2 Remove the jammed paper.
Clearing jams 87 Front paper jams 1 Remove the standard tray from the printer. 2 Push the tab down. 1 2 3 Remove the jammed paper. 4 Insert the standard tray. 5 Press . 231-239 paper jams (optional external duplex unit) Rear paper jams 1 Push in and hold the latch while pulling up the rear duplex door. 2 1 2 Remove the jammed paper.
User Guide
Page 88
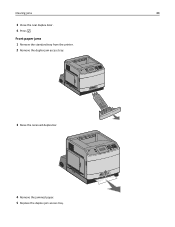
Front paper jams 1 Remove the standard tray from the printer. 2 Remove the duplex jam access tray. 3 Raise the recessed duplex bar. 4 Remove the jammed paper. 5 Replace the duplex jam access tray. Clearing jams 88 3 Close the rear duplex door. 4 Press .
Front paper jams 1 Remove the standard tray from the printer. 2 Remove the duplex jam access tray. 3 Raise the recessed duplex bar. 4 Remove the jammed paper. 5 Replace the duplex jam access tray. Clearing jams 88 3 Close the rear duplex door. 4 Press .
User Guide
Page 89
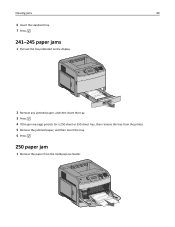
Clearing jams 89 6 Insert the standard tray. 7 Press . 241-245 paper jams 1 Pull out the tray indicated on the display. 2 Remove any jammed paper, and then insert the tray. 3 Press . 4 If the jam message persists for a 250‑sheet or 550‑sheet tray, then remove the tray from the printer. 5 Remove the jammed paper, and then insert the tray. 6 Press . 250 paper jam 1 Remove the paper from the multipurpose feeder.
Clearing jams 89 6 Insert the standard tray. 7 Press . 241-245 paper jams 1 Pull out the tray indicated on the display. 2 Remove any jammed paper, and then insert the tray. 3 Press . 4 If the jam message persists for a 250‑sheet or 550‑sheet tray, then remove the tray from the printer. 5 Remove the jammed paper, and then insert the tray. 6 Press . 250 paper jam 1 Remove the paper from the multipurpose feeder.
User Guide
Page 90
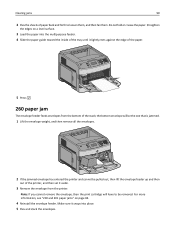
...the envelope weight, and then remove all the envelopes. 2 If the jammed envelope has entered the printer and cannot be removed. Do not fold or crease the paper. Make sure it snaps into the multipurpose feeder. 4 Slide the paper guide toward the inside of the tray until it aside. 3 Remove the... from the bottom of paper back and forth to be pulled out, then lift the envelope feeder up and then out of the printer, and then set it lightly rests against the edge of the paper. 5 Press . 260 paper jam The envelope feeder feeds envelopes from the printer. Clearing jams 90 2 Flex the ...
...the envelope weight, and then remove all the envelopes. 2 If the jammed envelope has entered the printer and cannot be removed. Do not fold or crease the paper. Make sure it snaps into the multipurpose feeder. 4 Slide the paper guide toward the inside of the tray until it aside. 3 Remove the... from the bottom of paper back and forth to be pulled out, then lift the envelope feeder up and then out of the printer, and then set it lightly rests against the edge of the paper. 5 Press . 260 paper jam The envelope feeder feeds envelopes from the printer. Clearing jams 90 2 Flex the ...
User Guide
Page 91
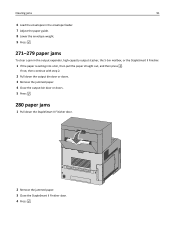
... exiting into a bin, then pull the paper straight out, and then press . If not, then continue with step 2. 2 Pull down the output bin door or doors. 3 Remove the jammed paper. 4 Close the output bin door or doors. 5 Press . 280 paper jams 1 Pull down the StapleSmart II Finisher door. 2 Remove the jammed paper. 3 Close the StapleSmart II Finisher...
... exiting into a bin, then pull the paper straight out, and then press . If not, then continue with step 2. 2 Pull down the output bin door or doors. 3 Remove the jammed paper. 4 Close the output bin door or doors. 5 Press . 280 paper jams 1 Pull down the StapleSmart II Finisher door. 2 Remove the jammed paper. 3 Close the StapleSmart II Finisher...
User Guide
Page 92
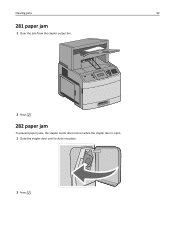
Clearing jams 92 281 paper jam 1 Clear the jam from the stapler output bin. 2 Press . 282 paper jam To prevent paper jams, the stapler motor does not run when the stapler door is open. 1 Close the stapler door until it clicks into place. 2 Press .
Clearing jams 92 281 paper jam 1 Clear the jam from the stapler output bin. 2 Press . 282 paper jam To prevent paper jams, the stapler motor does not run when the stapler door is open. 1 Close the stapler door until it clicks into place. 2 Press .
User Guide
Page 167
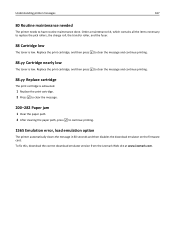
... cartridge The print cartridge is exhausted. 1 Replace the print cartridge. 2 Press to clear the message. 200-282 Paper jam 1 Clear the paper path. 2 After clearing the paper path, press to replace the pick rollers, the charge roll, the transfer roller, and the fuser. 88 Cartridge low..., download the correct download emulator version from the Lexmark Web site at www.lexmark.com. Replace the print cartridge, and then press to have routine maintenance done. Understanding printer messages 167 80 Routine maintenance needed The printer needs to clear the message and continue printing. ...
... cartridge The print cartridge is exhausted. 1 Replace the print cartridge. 2 Press to clear the message. 200-282 Paper jam 1 Clear the paper path. 2 After clearing the paper path, press to replace the pick rollers, the charge roll, the transfer roller, and the fuser. 88 Cartridge low..., download the correct download emulator version from the Lexmark Web site at www.lexmark.com. Replace the print cartridge, and then press to have routine maintenance done. Understanding printer messages 167 80 Routine maintenance needed The printer needs to clear the message and continue printing. ...
User Guide
Page 182
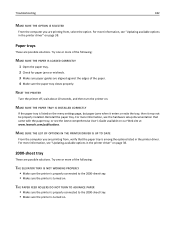
... computer you are printing from , select the option. MAKE SURE THE PAPER TRAY IS INSTALLED CORRECTLY If the paper tray is turned on our Web site at www.lexmark.com/publications. MAKE SURE THE LIST OF OPTIONS IN THE PRINTER DRIVER IS UP TO DATE From the computer you are possible solutions.... properly connected to the 2000‑sheet tray. • Make sure the printer is listed on . RESET THE PRINTER Turn the printer off, wait about 10 seconds, and then turn the printer on the menu settings page, but paper jams when it enters or exits the tray, then it may not be properly installed. ...
... computer you are printing from , select the option. MAKE SURE THE PAPER TRAY IS INSTALLED CORRECTLY If the paper tray is turned on our Web site at www.lexmark.com/publications. MAKE SURE THE LIST OF OPTIONS IN THE PRINTER DRIVER IS UP TO DATE From the computer you are possible solutions.... properly connected to the 2000‑sheet tray. • Make sure the printer is listed on . RESET THE PRINTER Turn the printer off, wait about 10 seconds, and then turn the printer on the menu settings page, but paper jams when it enters or exits the tray, then it may not be properly installed. ...

User Guide
Page 183
MAKE SURE THE ENVELOPE FEEDER IS INSTALLED CORRECTLY If the envelope feeder is listed on the menu settings page, but paper jams when it exits the printer or enters the output option, then it may not be properly installed. Output options If the Output Expander, High Capacity Output Expander, or ... that came with the duplex unit, or go to www.lexmark.com/publications to view the 5‑bin mailbox instruction sheet. Duplex unit If the duplex unit is listed on the menu settings page, but paper jams when it exits the printer and enters the mailbox, then it may not be properly ...
MAKE SURE THE ENVELOPE FEEDER IS INSTALLED CORRECTLY If the envelope feeder is listed on the menu settings page, but paper jams when it exits the printer or enters the output option, then it may not be properly installed. Output options If the Output Expander, High Capacity Output Expander, or ... that came with the duplex unit, or go to www.lexmark.com/publications to view the 5‑bin mailbox instruction sheet. Duplex unit If the duplex unit is listed on the menu settings page, but paper jams when it exits the printer and enters the mailbox, then it may not be properly ...
User Guide
Page 185
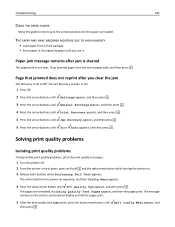
... the guides in its power‑on the printer control panel display until all the pages print. 5 After the print quality test pages print, press the down arrow button until Prt Quality Pgs appears, and then press . Paper jam message remains after you use it. Solving print... quality problems Isolating print quality problems To help isolate print quality problems, print the print quality test pages: 1 Turn the printer off. 2 From the printer control panel, press and hold and the ...
... the guides in its power‑on the printer control panel display until all the pages print. 5 After the print quality test pages print, press the down arrow button until Prt Quality Pgs appears, and then press . Paper jam message remains after you use it. Solving print... quality problems Isolating print quality problems To help isolate print quality problems, print the print quality test pages: 1 Turn the printer off. 2 From the printer control panel, press and hold and the ...
User Guide
Page 212
...;sheet tray loading 56 200-282 Paper jam 167 250‑sheet tray (standard or optional) loading 52 281 paper jam 92 282 paper jam 92 30 Invalid refill, change cartridge 160 31 Replace defective cartridge 160 32 Cartridge part number unsupported by device 160 34 Short paper 160 35 Insufficient memory to support...C cables Ethernet 36 USB 36 calling Customer Support 196 Cancel not available 146 Canceling 146 canceling a job from Macintosh 80 from the printer control panel 80 from Windows 80 card stock loading 59 tips on using 75 cartridges, print ordering 169 Change to 146 charge rolls ordering...
...;sheet tray loading 56 200-282 Paper jam 167 250‑sheet tray (standard or optional) loading 52 281 paper jam 92 282 paper jam 92 30 Invalid refill, change cartridge 160 31 Replace defective cartridge 160 32 Cartridge part number unsupported by device 160 34 Short paper 160 35 Insufficient memory to support...C cables Ethernet 36 USB 36 calling Customer Support 196 Cancel not available 146 Canceling 146 canceling a job from Macintosh 80 from the printer control panel 80 from Windows 80 card stock loading 59 tips on using 75 cartridges, print ordering 169 Change to 146 charge rolls ordering...
User Guide
Page 213
... networking Macintosh 44 Windows 44 Ethernet port 36 exit bins linking 64 exterior of the printer cleaning 168 e‑mail notice of low supply level 174 notice of paper jam 174 notice of paper needed 174 notice that different paper is needed 174 F factory defaults, restoring 176 FCC notices 199, 203 fiber optic network ... 202 and 203 84 230 85 231-239 (optional duplex) 87 241-245 89 250 89 260 90 271-279 91 280 paper jams 91 283 staple jam 93 stapler 93 L labels tips on using 75 letterhead loading, 2000‑sheet tray 56 loading, multipurpose feeder 59 loading, trays 52 tips on using 73
... networking Macintosh 44 Windows 44 Ethernet port 36 exit bins linking 64 exterior of the printer cleaning 168 e‑mail notice of low supply level 174 notice of paper jam 174 notice of paper needed 174 notice that different paper is needed 174 F factory defaults, restoring 176 FCC notices 199, 203 fiber optic network ... 202 and 203 84 230 85 231-239 (optional duplex) 87 241-245 89 250 89 260 90 271-279 91 280 paper jams 91 283 staple jam 93 stapler 93 L labels tips on using 75 letterhead loading, 2000‑sheet tray 56 loading, multipurpose feeder 59 loading, trays 52 tips on using 73
User Guide
Page 215
... 13 shipping 173 Printer busy, Continue, Quit 154 printer control panel 14 factory defaults, restoring 176 printer hard disk installing 29 printer messages 1565 Emulation error, load emulation option 167 200-282 Paper jam 167 281 paper jam 92 282 paper jam 92 30 Invalid refill, change cartridge 160 31 Replace defective cartridge 160 32 Cartridge part number unsupported by device...
... 13 shipping 173 Printer busy, Continue, Quit 154 printer control panel 14 factory defaults, restoring 176 printer hard disk installing 29 printer messages 1565 Emulation error, load emulation option 167 200-282 Paper jam 167 281 paper jam 92 282 paper jam 92 30 Invalid refill, change cartridge 160 31 Replace defective cartridge 160 32 Cartridge part number unsupported by device...


