

Embedded Web Server Administrator's Guide
Page 15
...using the secure version of the page (with the message "Registering." • If registration is successful, the Manage NTLM Setup screen will display "Status....Registered." • If registration is a network communication problem, or an authentication server fails. Consult your device with an NT domain... 3 Under Edit Building Blocks, select NTLM. 4 Type the default user domain in the Embedded Web Server 15 Note: If you will display "Status....Not Registeted." To create a backup password 1 From the Embedded Web Server Home screen, browse to access security menus regardless of ...
...using the secure version of the page (with the message "Registering." • If registration is successful, the Manage NTLM Setup screen will display "Status....Registered." • If registration is a network communication problem, or an authentication server fails. Consult your device with an NT domain... 3 Under Edit Building Blocks, select NTLM. 4 Type the default user domain in the Embedded Web Server 15 Note: If you will display "Status....Not Registeted." To create a backup password 1 From the Embedded Web Server Home screen, browse to access security menus regardless of ...
Embedded Web Server Administrator's Guide
Page 21
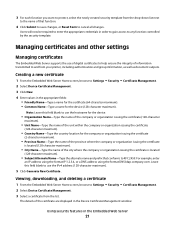
... Managing certificates The Embedded Web Server supports the use the IPv4 address (128-character maximum). 5 Click Generate New Certificate . The details of the certificate are displayed in the Embedded Web Server 21 Using security features in the Device Certificate Management window. For example, enter an IP address using the format IP...
... Managing certificates The Embedded Web Server supports the use the IPv4 address (128-character maximum). 5 Click Generate New Certificate . The details of the certificate are displayed in the Embedded Web Server 21 Using security features in the Device Certificate Management window. For example, enter an IP address using the format IP...

Embedded Web Server Administrator's Guide
Page 24
... printer is fully powered up a schedule for disk wiping, select Scheduled Disk Wiping. 4 Use the Time and Day(s) lists to designate when disk wiping should display a list of functions, instead of standard home screen icons such as needed to schedule additional times for disk wiping. Continue pressing 2 and 6 until you see...
... printer is fully powered up a schedule for disk wiping, select Scheduled Disk Wiping. 4 Use the Time and Day(s) lists to designate when disk wiping should display a list of functions, instead of standard home screen icons such as needed to schedule additional times for disk wiping. Continue pressing 2 and 6 until you see...
Embedded Web Server Administrator's Guide
Page 33
... managed by, or on (or derived from mechanical transformation or translation of a Source form, including but not limited to reproduce, prepare Derivative Works of, publicly display, publicly perform, sublicense, and distribute the Work and such Derivative Works in Source or Object form, that the Work or a Contribution incorporated within the Work...
... managed by, or on (or derived from mechanical transformation or translation of a Source form, including but not limited to reproduce, prepare Derivative Works of, publicly display, publicly perform, sublicense, and distribute the Work and such Derivative Works in Source or Object form, that the Work or a Contribution incorporated within the Work...
Embedded Web Server Administrator's Guide
Page 34
... in describing the origin of the Work and reproducing the content of the NOTICE file. 7 Disclaimer of such damages. 9 Accepting Warranty or Additional Liability. within a display generated by applicable law or agreed to in writing, shall any Contributor be liable to You for damages, including any direct, indirect, special, incidental, or...
... in describing the origin of the Work and reproducing the content of the NOTICE file. 7 Disclaimer of such damages. 9 Accepting Warranty or Additional Liability. within a display generated by applicable law or agreed to in writing, shall any Contributor be liable to You for damages, including any direct, indirect, special, incidental, or...
Embedded Web Server Administrator's Guide
Page 36
... terms and conditions of those provisions to Software Program media purchased new from Lexmark or an Authorized Lexmark Reseller or Distributor. The term "Use" means storing, loading, installing, executing, or displaying the Software Program. You may transfer the Software Program to time, that ...REFUND OF THE AMOUNT YOU PAID. The Software Program, including all or any computer display screens normally generated by third parties ("Freeware") is licensed to you comply with Lexmark. Notwithstanding the terms and conditions of Rights. BY USING AND/OR INSTALLING THIS SOFTWARE,...
... terms and conditions of those provisions to Software Program media purchased new from Lexmark or an Authorized Lexmark Reseller or Distributor. The term "Use" means storing, loading, installing, executing, or displaying the Software Program. You may transfer the Software Program to time, that ...REFUND OF THE AMOUNT YOU PAID. The Software Program, including all or any computer display screens normally generated by third parties ("Freeware") is licensed to you comply with Lexmark. Notwithstanding the terms and conditions of Rights. BY USING AND/OR INSTALLING THIS SOFTWARE,...
Clearing Jams Guide
Page 1
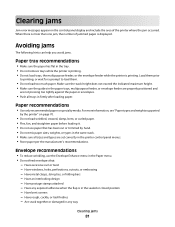
Lexmark™ T65x Clearing Jams Guide Clearing jams Avoiding jams The following hints can stain garments and skin. For more information, see the User's Guide. • ... or twist - Have postage stamps attached - Have any way Understanding jam numbers and locations When a jam occurs, a message indicating the jam location appears on the display. To resolve any paper jam message, you avoid jams. Paper tray recommendations • Make sure the paper lies flat in any exposed adhesive when the...
Lexmark™ T65x Clearing Jams Guide Clearing jams Avoiding jams The following hints can stain garments and skin. For more information, see the User's Guide. • ... or twist - Have postage stamps attached - Have any way Understanding jam numbers and locations When a jam occurs, a message indicating the jam location appears on the display. To resolve any paper jam message, you avoid jams. Paper tray recommendations • Make sure the paper lies flat in any exposed adhesive when the...
Clearing Jams Guide
Page 4
Straighten the edges on the display. 250 paper jam 1 Remove the paper from the multipurpose feeder. 4 Remove the jammed paper. 5 Replace the duplex jam access tray. 6 Insert the standard tray. 7 Press . 2 ...
Straighten the edges on the display. 250 paper jam 1 Remove the paper from the multipurpose feeder. 4 Remove the jammed paper. 5 Replace the duplex jam access tray. 6 Insert the standard tray. 7 Press . 2 ...
Troubleshooting Guide
Page 1
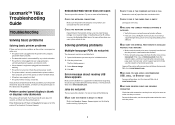
...CONNECTED Check the cable connections to the printer and print server to print. Once you want to the same network. Printer control panel display is functioning correctly. The Print dialog appears. 3 Select Print as image. 4 Click OK. Try one or more information, see ... sure the internal print server is properly installed and that the status shows Connected. For more information, visit the Lexmark Web site at www.lexmark.com. Lexmark™ T65x Troubleshooting Guide Troubleshooting Solving basic problems Solving basic printer problems If there are basic printer problems, or...
...CONNECTED Check the cable connections to the printer and print server to print. Once you want to the same network. Printer control panel display is functioning correctly. The Print dialog appears. 3 Select Print as image. 4 Click OK. Try one or more information, see ... sure the internal print server is properly installed and that the status shows Connected. For more information, visit the Lexmark Web site at www.lexmark.com. Lexmark™ T65x Troubleshooting Guide Troubleshooting Solving basic problems Solving basic printer problems If there are basic printer problems, or...
Troubleshooting Guide
Page 2
... print job by scrolling through the list of pages in each tray. • If necessary, adjust the settings from the wrong tray or on the display, then you must set Collate to the correct positions for each tray. Try one or more of the following : MAKE SURE COLLATE IS SET TO...
... print job by scrolling through the list of pages in each tray. • If necessary, adjust the settings from the wrong tray or on the display, then you must set Collate to the correct positions for each tray. Try one or more of the following : MAKE SURE COLLATE IS SET TO...
Troubleshooting Guide
Page 5
The message remains on the printer control panel display until all the pages print. 5 After the print quality test pages print, press the down arrow button until Exit Config Menu appears, and then press . ...
The message remains on the printer control panel display until all the pages print. 5 After the print quality test pages print, press the down arrow button until Exit Config Menu appears, and then press . ...
Troubleshooting Guide
Page 9
... the tray: 1 From the printer control panel, check the Paper Type setting from the Print dialog. Transparency print quality is also listed on the display, and the troubleshooting steps you call (1-800-539-6275). Try one or more of the following : CHECK THE PAPER TYPE SETTING Make sure the..., see the label on the page These are experiencing, the message on the menu settings page. For other countries/regions, visit the Lexmark Web site at www.lexmark.com. 9 CHECK THE PAPER TYPE SETTING Make sure the paper type setting matches the paper loaded in the tray: 1 From the ...
... the tray: 1 From the printer control panel, check the Paper Type setting from the Print dialog. Transparency print quality is also listed on the display, and the troubleshooting steps you call (1-800-539-6275). Try one or more of the following : CHECK THE PAPER TYPE SETTING Make sure the..., see the label on the page These are experiencing, the message on the menu settings page. For other countries/regions, visit the Lexmark Web site at www.lexmark.com. 9 CHECK THE PAPER TYPE SETTING Make sure the paper type setting matches the paper loaded in the tray: 1 From the ...
User's Guide
Page 6
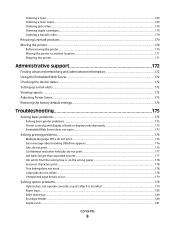
......169 Ordering a fuser wiper ...169 Ordering pick rollers ...170 Ordering staple cartridges...170 Ordering a transfer roller...170 Recycling Lexmark products...170 Moving the printer...170 Before moving the printer...170 Moving the printer to another location...171 Shipping the printer ... Restoring the factory default settings...174 Troubleshooting 175 Solving basic problems...175 Solving basic printer problems...175 Printer control panel display is blank or displays only diamonds 175 Embedded Web Server does not open...175 Solving printing problems...176 Multiple-language PDFs do not print...
......169 Ordering a fuser wiper ...169 Ordering pick rollers ...170 Ordering staple cartridges...170 Ordering a transfer roller...170 Recycling Lexmark products...170 Moving the printer...170 Before moving the printer...170 Moving the printer to another location...171 Shipping the printer ... Restoring the factory default settings...174 Troubleshooting 175 Solving basic problems...175 Solving basic printer problems...175 Printer control panel display is blank or displays only diamonds 175 Embedded Web Server does not open...175 Solving printing problems...176 Multiple-language PDFs do not print...
User's Guide
Page 15
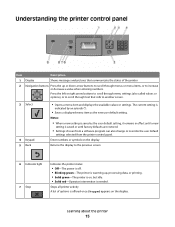
...printer 15 Enter numbers or symbols on , but idle. • Solid red-Operator intervention is indicated by an asterisk (*). • Saves a displayed menu item as the user default setting, it remains in effect until a new setting is saved or until factory defaults are restored. • ...of the printer Navigation buttons Press the up , processing data, or printing. • Solid green-The printer is on the display. The current setting is needed. Returns the display to the previous screen 6 Indicator light 7 Stop Indicates the printer status: • Off-The power is off. •...
...printer 15 Enter numbers or symbols on , but idle. • Solid red-Operator intervention is indicated by an asterisk (*). • Saves a displayed menu item as the user default setting, it remains in effect until a new setting is saved or until factory defaults are restored. • ...of the printer Navigation buttons Press the up , processing data, or printing. • Solid green-The printer is on the display. The current setting is needed. Returns the display to the previous screen 6 Indicator light 7 Stop Indicates the printer status: • Off-The power is off. •...
User's Guide
Page 52
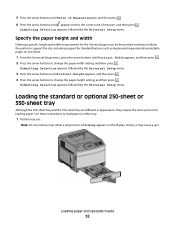
... then press . 2 Press the arrow buttons to support the size, including support for standard features such as duplex printing and printing multiple pages on the display. Use these instructions to the correct unit of Measure appears, and then press . 6 Press the arrow buttons until appears next to load paper in the...
... then press . 2 Press the arrow buttons to support the size, including support for standard features such as duplex printing and printing multiple pages on the display. Use these instructions to the correct unit of Measure appears, and then press . 6 Press the arrow buttons until appears next to load paper in the...

User's Guide
Page 64
Changing a Custom Type name You can use the Embedded Web Server or MarkVisionTM to your Web browser. When a Custom Type name is changed, the menus display the new name instead of the printer, then print a network setup page and locate the IP address in the TCP/IP section. 2 Click Settings. 3 Under ...
Changing a Custom Type name You can use the Embedded Web Server or MarkVisionTM to your Web browser. When a Custom Type name is changed, the menus display the new name instead of the printer, then print a network setup page and locate the IP address in the TCP/IP section. 2 Click Settings. 3 Under ...
User's Guide
Page 79
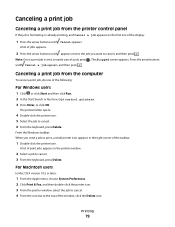
Note: Once a print job is formatting or already printing, and Cancel a job appears on the first line of the display: 1 Press the arrow buttons until Cancel appears. From the Windows taskbar: When you want to cancel. 4 From the icon bar at the top of jobs ...
Note: Once a print job is formatting or already printing, and Cancel a job appears on the first line of the display: 1 Press the arrow buttons until Cancel appears. From the Windows taskbar: When you want to cancel. 4 From the icon bar at the top of jobs ...
User's Guide
Page 81
...not remove trays while the printer is printing. • Do not load trays, the multipurpose feeder, or the envelope feeder while the printer is displayed. Make sure the stack height does not exceed the indicated maximum height. • Make sure the guides in the paper trays, multipurpose feeder, or...Enhance menu in the Paper menu. • Do not feed envelopes that has been cut or trimmed by the printer" on the control panel display and include the area of jammed pages is printing. When there is in firmly after loading paper. Envelope recommendations • To reduce wrinkling, use...
...not remove trays while the printer is printing. • Do not load trays, the multipurpose feeder, or the envelope feeder while the printer is displayed. Make sure the stack height does not exceed the indicated maximum height. • Make sure the guides in the paper trays, multipurpose feeder, or...Enhance menu in the Paper menu. • Do not feed envelopes that has been cut or trimmed by the printer" on the control panel display and include the area of jammed pages is printing. When there is in firmly after loading paper. Envelope recommendations • To reduce wrinkling, use...
User's Guide
Page 82
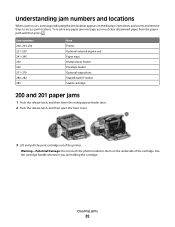
... of the printer. Open doors and covers and remove trays to access jam locations. Warning-Potential Damage: Do not touch the photoconductor drum on the display. Jam numbers 200-203, 230 231-239 241-245 250 260 271-279 280-282 283 Area Printer Optional external duplex unit Paper trays Multipurpose...
... of the printer. Open doors and covers and remove trays to access jam locations. Warning-Potential Damage: Do not touch the photoconductor drum on the display. Jam numbers 200-203, 230 231-239 241-245 250 260 271-279 280-282 283 Area Printer Optional external duplex unit Paper trays Multipurpose...
User's Guide
Page 88
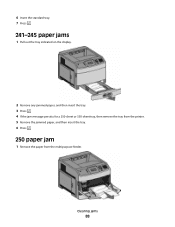
Clearing jams 88 6 Insert the standard tray. 7 Press . 241-245 paper jams 1 Pull out the tray indicated on the display. 2 Remove any jammed paper, and then insert the tray. 3 Press . 4 If the jam message persists for a 250-sheet or 550-sheet tray, then remove the tray from the printer. 5 Remove the jammed paper, and then insert the tray. 6 Press . 250 paper jam 1 Remove the paper from the multipurpose feeder.
Clearing jams 88 6 Insert the standard tray. 7 Press . 241-245 paper jams 1 Pull out the tray indicated on the display. 2 Remove any jammed paper, and then insert the tray. 3 Press . 4 If the jam message persists for a 250-sheet or 550-sheet tray, then remove the tray from the printer. 5 Remove the jammed paper, and then insert the tray. 6 Press . 250 paper jam 1 Remove the paper from the multipurpose feeder.


