
Setup Guide
Page 2
... Westhorpe, Marlow Bucks SL7 3RQ. Evaluation and verification of operation in your printer hardware or software. PostScript 3 is intended to be directed to: Director of Lexmark Technology & Services Lexmark International, Inc. 740 West New Circle Road Lexington, KY 40550 (859...services do not allow disclaimer of their respective owners. © 2003 Lexmark International, Inc. Lexmark is properly grounded. therefore, this book. Federal Communications Commission (FCC) compliance information statement This printer complies with the limits for a Class B digital device (without incurring...
... Westhorpe, Marlow Bucks SL7 3RQ. Evaluation and verification of operation in your printer hardware or software. PostScript 3 is intended to be directed to: Director of Lexmark Technology & Services Lexmark International, Inc. 740 West New Circle Road Lexington, KY 40550 (859...services do not allow disclaimer of their respective owners. © 2003 Lexmark International, Inc. Lexmark is properly grounded. therefore, this book. Federal Communications Commission (FCC) compliance information statement This printer complies with the limits for a Class B digital device (without incurring...

Setup Guide
Page 3
...drawer 8 Changing the 2000-sheet drawer paper size 10 Installing a 250-sheet or 500-sheet drawer 11 Installing a duplex unit 13 Setting up the printer 14 Installing an envelope feeder 17 Installing a finisher 19 Installing a high-capacity output stacker 22 Installing an output expander 24 Installing a 5-bin mailbox 27... Attaching labels to print media handling options 29 Step 3: Install memory and option cards 30 Accessing the printer system board 30 Installing printer memory 32 Installing an optional flash memory or firmware card 33 Contents iii
...drawer 8 Changing the 2000-sheet drawer paper size 10 Installing a 250-sheet or 500-sheet drawer 11 Installing a duplex unit 13 Setting up the printer 14 Installing an envelope feeder 17 Installing a finisher 19 Installing a high-capacity output stacker 22 Installing an output expander 24 Installing a 5-bin mailbox 27... Attaching labels to print media handling options 29 Step 3: Install memory and option cards 30 Accessing the printer system board 30 Installing printer memory 32 Installing an optional flash memory or firmware card 33 Contents iii
Setup Guide
Page 4
... cable 42 Step 6: Install drivers for local printing 44 Windows 45 Macintosh 49 UNIX/Linux 50 Serial connections 51 Step 7: Verify printer setup 54 Printing a menu settings page 54 Printing a network setup page 54 Printing Quick Reference information 55 Step 8: Configure for TCP/IP ...56 Assigning a printer IP address 56 Verifying the IP settings 57 Configuring for Pull Printing 57 Step 9: Install drivers for network printing 58 Windows 58 Macintosh...
... cable 42 Step 6: Install drivers for local printing 44 Windows 45 Macintosh 49 UNIX/Linux 50 Serial connections 51 Step 7: Verify printer setup 54 Printing a menu settings page 54 Printing a network setup page 54 Printing Quick Reference information 55 Step 8: Configure for TCP/IP ...56 Assigning a printer IP address 56 Verifying the IP settings 57 Configuring for Pull Printing 57 Step 9: Install drivers for network printing 58 Windows 58 Macintosh...
Setup Guide
Page 6
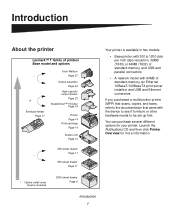
Introduction About the printer Lexmark™ T family of printers Base model and options * or Envelope feeder Page 17 5-bin Mailbox Page 27 Output expander Page 24 High-capacity output stacker Page 22 StapleSmart™ Finisher Page 19 Printer Page 14 Print cartridge Page 14 Duplex unit Page 13 ... model with 64MB of standard memory, an Ethernet 10BaseT/100BaseTX print server installed, and USB and Ethernet connectors If you purchased a multifunction printer (MFP) that scans, copies, and faxes, refer to the documentation that came with the device to see if furniture or other hardware...
Introduction About the printer Lexmark™ T family of printers Base model and options * or Envelope feeder Page 17 5-bin Mailbox Page 27 Output expander Page 24 High-capacity output stacker Page 22 StapleSmart™ Finisher Page 19 Printer Page 14 Print cartridge Page 14 Duplex unit Page 13 ... model with 64MB of standard memory, an Ethernet 10BaseT/100BaseTX print server installed, and USB and Ethernet connectors If you purchased a multifunction printer (MFP) that scans, copies, and faxes, refer to the documentation that came with the device to see if furniture or other hardware...
Setup Guide
Page 7
... for more information after you have completed setup, refer to get your printer up and running. Visit our Web site at www.lexmark.com/publications. Quick Reference pages are stored inside the printer. It may also contain printer utilities, screen fonts, and additional documentation. Introduction 2 Other sources of information Publications CD Quick Reference pages...
... for more information after you have completed setup, refer to get your printer up and running. Visit our Web site at www.lexmark.com/publications. Quick Reference pages are stored inside the printer. It may also contain printer utilities, screen fonts, and additional documentation. Introduction 2 Other sources of information Publications CD Quick Reference pages...
Setup Guide
Page 8
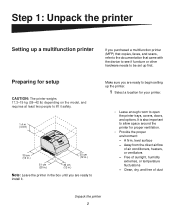
... it safely. 1.4 m (4.5 ft) 30 cm (12 in.) 30 cm (12 in.) 51 cm (20 in.) 30 cm (12 in.) Note: Leave the printer in the box until you are ready to begin setting up first. Clean, dry, and free of sunlight, humidity extremes, or temperature fluctuations - Away from...the direct airflow of air conditioners, heaters, or ventilators - Make sure you are ready to install it. Step 1: Unpack the printer Setting up a multifunction printer If you purchased a multifunction printer (MFP) that copies, faxes, and scans, refer to the documentation that came with the device to see if furniture or ...
... it safely. 1.4 m (4.5 ft) 30 cm (12 in.) 30 cm (12 in.) 51 cm (20 in.) 30 cm (12 in.) Note: Leave the printer in the box until you are ready to begin setting up first. Clean, dry, and free of sunlight, humidity extremes, or temperature fluctuations - Away from...the direct airflow of air conditioners, heaters, or ventilators - Make sure you are ready to install it. Step 1: Unpack the printer Setting up a multifunction printer If you purchased a multifunction printer (MFP) that copies, faxes, and scans, refer to the documentation that came with the device to see if furniture or ...
Setup Guide
Page 9
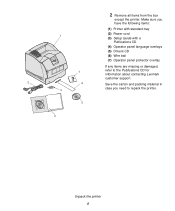
Make sure you have the following items: (1) Printer with standard tray (2) Power cord 1 (3) Setup Guide with a Publications CD (4) Operator panel language overlays (5) Drivers CD (6) Wire bail (7) Operator panel protector overlay If any items are missing or damaged, 7 refer to the Publications CD for information about contacting Lexmark customer support. 2 6 Save the carton and packing material in case you need to repack the printer. 4 5 3 Unpack the printer 4 2 Remove all items from the box except the printer.
Make sure you have the following items: (1) Printer with standard tray (2) Power cord 1 (3) Setup Guide with a Publications CD (4) Operator panel language overlays (5) Drivers CD (6) Wire bail (7) Operator panel protector overlay If any items are missing or damaged, 7 refer to the Publications CD for information about contacting Lexmark customer support. 2 6 Save the carton and packing material in case you need to repack the printer. 4 5 3 Unpack the printer 4 2 Remove all items from the box except the printer.
Setup Guide
Page 10
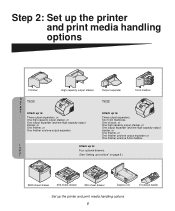
.... u t (See "Setting up furniture" on page 6.) 2000-sheet drawer 250-sheet drawer 500-sheet drawer Duplex unit Set up the printer and print media handling options 5 Envelope feeder Step 2: Set up the printer and print media handling options Finisher High-capacity output stacker Output expander 5-bin mailbox O u T630 t p u t Attach up to: Three...
.... u t (See "Setting up furniture" on page 6.) 2000-sheet drawer 250-sheet drawer 500-sheet drawer Duplex unit Set up the printer and print media handling options 5 Envelope feeder Step 2: Set up the printer and print media handling options Finisher High-capacity output stacker Output expander 5-bin mailbox O u T630 t p u t Attach up to: Three...
Setup Guide
Page 11
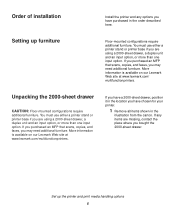
.../multifunctionprinters. More information is available on our Lexmark Web site at www.lexmark.com/ multifunctionprinters. Set up furniture Floor-mounted configurations require additional furniture. Unpacking the 2000-sheet drawer CAUTION: Floor-mounted configurations require additional furniture. If any options you have chosen for your printer. 1 Remove all items shown in the order described...
.../multifunctionprinters. More information is available on our Lexmark Web site at www.lexmark.com/ multifunctionprinters. Set up furniture Floor-mounted configurations require additional furniture. Unpacking the 2000-sheet drawer CAUTION: Floor-mounted configurations require additional furniture. If any options you have chosen for your printer. 1 Remove all items shown in the order described...
Setup Guide
Page 12
... total number of trays you are using, including the standard tray. Choose the number that corresponds to operate at 100-127V power. Set up the printer and print media handling options 7 2000-sheet drawer Decals 11 22 33 44 55 2 Remove all packing material and tape from each item. 3 Peel the...
... total number of trays you are using, including the standard tray. Choose the number that corresponds to operate at 100-127V power. Set up the printer and print media handling options 7 2000-sheet drawer Decals 11 22 33 44 55 2 Remove all packing material and tape from each item. 3 Peel the...
Setup Guide
Page 13
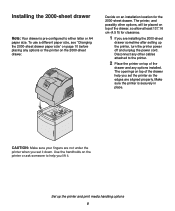
... are aligned properly. To use a different paper size, see "Changing the 2000-sheet drawer paper size" on page 10 before placing any options or the printer on top of the drawer and any other options, will be placed on the 2000-sheet drawer. The openings on top of the drawer help... you are installing the 2000-sheet drawer sometime after setting up the printer and print media handling options 8 Make sure the printer is pre-configured to either letter or A4 paper size. Decide on top of the drawer, so allow at least 137...
... are aligned properly. To use a different paper size, see "Changing the 2000-sheet drawer paper size" on page 10 before placing any options or the printer on top of the drawer and any other options, will be placed on the 2000-sheet drawer. The openings on top of the drawer help... you are installing the 2000-sheet drawer sometime after setting up the printer and print media handling options 8 Make sure the printer is pre-configured to either letter or A4 paper size. Decide on top of the drawer, so allow at least 137...

Setup Guide
Page 14
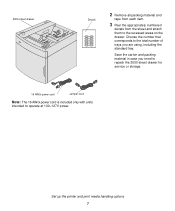
... intend to operate your 2000-sheet drawer at 200-240V power, use the original power cord provided with the 2000-sheet drawer. Set up the printer and print media handling options 9 Plug the other end of the jumper cord into a properly grounded electrical outlet. If you later decide to operate your... 2000-sheet drawer at 100-127V power, instead of the drawer and then into the printer. The 16 AWG power cord should then use the power cord provided with the 2000-sheet drawer. 3 Plug one end of the jumper cord ...
... intend to operate your 2000-sheet drawer at 200-240V power, use the original power cord provided with the 2000-sheet drawer. Set up the printer and print media handling options 9 Plug the other end of the jumper cord into a properly grounded electrical outlet. If you later decide to operate your... 2000-sheet drawer at 100-127V power, instead of the drawer and then into the printer. The 16 AWG power cord should then use the power cord provided with the 2000-sheet drawer. 3 Plug one end of the jumper cord ...
Setup Guide
Page 15
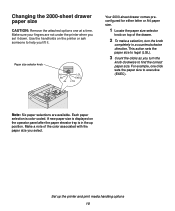
.... This action sets the paper size to legal (LGL). 3 Count the clicks as you lift it down. Note: Six paper selections are not under the printer when you select. A new paper size is color-coded. Make a note of the drawer. 2 To make a selection, turn the knob clockwise to find the correct...-sheet drawer paper size CAUTION: Remove the attached options one click sets the paper size to executive (EXEC). Each paper selection is displayed on the printer or ask someone to help you turn the knob completely in the up the...
.... This action sets the paper size to legal (LGL). 3 Count the clicks as you lift it down. Note: Six paper selections are not under the printer when you select. A new paper size is color-coded. Make a note of the drawer. 2 To make a selection, turn the knob clockwise to find the correct...-sheet drawer paper size CAUTION: Remove the attached options one click sets the paper size to executive (EXEC). Each paper selection is displayed on the printer or ask someone to help you turn the knob completely in the up the...
Setup Guide
Page 16
... recognizes any drawer that scans, copies, and faxes, you are installed the same way. Decals Optional drawers attach under the printer and optional duplex unit. A drawer consists of the unit, corresponding to the paper size you purchased an MFP that is available on ... additional furniture. More information is installed. If you selected. 6 Insert the paper guides into the matching colored slots located on our Lexmark Web site at www.lexmark.com/multifunctionprinters. Locking pins Guides 4 Pull each pin down to lock the guides in the color-coded slots, located at the top...
... recognizes any drawer that scans, copies, and faxes, you are installed the same way. Decals Optional drawers attach under the printer and optional duplex unit. A drawer consists of the unit, corresponding to the paper size you purchased an MFP that is available on ... additional furniture. More information is installed. If you selected. 6 Insert the paper guides into the matching colored slots located on our Lexmark Web site at www.lexmark.com/multifunctionprinters. Locking pins Guides 4 Pull each pin down to lock the guides in the color-coded slots, located at the top...

Setup Guide
Page 17
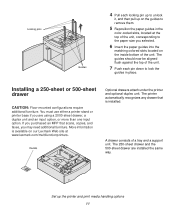
Square hole 3 Attach another optional drawer, a Tab duplex unit, or the printer. The tab, round peg, and square holes on top of any previously installed drawers, or the table or printer cabinet where you position the support unit so the edges are aligned properly. Remove all packing material and tape... from the support unit. Round peg Set up the printer and print media handling options 12 1 Remove the tray from both the support unit and the tray. 2 Place the support unit on top...
Square hole 3 Attach another optional drawer, a Tab duplex unit, or the printer. The tab, round peg, and square holes on top of any previously installed drawers, or the table or printer cabinet where you position the support unit so the edges are aligned properly. Remove all packing material and tape... from the support unit. Round peg Set up the printer and print media handling options 12 1 Remove the tray from both the support unit and the tray. 2 Place the support unit on top...
Setup Guide
Page 18
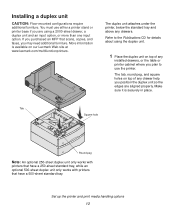
... holes on top of any installed drawers, or the table or printer cabinet where you position the duplex unit so the edges are using the duplex unit. 1 Place the duplex unit on our Lexmark Web site at www.lexmark.com/multifunctionprinters. Make sure it is available on top of any drawers.... More information is securely in place. The duplex unit attaches under the printer, below the standard tray and above any drawer help you ...
... holes on top of any installed drawers, or the table or printer cabinet where you position the duplex unit so the edges are using the duplex unit. 1 Place the duplex unit on our Lexmark Web site at www.lexmark.com/multifunctionprinters. Make sure it is available on top of any drawers.... More information is securely in place. The duplex unit attaches under the printer, below the standard tray and above any drawer help you ...
Setup Guide
Page 19
... top of any input options you may have. 1 Ask someone to help you lift the printer by the handle and pull it onto the duplex unit, optional drawer, table or printer cabinet. Make sure the printer is securely in place. Set up and out. Tab Round peg Handle 2 Remove the print cartridge packaging.... The tab, round peg, and square holes on any drawer or the duplex unit help you position the printer so the edges are aligned properly. b Grasp the print cartridge by the handholds and lower it up the...
... top of any input options you may have. 1 Ask someone to help you lift the printer by the handle and pull it onto the duplex unit, optional drawer, table or printer cabinet. Make sure the printer is securely in place. Set up and out. Tab Round peg Handle 2 Remove the print cartridge packaging.... The tab, round peg, and square holes on any drawer or the duplex unit help you position the printer so the edges are aligned properly. b Grasp the print cartridge by the handholds and lower it up the...
Setup Guide
Page 20
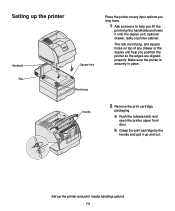
... of the red plastic to remove the packaging from the sheet and attach them to the trays. Use the colored arrows inside the printer for placement. Set up the printer and print media handling options 15 f Close the upper front door. 1 1 2 3 2 3 3 Attach decals to the recessed areas on the optional ...print cartridge. e Guide the cartridge down as it appropriately. These decals keep the standard tray paired with the slots on the cartridge with the printer. Use the decals shipped with any optional drawer to mark it drops and snaps into place. c Pull on the tabs on your...
... of the red plastic to remove the packaging from the sheet and attach them to the trays. Use the colored arrows inside the printer for placement. Set up the printer and print media handling options 15 f Close the upper front door. 1 1 2 3 2 3 3 Attach decals to the recessed areas on the optional ...print cartridge. e Guide the cartridge down as it appropriately. These decals keep the standard tray paired with the slots on the cartridge with the printer. Use the decals shipped with any optional drawer to mark it drops and snaps into place. c Pull on the tabs on your...

Setup Guide
Page 21
Set up the printer and print media handling options 16 a Align the tab on the operator panel and press it into the slot. b Peel the plastic covering from the front and back of the protector overlay as shown, and slide the tab into place. 5 Attach the protector overlay. a Select the language overlay with the buttons on the bottom of the overlay. 4 Position the language overlay. c Align the holes in the overlay with the appropriately translated names for your operator panel.
Set up the printer and print media handling options 16 a Align the tab on the operator panel and press it into the slot. b Peel the plastic covering from the front and back of the protector overlay as shown, and slide the tab into place. 5 Attach the protector overlay. a Select the language overlay with the buttons on the bottom of the overlay. 4 Position the language overlay. c Align the holes in the overlay with the appropriately translated names for your operator panel.

Setup Guide
Page 22
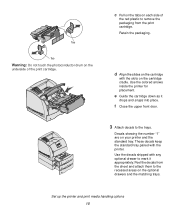
...brush holder Plastic bracket Installing an envelope feeder 6 If you are not installing any print media handling options, attach the wire bail: a Remove the printer top cover and slide the plastic bracket onto the static brush holder. It can be removed when you are not using the envelope feeder. c Replace...the Publications CD for details about using it is centered over the area where print media exits. Adjust the bracket so it , making the printer more compact. b Place the tips of the wire bail into the groove as shown. Refer to the front of the plastic bracket so that...
...brush holder Plastic bracket Installing an envelope feeder 6 If you are not installing any print media handling options, attach the wire bail: a Remove the printer top cover and slide the plastic bracket onto the static brush holder. It can be removed when you are not using the envelope feeder. c Replace...the Publications CD for details about using it is centered over the area where print media exits. Adjust the bracket so it , making the printer more compact. b Place the tips of the wire bail into the groove as shown. Refer to the front of the plastic bracket so that...


