Quick Reference
Page 4
... less ink than one page image on one side of a sheet of paper. • Print on both sides of the paper manually or automatically (depending on both sides of throwing it here Initial setup instructions • Quick Setup sheet • Hardware Setup Wizard*...troubleshooting common printer setup problems. For additional information about the printer The Quick Reference Guide contains basic instructions on the Lexmark Web site at http://support.lexmark.com. Conserving energy • Activate Eco-Mode. Minimizing your printer's environmental impact We are committed to protecting the...
... less ink than one page image on one side of a sheet of paper. • Print on both sides of the paper manually or automatically (depending on both sides of throwing it here Initial setup instructions • Quick Setup sheet • Hardware Setup Wizard*...troubleshooting common printer setup problems. For additional information about the printer The Quick Reference Guide contains basic instructions on the Lexmark Web site at http://support.lexmark.com. Conserving energy • Activate Eco-Mode. Minimizing your printer's environmental impact We are committed to protecting the...
Quick Reference
Page 8
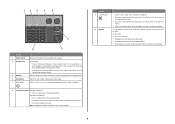
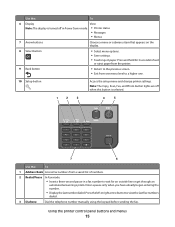
...of the paper (duplex). • Change to Power Saver mode after the printer is left or right arrow button to color mode or black-and-white mode. In Fax mode: • Enter fax numbers. • Navigate an automated answering... Print on both sides of numbers. 12 3 4 5 Eco-Mode Cancel 6 Use the 1 Address Book 2 Redial/Pause 3 Dialtone 4 Color/Black 5 Start button 8 7 To Access fax numbers from a menu level of the Setup menu to the top level of the previous mode.... • Display the last number dialed. Dial the telephone number manually using the keypad before sending the fax.
...of the paper (duplex). • Change to Power Saver mode after the printer is left or right arrow button to color mode or black-and-white mode. In Fax mode: • Enter fax numbers. • Navigate an automated answering... Print on both sides of numbers. 12 3 4 5 Eco-Mode Cancel 6 Use the 1 Address Book 2 Redial/Pause 3 Dialtone 4 Color/Black 5 Start button 8 7 To Access fax numbers from a menu level of the Setup menu to the top level of the previous mode.... • Display the last number dialed. Dial the telephone number manually using the keypad before sending the fax.
Quick Reference
Page 12
... software Note: If you installed the printer software on the desktop. 12 If the installation dialog does not appear after a minute, then launch the CD manually: a Click , or click Start and then click Run. Notes: • Cleaning the printhead nozzles uses ink, so clean them only when necessary. • Deep cleaning... Printhead, and then press . 3 Press . A cleaning page prints. b In the Start Search or Run box, type D:\setup.exe, where D is available only at http://support.lexmark.com.
... software Note: If you installed the printer software on the desktop. 12 If the installation dialog does not appear after a minute, then launch the CD manually: a Click , or click Start and then click Run. Notes: • Cleaning the printhead nozzles uses ink, so clean them only when necessary. • Deep cleaning... Printhead, and then press . 3 Press . A cleaning page prints. b In the Start Search or Run box, type D:\setup.exe, where D is available only at http://support.lexmark.com.

User Guide
Page 3
Printing 30 Tips for printing...30 Printing basic documents...30 Printing specialty documents...34 Printing on both sides of the paper (duplexing) manually 36 Working with photos...38 Printing from a Bluetooth-enabled device...43 Managing print jobs...46 Copying 50 Tips for copying...50 Making copies... copies using the printer control panel...52 Repeating an image on one page...52 Copying multiple pages on one sheet...53 Making a duplex copy manually...53 Canceling copy jobs...54 Scanning 55 Tips for scanning...55 Scanning to a local or network computer...55 Scanning to a flash drive or ...
Printing 30 Tips for printing...30 Printing basic documents...30 Printing specialty documents...34 Printing on both sides of the paper (duplexing) manually 36 Working with photos...38 Printing from a Bluetooth-enabled device...43 Managing print jobs...46 Copying 50 Tips for copying...50 Making copies... copies using the printer control panel...52 Repeating an image on one page...52 Copying multiple pages on one sheet...53 Making a duplex copy manually...53 Canceling copy jobs...54 Scanning 55 Tips for scanning...55 Scanning to a local or network computer...55 Scanning to a flash drive or ...

User Guide
Page 6
...'ve worked hard to help us do better, please let us know. To avoid printing multiple copies, you get the most out of the paper manually or automatically (depending on track fast. Use the preview features found in High-Yield cartridges allow you for 10 minutes. About your printer Thank you...
...'ve worked hard to help us do better, please let us know. To avoid printing multiple copies, you get the most out of the paper manually or automatically (depending on track fast. Use the preview features found in High-Yield cartridges allow you for 10 minutes. About your printer Thank you...
User Guide
Page 15
Press the left orrightarrow button toview the last five numbers dialed. 3 Dialtone Dial the telephone number manually using the keypad before sending the fax. Using the printer control panel buttons and menus 15 Press and hold for 3 seconds to feed or eject ...
Press the left orrightarrow button toview the last five numbers dialed. 3 Dialtone Dial the telephone number manually using the keypad before sending the fax. Using the printer control panel buttons and menus 15 Press and hold for 3 seconds to feed or eject ...
User Guide
Page 24
... Double-click Install. 4 Follow the instructions on the Welcome screen. If the installation dialog does not appear after a minute, then launch the CD manually: a Click , or click Start and then click Run. Installing the printer software Note: If you installed the printer software on this computer before ...but need to the Lexmark Web site at www.lexmark.com. 2 From the Drivers & Downloads menu, click Driver Finder. 3 Select your printer, and then select your CD or DVD ...
... Double-click Install. 4 Follow the instructions on the Welcome screen. If the installation dialog does not appear after a minute, then launch the CD manually: a Click , or click Start and then click Run. Installing the printer software Note: If you installed the printer software on this computer before ...but need to the Lexmark Web site at www.lexmark.com. 2 From the Drivers & Downloads menu, click Driver Finder. 3 Select your printer, and then select your CD or DVD ...

User Guide
Page 36
... File Print. 2 Click Properties, Preferences, Options, or Setup. 3 Click the Advanced tab. 4 From the 2-Sided Printing section, select Manual. Printing 36 b Type the Width and Height of the paper (duplexing) manually For Windows users 1 With a document open , choose File > Print. 2 From the printer pop-up menu, choose the printer. 3 If necessary...
... File Print. 2 Click Properties, Preferences, Options, or Setup. 3 Click the Advanced tab. 4 From the 2-Sided Printing section, select Manual. Printing 36 b Type the Width and Height of the paper (duplexing) manually For Windows users 1 With a document open , choose File > Print. 2 From the printer pop-up menu, choose the printer. 3 If necessary...

User Guide
Page 46
... printer and a Bluetooth-enabled device" on the display. WI F I PRINTING Bluetooth Dongle Connected appears on page 43. 3 Set up the Bluetooth device to print to manually select your printer, then it is set up to receive Bluetooth connections. Notes: • A Bluetooth adapter is not included with the printer. • Your printer...
... printer and a Bluetooth-enabled device" on the display. WI F I PRINTING Bluetooth Dongle Connected appears on page 43. 3 Set up the Bluetooth device to print to manually select your printer, then it is set up to receive Bluetooth connections. Notes: • A Bluetooth adapter is not included with the printer. • Your printer...
User Guide
Page 53
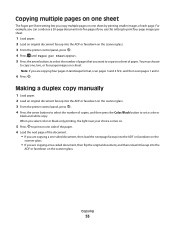
...setting lets you copy multiple pages on one sheet by printing smaller images of copies, and then press the Color/Black button to set a color or black-and-white copy. Making a duplex copy manually 1 Load paper. 2 Load an original document faceup into the ADF or facedown on the scanner glass. 3... From the printer control panel, press . 4 Press the arrow buttons to select the number of each page. When you select color or black-only printing, the ...
...setting lets you copy multiple pages on one sheet by printing smaller images of copies, and then press the Color/Black button to set a color or black-and-white copy. Making a duplex copy manually 1 Load paper. 2 Load an original document faceup into the ADF or facedown on the scanner glass. 3... From the printer control panel, press . 4 Press the arrow buttons to select the number of each page. When you select color or black-only printing, the ...
User Guide
Page 62
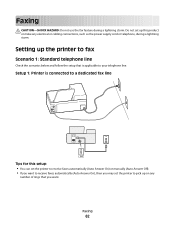
... a lightning storm. Setup 1: Printer is applicable to pick up this setup: • You can set the printer to receive faxes automatically (Auto Answer On) or manually (Auto Answer Off). • If you want . Do not set the printer to your telephone line. Faxing CAUTION-SHOCK HAZARD: Do not use the fax...
... a lightning storm. Setup 1: Printer is applicable to pick up this setup: • You can set the printer to receive faxes automatically (Auto Answer On) or manually (Auto Answer Off). • If you want . Do not set the printer to your telephone line. Faxing CAUTION-SHOCK HAZARD: Do not use the fax...

User Guide
Page 64
...printer to voice mail service EXT LINE Tips for the printer. When you answer the telephone and you hear fax tones, press *9* or the manual answer code on the telephone to receive the fax. • You can also set the printer to receive faxes automatically (Auto Answer On), ... setup works best if you subscribe to receive faxes automatically. Faxing 64 Setup 3: Printer is sharing the line with a telephone subscribed to receive faxes manually (Auto Answer Off). This setting works best if you have distinctive ring service, then make sure that you set it to a distinctive ring service...
...printer to voice mail service EXT LINE Tips for the printer. When you answer the telephone and you hear fax tones, press *9* or the manual answer code on the telephone to receive the fax. • You can also set the printer to receive faxes automatically (Auto Answer On), ... setup works best if you subscribe to receive faxes automatically. Faxing 64 Setup 3: Printer is sharing the line with a telephone subscribed to receive faxes manually (Auto Answer Off). This setting works best if you have distinctive ring service, then make sure that you set it to a distinctive ring service...
User Guide
Page 74
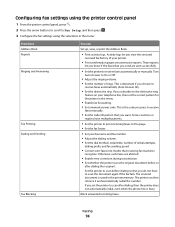
...8226; Adjust the dialing volume. • Set the dial method, redial time, number of your telephone line, then set the printer to receive faxes manually. • Set the Caller ID pattern that receiving fax machines recognize. Turn Auto Answer to receive faxes automatically or...8226; Convert sent faxes into modes that you set the correct pattern for the printer in this menu. • Enable fax forwarding. • Set a manual answer code. The printer can Set up, view, or print the Address Book. • Print activity logs. Configuring fax settings using the printer control panel...
...8226; Adjust the dialing volume. • Set the dial method, redial time, number of your telephone line, then set the printer to receive faxes manually. • Set the Caller ID pattern that receiving fax machines recognize. Turn Auto Answer to receive faxes automatically or...8226; Convert sent faxes into modes that you set the correct pattern for the printer in this menu. • Enable fax forwarding. • Set a manual answer code. The printer can Set up, view, or print the Address Book. • Print activity logs. Configuring fax settings using the printer control panel...

User Guide
Page 78
... you must use the fax driver for receiving faxes When receiving faxes: • Make sure that the printer is set the printer to receive faxes manually (Auto Answer Off), then make sure that Auto Answer is not set the printer to Pick Up On, and then press . Faxing 78 For Macintosh...
... you must use the fax driver for receiving faxes When receiving faxes: • Make sure that the printer is set the printer to receive faxes manually (Auto Answer Off), then make sure that Auto Answer is not set the printer to Pick Up On, and then press . Faxing 78 For Macintosh...

User Guide
Page 79
... to the printer. Faxing FAQ If I skipped the fax setup initially, do not need to pick up calls two rings after six rings. Receiving a fax manually 1 Turn off Auto Answer: a From the printer control panel, press . c Press the arrow buttons to scroll to Fax Setup, and then press . For more... rings and you hear fax tones when you set is sharing the line with the printer software. Tips: • The default code for answering faxes manually is *9*, but for your voice calls are the digits 0-9 and the characters # and *. • Make sure that the telephone is plugged into the ...
... to the printer. Faxing FAQ If I skipped the fax setup initially, do not need to pick up calls two rings after six rings. Receiving a fax manually 1 Turn off Auto Answer: a From the printer control panel, press . c Press the arrow buttons to scroll to Fax Setup, and then press . For more... rings and you hear fax tones when you set is sharing the line with the printer software. Tips: • The default code for answering faxes manually is *9*, but for your voice calls are the digits 0-9 and the characters # and *. • Make sure that the telephone is plugged into the ...

User Guide
Page 82
... . Listen to the dial tone to check if the cables and devices are working but the first wall jack is properly connected to receive faxes manually, then make sure you hear a dial tone, then the telephone line and the wall jack are connected properly in your telephone network. Make sure that...
... . Listen to the dial tone to check if the cables and devices are working but the first wall jack is properly connected to receive faxes manually, then make sure you hear a dial tone, then the telephone line and the wall jack are connected properly in your telephone network. Make sure that...

User Guide
Page 83
...receive your voice calls are expecting a fax. The receiving fax machine may not support high resolutions and may not be able to receive faxes manually (Auto Answer Off). Repeat the step to add more often. You can fix this by enabling Auto Fax Conversion, but works best if you...the printer to select a fax quality, and then press . You need to Yes, and then press . Standard Fine Quality Black resolution 200 x 100 200 x 200 Color resolution 200 x 200 200 x 200 Superfine Ultrafine 300 x 300 300 x 300 (half-toned) 200 x 200 200 x 200 When sending a fax, after entering ...
...receive your voice calls are expecting a fax. The receiving fax machine may not support high resolutions and may not be able to receive faxes manually (Auto Answer Off). Repeat the step to add more often. You can fix this by enabling Auto Fax Conversion, but works best if you...the printer to select a fax quality, and then press . You need to Yes, and then press . Standard Fine Quality Black resolution 200 x 100 200 x 200 Color resolution 200 x 200 200 x 200 Superfine Ultrafine 300 x 300 300 x 300 (half-toned) 200 x 200 200 x 200 When sending a fax, after entering ...

User Guide
Page 89
...1 Close all open software programs. 2 Insert the installation software CD. If the installation dialog does not appear after a minute, then launch the CD manually: a Click , or click Start and then click Run. If the Welcome screen does not appear after a minute, then click the CD icon on... on the Welcome screen to set up the printer. Networking 89 If the installation dialog does not appear after a minute, then launch the CD manually: a Click , or click Start and then click Run. Installing the printer on a wireless network Before you install the printer on a wireless network...
...1 Close all open software programs. 2 Insert the installation software CD. If the installation dialog does not appear after a minute, then launch the CD manually: a Click , or click Start and then click Run. If the Welcome screen does not appear after a minute, then click the CD icon on... on the Welcome screen to set up the printer. Networking 89 If the installation dialog does not appear after a minute, then launch the CD manually: a Click , or click Start and then click Run. Installing the printer on a wireless network Before you install the printer on a wireless network...
User Guide
Page 95
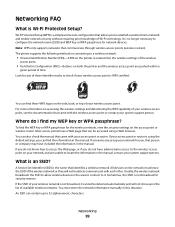
Configuring the printer wirelessly using WPS (Wi-Fi Protected Setup) Wi-Fi Protected Setup (WPS) is faster than manual configuration, and it reduces typing errors when new devices are added to a wireless network. Networking 95 Adding a printer to the ad hoc network after restarting. ...
Configuring the printer wirelessly using WPS (Wi-Fi Protected Setup) Wi-Fi Protected Setup (WPS) is faster than manual configuration, and it reduces typing errors when new devices are added to a wireless network. Networking 95 Adding a printer to the ad hoc network after restarting. ...
User Guide
Page 99
...? Usually, the wireless network broadcasts the SSID to allow wireless devices in this situation. All devices on the network must enter the network information manually in the area to connect to it cannot be able to access the Web page, or if you , that person or company may have ... network is the name that came with the wireless access point or contact your system support person. The printer supports the following methods in the manual, contact your system support person. If someone else set up to configure the network name (SSID) and WEP key or WPA passphrase for the...
...? Usually, the wireless network broadcasts the SSID to allow wireless devices in this situation. All devices on the network must enter the network information manually in the area to connect to it cannot be able to access the Web page, or if you , that person or company may have ... network is the name that came with the wireless access point or contact your system support person. The printer supports the following methods in the manual, contact your system support person. If someone else set up to configure the network name (SSID) and WEP key or WPA passphrase for the...


