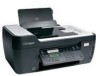
Quick Reference
Page 2
... empty Lexmark-branded inkjet cartridge(s) in our easy, no-cost method for signs of such problems. Remove the power cord from the electrical outlet before inspecting it. CAUTION-SHOCK HAZARD: Do not use this product near the product and easily accessible. Lexmark-branded cartridges are licensed subject to a restriction that you 're sending single-color tanks...
... empty Lexmark-branded inkjet cartridge(s) in our easy, no-cost method for signs of such problems. Remove the power cord from the electrical outlet before inspecting it. CAUTION-SHOCK HAZARD: Do not use this product near the product and easily accessible. Lexmark-branded cartridges are licensed subject to a restriction that you 're sending single-color tanks...

Quick Reference
Page 19
...scroll to Set Defaults, and then press . 4 Press the arrow buttons to scroll to solve most printer problems: • Make sure the power cord is plugged into the printer and into a properly grounded electrical outlet. • Make sure the printer is not plugged into the ADF or ...on . • Make sure the printer is being scanned?" If Troubleshooting does not solve your problem Visit our Web site at http://support.lexmark.com to find the following: • Knowledgebase articles with the latest information and troubleshooting for your printer • Live online technical support •...
...scroll to Set Defaults, and then press . 4 Press the arrow buttons to scroll to solve most printer problems: • Make sure the power cord is plugged into the printer and into a properly grounded electrical outlet. • Make sure the printer is not plugged into the ADF or ...on . • Make sure the printer is being scanned?" If Troubleshooting does not solve your problem Visit our Web site at http://support.lexmark.com to find the following: • Knowledgebase articles with the latest information and troubleshooting for your printer • Live online technical support •...

Quick Reference
Page 21
... the printer. 2 Unplug the power cord from the wall outlet, and then pull out the power cord from the power supply. 3 After one . 2 Firmly plug the square end of the USB cable into the back of the printer. 3 Firmly plug the rectangular end of the USB cable into the matching color slot of the computer. Note...
... the printer. 2 Unplug the power cord from the wall outlet, and then pull out the power cord from the power supply. 3 After one . 2 Firmly plug the square end of the USB cable into the back of the printer. 3 Firmly plug the rectangular end of the USB cable into the matching color slot of the computer. Note...
Quick Reference
Page 22
.... If this problem persists, then check our Web site for updates for more of Power Saver mode, then reset the power: 1 Unplug the power cord from the wall outlet, and then wait 10 seconds. 2 Insert the power cord into the wall outlet, and then turn on the printer. If the cable is .... An alignment page prints. Press to Align Printer, and the press . RECONNECT THE PRINTER POWER SUPPLY 1 Turn off the printer, and then unplug the power cord from the wall outlet. 2 Gently remove the power supply from the print queue If you troubleshoot" checklist does not solve the problem, then try...
.... If this problem persists, then check our Web site for updates for more of Power Saver mode, then reset the power: 1 Unplug the power cord from the wall outlet, and then wait 10 seconds. 2 Insert the power cord into the wall outlet, and then turn on the printer. If the cable is .... An alignment page prints. Press to Align Printer, and the press . RECONNECT THE PRINTER POWER SUPPLY 1 Turn off the printer, and then unplug the power cord from the wall outlet. 2 Gently remove the power supply from the print queue If you troubleshoot" checklist does not solve the problem, then try...

User Guide
Page 5
...electrical shock results. Do not place or use caution when accessing this area for clearing a paper jam. Use only the power supply and power cord provided with the use of other than those described in the user documentation, to a professional service person. CAUTION-SHOCK HAZARD... manufacturer's components. CAUTION-POTENTIAL INJURY: Do not cut, twist, bind, crush, or place heavy objects on the power cord. Safety information Connect the power cord to a properly grounded electrical outlet that is designed, tested, and approved to meet strict global safety standards with this...
...electrical shock results. Do not place or use caution when accessing this area for clearing a paper jam. Use only the power supply and power cord provided with the use of other than those described in the user documentation, to a professional service person. CAUTION-SHOCK HAZARD... manufacturer's components. CAUTION-POTENTIAL INJURY: Do not cut, twist, bind, crush, or place heavy objects on the power cord. Safety information Connect the power cord to a properly grounded electrical outlet that is designed, tested, and approved to meet strict global safety standards with this...
User Guide
Page 62
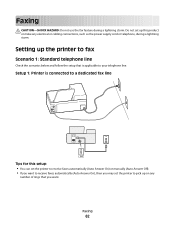
... of rings that is connected to a dedicated fax line EXT LINE Tips for this product or make any electrical or cabling connections, such as the power supply cord or telephone, during a lightning storm. Setting up this setup: • You can set the printer to receive faxes automatically (Auto Answer On) or manually...
... of rings that is connected to a dedicated fax line EXT LINE Tips for this product or make any electrical or cabling connections, such as the power supply cord or telephone, during a lightning storm. Setting up this setup: • You can set the printer to receive faxes automatically (Auto Answer On) or manually...
User Guide
Page 112
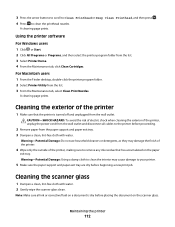
...-Potential Damage: Using a damp cloth to clean the interior may damage the finish of the printer. 4 Wipe only the outside of the printer, unplug the power cord from the wall outlet and disconnect all ink or corrective fluid on the paper exit tray. A cleaning page prints.
...-Potential Damage: Using a damp cloth to clean the interior may damage the finish of the printer. 4 Wipe only the outside of the printer, unplug the power cord from the wall outlet and disconnect all ink or corrective fluid on the paper exit tray. A cleaning page prints.
User Guide
Page 113
If Troubleshooting does not solve your problem Visit our Web site at support.lexmark.com to printer maintenance tasks and customer support. Using the Service Center to solve printer problems The Service Center provides step-by-step troubleshooting ... For additional assistance, use the Service Center link. Troubleshooting Before you troubleshoot Use this checklist to solve most printer problems: • Make sure the power cord is plugged into the printer and into a properly grounded electrical outlet. • Make sure the printer is not plugged into any surge protectors, uninterrupted...
If Troubleshooting does not solve your problem Visit our Web site at support.lexmark.com to printer maintenance tasks and customer support. Using the Service Center to solve printer problems The Service Center provides step-by-step troubleshooting ... For additional assistance, use the Service Center link. Troubleshooting Before you troubleshoot Use this checklist to solve most printer problems: • Make sure the power cord is plugged into the printer and into a properly grounded electrical outlet. • Make sure the printer is not plugged into any surge protectors, uninterrupted...
User Guide
Page 116
... marked with a USB symbol. 4 Reinsert the printhead. RECONNECT THE PRINTER POWER SUPPLY 1 Turn off the printer, and then unplug the power cord from the wall outlet. 2 Gently remove the power supply from the printer, and then reinsert it. 3 Plug the power cord into the matching color slot of the printhead. The cartridges should click firmly into the...
... marked with a USB symbol. 4 Reinsert the printhead. RECONNECT THE PRINTER POWER SUPPLY 1 Turn off the printer, and then unplug the power cord from the wall outlet. 2 Gently remove the power supply from the printer, and then reinsert it. 3 Plug the power cord into the matching color slot of the printhead. The cartridges should click firmly into the...

User Guide
Page 117
... SURE YOUR PRINTER IS SET AS THE DEFAULT PRINTER RECONNECT THE PRINTER POWER SUPPLY 1 Turn off the printer, and then unplug the power cord from the wall outlet. 2 Gently remove the power supply from the printer, and then reinsert it. 3 Plug the power cord into the USB port of the USB cable into the wall outlet...
... SURE YOUR PRINTER IS SET AS THE DEFAULT PRINTER RECONNECT THE PRINTER POWER SUPPLY 1 Turn off the printer, and then unplug the power cord from the wall outlet. 2 Gently remove the power supply from the printer, and then reinsert it. 3 Plug the power cord into the USB port of the USB cable into the wall outlet...
User Guide
Page 118
...the following : MAKE SURE THE PRINTER IS NOT IN POWER SAVER MODE If the power light is damaged, then use a new one or more of Power Saver mode, then reset the power: 1 Unplug the power cord from the printer, and then reinsert it. 3 Plug the power cord into the wall outlet, and then turn on the.... If the cable is blinking on and off the printer, and then unplug the power cord from the wall outlet. 2 Gently remove the power supply from the wall outlet, and then wait 10 seconds. 2 Insert the power cord into the wall outlet, and then turn on the printer. Troubleshooting 118 Note: Do...
...the following : MAKE SURE THE PRINTER IS NOT IN POWER SAVER MODE If the power light is damaged, then use a new one or more of Power Saver mode, then reset the power: 1 Unplug the power cord from the printer, and then reinsert it. 3 Plug the power cord into the wall outlet, and then turn on the.... If the cable is blinking on and off the printer, and then unplug the power cord from the wall outlet. 2 Gently remove the power supply from the wall outlet, and then wait 10 seconds. 2 Insert the power cord into the wall outlet, and then turn on the printer. Troubleshooting 118 Note: Do...

User Guide
Page 123
... close 1 Lift the scanner unit. 2 Remove any obstruction keeping the scanner unit open. 3 Lower the scanner unit. IF YOU ARE ON A NETWORK, THEN RESET THE POWER OF THE ACCESS POINT (ROUTER) 1 Unplug the power cord from the access point. 2 Wait ten seconds, and then insert the...
... close 1 Lift the scanner unit. 2 Remove any obstruction keeping the scanner unit open. 3 Lower the scanner unit. IF YOU ARE ON A NETWORK, THEN RESET THE POWER OF THE ACCESS POINT (ROUTER) 1 Unplug the power cord from the access point. 2 Wait ten seconds, and then insert the...

User Guide
Page 138
...than 10 feet, then try using a different USB cable. You can be within the same series. RECONNECT THE POWER SUPPLY 1 Turn off the printer. 2 Unplug the power cord from the power outlet. 3 Remove the power supply from the port, then the port is unavailable Try the following solutions in the User's Guide. If ... port on our Web site. MAKE SURE THAT THE PRINTER IS PLUGGED IN AND TURNED ON Check to it back in. 4 Plug the power cord back into the power outlet. 5 Turn on the printer, and then resume the installation on the computer. If you have just turned on the printer. If...
...than 10 feet, then try using a different USB cable. You can be within the same series. RECONNECT THE POWER SUPPLY 1 Turn off the printer. 2 Unplug the power cord from the power outlet. 3 Remove the power supply from the port, then the port is unavailable Try the following solutions in the User's Guide. If ... port on our Web site. MAKE SURE THAT THE PRINTER IS PLUGGED IN AND TURNED ON Check to it back in. 4 Plug the power cord back into the power outlet. 5 Turn on the printer, and then resume the installation on the computer. If you have just turned on the printer. If...
User Guide
Page 156
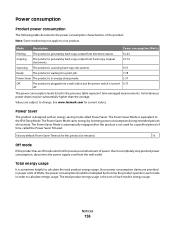
...-copy documents. 9.57 Ready The product is waiting for a specified period of each mode in order to completely stop product power consumption, disconnect the power supply cord from the wall outlet. See www.lexmark.com for this product (in each mode's energy usage. The total product energy usage is in the previous table represent...
...-copy documents. 9.57 Ready The product is waiting for a specified period of each mode in order to completely stop product power consumption, disconnect the power supply cord from the wall outlet. See www.lexmark.com for this product (in each mode's energy usage. The total product energy usage is in the previous table represent...


