Quick Reference
Page 2
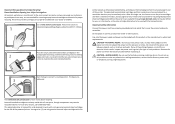
... for returning empty Lexmark cartridges to work with zero waste to Lexmark for signs of the patented printer. After this product or the manufacturer's authorized replacements. Replacement inkjet cartridge(s) sold without these things happen, a risk of this Use only the power supply and power cord provided with ...all new parts, though components may be used only once. CAUTION-POTENTIAL INJURY: Do not cut, twist, bind, crush, or place heavy objects on the power cord. Do not subject the power cord to be refilled by...
... for returning empty Lexmark cartridges to work with zero waste to Lexmark for signs of the patented printer. After this product or the manufacturer's authorized replacements. Replacement inkjet cartridge(s) sold without these things happen, a risk of this Use only the power supply and power cord provided with ...all new parts, though components may be used only once. CAUTION-POTENTIAL INJURY: Do not cut, twist, bind, crush, or place heavy objects on the power cord. Do not subject the power cord to be refilled by...
Quick Reference
Page 12
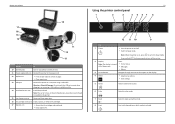
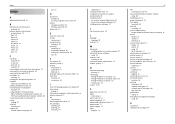
... Scanner unit • Access the ink cartridges and printhead. • Clear paper jams. 12 Using the printer control panel 1 2 3 4 5 67 8 12 11 10 9 Use 1 Power To • Turn the printer on and off in or removing a USB cable or installation cable. 14 Printhead access area Install the printhead. Note: The... printer 10 17 16 15 14 11 12 13 Use the To 10 Scanner glass Scan or copy photos and documents. 11 Power supply with port Connect the printer to the power cord. 12 Duplex unit • Print on both sides of a sheet of paper. • Clear paper jams. 13 USB port...
... Scanner unit • Access the ink cartridges and printhead. • Clear paper jams. 12 Using the printer control panel 1 2 3 4 5 67 8 12 11 10 9 Use 1 Power To • Turn the printer on and off in or removing a USB cable or installation cable. 14 Printhead access area Install the printhead. Note: The... printer 10 17 16 15 14 11 12 13 Use the To 10 Scanner glass Scan or copy photos and documents. 11 Power supply with port Connect the printer to the power cord. 12 Duplex unit • Print on both sides of a sheet of paper. • Clear paper jams. 13 USB port...

Quick Reference
Page 30
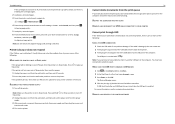
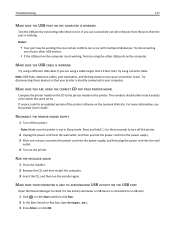
... connected to a defective port. MAKE SURE THE PRINT JOB IS NOT PAUSED MAKE SURE YOUR PRINTER IS SET AS THE DEFAULT PRINTER RECONNECT THE PRINTER POWER SUPPLY 1 Turn off the printer. If the cable is damaged, then use a new one. 2 Firmly plug the square end of the USB cable into the back... either of printers in the Default tab, select your printer, and then click Add. 30 If your printer, and then click Print. RECONNECT THE PRINTER POWER SUPPLY 1 Turn off the printer. If your printer does not appear in the list, then try another USB port on the computer. From the list of...
... connected to a defective port. MAKE SURE THE PRINT JOB IS NOT PAUSED MAKE SURE YOUR PRINTER IS SET AS THE DEFAULT PRINTER RECONNECT THE PRINTER POWER SUPPLY 1 Turn off the printer. If the cable is damaged, then use a new one. 2 Firmly plug the square end of the USB cable into the back... either of printers in the Default tab, select your printer, and then click Add. 30 If your printer, and then click Print. RECONNECT THE PRINTER POWER SUPPLY 1 Turn off the printer. If your printer does not appear in the list, then try another USB port on the computer. From the list of...
Quick Reference
Page 31
... computer documentation. REMOVE AND REINSTALL THE PRINTER SOFTWARE RECONNECT THE PRINTER POWER SUPPLY 1 Turn off slowly, then the printer is damaged, then use a new one minute, reconnect the power cord into the power supply, and then plug the power cord into the wall outlet, and then turn off the printer.... 2 Unplug the power cord from the wall outlet, and then pull out the power cord from the power supply. 3 After one . 2 Firmly plug...
... computer documentation. REMOVE AND REINSTALL THE PRINTER SOFTWARE RECONNECT THE PRINTER POWER SUPPLY 1 Turn off slowly, then the printer is damaged, then use a new one minute, reconnect the power cord into the power supply, and then plug the power cord into the wall outlet, and then turn off the printer.... 2 Unplug the power cord from the wall outlet, and then pull out the power cord from the power supply. 3 After one . 2 Firmly plug...
Quick Reference
Page 37
...bidirectional communication enabling 34 buttons, printer control panel arrow buttons 12 Back 13 Black 12 Cancel 13 Color 12 Eco‑Mode 13 Home 12 Power 12 Select 12 Start 12 C canceling copy job 23 e‑mail 26 print job 21 scan job 25 cannot delete documents from print ... 11 paper guides 11 paper support 11 parts diagram 11 37 PDF creating from scan 25 Personal Identification Number method using 28 PictBridge port 11 power supply port 12 Print dialog launching 18 print job canceling 21 print troubleshooting cannot delete documents from print queue 31 printer features 5 models 5 setting ...
...bidirectional communication enabling 34 buttons, printer control panel arrow buttons 12 Back 13 Black 12 Cancel 13 Color 12 Eco‑Mode 13 Home 12 Power 12 Select 12 Start 12 C canceling copy job 23 e‑mail 26 print job 21 scan job 25 cannot delete documents from print ... 11 paper guides 11 paper support 11 parts diagram 11 37 PDF creating from scan 25 Personal Identification Number method using 28 PictBridge port 11 power supply port 12 Print dialog launching 18 print job canceling 21 print troubleshooting cannot delete documents from print queue 31 printer features 5 models 5 setting ...

User's Guide
Page 5
...Discard used lithium batteries according to abrasion or stress. The manufacturer is a danger of specific manufacturer's components. Inspect the power cord regularly for the use this product or the manufacturer's authorized replacements. SAVE THESE INSTRUCTIONS. There is not responsible for ... all cables from the electrical outlet before proceeding. Do not recharge, disassemble, or incinerate a lithium battery. Use only the power supply and power cord provided with the use the fax feature during a lightning storm. CAUTION-POTENTIAL INJURY: The lithium battery in the user ...
...Discard used lithium batteries according to abrasion or stress. The manufacturer is a danger of specific manufacturer's components. Inspect the power cord regularly for the use this product or the manufacturer's authorized replacements. SAVE THESE INSTRUCTIONS. There is not responsible for ... all cables from the electrical outlet before proceeding. Do not recharge, disassemble, or incinerate a lithium battery. Use only the power supply and power cord provided with the use the fax feature during a lightning storm. CAUTION-POTENTIAL INJURY: The lithium battery in the user ...
User's Guide
Page 11
... feeding. 10 17 16 15 14 11 12 13 Use the To 10 Scanner glass Scan or copy photos and documents. 11 Power supply with port Connect the printer to the power cord. 12 Duplex unit • Print on both sides of a sheet of paper. • Clear paper jams. 13 USB port Connect...
... feeding. 10 17 16 15 14 11 12 13 Use the To 10 Scanner glass Scan or copy photos and documents. 11 Power supply with port Connect the printer to the power cord. 12 Duplex unit • Print on both sides of a sheet of paper. • Clear paper jams. 13 USB port Connect...

User's Guide
Page 96
...: Make sure the printer is marked with . RECONNECT THE PRINTER POWER SUPPLY 1 Turn off the printer. 2 Unplug the power cord from the wall outlet, and then pull out the power cord from the power supply. 3 After one minute, reconnect the power cord into the power supply, and then plug the power cord into the wall outlet. 4 Turn on the computer...
...: Make sure the printer is marked with . RECONNECT THE PRINTER POWER SUPPLY 1 Turn off the printer. 2 Unplug the power cord from the wall outlet, and then pull out the power cord from the power supply. 3 After one minute, reconnect the power cord into the power supply, and then plug the power cord into the wall outlet. 4 Turn on the computer...
User's Guide
Page 97
...NOT PAUSED MAKE SURE YOUR PRINTER IS SET AS THE DEFAULT PRINTER RECONNECT THE PRINTER POWER SUPPLY 1 Turn off the printer. 2 Unplug the power cord from the wall outlet, and then pull out the power cord from the power supply. 3 After one . 2 Firmly plug the square end of the USB cable ... reconnect the USB cable. • For a printer that is damaged, then use a new one minute, reconnect the power cord into the power supply, and then plug the power cord into the USB port of the computer. REMOVE AND REINSTALL THE PRINTER SOFTWARE Troubleshooting 97 SELECT YOUR PRINTER FROM THE PRINT...
...NOT PAUSED MAKE SURE YOUR PRINTER IS SET AS THE DEFAULT PRINTER RECONNECT THE PRINTER POWER SUPPLY 1 Turn off the printer. 2 Unplug the power cord from the wall outlet, and then pull out the power cord from the power supply. 3 After one . 2 Firmly plug the square end of the USB cable ... reconnect the USB cable. • For a printer that is damaged, then use a new one minute, reconnect the power cord into the power supply, and then plug the power cord into the USB port of the computer. REMOVE AND REINSTALL THE PRINTER SOFTWARE Troubleshooting 97 SELECT YOUR PRINTER FROM THE PRINT...
User's Guide
Page 98
... problem persists, then check our Web site for updates for more of Sleep mode, then reset the power: 1 Unplug the power cord from the power supply. 3 After one or more information. RECONNECT THE PRINTER POWER SUPPLY 1 Turn off slowly, then the printer is properly seated, and then try one minute, reconnect the... power cord into the power supply, and then plug the power cord into the wall outlet, and then turn off the printer. 2 Unplug the power cord from the wall outlet, and then pull out the power cord from the wall outlet, and then wait...
... problem persists, then check our Web site for updates for more of Sleep mode, then reset the power: 1 Unplug the power cord from the power supply. 3 After one or more information. RECONNECT THE PRINTER POWER SUPPLY 1 Turn off slowly, then the printer is properly seated, and then try one minute, reconnect the... power cord into the power supply, and then plug the power cord into the wall outlet, and then turn off the printer. 2 Unplug the power cord from the wall outlet, and then pull out the power cord from the wall outlet, and then wait...
User's Guide
Page 117
... Notes: • Your port may cause connection issues. Try disconnecting one minute, reconnect the power cord into the power supply, and then plug the power cord into the wall outlet. 4 Turn on the Lexmark Web site. If you can occur with multiple USB devices. Press and hold for an updated... If unsure, look for three seconds to your printer is not working . RECONNECT THE PRINTER POWER SUPPLY 1 Turn off the printer. 2 Unplug the power cord from the wall outlet, and then pull out the power cord from the port, then the port is working , then try using a different USB ...
... Notes: • Your port may cause connection issues. Try disconnecting one minute, reconnect the power cord into the power supply, and then plug the power cord into the wall outlet. 4 Turn on the Lexmark Web site. If you can occur with multiple USB devices. Press and hold for an updated... If unsure, look for three seconds to your printer is not working . RECONNECT THE PRINTER POWER SUPPLY 1 Turn off the printer. 2 Unplug the power cord from the wall outlet, and then pull out the power cord from the port, then the port is working , then try using a different USB ...

User's Guide
Page 132
...exigences de la norme canadienne relative aux équipements pouvant causer des interférences NMB-003. The authorized representative is: Lexmark International Technology Hungária Kft., 8 Lechner Ödön fasor, Millennium Tower III, 1095 Budapest HUNGARY, A declaration ... Directives is available upon request from the wall outlet. Setting the Power Saver Timeout to completely stop product power consumption, disconnect the power supply cord from the Authorized Representative. Since power consumption claims are provided in each mode's energy usage. Regulatory notices...
...exigences de la norme canadienne relative aux équipements pouvant causer des interférences NMB-003. The authorized representative is: Lexmark International Technology Hungária Kft., 8 Lechner Ödön fasor, Millennium Tower III, 1095 Budapest HUNGARY, A declaration ... Directives is available upon request from the wall outlet. Setting the Power Saver Timeout to completely stop product power consumption, disconnect the power supply cord from the Authorized Representative. Since power consumption claims are provided in each mode's energy usage. Regulatory notices...

User's Guide
Page 140
... with a Windows computer 75 no wireless network 67 noise emission levels 129 notices 128, 129, 130, 131, 132, 133, 134 O ordering paper and other supplies 14 P page does not print 96 page order changing 31 Pages per Side copies 48 paper conserving 6 paper and media envelopes 27 heavyweight matte paper... 10 PictBridge-enabled camera, connecting 37 plain paper 26 poor quality at the edges of page 112 poor scanned image quality 115 postcards 27 power supply port 11 Print dialog launching 21 print job canceling 43 pausing 42 resuming 43 print media greeting cards 27 labels 27 print order changing 31...
... with a Windows computer 75 no wireless network 67 noise emission levels 129 notices 128, 129, 130, 131, 132, 133, 134 O ordering paper and other supplies 14 P page does not print 96 page order changing 31 Pages per Side copies 48 paper conserving 6 paper and media envelopes 27 heavyweight matte paper... 10 PictBridge-enabled camera, connecting 37 plain paper 26 poor quality at the edges of page 112 poor scanned image quality 115 postcards 27 power supply port 11 Print dialog launching 21 print job canceling 43 pausing 42 resuming 43 print media greeting cards 27 labels 27 print order changing 31...


