
Embedded Web Server User's Guide
Page 7
...a solution. For more of the following : Tech Library You can browse our library of manuals, support documentation, drivers, and other countries or regions, visit the Lexmark Web site at http://support.lexmark.com, and then select one or more information, see the label on and connected to ... servers may need to be able to describe the problem you successfully use your problem. For more information, contact your problem. A Lexmark team representative will need to solve your system support person. • Make sure printer IP address is also listed on the network settings...
...a solution. For more of the following : Tech Library You can browse our library of manuals, support documentation, drivers, and other countries or regions, visit the Lexmark Web site at http://support.lexmark.com, and then select one or more information, see the label on and connected to ... servers may need to be able to describe the problem you successfully use your problem. For more information, contact your problem. A Lexmark team representative will need to solve your system support person. • Make sure printer IP address is also listed on the network settings...
Quick Reference
Page 3
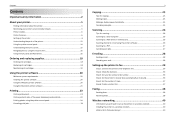
... 29 Step 2: Check the dial tone 36 Step 3: Set your fax name and fax number 36 Step 4: Set the printer to receive faxes automatically or manually 36 Step 5: Set the number of rings 37 Step 6: Create a contact list 37 Faxing 38 Sending faxes...38 Receiving faxes...38 Wireless networking 40 Information...
... 29 Step 2: Check the dial tone 36 Step 3: Set your fax name and fax number 36 Step 4: Set the printer to receive faxes automatically or manually 36 Step 5: Set the number of rings 37 Step 6: Create a contact list 37 Faxing 38 Sending faxes...38 Receiving faxes...38 Wireless networking 40 Information...

Quick Reference
Page 4
Contents 4 Configuring Wi‑Fi Protected Setup manually 41 Using SmartSolutions 42 What is SmartSolutions?...42 Troubleshooting 43 Notices 52 Edition notice...52 Index 53
Contents 4 Configuring Wi‑Fi Protected Setup manually 41 Using SmartSolutions 42 What is SmartSolutions?...42 Troubleshooting 43 Notices 52 Edition notice...52 Index 53
Quick Reference
Page 5
... instructions to request a postage‑paid bag. • Recycle the product packaging. • Recycle your old printer instead of the paper manually or automatically (depending on your printer model). • Preview print jobs before printing. Find it away. • Recycle paper from any printer...). Use the preview features found in a minimum‑power standby mode after the printer has been idle for reuse or recycling through the Lexmark Cartridge Collection Program. To return an ink cartridge, go to : Applications > select your printer folder 2 Double‑click User's Guide....
... instructions to request a postage‑paid bag. • Recycle the product packaging. • Recycle your old printer instead of the paper manually or automatically (depending on your printer model). • Preview print jobs before printing. Find it away. • Recycle paper from any printer...). Use the preview features found in a minimum‑power standby mode after the printer has been idle for reuse or recycling through the Lexmark Cartridge Collection Program. To return an ink cartridge, go to : Applications > select your printer folder 2 Double‑click User's Guide....
Quick Reference
Page 20
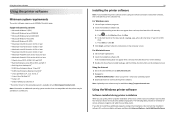
... installed the printer software on the computer screen. If the installation dialog does not appear after a minute, then launch the CD manually: a Click , or click Start and then click Run. Note: Updated printer software may be available on our Web site. ... Insert the installation software CD. For Macintosh users 1 Close all open applications. 2 Insert the installation software CD. You may be available at http://support.lexmark.com. Supported operating systems • Microsoft Windows 7 (SP 1) • Microsoft Windows Server 2008 (R2) • Microsoft Windows Server 2003 (SP2)...
... installed the printer software on the computer screen. If the installation dialog does not appear after a minute, then launch the CD manually: a Click , or click Start and then click Run. Note: Updated printer software may be available on our Web site. ... Insert the installation software CD. For Macintosh users 1 Close all open applications. 2 Insert the installation software CD. You may be available at http://support.lexmark.com. Supported operating systems • Microsoft Windows 7 (SP 1) • Microsoft Windows Server 2008 (R2) • Microsoft Windows Server 2003 (SP2)...

Quick Reference
Page 25
..., small items (such as postcards or photos), transparencies, photo paper, or thin media (such as magazine clippings) into the ADF. Tips for making a duplex copy manually. Making a duplex copy automatically The automatic duplex unit, available only on the scanner glass. If you can press to print one ‑sided document. •...
..., small items (such as postcards or photos), transparencies, photo paper, or thin media (such as magazine clippings) into the ADF. Tips for making a duplex copy manually. Making a duplex copy automatically The automatic duplex unit, available only on the scanner glass. If you can press to print one ‑sided document. •...

Quick Reference
Page 28
... e‑mail, you want to create. 4 Touch an option to enter or select the recipients: • Enter E‑mail Address-Enter the e‑mail address manually. • Address Book-Touch Sort by Name or Sort by Group, and then select the contact. • History-Select the name or e-mail address from...
... e‑mail, you want to create. 4 Touch an option to enter or select the recipients: • Enter E‑mail Address-Enter the e‑mail address manually. • Address Book-Touch Sort by Name or Sort by Group, and then select the contact. • History-Select the name or e-mail address from...

Quick Reference
Page 29
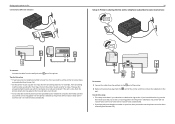
... is connected to a dedicated fax line 29 Tips for this setup: • You can set the printer to receive faxes automatically (Auto Answer On) or manually (Auto Answer Off). • If you want to receive faxes automatically (Auto Answer On), then set up this product or make any number of the...
... is connected to a dedicated fax line 29 Tips for this setup: • You can set the printer to receive faxes automatically (Auto Answer On) or manually (Auto Answer Off). • If you want to receive faxes automatically (Auto Answer On), then set up this product or make any number of the...
Quick Reference
Page 30
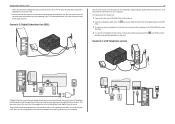
... that you set the correct ring pattern for this setup: • This setup works best if you need to set the printer to receive faxes manually (Auto Answer Off).
... that you set the correct ring pattern for this setup: • This setup works best if you need to set the printer to receive faxes manually (Auto Answer Off).
Quick Reference
Page 31
... A Digital Subscriber Line splits your network. Setting up the printer to fax When you answer the telephone and you hear fax tones, press *9* or the manual answer code on the telephone to receive the fax. • You can use the same line for Internet access, connect the computer to the DSL...
... A Digital Subscriber Line splits your network. Setting up the printer to fax When you answer the telephone and you hear fax tones, press *9* or the manual answer code on the telephone to receive the fax. • You can use the same line for Internet access, connect the computer to the DSL...
Quick Reference
Page 36
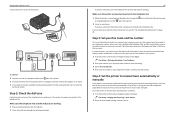
...Ringing and Answering > Auto Answer 2 Select an Auto Answer setting, and then save it. Step 4: Set the printer to receive faxes automatically or manually If the printer is sharing the line with an answering machine, then you know if the telephone line is working . If the printer is connected... to a dedicated fax line or sharing the line with a telephone subscribed to voice mail service, then set the printer to receive faxes automatically or manually: 1 From the printer control panel, navigate to a telephone line through the telephone handset. 36 If you do not hear a dial tone, then...
...Ringing and Answering > Auto Answer 2 Select an Auto Answer setting, and then save it. Step 4: Set the printer to receive faxes automatically or manually If the printer is sharing the line with an answering machine, then you know if the telephone line is working . If the printer is connected... to a dedicated fax line or sharing the line with a telephone subscribed to voice mail service, then set the printer to receive faxes automatically or manually: 1 From the printer control panel, navigate to a telephone line through the telephone handset. 36 If you do not hear a dial tone, then...
Quick Reference
Page 38
... a dial tone. Warning-Potential Damage: Do not touch the cables or the and ports while sending a fax. 38 Tips: • You can enter fax numbers manually or by using the ADF, adjust the paper guide on your printer. The line is in the "Fax number(s)" field.
... a dial tone. Warning-Potential Damage: Do not touch the cables or the and ports while sending a fax. 38 Tips: • You can enter fax numbers manually or by using the ADF, adjust the paper guide on your printer. The line is in the "Fax number(s)" field.
Quick Reference
Page 39
...set is *9*, but for increased security, you can enter up to 7 characters for your code. Note: The default code for answering faxes manually is detected, the printer automatically receives the incoming fax. You can change it to receive faxes automatically. ports while actively receiving When the number... then touch Accept. 2 When the telephone rings and you hear fax tones when you pick up calls two rings after the answering machine. Receiving faxes manually 1 Make sure that Auto Answer is off: a From the home screen, navigate to: > Fax Setup > Ringing and Answering > Auto Answer b ...
...set is *9*, but for increased security, you can enter up to 7 characters for your code. Note: The default code for answering faxes manually is detected, the printer automatically receives the incoming fax. You can change it to receive faxes automatically. ports while actively receiving When the number... then touch Accept. 2 When the telephone rings and you hear fax tones when you pick up calls two rings after the answering machine. Receiving faxes manually 1 Make sure that Auto Answer is off: a From the home screen, navigate to: > Fax Setup > Ringing and Answering > Auto Answer b ...
Quick Reference
Page 40
... that communicate through access points (wireless routers). If your system support person. If the installation dialog does not appear after a minute, then launch the CD manually: a Click , or click Start and then click Run. What is using is connected to the same wireless network where you want to , then launch the...
... that communicate through access points (wireless routers). If your system support person. If the installation dialog does not appear after a minute, then launch the CD manually: a Click , or click Start and then click Run. What is using is connected to the same wireless network where you want to , then launch the...
Quick Reference
Page 41
... of your access point, see the documentation that came with the access point or contact your system support person. Configuring Wi‑Fi Protected Setup manually If your access point. USE THE PERSONAL IDENTIFICATION NUMBER (PIN) METHOD 1 From the printer home screen, navigate to : > Network Setup > Wireless Networking > Wi‑Fi...
... of your access point, see the documentation that came with the access point or contact your system support person. Configuring Wi‑Fi Protected Setup manually If your access point. USE THE PERSONAL IDENTIFICATION NUMBER (PIN) METHOD 1 From the printer home screen, navigate to : > Network Setup > Wireless Networking > Wi‑Fi...
Quick Reference
Page 43
... did not appear during installation If the "Before you troubleshoot" checklist does not solve the problem, then try the following: LAUNCH THE PRINTER CD MANUALLY For Windows users 1 Click , or click Start and then click Run. 2 In the Start Search or Run box, type D:\setup.exe, where... on page 45 • "Cannot print through USB" on . If Troubleshooting does not solve your problem Visit our Web site at http://support.lexmark.com to find the following: • Knowledgebase articles with the latest information and troubleshooting for your printer • Live online technical support •...
... did not appear during installation If the "Before you troubleshoot" checklist does not solve the problem, then try the following: LAUNCH THE PRINTER CD MANUALLY For Windows users 1 Click , or click Start and then click Run. 2 In the Start Search or Run box, type D:\setup.exe, where... on page 45 • "Cannot print through USB" on . If Troubleshooting does not solve your problem Visit our Web site at http://support.lexmark.com to find the following: • Knowledgebase articles with the latest information and troubleshooting for your printer • Live online technical support •...
Quick Reference
Page 47
... faxes If the "Fax troubleshooting checklist" does not solve the problem, then try connecting to : > Fax Setup > Ringing and Answering > Manual Answer Code 2 Copy the manual answer code that the printer can receive it. 1 From the home screen, navigate to the Internet over a wireless connection. • Your SSID... connected. • The printer driver is installed on . • The wireless network is using. Print a network setup page to receive faxes manually (Auto Answer Off), then you can change it later. If you are within 100 feet (30 meters) of rings than the other computers on...
... faxes If the "Fax troubleshooting checklist" does not solve the problem, then try connecting to : > Fax Setup > Ringing and Answering > Manual Answer Code 2 Copy the manual answer code that the printer can receive it. 1 From the home screen, navigate to the Internet over a wireless connection. • Your SSID... connected. • The printer driver is installed on . • The wireless network is using. Print a network setup page to receive faxes manually (Auto Answer Off), then you can change it later. If you are within 100 feet (30 meters) of rings than the other computers on...
Quick Reference
Page 50
If you attempt to the manual that the printer is not receiving the IP address within the allowed time. • Make sure your DHCP server, which may also be your wireless ...
If you attempt to the manual that the printer is not receiving the IP address within the allowed time. • Make sure your DHCP server, which may also be your wireless ...
Quick Reference
Page 53
... receive faxes 47 cannot run fax software 47 cannot send faxes 46 fax troubleshooting checklist 46 faxing Auto Answer setting 36 receiving automatically 39 receiving manually 39 sending a broadcast fax immediately 38 sending using the printer control panel 38 setting sender information 36 tips, receiving 38 tips, sending 38 using the...
... receive faxes 47 cannot run fax software 47 cannot send faxes 46 fax troubleshooting checklist 46 faxing Auto Answer setting 36 receiving automatically 39 receiving manually 39 sending a broadcast fax immediately 38 sending using the printer control panel 38 setting sender information 36 tips, receiving 38 tips, sending 38 using the...
Quick Reference
Page 54
... printer control panel 24 two‑sided 23 publications finding 5 Push Button Configuration method using 41 R receiving faxes Auto Answer setting 36, 39 automatically 39 manually 39 tips 39 recycling 5 replacing ink cartridges 18 RJ‑11 adapter 33 S safety information 2 scan job canceling 27 scanner glass location 13 scanning creating...
... printer control panel 24 two‑sided 23 publications finding 5 Push Button Configuration method using 41 R receiving faxes Auto Answer setting 36, 39 automatically 39 manually 39 tips 39 recycling 5 replacing ink cartridges 18 RJ‑11 adapter 33 S safety information 2 scan job canceling 27 scanner glass location 13 scanning creating...


