User Guide
Page 3
... Canceling copy jobs...57 Scanning 58 Tips for scanning...58 Scanning to a local or network computer...58 Scanning to a flash drive or memory card...59 Scanning photos into an editing application...59 Scanning documents into an editing application 61 Scanning directly to e-mail using the printer software 61 Scanning to a PDF...62 Scanning FAQ...63 Canceling scan jobs...64 Faxing...
... Canceling copy jobs...57 Scanning 58 Tips for scanning...58 Scanning to a local or network computer...58 Scanning to a flash drive or memory card...59 Scanning photos into an editing application...59 Scanning documents into an editing application 61 Scanning directly to e-mail using the printer software 61 Scanning to a PDF...62 Scanning FAQ...63 Canceling scan jobs...64 Faxing...
User Guide
Page 4
... solve printer problems 115 If Troubleshooting does not solve your problem 115 Setup troubleshooting...115 Jams and misfeeds troubleshooting...121 Print troubleshooting...124 Copy and scan troubleshooting...126 Fax troubleshooting...128 Memory card troubleshooting...134 Wireless troubleshooting...136 Notices 155 Product information...155 Edition notice...155 Power consumption...159 Index 171...
... solve printer problems 115 If Troubleshooting does not solve your problem 115 Setup troubleshooting...115 Jams and misfeeds troubleshooting...121 Print troubleshooting...124 Copy and scan troubleshooting...126 Fax troubleshooting...128 Memory card troubleshooting...134 Wireless troubleshooting...136 Notices 155 Product information...155 Edition notice...155 Power consumption...159 Index 171...
User Guide
Page 6
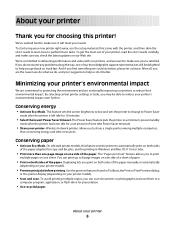
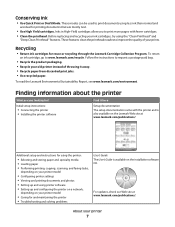
...a minimum-power standby mode after the printer is left idle for 10 minutes. • Select the lowest Power Saver timeout. You can scan documents or photographs and save . About your printer 6 To start using your new printer right away, use the setup materials that came with... allows you for printing in Toolbars, the Print or Print Preview dialog, or the printer display (depending on your printer model). • Scan and save them to reduce your printer's environmental impact even further. About your printer Thank you to reduce their environmental impact. Minimizing your printer...
...a minimum-power standby mode after the printer is left idle for 10 minutes. • Select the lowest Power Saver timeout. You can scan documents or photographs and save . About your printer 6 To start using your new printer right away, use the setup materials that came with... allows you for printing in Toolbars, the Print or Print Preview dialog, or the printer display (depending on your printer model). • Scan and save them to reduce your printer's environmental impact even further. About your printer Thank you to reduce their environmental impact. Minimizing your printer...
User Guide
Page 7
... the product packaging. • Recycle your printer model • Caring for ? About your prints. Follow the instructions to www.lexmark.com/recycle. Inks in High-Yield cartridges allow you looking for and maintaining the printer • Troubleshooting and solving problems User's ...cartridges for using the printer: • Selecting and storing paper and specialty media • Loading paper • Performing printing, copying, scanning, and faxing tasks, depending on your printer model • Configuring printer settings • Viewing and printing documents and photos •...
... the product packaging. • Recycle your printer model • Caring for ? About your prints. Follow the instructions to www.lexmark.com/recycle. Inks in High-Yield cartridges allow you looking for and maintaining the printer • Troubleshooting and solving problems User's ...cartridges for using the printer: • Selecting and storing paper and specialty media • Loading paper • Performing printing, copying, scanning, and faxing tasks, depending on your printer model • Configuring printer settings • Viewing and printing documents and photos •...
User Guide
Page 9
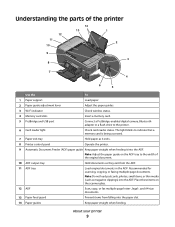
... the printer. 9 Automatic Document Feeder (ADF) paper guide Keep paper straight when feeding it into the ADF. About your printer 9 Recommended for scanning, copying, or faxing multiple-page documents. Understanding the parts of the original document. 10 ADF output tray Hold documents as they exit from falling ... light blinks to the printer. 6 Card reader light Check card reader status. Note: Adjust the paper guide on the scanner glass. 12 ADF Scan, copy, or fax multiple-page letter-, legal-, and A4-size documents. 13 Paper feed guard Prevent items from the ADF. 11 ADF tray ...
... the printer. 9 Automatic Document Feeder (ADF) paper guide Keep paper straight when feeding it into the ADF. About your printer 9 Recommended for scanning, copying, or faxing multiple-page documents. Understanding the parts of the original document. 10 ADF output tray Hold documents as they exit from falling ... light blinks to the printer. 6 Card reader light Check card reader status. Note: Adjust the paper guide on the scanner glass. 12 ADF Scan, copy, or fax multiple-page letter-, legal-, and A4-size documents. 13 Paper feed guard Prevent items from the ADF. 11 ADF tray ...

User Guide
Page 10
... printer, and if this connection method is installed on the printer. 1 W I F I PRINTING 10 9 8 W I F I PRINTING 2 3 4 5 6 7 Use the To 1 Scanner lid Access the scanner glass. 2 Scanner glass Scan and copy photos and documents. 3 Power supply with port Connect the printer to a power source. 4 Duplex unit • Print on both sides of a sheet of...
... printer, and if this connection method is installed on the printer. 1 W I F I PRINTING 10 9 8 W I F I PRINTING 2 3 4 5 6 7 Use the To 1 Scanner lid Access the scanner glass. 2 Scanner glass Scan and copy photos and documents. 3 Power supply with port Connect the printer to a power source. 4 Duplex unit • Print on both sides of a sheet of...
User Guide
Page 15
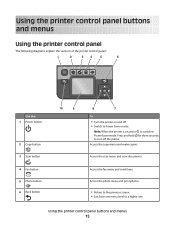
Access the scan menu and scan documents. Access the fax menu and send faxes. Access the copy menu and make copies. Press and hold for three seconds to turn off . • ... and menus Using the printer control panel The following diagrams explain the sections of the printer control panel: 1 2 34 5 6 Use the: 1 Power button 2 Copy button 3 Scan button 4 Fax button 5 Photo button 6 Back button 10 9 8 7 To • Turn the printer on , press to switch to Power Saver mode. Access the photo menu...
Access the scan menu and scan documents. Access the fax menu and send faxes. Access the copy menu and make copies. Press and hold for three seconds to turn off . • ... and menus Using the printer control panel The following diagrams explain the sections of the printer control panel: 1 2 34 5 6 Use the: 1 Power button 2 Copy button 3 Scan button 4 Fax button 5 Photo button 6 Back button 10 9 8 7 To • Turn the printer on , press to switch to Power Saver mode. Access the photo menu...
User Guide
Page 16
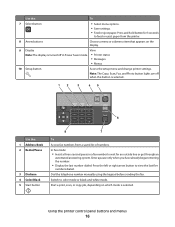
... manually using the keypad before sending the fax. Using the printer control panel buttons and menus 16 Press the left or right arrow button to color mode or black-and-white mode. Use the: To 7 Select button • Select menu options. • Save settings. • Feed or eject ...paper. Note: The Copy, Scan, Fax, and Photo button lights are off when this button is selected.. 12 3 45 Eco-Mode Cancel 6 Use the: 1 Address Book 2 Redial/Pause 3 Dialtone 4 Color/Black 5 Start button 8 7 To Access fax numbers from the printer. 8 Arrow ...
... manually using the keypad before sending the fax. Using the printer control panel buttons and menus 16 Press the left or right arrow button to color mode or black-and-white mode. Use the: To 7 Select button • Select menu options. • Save settings. • Feed or eject ...paper. Note: The Copy, Scan, Fax, and Photo button lights are off when this button is selected.. 12 3 45 Eco-Mode Cancel 6 Use the: 1 Address Book 2 Redial/Pause 3 Dialtone 4 Color/Black 5 Start button 8 7 To Access fax numbers from the printer. 8 Arrow ...
User Guide
Page 17
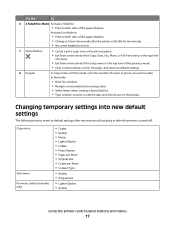
... into new default settings The following menus revert to default settings after two minutes of inactivity or after the printer is turned off: Copy menu Scan menu Fax menu (selected models only) • Copies • Quality • Resize • Lighter/Darker • Collate • Photo Reprint • Pages ... idle for ten minutes. • Set screen brightness to low. 7 Cancel button • Cancel a print, copy, scan, or fax job in progress. • Exit from a menu level of the Copy, Scan, Fax, Photo, or File Print menu to the top level of a menu. • Exit from a menu level ...
... into new default settings The following menus revert to default settings after two minutes of inactivity or after the printer is turned off: Copy menu Scan menu Fax menu (selected models only) • Copies • Quality • Resize • Lighter/Darker • Collate • Photo Reprint • Pages ... idle for ten minutes. • Set screen brightness to low. 7 Cancel button • Cancel a print, copy, scan, or fax job in progress. • Exit from a menu level of the Copy, Scan, Fax, Photo, or File Print menu to the top level of a menu. • Exit from a menu level ...
User Guide
Page 21
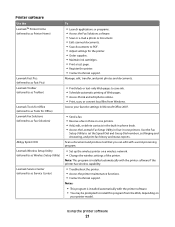
... as Fax Solutions) Abbyy Sprint OCR Lexmark Wireless Setup Utility (referred to as Wireless Setup Utility) Lexmark Service Center (referred to as Service Center) To • Launch applications or programs. • Access the Fax Solutions software. • Scan or e-mail a photo or document. • Edit scanned documents. • Scan documents to set the Speed Dial...
... as Fax Solutions) Abbyy Sprint OCR Lexmark Wireless Setup Utility (referred to as Wireless Setup Utility) Lexmark Service Center (referred to as Service Center) To • Launch applications or programs. • Access the Fax Solutions software. • Scan or e-mail a photo or document. • Edit scanned documents. • Scan documents to set the Speed Dial...
User Guide
Page 22
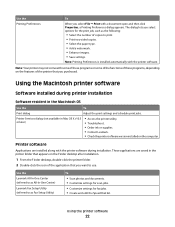
... the To Print dialog Adjust the print settings and schedule print jobs. Use the Lexmark All-In-One Center (referred to as Fax Setup Utility) To • Scan photos and documents. • Customize settings for scan jobs. • Customize settings for fax jobs. • Create and edit the...available in Mac OS X v10.5 or later) • Access the printer utility. • Troubleshoot. • Order ink or supplies. • Contact Lexmark. • Check the printer software version installed on the features of the printer that you select options for the print job, such as the following...
... the To Print dialog Adjust the print settings and schedule print jobs. Use the Lexmark All-In-One Center (referred to as Fax Setup Utility) To • Scan photos and documents. • Customize settings for scan jobs. • Customize settings for fax jobs. • Create and edit the...available in Mac OS X v10.5 or later) • Access the printer utility. • Troubleshoot. • Order ink or supplies. • Contact Lexmark. • Check the printer software version installed on the features of the printer that you select options for the print job, such as the following...
User Guide
Page 29
... quality. Load up or down arrow button to scroll to Paper Type, and then press . Note: These default settings apply only to print, copy, and scan jobs that you want to select Photo Print Size.
... quality. Load up or down arrow button to scroll to Paper Type, and then press . Note: These default settings apply only to print, copy, and scan jobs that you want to select Photo Print Size.
User Guide
Page 30
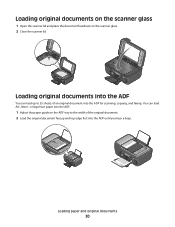
... facedown on the ADF tray to 35 sheets of the original document. 2 Load the original document faceup and top edge first into the ADF for scanning, copying, and faxing. You can load up to the width of an original document into the ADF until you hear a beep. WI F I PRINTING WI F I PRINTING...
... facedown on the ADF tray to 35 sheets of the original document. 2 Load the original document faceup and top edge first into the ADF for scanning, copying, and faxing. You can load up to the width of an original document into the ADF until you hear a beep. WI F I PRINTING WI F I PRINTING...

User Guide
Page 42
... then press to save your camera to fill in the circles completely. 8 When Scan Proof Sheet appears on the display, press , and then load the proof sheet facedown on the display. 9 ...Press . The printer scans the proof sheet. 10 Load photo paper. Note: Make sure that the paper matches the size.... Printing photos from the camera. 5 See the documentation for the job to access the PictBridge menu. Note: If Scan Proof Sheet does not appear on the proof sheet. or A4-size plain paper. 2 From the printer control panel,...
... then press to save your camera to fill in the circles completely. 8 When Scan Proof Sheet appears on the display, press , and then load the proof sheet facedown on the display. 9 ...Press . The printer scans the proof sheet. 10 Load photo paper. Note: Make sure that the paper matches the size.... Printing photos from the camera. 5 See the documentation for the job to access the PictBridge menu. Note: If Scan Proof Sheet does not appear on the proof sheet. or A4-size plain paper. 2 From the printer control panel,...

User Guide
Page 53
...the light near your choice comes on selected models. Tips for copying • When using the scanner glass, close the scanner lid to set a color or black-and-white copy. Copying photos 1 Load photo paper. 2 Place a photo facedown on the scanner glass. 3 From the printer control ... . Use the scanner glass for multiple-page documents. When you purchased a printer without an ADF, then load original documents or photos on the scanned image. • Do not load postcards, photos, small items, transparencies, photo paper, or thin media (such as magazine clippings). Place these...
...the light near your choice comes on selected models. Tips for copying • When using the scanner glass, close the scanner lid to set a color or black-and-white copy. Copying photos 1 Load photo paper. 2 Place a photo facedown on the scanner glass. 3 From the printer control ... . Use the scanner glass for multiple-page documents. When you purchased a printer without an ADF, then load original documents or photos on the scanned image. • Do not load postcards, photos, small items, transparencies, photo paper, or thin media (such as magazine clippings). Place these...
User Guide
Page 56
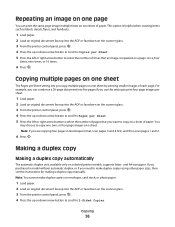
... a sheet. For example, you need to copy one sheet The Pages per Sheet setting lets you are copying four pages in landscape format, scan pages 3 and 4 first, and then scan pages 1 and 2. 6 Press . and A4-size paper. Copying multiple pages on one , two, or four page images on one sheet of paper...
... a sheet. For example, you need to copy one sheet The Pages per Sheet setting lets you are copying four pages in landscape format, scan pages 3 and 4 first, and then scan pages 1 and 2. 6 Press . and A4-size paper. Copying multiple pages on one , two, or four page images on one sheet of paper...
User Guide
Page 57
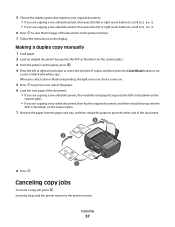
Scanning stops and the printer returns to set a color or black-and-white copy. Making a duplex copy manually 1 Load paper. 2 Load ...document. 3 2 WI F I PRINTING 1 8 Press . Canceling copy jobs To cancel a copy job, press . When you select color or black-only printing, the light near your original document: • If you are copying a one -sided document, then load the..., press . 4 Press the left or right arrow button to select the number of copies, and then press the Color/Black button to the previous menu. Copying 57 5 Choose the duplex option that matches your choice comes on. 5 ...
Scanning stops and the printer returns to set a color or black-and-white copy. Making a duplex copy manually 1 Load paper. 2 Load ...document. 3 2 WI F I PRINTING 1 8 Press . Canceling copy jobs To cancel a copy job, press . When you select color or black-only printing, the light near your original document: • If you are copying a one -sided document, then load the..., press . 4 Press the left or right arrow button to select the number of copies, and then press the Color/Black button to the previous menu. Copying 57 5 Choose the duplex option that matches your choice comes on. 5 ...

User Guide
Page 58
...load postcards, photos, small items, transparencies, photo paper, or thin media (such as magazine clippings) into the ADF or facedown on the selected computer. Scanning to USB or the name of the original document. • When using the keypad. • To assign a computer name and a PIN to the... computer, see the Help for multiple-page documents. Wait until the printer has finished downloading a list of the scan applications. • You may be prompted to avoid dark edges on selected models. Notes: • If the printer is the destination that will ...
...load postcards, photos, small items, transparencies, photo paper, or thin media (such as magazine clippings) into the ADF or facedown on the selected computer. Scanning to USB or the name of the original document. • When using the keypad. • To assign a computer name and a PIN to the... computer, see the Help for multiple-page documents. Wait until the printer has finished downloading a list of the scan applications. • You may be prompted to avoid dark edges on selected models. Notes: • If the printer is the destination that will ...

User Guide
Page 59
... flash drive or memory card is connected only to create, and the original image size. Press each time you scanned has been saved. Scanning to a flash drive or memory card Before you want to scan multiple pages and save them as a new file. Press each time you make a selection. 6 Press to select a... photo editing application, and then press . Scanning photos into the ADF or facedown on the scanner glass. 2 From the printer control panel, press . 3 Press the up or down arrow button to ...
... flash drive or memory card is connected only to create, and the original image size. Press each time you scanned has been saved. Scanning to a flash drive or memory card Before you want to scan multiple pages and save them as a new file. Press each time you make a selection. 6 Press to select a... photo editing application, and then press . Scanning photos into the ADF or facedown on the scanner glass. 2 From the printer control panel, press . 3 Press the up or down arrow button to ...

User Guide
Page 60
... of space between photos if you want to create, and the original image size. Note: Allow at once and save them as separate images. Scanning starts and the scan progress dialog appears. 7 Save the photo or photos and open the All-In-One Center. 4 From the "What is complete when the photo... editing application you want to start scanning. menu on the scanner glass. 2 From the Finder desktop, double-click the printer program folder. 3 Double-click the printer Center to open in step 4 opens...
... of space between photos if you want to create, and the original image size. Note: Allow at once and save them as separate images. Scanning starts and the scan progress dialog appears. 7 Save the photo or photos and open the All-In-One Center. 4 From the "What is complete when the photo... editing application you want to start scanning. menu on the scanner glass. 2 From the Finder desktop, double-click the printer program folder. 3 Double-click the printer Center to open in step 4 opens...


