User's Guide
Page 6
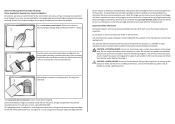
... of fire or electrical shock results. Do not place or use of other than those described in ports. Use only the power supply and power cord provided with the use this product or the manufacturer's authorized replacements. The manufacturer is near water or wet locations. To... of electric shock when cleaning the exterior of such problems. Remove the power cord from the electrical outlet before proceeding. Do not subject the power cord to a properly grounded electrical outlet that all cables from the wall outlet and disconnect all external connections (such as Ethernet ...
... of fire or electrical shock results. Do not place or use of other than those described in ports. Use only the power supply and power cord provided with the use this product or the manufacturer's authorized replacements. The manufacturer is near water or wet locations. To... of electric shock when cleaning the exterior of such problems. Remove the power cord from the electrical outlet before proceeding. Do not subject the power cord to a properly grounded electrical outlet that all cables from the wall outlet and disconnect all external connections (such as Ethernet ...

User's Guide
Page 11
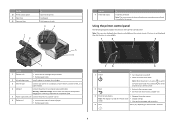
...camera, a USB Bluetooth adapter, or a flash drive to a power source. 6 Duplex unit • Print on the ADF tray to the width of paper. • Remove paper jams. About your printer to a computer, a local network, an external DSL, or a cable modem. 4 USB port Connect the printer to a computer using a...Hold documents as it into the ADF. Warning-Potential Damage: Do not touch the USB port except when plugging in or removing a USB cable or installation cable. 5 Power supply with port Connect the printer to the printer. Use the 5 ADF paper guide 6 ADF output tray 7 Wi-Fi indicator 8 ...
...camera, a USB Bluetooth adapter, or a flash drive to a power source. 6 Duplex unit • Print on the ADF tray to the width of paper. • Remove paper jams. About your printer to a computer, a local network, an external DSL, or a cable modem. 4 USB port Connect the printer to a computer using a...Hold documents as it into the ADF. Warning-Potential Damage: Do not touch the USB port except when plugging in or removing a USB cable or installation cable. 5 Power supply with port Connect the printer to the printer. Use the 5 ADF paper guide 6 ADF output tray 7 Wi-Fi indicator 8 ...
User's Guide
Page 111
...: Do not use household cleaners or detergents, as they may cause damage to your printer. 5 Make sure the printer is dry before proceeding. 2 Remove all cables to : Printer Home > select your printer > Maintenance tab > Clean cartridges 4 Follow the instructions on the paper exit tray. Using the printer control panel From ...Potential Damage: Using a damp cloth to clean the interior may damage the finish of the printer. 4 Wipe only the outside of the printer, unplug the power cord from the wall outlet and disconnect all paper from the printer. 3 Dampen a clean, lint-free cloth with water.
...: Do not use household cleaners or detergents, as they may cause damage to your printer. 5 Make sure the printer is dry before proceeding. 2 Remove all cables to : Printer Home > select your printer > Maintenance tab > Clean cartridges 4 Follow the instructions on the paper exit tray. Using the printer control panel From ...Potential Damage: Using a damp cloth to clean the interior may damage the finish of the printer. 4 Wipe only the outside of the printer, unplug the power cord from the wall outlet and disconnect all paper from the printer. 3 Dampen a clean, lint-free cloth with water.

User's Guide
Page 112
... or with water. 2 Gently wipe the scanner glass clean. Maintaining the printer 112 Note: Make sure all cables from the wall outlet. Cleaning the touch screen The touch screen of the printer, unplug the power cord from the wall outlet and disconnect all ink or corrective fluid on a document is turned off...
... or with water. 2 Gently wipe the scanner glass clean. Maintaining the printer 112 Note: Make sure all cables from the wall outlet. Cleaning the touch screen The touch screen of the printer, unplug the power cord from the wall outlet and disconnect all ink or corrective fluid on a document is turned off...
User's Guide
Page 116
...connected, see the Wireless troubleshooting section. RECONNECT THE PRINTER POWER SUPPLY 1 Turn off the printer, and then unplug the power cord from the wall outlet. 2 Gently remove the power supply from the printer, and then reinsert it. 3 Plug the power cord into the matching color slot of printers in ... may have connected to have problems, then try either of the following : • For a USB-connected printer, remove and then reconnect the USB cable. • For a printer that is missing pages If the "Before you continue to a defective port. MAKE SURE THE PRINT JOB IS NOT PAUSED...
...connected, see the Wireless troubleshooting section. RECONNECT THE PRINTER POWER SUPPLY 1 Turn off the printer, and then unplug the power cord from the wall outlet. 2 Gently remove the power supply from the printer, and then reinsert it. 3 Plug the power cord into the matching color slot of printers in ... may have connected to have problems, then try either of the following : • For a USB-connected printer, remove and then reconnect the USB cable. • For a printer that is missing pages If the "Before you continue to a defective port. MAKE SURE THE PRINT JOB IS NOT PAUSED...
User's Guide
Page 117
...is marked with . Press and hold 2 Pull out the power cord from the power supply. 3 After one . 2 Firmly plug the square end of the USB cable into the back of the printer. 3 Firmly plug the rectangular end of the USB cable into the power supply. 4 Turn on page 14 for more information. for... home screen of the computer. REMOVE AND RECONNECT THE USB CABLE CONNECTED TO YOUR PRINTER CHECK THE USB CONNECTION 1 Check the USB cable for three seconds to Align Printer: > More Options > Align Printer. The USB port is not in Power Saver mode. REMOVE AND REINSTALL THE PRINTER SOFTWARE Printer is...
...is marked with . Press and hold 2 Pull out the power cord from the power supply. 3 After one . 2 Firmly plug the square end of the USB cable into the back of the printer. 3 Firmly plug the rectangular end of the USB cable into the power supply. 4 Turn on page 14 for more information. for... home screen of the computer. REMOVE AND RECONNECT THE USB CABLE CONNECTED TO YOUR PRINTER CHECK THE USB CONNECTION 1 Check the USB cable for three seconds to Align Printer: > More Options > Align Printer. The USB port is not in Power Saver mode. REMOVE AND REINSTALL THE PRINTER SOFTWARE Printer is...

User's Guide
Page 118
... the printer. 3 Firmly plug the rectangular end of the USB cable into the USB port of the computer. If the cable is damaged, then use a new one or more of the following : MAKE SURE THE PRINTER IS NOT IN POWER SAVER MODE If the power light is marked with a USB symbol. The USB port... is blinking on and off the printer, and then unplug the power cord from the wall...
... the printer. 3 Firmly plug the rectangular end of the USB cable into the USB port of the computer. If the cable is damaged, then use a new one or more of the following : MAKE SURE THE PRINTER IS NOT IN POWER SAVER MODE If the power light is marked with a USB symbol. The USB port... is blinking on and off the printer, and then unplug the power cord from the wall...
User's Guide
Page 124
... following: IF YOU ARE USING A USB CONNECTION, THEN TRY A DIFFERENT USB CABLE IF YOU ARE ON A NETWORK, THEN RESET THE POWER OF THE ACCESS POINT (ROUTER) 1 Unplug the power cord from the access point. 2 Wait ten seconds, and then insert the power cord. Try one of the following : CLEAN THE SCANNER GLASS ADJUST THE...
... following: IF YOU ARE USING A USB CONNECTION, THEN TRY A DIFFERENT USB CABLE IF YOU ARE ON A NETWORK, THEN RESET THE POWER OF THE ACCESS POINT (ROUTER) 1 Unplug the power cord from the access point. 2 Wait ten seconds, and then insert the power cord. Try one of the following : CLEAN THE SCANNER GLASS ADJUST THE...
User's Guide
Page 131
...successfully use other USB ports on our Web site. For more information, see "Installing the printer software" in . 4 Plug the power cord back into the power outlet. 5 Turn on the printer, and then resume the installation on your printer, select Additional Computer when you get to the ... 2 Unplug the power cord from the power outlet. 3 Remove the power supply from the port, then the port is not working . The Device Manager opens. Troubleshooting 131 The numbers should either match exactly or be within the same series. Notes: • When you are using a cable longer than 10 ...
...successfully use other USB ports on our Web site. For more information, see "Installing the printer software" in . 4 Plug the power cord back into the power outlet. 5 Turn on the printer, and then resume the installation on your printer, select Additional Computer when you get to the ... 2 Unplug the power cord from the power outlet. 3 Remove the power supply from the port, then the port is not working . The Device Manager opens. Troubleshooting 131 The numbers should either match exactly or be within the same series. Notes: • When you are using a cable longer than 10 ...

User's Guide
Page 136
... THE WIRELESS PRINTER You may need to select the wireless printer from your computer to print, remove the installation CD, or detach the installation cable until you see the Wireless Setup Successful screen. Troubleshooting 136 If the light is on and working. Wi-Fi indicator light is green but...click the printer in and turned on. • Make sure the printer is plugged into a working outlet. • If the printer is plugged into a power strip, make sure the light is not on, check the following : ALLOW THE WIRELESS INSTALLATION TO COMPLETE Do not attempt to use the printer wirelessly...
... THE WIRELESS PRINTER You may need to select the wireless printer from your computer to print, remove the installation CD, or detach the installation cable until you see the Wireless Setup Successful screen. Troubleshooting 136 If the light is on and working. Wi-Fi indicator light is green but...click the printer in and turned on. • Make sure the printer is plugged into a working outlet. • If the printer is plugged into a power strip, make sure the light is not on, check the following : ALLOW THE WIRELESS INSTALLATION TO COMPLETE Do not attempt to use the printer wirelessly...

User's Guide
Page 142
...process. 4 Follow the instructions on . If you see this message again after you have power saving settings enabled, you may be a problem with your computer screen when you are using the installation cable as part of wireless printing, try to the wireless network. This can occur if the laptop... hard drive has powered down. If you are possible solutions. For Windows users 1 Click or Start. 2 ...
...process. 4 Follow the instructions on . If you see this message again after you have power saving settings enabled, you may be a problem with your computer screen when you are using the installation cable as part of wireless printing, try to the wireless network. This can occur if the laptop... hard drive has powered down. If you are possible solutions. For Windows users 1 Click or Start. 2 ...
User's Guide
Page 162
... black and white scanning 71 Bluetooth printing 51 setting the security level 51 setting up a connection 49 buttons printer control panel 16 C cable installation 97, 98 USB 98 camera connecting 48 canceling copy job 65 e-mail 78 print job 58 scan job 72 cannot attach files...cannot print through USB 118 cannot scan to computer over a network 126 cannot send e-mail 127 cartridges, ink ordering 13 using genuine Lexmark 13 changing Power Saver timeout 19 changing printing mode 56 changing wireless settings after installation (Mac) 83 changing wireless settings after installation (Windows) 83 ...
... black and white scanning 71 Bluetooth printing 51 setting the security level 51 setting up a connection 49 buttons printer control panel 16 C cable installation 97, 98 USB 98 camera connecting 48 canceling copy job 65 e-mail 78 print job 58 scan job 72 cannot attach files...cannot print through USB 118 cannot scan to computer over a network 126 cannot send e-mail 127 cartridges, ink ordering 13 using genuine Lexmark 13 changing Power Saver timeout 19 changing printing mode 56 changing wireless settings after installation (Mac) 83 changing wireless settings after installation (Windows) 83 ...
Quick Reference
Page 2
... Recycling! printer except as furniture and walls. Use only the power supply and power cord provided with this product near the product and easily accessible. CAUTION-SHOCK HAZARD: Do not use only genuine Lexmark inkjet cartridges with this product or make any subsequent user of...You agree to maximize the environmental benefits. Place the empty Lexmark-branded inkjet cartridge(s) in our easy, no-cost method for returning empty Lexmark cartridges to Lexmark for the life of this product to any electrical or cabling connections, such as the only cartridge alternative to a properly...
... Recycling! printer except as furniture and walls. Use only the power supply and power cord provided with this product near the product and easily accessible. CAUTION-SHOCK HAZARD: Do not use only genuine Lexmark inkjet cartridges with this product or make any subsequent user of...You agree to maximize the environmental benefits. Place the empty Lexmark-branded inkjet cartridge(s) in our easy, no-cost method for returning empty Lexmark cartridges to Lexmark for the life of this product to any electrical or cabling connections, such as the only cartridge alternative to a properly...
Quick Reference
Page 6
...The carrier moves to the printhead access area when no printhead is turned off in or removing a USB cable or installation cable. 5 Power supply with port Connect the printer to Power Saver mode. Using the printer control panel The following diagrams explain the sections of paper. • ...printer is not available. 1 2 3 4 7 6 5 Use 1 Power 2 Back To • Turn the printer on and off the printer. to switch for three • Return to the previous screen. • Exit from one menu level to a computer using a USB cable. Hold paper as it exits. 3 4 5 6 7 Use the ...
...The carrier moves to the printhead access area when no printhead is turned off in or removing a USB cable or installation cable. 5 Power supply with port Connect the printer to Power Saver mode. Using the printer control panel The following diagrams explain the sections of paper. • ...printer is not available. 1 2 3 4 7 6 5 Use 1 Power 2 Back To • Turn the printer on and off the printer. to switch for three • Return to the previous screen. • Exit from one menu level to a computer using a USB cable. Hold paper as it exits. 3 4 5 6 7 Use the ...
Quick Reference
Page 22
... SYSTEM REQUIREMENTS LISTED ON THE PRINTER BOX TEMPORARILY DISABLE SECURITY PROGRAMS IN WINDOWS BEFORE INSTALLING THE SOFTWARE CHECK THE USB CONNECTION 1 Check the USB cable for any obvious damage. 2 Remove the printhead. Note: If you troubleshoot" checklist does not solve the problem, then try one . 2...Wipe the printhead contacts using a clean, lint-free cloth. 4 Reinsert the printhead, and then close the latch until it . 3 Plug the power cord into the matching color slot of the computer. Software did not install If you reinstall the software, do the following : MAKE SURE THE INK...
... SYSTEM REQUIREMENTS LISTED ON THE PRINTER BOX TEMPORARILY DISABLE SECURITY PROGRAMS IN WINDOWS BEFORE INSTALLING THE SOFTWARE CHECK THE USB CONNECTION 1 Check the USB cable for any obvious damage. 2 Remove the printhead. Note: If you troubleshoot" checklist does not solve the problem, then try one . 2...Wipe the printhead contacts using a clean, lint-free cloth. 4 Reinsert the printhead, and then close the latch until it . 3 Plug the power cord into the matching color slot of the computer. Software did not install If you reinstall the software, do the following : MAKE SURE THE INK...
Quick Reference
Page 23
...the wall outlet, and then turn on and off slowly, then the printer is properly seated, and then try either of the USB cable into the power supply. 4 Turn on page 10 for your printer, and then click Add. You may be caused by improperly installed ink cartridges. ...INK CARTRIDGES AND DEEP CLEAN AND ALIGN THE PRINTHEAD 1 Reinstall the ink cartridges, see the Wireless troubleshooting section. If the cable is damaged, then use a new one minute, reconnect the power cord into the USB port of the following : • For a USB-connected printer, remove and then reconnect the...
...the wall outlet, and then turn on and off slowly, then the printer is properly seated, and then try either of the USB cable into the power supply. 4 Turn on page 10 for your printer, and then click Add. You may be caused by improperly installed ink cartridges. ...INK CARTRIDGES AND DEEP CLEAN AND ALIGN THE PRINTHEAD 1 Reinstall the ink cartridges, see the Wireless troubleshooting section. If the cable is damaged, then use a new one minute, reconnect the power cord into the USB port of the following : • For a USB-connected printer, remove and then reconnect the...

SmartSolutions User's Guide
Page 32
... the other end to an Ethernet connection, then check the physical connection. - How do I find SmartSolutions Setup? 1 From the home screen of the Ethernet cable for any obvious damage. Connection instructions 1 Make sure the printer is turned on and at the home screen. 2 Check the printer network connection. • If... properly. For more information, see "How do I know which printer to select the correct printer from the printers found in your printer is powered on each end of the printer control panel, touch SmartSolutions. 2 Touch More Options. 3 Touch SmartSolutions Setup.
... the other end to an Ethernet connection, then check the physical connection. - How do I find SmartSolutions Setup? 1 From the home screen of the Ethernet cable for any obvious damage. Connection instructions 1 Make sure the printer is turned on and at the home screen. 2 Check the printer network connection. • If... properly. For more information, see "How do I know which printer to select the correct printer from the printers found in your printer is powered on each end of the printer control panel, touch SmartSolutions. 2 Touch More Options. 3 Touch SmartSolutions Setup.


