User's Guide
Page 8
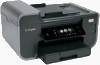
... recycling your prints. Recycling • Return ink cartridges for printing documents that are you to print documents using the "Clean Printhead" and "Deep Clean Printhead" features. To read the Lexmark Environmental Sustainability Report, see www.lexmark.com/environment. About your old printer instead of your ink cartridges, try using less ink than normal and are ideal...
... recycling your prints. Recycling • Return ink cartridges for printing documents that are you to print documents using the "Clean Printhead" and "Deep Clean Printhead" features. To read the Lexmark Environmental Sustainability Report, see www.lexmark.com/environment. About your old printer instead of your ink cartridges, try using less ink than normal and are ideal...
User's Guide
Page 24
... application is automatically installed with cartridge installation. • Print a test page. • Print an alignment page. • Clean the printhead nozzles. • Order ink or supplies. • Register the printer. • Contact technical support. Lexmark Printer Utility (not available in Mac OS X version 10.6) (referred to visit. Register your printer folder > Web Links...
... application is automatically installed with cartridge installation. • Print a test page. • Print an alignment page. • Clean the printhead nozzles. • Order ink or supplies. • Register the printer. • Contact technical support. Lexmark Printer Utility (not available in Mac OS X version 10.6) (referred to visit. Register your printer folder > Web Links...
User's Guide
Page 110
...4 Navigate to: Printer Home > select your printer > Maintenance tab > Align cartridges 5 Follow the instructions on the computer screen. Clean the printhead nozzles to improve the quality of the Printer Utility dialog, click Print Alignment Page. 5 Follow the instructions on the computer screen. Aligning ...from the list. 4 From the Maintenance tab of your prints. Notes: • Cleaning the printhead nozzles uses ink, so clean them only when necessary. • Deep cleaning uses more ink, so try the Clean Printhead option first to : > More Options > Align Printer An alignment page prints. ...
...4 Navigate to: Printer Home > select your printer > Maintenance tab > Align cartridges 5 Follow the instructions on the computer screen. Clean the printhead nozzles to improve the quality of the Printer Utility dialog, click Print Alignment Page. 5 Follow the instructions on the computer screen. Aligning ...from the list. 4 From the Maintenance tab of your prints. Notes: • Cleaning the printhead nozzles uses ink, so clean them only when necessary. • Deep cleaning uses more ink, so try the Clean Printhead option first to : > More Options > Align Printer An alignment page prints. ...
User's Guide
Page 111
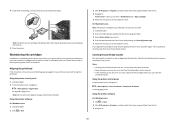
... 4 From the Maintenance tab, select Clean Print Nozzles. For Macintosh users Note: This feature is dry before proceeding. 2 Remove all paper from the wall outlet and disconnect all cables to : > More Options > Clean Printhead or Deep Clean Printhead A cleaning page prints. CAUTION-SHOCK HAZARD: To... avoid the risk of electric shock when cleaning the exterior of the printer, unplug the power cord from the printer. 3 Dampen...
... 4 From the Maintenance tab, select Clean Print Nozzles. For Macintosh users Note: This feature is dry before proceeding. 2 Remove all paper from the wall outlet and disconnect all cables to : > More Options > Clean Printhead or Deep Clean Printhead A cleaning page prints. CAUTION-SHOCK HAZARD: To... avoid the risk of electric shock when cleaning the exterior of the printer, unplug the power cord from the printer. 3 Dampen...

User's Guide
Page 115
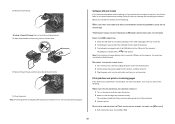
..., then try removing and reinstalling the software. 2 Remove the printhead. Note: If removing and reinserting the printhead does not resolve the error, then contact technical support. Warning-Potential Damage: Do not touch the printhead nozzles. 3 Wipe the printhead contacts using a clean, lint-free cloth. 4 Reinsert the printhead, and then close the latch until it clicks. 5 Close...
..., then try removing and reinstalling the software. 2 Remove the printhead. Note: If removing and reinserting the printhead does not resolve the error, then contact technical support. Warning-Potential Damage: Do not touch the printhead nozzles. 3 Wipe the printhead contacts using a clean, lint-free cloth. 4 Reinsert the printhead, and then close the latch until it clicks. 5 Close...
User's Guide
Page 117
... the USB cable for more information. You may be caused by improperly installed ink cartridges. REINSTALL THE INK CARTRIDGES AND DEEP CLEAN AND ALIGN THE PRINTHEAD 1 Reinstall the ink cartridges, see "Replacing ink cartridges" on page 14 for any obvious damage. RECONNECT THE PRINTER POWER...use a new one minute, reconnect the power cord into the USB port of the printer control panel, navigate to Deep Clean Printhead: > More Options > Deep Clean Printhead A cleaning page prints. 4 Navigate to Align Printer: > More Options > Align Printer. for three seconds to have connected to fit, ...
... the USB cable for more information. You may be caused by improperly installed ink cartridges. REINSTALL THE INK CARTRIDGES AND DEEP CLEAN AND ALIGN THE PRINTHEAD 1 Reinstall the ink cartridges, see "Replacing ink cartridges" on page 14 for any obvious damage. RECONNECT THE PRINTER POWER...use a new one minute, reconnect the power cord into the USB port of the printer control panel, navigate to Deep Clean Printhead: > More Options > Deep Clean Printhead A cleaning page prints. 4 Navigate to Align Printer: > More Options > Align Printer. for three seconds to have connected to fit, ...

User's Guide
Page 123
SELECT A HIGHER PRINT QUALITY FROM THE PRINTER SOFTWARE MAKE SURE THE INK CARTRIDGES ARE PROPERLY INSTALLED ALIGN THE PRINTHEAD CLEAN OR DEEP CLEAN THE PRINTHEAD NOZZLES Note: If these solutions do not remove the streaks or lines on printed image If the "Before you troubleshoot" checklist does not solve the ...
SELECT A HIGHER PRINT QUALITY FROM THE PRINTER SOFTWARE MAKE SURE THE INK CARTRIDGES ARE PROPERLY INSTALLED ALIGN THE PRINTHEAD CLEAN OR DEEP CLEAN THE PRINTHEAD NOZZLES Note: If these solutions do not remove the streaks or lines on printed image If the "Before you troubleshoot" checklist does not solve the ...
User's Guide
Page 162
...tray location 11 ADF paper guide location 11 ADF tray location 10 AliceBox 82 aligning the printhead 110 appliances wireless network 100 application list updating 72 assigning IP address 104 Automatic Document ...Lexmark 13 changing Power Saver timeout 19 changing printing mode 56 changing wireless settings after installation (Mac) 83 changing wireless settings after installation (Windows) 83 checking an unresponsive printer 113 checking ink levels 109 checklist before you troubleshoot 113 memory card troubleshooting 127 cleaning exterior of the printer 111 cleaning printhead nozzles 110 cleaning...
...tray location 11 ADF paper guide location 11 ADF tray location 10 AliceBox 82 aligning the printhead 110 appliances wireless network 100 application list updating 72 assigning IP address 104 Automatic Document ...Lexmark 13 changing Power Saver timeout 19 changing printing mode 56 changing wireless settings after installation (Mac) 83 changing wireless settings after installation (Windows) 83 checking an unresponsive printer 113 checking ink levels 109 checklist before you troubleshoot 113 memory card troubleshooting 127 cleaning exterior of the printer 111 cleaning printhead nozzles 110 cleaning...

User's Guide
Page 165
...basic solutions 113 printer software installing 27 uninstalling 26 printer solutions 106 printer, setting as default 56 printhead aligning 110 printhead access location 10 printhead error 114 printhead nozzles cleaning 110 printing collate 39 custom-size paper 43 documents 38 documents from memory card or flash drive ... 55 printing in draft mode 56 printing mode changing 56 proof sheet using 49 protocol 104 publications finding 8 R recycling 7 Lexmark products 15 WEEE statement 149 reducing an image 62 repeating an image 63 replacing ink cartridges 14 resetting internal wireless print server to...
...basic solutions 113 printer software installing 27 uninstalling 26 printer solutions 106 printer, setting as default 56 printhead aligning 110 printhead access location 10 printhead error 114 printhead nozzles cleaning 110 printing collate 39 custom-size paper 43 documents 38 documents from memory card or flash drive ... 55 printing in draft mode 56 printing mode changing 56 proof sheet using 49 protocol 104 publications finding 8 R recycling 7 Lexmark products 15 WEEE statement 149 reducing an image 62 repeating an image 63 replacing ink cartridges 14 resetting internal wireless print server to...
User's Guide
Page 166
... notices 155, 156, 157, 158 Tell Me More 106 tips for copying 60 e-mailing 76 printing 38 scanning 66 touch screen cleaning 112 navigating 18 transparencies loading 34 tray loading paper 28 troubleshooting checking an unresponsive printer 113 contacting technical support 113 Service Center 113 ... USB 118 incorrect language appears on display 114 page does not print 116 printer does not respond 118 printer printing blank pages 117 printhead error 114 software did not install 115 troubleshooting, wireless cannot print over wireless network 133 changing wireless settings after installation (Mac) 83...
... notices 155, 156, 157, 158 Tell Me More 106 tips for copying 60 e-mailing 76 printing 38 scanning 66 touch screen cleaning 112 navigating 18 transparencies loading 34 tray loading paper 28 troubleshooting checking an unresponsive printer 113 contacting technical support 113 Service Center 113 ... USB 118 incorrect language appears on display 114 page does not print 116 printer does not respond 118 printer printing blank pages 117 printhead error 114 software did not install 115 troubleshooting, wireless cannot print over wireless network 133 changing wireless settings after installation (Mac) 83...
Quick Reference
Page 4
...10.5 or earlier 1 From the Finder desktop, double-click the printer folder. 2 Double-click User's Guide. These features clean the printhead nozzles to automatically print on your prints. About your printer's environmental impact even further. For Macintosh users In Mac OS ...for using the "Clean Printhead" and "Deep Clean Printhead" features. It also includes information on troubleshooting common printer setup problems. For additional information about the printer The Quick Reference Guide contains basic instructions on the Lexmark Web site at http://support.lexmark.com. Find ...
...10.5 or earlier 1 From the Finder desktop, double-click the printer folder. 2 Double-click User's Guide. These features clean the printhead nozzles to automatically print on your prints. About your printer's environmental impact even further. For Macintosh users In Mac OS ...for using the "Clean Printhead" and "Deep Clean Printhead" features. It also includes information on troubleshooting common printer setup problems. For additional information about the printer The Quick Reference Guide contains basic instructions on the Lexmark Web site at http://support.lexmark.com. Find ...
Quick Reference
Page 11
...Using the printer control panel 1 Load plain paper. 2 From the home screen, navigate to : > More Options > Clean Printhead or Deep Clean Printhead A cleaning page prints. Cleaning the printhead nozzles Poor print quality is finished. Use two hands to air. 5 Close the printer. It will briefly come out of... document again. If print quality has not improved, then clean the printhead nozzles. Notes: • Cleaning the printhead nozzles uses ink, so clean them only when necessary. • Deep cleaning uses more ink, so try the Clean Printhead option first to save ink. • If the ink...
...Using the printer control panel 1 Load plain paper. 2 From the home screen, navigate to : > More Options > Clean Printhead or Deep Clean Printhead A cleaning page prints. Cleaning the printhead nozzles Poor print quality is finished. Use two hands to air. 5 Close the printer. It will briefly come out of... document again. If print quality has not improved, then clean the printhead nozzles. Notes: • Cleaning the printhead nozzles uses ink, so clean them only when necessary. • Deep cleaning uses more ink, so try the Clean Printhead option first to save ink. • If the ink...
Quick Reference
Page 14
...or earlier) (referred to the computer over a network. Visit the Lexmark Web site. Note: Your printer may not come with cartridge installation. • Print a test page. • Print an alignment page. • Clean the printhead nozzles. • Order ink or supplies. • Register the printer.... • Contact technical support. Printer Settings (in Mac OS X version 10.6) or Lexmark AIO Setup Utility (in Mac OS X version 10.5 or earlier...
...or earlier) (referred to the computer over a network. Visit the Lexmark Web site. Note: Your printer may not come with cartridge installation. • Print a test page. • Print an alignment page. • Clean the printhead nozzles. • Order ink or supplies. • Register the printer.... • Contact technical support. Printer Settings (in Mac OS X version 10.6) or Lexmark AIO Setup Utility (in Mac OS X version 10.5 or earlier...
Quick Reference
Page 22
... software. Note: If removing and reinserting the printhead does not resolve the error, then contact technical support. Warning-Potential Damage: Do not touch the printhead nozzles. 3 Wipe the printhead contacts using a clean, lint-free cloth. 4 Reinsert the printhead, and then close the latch until it .... 3 Plug the power cord into the USB port of the printhead. 3 Close the printer. RECONNECT THE PRINTER ...
... software. Note: If removing and reinserting the printhead does not resolve the error, then contact technical support. Warning-Potential Damage: Do not touch the printhead nozzles. 3 Wipe the printhead contacts using a clean, lint-free cloth. 4 Reinsert the printhead, and then close the latch until it .... 3 Plug the power cord into the USB port of the printhead. 3 Close the printer. RECONNECT THE PRINTER ...
Quick Reference
Page 23
From the list of the printer control panel, navigate to Deep Clean Printhead: > More Options > Deep Clean Printhead A cleaning page prints. 4 Navigate to Align Printer: > More Options > Align Printer. Note: Make sure the printer is properly seated, and then try installing ..." checklist does not solve the problem, then try one or more information. for any obvious damage. REINSTALL THE INK CARTRIDGES AND DEEP CLEAN AND ALIGN THE PRINTHEAD 1 Reinstall the ink cartridges, see the Wireless troubleshooting section. The USB port is damaged, then use a new one minute, reconnect ...
From the list of the printer control panel, navigate to Deep Clean Printhead: > More Options > Deep Clean Printhead A cleaning page prints. 4 Navigate to Align Printer: > More Options > Align Printer. Note: Make sure the printer is properly seated, and then try installing ..." checklist does not solve the problem, then try one or more information. for any obvious damage. REINSTALL THE INK CARTRIDGES AND DEEP CLEAN AND ALIGN THE PRINTHEAD 1 Reinstall the ink cartridges, see the Wireless troubleshooting section. The USB port is damaged, then use a new one minute, reconnect ...

