User's Guide
Page 8
...The setup documentation came with fewer cartridges. • Clean the printhead. Inks in High-Yield cartridges allow you looking for reuse or recycling through the Lexmark Cartridge Collection Program. Before replacing and recycling your printer 8 Recycling • Return ink cartridges for... ? Follow the instructions to www.lexmark.com/recycle. To return an ink cartridge, go to ...
...The setup documentation came with fewer cartridges. • Clean the printhead. Inks in High-Yield cartridges allow you looking for reuse or recycling through the Lexmark Cartridge Collection Program. Before replacing and recycling your printer 8 Recycling • Return ink cartridges for... ? Follow the instructions to www.lexmark.com/recycle. To return an ink cartridge, go to ...

User's Guide
Page 11
.... 4 1 2 3 < < LINE EXT 5 6 7 9 8 Use the 1 Scanner unit 2 Ink cartridge access 3 Ethernet port 4 USB port 5 LINE Port To • Access the ink cartridges and printhead. • Remove paper jams. Install, replace, or remove ink cartridges. Use this port if you can load the same type of paper and change the paper default settings so...
.... 4 1 2 3 < < LINE EXT 5 6 7 9 8 Use the 1 Scanner unit 2 Ink cartridge access 3 Ethernet port 4 USB port 5 LINE Port To • Access the ink cartridges and printhead. • Remove paper jams. Install, replace, or remove ink cartridges. Use this port if you can load the same type of paper and change the paper default settings so...

User's Guide
Page 14
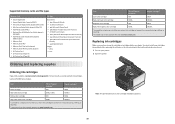
Ordering and replacing supplies 14 Replacing ink cartridges Make sure you have a new ink cartridge or cartridges before you begin. You must install new cartridges immediately after removing the protective cap ... hands to the cartridge installation position. 3 Press the release tab, and then remove the used ink cartridge or cartridges. 1 2 4 Install each ink cartridge. Note: The printhead moves to install the black cartridge. Note: Install the new ink cartridges immediately after removing the old ones or the ink remaining in the...
Ordering and replacing supplies 14 Replacing ink cartridges Make sure you have a new ink cartridge or cartridges before you begin. You must install new cartridges immediately after removing the protective cap ... hands to the cartridge installation position. 3 Press the release tab, and then remove the used ink cartridge or cartridges. 1 2 4 Install each ink cartridge. Note: The printhead moves to install the black cartridge. Note: Install the new ink cartridges immediately after removing the old ones or the ink remaining in the...
User's Guide
Page 133
.... • If the ink levels are too low, you must replace the ink cartridges before you aligned the cartridges to improve the quality of the Printer Utility dialog, click Print Alignment Page. 5 Follow the instructions on the computer screen. Clean the printhead nozzles to improve print quality, then print your printer from...
.... • If the ink levels are too low, you must replace the ink cartridges before you aligned the cartridges to improve the quality of the Printer Utility dialog, click Print Alignment Page. 5 Follow the instructions on the computer screen. Clean the printhead nozzles to improve print quality, then print your printer from...
User's Guide
Page 140
... off slowly, then the printer is in Power Saver mode. REINSTALL THE INK CARTRIDGES AND DEEP CLEAN AND ALIGN THE PRINTHEAD 1 Reinstall the ink cartridges, see "Replacing ink cartridges" on the printer. Press printer. If this problem persists, then check our Web site for updates for ...then try installing the cartridges again. 2 Load plain paper. 3 From the home screen of the printer control panel, navigate to Deep Clean Printhead: > More Options > Deep Clean Printhead A cleaning page prints. 4 Navigate to wake up the 1 Unplug the power cord from the wall outlet, and then wait 10 seconds...
... off slowly, then the printer is in Power Saver mode. REINSTALL THE INK CARTRIDGES AND DEEP CLEAN AND ALIGN THE PRINTHEAD 1 Reinstall the ink cartridges, see "Replacing ink cartridges" on the printer. Press printer. If this problem persists, then check our Web site for updates for ...then try installing the cartridges again. 2 Load plain paper. 3 From the home screen of the printer control panel, navigate to Deep Clean Printhead: > More Options > Deep Clean Printhead A cleaning page prints. 4 Navigate to wake up the 1 Unplug the power cord from the wall outlet, and then wait 10 seconds...
User's Guide
Page 196
...problems, basic solutions 136 printer software installing 26 uninstalling 25 printer solutions 129 printer, setting as default 54 printhead aligning 132 printhead access location 10 printhead error 137 printhead nozzles cleaning 133 printing collate 38 custom-size paper 42 documents 37 documents from memory card or flash ... 93, 94 automatically 93 manually 94 tips 93, 94 recycling 7 Lexmark products 15 WEEE statement 178 redial attempts setting 89 redial time setting 89 reducing an image 60 repeating an image 61 replacing ink cartridges 14 reports fax history 99 reports, fax setting 89 resetting...
...problems, basic solutions 136 printer software installing 26 uninstalling 25 printer solutions 129 printer, setting as default 54 printhead aligning 132 printhead access location 10 printhead error 137 printhead nozzles cleaning 133 printing collate 38 custom-size paper 42 documents 37 documents from memory card or flash ... 93, 94 automatically 93 manually 94 tips 93, 94 recycling 7 Lexmark products 15 WEEE statement 178 redial attempts setting 89 redial time setting 89 reducing an image 60 repeating an image 61 replacing ink cartridges 14 reports fax history 99 reports, fax setting 89 resetting...
Quick Reference
Page 4
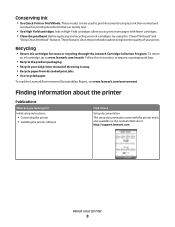
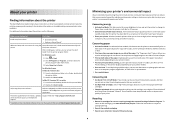
...printer among multiple computers, thus conserving energy and other resources. The latest supplemental information, updates, Support Web site-http://support.lexmark.com online technical support, and telephone support * Available on the installation software CD and on both sides of the paper ...program or application. Conserving ink • Use Quick Print or Draft Mode. Before replacing and recycling your printer model). • Preview print jobs before printing. These features clean the printhead nozzles to request a postage-paid bag. • Recycle the product packaging. &#...
...printer among multiple computers, thus conserving energy and other resources. The latest supplemental information, updates, Support Web site-http://support.lexmark.com online technical support, and telephone support * Available on the installation software CD and on both sides of the paper ...program or application. Conserving ink • Use Quick Print or Draft Mode. Before replacing and recycling your printer model). • Preview print jobs before printing. These features clean the printhead nozzles to request a postage-paid bag. • Recycle the product packaging. &#...

Quick Reference
Page 6
... 4 USB port 5 LINE Port To • Access the ink cartridges and printhead. • Remove paper jams. Install, replace, or remove ink cartridges. Note: The carrier moves to the printhead access area when no printhead is turned off . • Switch to Power Saver mode. Press and hold.... Using the printer control panel The following diagrams explain the sections of paper. • Remove paper jams. Use the 9 Printhead access To Install the printhead. Warning-Potential Damage: Do not touch the USB port except when plugging in your printer to a computer using a USB cable...
... 4 USB port 5 LINE Port To • Access the ink cartridges and printhead. • Remove paper jams. Install, replace, or remove ink cartridges. Note: The carrier moves to the printhead access area when no printhead is turned off . • Switch to Power Saver mode. Press and hold.... Using the printer control panel The following diagrams explain the sections of paper. • Remove paper jams. Use the 9 Printhead access To Install the printhead. Warning-Potential Damage: Do not touch the USB port except when plugging in your printer to a computer using a USB cable...
Quick Reference
Page 10
... only. Replacing ink cartridges Make sure you have a new ink cartridge or cartridges before you begin. After use only Lexmark ink cartridges. You must install new cartridges immediately after removing the old ones or the ink remaining in the printhead nozzles may dry out. 1 Turn on the Lexmark Web site at www.lexmark.com. Lexmark Pro900...
... only. Replacing ink cartridges Make sure you have a new ink cartridge or cartridges before you begin. After use only Lexmark ink cartridges. You must install new cartridges immediately after removing the old ones or the ink remaining in the printhead nozzles may dry out. 1 Turn on the Lexmark Web site at www.lexmark.com. Lexmark Pro900...
Quick Reference
Page 11
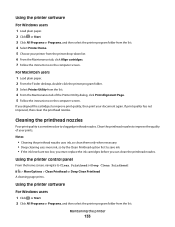
...not remove the alignment page until printing is sometimes due to save ink. • If the ink levels are too low, then you must replace the ink cartridges before you may need to install the black cartridge. For Macintosh users Note: This feature is available only in Mac OS X... It will briefly come out of your printer performs an automatic maintenance cycle every week if it is plugged into an electrical outlet. Clean the printhead nozzles to : Printer Home > select your printer > Maintenance tab > Align cartridges 5 Follow the instructions on your printed image appear jagged or wavy,...
...not remove the alignment page until printing is sometimes due to save ink. • If the ink levels are too low, then you must replace the ink cartridges before you may need to install the black cartridge. For Macintosh users Note: This feature is available only in Mac OS X... It will briefly come out of your printer performs an automatic maintenance cycle every week if it is plugged into an electrical outlet. Clean the printhead nozzles to : Printer Home > select your printer > Maintenance tab > Align cartridges 5 Follow the instructions on your printed image appear jagged or wavy,...
Quick Reference
Page 23
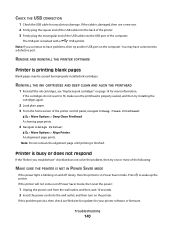
Print job does not print or is wirelessly connected, see "Replacing ink cartridges" on page 10 for more of the printhead. 3 Close the printer. You may have connected to have problems, then try another USB port on the printer. Note: If you continue to a defective... printer. 3 Firmly plug the rectangular end of the USB cable into the USB port of the printer control panel, navigate to Deep Clean Printhead: > More Options > Deep Clean Printhead A cleaning page prints. 4 Navigate to a defective port. If the cable is properly seated, and then try either of the following : ...
Print job does not print or is wirelessly connected, see "Replacing ink cartridges" on page 10 for more of the printhead. 3 Close the printer. You may have connected to have problems, then try another USB port on the printer. Note: If you continue to a defective... printer. 3 Firmly plug the rectangular end of the USB cable into the USB port of the printer control panel, navigate to Deep Clean Printhead: > More Options > Deep Clean Printhead A cleaning page prints. 4 Navigate to a defective port. If the cable is properly seated, and then try either of the following : ...
Quick Reference
Page 26
...printer control panel 6 incorrect language appears on display 22 information finding 4 ink conserving 4 ink cartridge access location 5 ink cartridges ordering 10 replacing 10 inserting a memory card or flash drive 9 installing printer software 12 L language changing 22 LINE port location 6 M Macintosh printer ... printing blank pages 23 printer problems, basic solutions 21 printer software installing 12 printer solutions 21 printhead aligning 11 printhead access location 5 printhead error 22 printhead nozzles cleaning 11 printing documents 14 network setup page 24 on both sides of the paper 15...
...printer control panel 6 incorrect language appears on display 22 information finding 4 ink conserving 4 ink cartridge access location 5 ink cartridges ordering 10 replacing 10 inserting a memory card or flash drive 9 installing printer software 12 L language changing 22 LINE port location 6 M Macintosh printer ... printing blank pages 23 printer problems, basic solutions 21 printer software installing 12 printer solutions 21 printhead aligning 11 printhead access location 5 printhead error 22 printhead nozzles cleaning 11 printing documents 14 network setup page 24 on both sides of the paper 15...


