User's Guide
Page 3
Contents Safety and other information 5 Things you should know before getting started 6 Finding information about the printer 7 Understanding the printer 9 Printer parts...9 Using the control panel 11 Navigating the display menus 13 Loading paper into the printer 15 Loading paper 15 Selecting the paper size 16 Selecting the paper type 16 Getting started printing photos...
Contents Safety and other information 5 Things you should know before getting started 6 Finding information about the printer 7 Understanding the printer 9 Printer parts...9 Using the control panel 11 Navigating the display menus 13 Loading paper into the printer 15 Loading paper 15 Selecting the paper size 16 Selecting the paper type 16 Getting started printing photos...
User's Guide
Page 4
Using photo storage devices 27 Inserting a memory card 27 Inserting a USB flash drive 29 Using the CD drive 30 Printing directly from digital cameras, mobile phones, and PDAs 32 Printing from mobile phones 32 Bluetooth wireless support 32 Using a PictBridge-enabled digital camera to control printing photos............34 Printing a DPOF selection 34 Maintaining the printer 36 Maintaining the cartridge 36 Refilling the print cartridge 42 Troubleshooting 43 General troubleshooting 43 Photo storage device troubleshooting 47 Error messages 48 Notices 50 Index 54 4
Using photo storage devices 27 Inserting a memory card 27 Inserting a USB flash drive 29 Using the CD drive 30 Printing directly from digital cameras, mobile phones, and PDAs 32 Printing from mobile phones 32 Bluetooth wireless support 32 Using a PictBridge-enabled digital camera to control printing photos............34 Printing a DPOF selection 34 Maintaining the printer 36 Maintaining the cartridge 36 Refilling the print cartridge 42 Troubleshooting 43 General troubleshooting 43 Photo storage device troubleshooting 47 Error messages 48 Notices 50 Index 54 4
User's Guide
Page 6
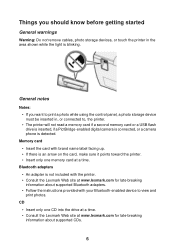
...area shown while the light is an arrow on the card, make sure it points toward the printer. • Insert only one CD into the drive at a time. • Consult the Lexmark Web site at a time. Memory card • Insert the card with your Bluetooth-enabled ...digital camera is connected, or a camera phone is detected. Bluetooth adapters • An adapter is not included with the printer. • Consult the Lexmark Web site at www.lexmark.com for late-breaking information about supported Bluetooth adapters. • Follow the instructions provided with brand name label facing up....
...area shown while the light is an arrow on the card, make sure it points toward the printer. • Insert only one CD into the drive at a time. • Consult the Lexmark Web site at a time. Memory card • Insert the card with your Bluetooth-enabled ...digital camera is connected, or a camera phone is detected. Bluetooth adapters • An adapter is not included with the printer. • Consult the Lexmark Web site at www.lexmark.com for late-breaking information about supported Bluetooth adapters. • Follow the instructions provided with brand name label facing up....
User's Guide
Page 7
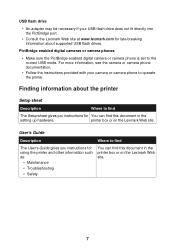
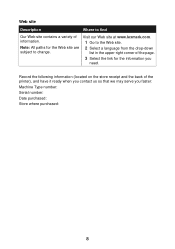
...with your USB flash drive does not fit directly into the PictBridge port. • Consult the Lexmark Web site at www.lexmark.com for late-breaking information about the printer Setup sheet Description Where to find The Setup sheet gives you instructions for You can find this document... in the setting up hardware. printer box or on the Lexmark Web site. 7 Finding information about supported USB flash drives. USB flash drive • An adapter may be necessary if ...
...with your USB flash drive does not fit directly into the PictBridge port. • Consult the Lexmark Web site at www.lexmark.com for late-breaking information about the printer Setup sheet Description Where to find The Setup sheet gives you instructions for You can find this document... in the setting up hardware. printer box or on the Lexmark Web site. 7 Finding information about supported USB flash drives. USB flash drive • An adapter may be necessary if ...
User's Guide
Page 8
Record the following information (located on the store receipt and the back of the printer), and have it ready when you contact us so that we may serve you need. Note: All paths for the Web site are subject to find Our Web site contains a variety of the page. 3 Select the link for the information you faster: Machine Type number: Serial number: Date purchased: Store where purchased: 8 Visit our Web site at www.lexmark.com. 1 Go to the Web site. 2 Select a language from the drop-down list in the upper-right corner of information. Web site Description Where to change.
Record the following information (located on the store receipt and the back of the printer), and have it ready when you contact us so that we may serve you need. Note: All paths for the Web site are subject to find Our Web site contains a variety of the page. 3 Select the link for the information you faster: Machine Type number: Serial number: Date purchased: Store where purchased: 8 Visit our Web site at www.lexmark.com. 1 Go to the Web site. 2 Select a language from the drop-down list in the upper-right corner of information. Web site Description Where to change.
User's Guide
Page 9
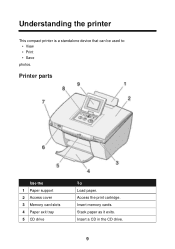
Access the print cartridge. Insert a CD in the CD drive. 9 Printer parts Use the 1 Paper support 2 Access cover 3 Memory card slots 4 Paper exit tray 5 CD drive To Load paper. Insert memory cards. Stack paper as it exits. Understanding the printer This compact printer is a standalone device that can be used to: • View • Print • Save photos.
Access the print cartridge. Insert a CD in the CD drive. 9 Printer parts Use the 1 Paper support 2 Access cover 3 Memory card slots 4 Paper exit tray 5 CD drive To Load paper. Insert memory cards. Stack paper as it exits. Understanding the printer This compact printer is a standalone device that can be used to: • View • Print • Save photos.
User's Guide
Page 10
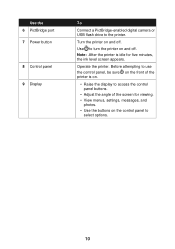
Use to turn the printer on the control panel to select options. 10 Operate the printer. Before attempting to use the control panel, be sure on the front of the screen for five minutes, the ink level screen appears. Turn the printer on and off . Note: .After the printer is on. &#...8226; Raise the display to the printer. Use the 6 PictBridge port 7 Power button 8 Control panel 9 Display To Connect a PictBridge-enabled digital...
Use to turn the printer on the control panel to select options. 10 Operate the printer. Before attempting to use the control panel, be sure on the front of the screen for five minutes, the ink level screen appears. Turn the printer on and off . Note: .After the printer is on. &#...8226; Raise the display to the printer. Use the 6 PictBridge port 7 Power button 8 Control panel 9 Display To Connect a PictBridge-enabled digital...
User's Guide
Page 11
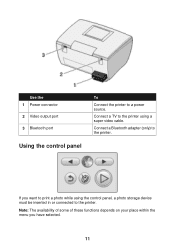
Note: The availability of some of these functions depends on your place within the menu you want to print a photo while using a super video cable. Use the 1 Power connector 2 Video output port 3 Bluetooth port Using the control panel To Connect the printer to the printer using the control panel, a photo storage device must be inserted in or connected to the printer. If you have selected. 11 Connect a TV to a power source. Connect a Bluetooth adapter (only) to the printer.
Note: The availability of some of these functions depends on your place within the menu you want to print a photo while using a super video cable. Use the 1 Power connector 2 Video output port 3 Bluetooth port Using the control panel To Connect the printer to the printer using the control panel, a photo storage device must be inserted in or connected to the printer. If you have selected. 11 Connect a TV to a power source. Connect a Bluetooth adapter (only) to the printer.
User's Guide
Page 13
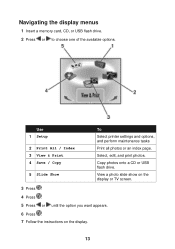
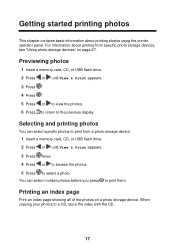
View a photo slide show on the display or TV screen. 3 Press . 4 Press . 5 Press or until the option you want appears. 6 Press . 7 Follow the instructions on the display. 13 Use 1 Setup 2 Print All / Index 3 View & Print 4 Save / Copy 5 Slide Show To Select printer settings and options, and perform maintenance tasks Print all photos or an index page. Copy photos onto a CD or USB flash drive. Navigating the display menus 1 Insert a memory card, CD, or USB flash drive. 2 Press or to choose one of the available options. Select, edit, and print photos.
View a photo slide show on the display or TV screen. 3 Press . 4 Press . 5 Press or until the option you want appears. 6 Press . 7 Follow the instructions on the display. 13 Use 1 Setup 2 Print All / Index 3 View & Print 4 Save / Copy 5 Slide Show To Select printer settings and options, and perform maintenance tasks Print all photos or an index page. Copy photos onto a CD or USB flash drive. Navigating the display menus 1 Insert a memory card, CD, or USB flash drive. 2 Press or to choose one of the available options. Select, edit, and print photos.
User's Guide
Page 14
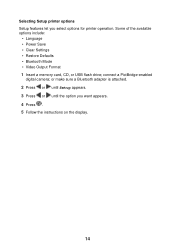
Selecting Setup printer options Setup features let you want appears. 4 Press . 5 Follow the instructions on the display. 14 or make sure a Bluetooth adapter is attached. 2 Press or until Setup appears. 3 Press or until the option you select options for printer operation. Some of the available options include: • Language • Power Save • Clear Settings • Restore Defaults • Bluetooth Mode • Video Output Format 1 Insert a memory card, CD, or USB flash drive; connect a PictBridge-enabled digital camera;
Selecting Setup printer options Setup features let you want appears. 4 Press . 5 Follow the instructions on the display. 14 or make sure a Bluetooth adapter is attached. 2 Press or until Setup appears. 3 Press or until the option you select options for printer operation. Some of the available options include: • Language • Power Save • Clear Settings • Restore Defaults • Bluetooth Mode • Video Output Format 1 Insert a memory card, CD, or USB flash drive; connect a PictBridge-enabled digital camera;
User's Guide
Page 15
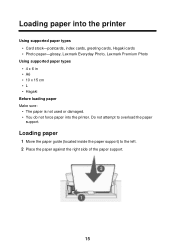
... the paper against the right side of the paper support. 15 Loading paper into the printer Using supported paper types • Card stock-postcards, index cards, greeting cards, Hagaki cards • Photo paper-glossy, Lexmark Everyday Photo, Lexmark Premium Photo Using supported paper types • 4 x 6 in • A6 • 10 x 15 cm •...
... the paper against the right side of the paper support. 15 Loading paper into the printer Using supported paper types • Card stock-postcards, index cards, greeting cards, Hagaki cards • Photo paper-glossy, Lexmark Everyday Photo, Lexmark Premium Photo Using supported paper types • 4 x 6 in • A6 • 10 x 15 cm •...
User's Guide
Page 17
... . 5 Press or to view the photos. 6 Press to return to a CD, store the index with the CD. 17 For information about printing photos using the printer operator panel. Selecting and printing photos You can select multiple photos before you press to select a photo. You can select specific photos to print from...
... . 5 Press or to view the photos. 6 Press to return to a CD, store the index with the CD. 17 For information about printing photos using the printer operator panel. Selecting and printing photos You can select multiple photos before you press to select a photo. You can select specific photos to print from...
User's Guide
Page 21
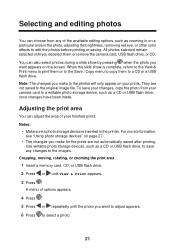
... . 5 Press or repeatedly until View & Print appears. 3 Press . When the slide show by pressing when the photo you want appears on a particular area in the printer. To save any of the available editing options, such as zooming in on the screen. All photos selected remain selected until you make for the...
... . 5 Press or repeatedly until View & Print appears. 3 Press . When the slide show by pressing when the photo you want appears on a particular area in the printer. To save any of the available editing options, such as zooming in on the screen. All photos selected remain selected until you make for the...
User's Guide
Page 26
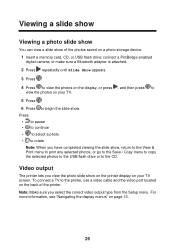
...PictBridge-enabled digital camera; For more information, see "Navigating the display menus" on your TV. 5 Press . 6 Press to begin the slide show on the printer display on page 13. 26 Viewing a slide show Viewing a photo slide show You can view a slide show , return to the View & Print menu to... • to pause • to continue • to select a photo • to view the photos on your TV screen. Video output The printer lets you select the correct video output type from the Setup menu. or make sure a Bluetooth adapter is attached. 2 Press repeatedly until Slide Show appears...
...PictBridge-enabled digital camera; For more information, see "Navigating the display menus" on your TV. 5 Press . 6 Press to begin the slide show on the printer display on page 13. 26 Viewing a slide show Viewing a photo slide show You can view a slide show , return to the View & Print menu to... • to pause • to continue • to select a photo • to view the photos on your TV screen. Video output The printer lets you select the correct video output type from the Setup menu. or make sure a Bluetooth adapter is attached. 2 Press repeatedly until Slide Show appears...
User's Guide
Page 27
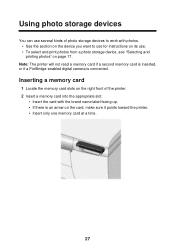
...; Insert only one memory card at a time. 27 Using photo storage devices You can use several kinds of the printer. 2 Insert a memory card into the appropriate slot. • Insert the card with photos. • See the section on the device you want to work with ...
...; Insert only one memory card at a time. 27 Using photo storage devices You can use several kinds of the printer. 2 Insert a memory card into the appropriate slot. • Insert the card with photos. • See the section on the device you want to work with ...
User's Guide
Page 28
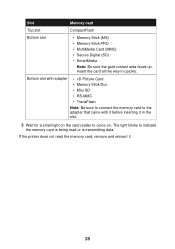
...; RS-MMC • TransFlash Note: Be sure to connect the memory card to the adapter that came with it before inserting it . 28 If the printer does not read or is transmitting data. Slot Memory card Top slot CompactFlash Bottom slot • Memory Stick (MS) • Memory Stick PRO • MultiMedia...
...; RS-MMC • TransFlash Note: Be sure to connect the memory card to the adapter that came with it before inserting it . 28 If the printer does not read or is transmitting data. Slot Memory card Top slot CompactFlash Bottom slot • Memory Stick (MS) • Memory Stick PRO • MultiMedia...
User's Guide
Page 29
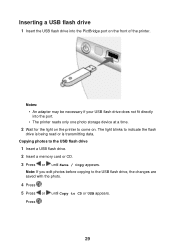
Inserting a USB flash drive 1 Insert the USB flash drive into the port. • The printer reads only one photo storage device at a time. 2 Wait for the light on the front of the printer. Copying photos to indicate the flash drive is being read or is transmitting data. Press . 29 The light blinks to... to come on. Notes: • An adapter may be necessary if your USB flash drive does not fit directly into the PictBridge port on the printer to CD or USB appears. Note: If you edit photos before copying to the USB flash drive, the changes are saved with the photo. 4 Press...
Inserting a USB flash drive 1 Insert the USB flash drive into the port. • The printer reads only one photo storage device at a time. 2 Wait for the light on the front of the printer. Copying photos to indicate the flash drive is being read or is transmitting data. Press . 29 The light blinks to... to come on. Notes: • An adapter may be necessary if your USB flash drive does not fit directly into the PictBridge port on the printer to CD or USB appears. Note: If you edit photos before copying to the USB flash drive, the changes are saved with the photo. 4 Press...
User's Guide
Page 30
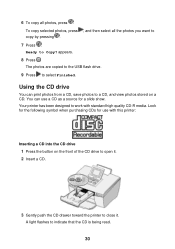
... stored on the front of the CD drive to open it. 2 Insert a CD. 3 Gently push the CD drawer toward the printer to close it. Your printer has been designed to work with this printer: Inserting a CD into the CD drive 1 Press the button on a CD. Look for the following symbol when purchasing CDs...
... stored on the front of the CD drive to open it. 2 Insert a CD. 3 Gently push the CD drawer toward the printer to close it. Your printer has been designed to work with this printer: Inserting a CD into the CD drive 1 Press the button on a CD. Look for the following symbol when purchasing CDs...
User's Guide
Page 32
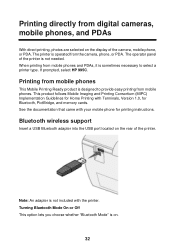
.... The operator panel of the camera, mobile phone, or PDA. Note: An adapter is on the rear of the printer. Bluetooth wireless support Insert a USB Bluetooth adapter into the USB port located on . 32 Turning Bluetooth Mode On or Off This option lets ...you choose whether "Bluetooth Mode" is not included with the printer. When printing from mobile phones. See the documentation that came with Terminals, Version 1.0, for printing instructions. This product follows Mobile Imaging and Printing Consortium ...
.... The operator panel of the camera, mobile phone, or PDA. Note: An adapter is on the rear of the printer. Bluetooth wireless support Insert a USB Bluetooth adapter into the USB port located on . 32 Turning Bluetooth Mode On or Off This option lets ...you choose whether "Bluetooth Mode" is not included with the printer. When printing from mobile phones. See the documentation that came with Terminals, Version 1.0, for printing instructions. This product follows Mobile Imaging and Printing Consortium ...
User's Guide
Page 33
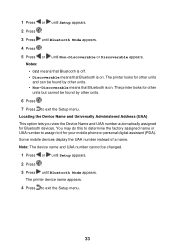
... the Device Name and UAA number automatically assigned for your mobile phone or personal digital assistant (PDA). The printer device name appears. 4 Press to it for Bluetooth devices. The printer looks for other units and can be found by other units. • Non-Discoverable means that Bluetooth is... on . Some mobile devices display the UAA number instead of a name. The printer looks for other units but cannot be found by other units. 6 Press . 7 Press to exit the Setup menu. You may do this ...
... the Device Name and UAA number automatically assigned for your mobile phone or personal digital assistant (PDA). The printer device name appears. 4 Press to it for Bluetooth devices. The printer looks for other units and can be found by other units. • Non-Discoverable means that Bluetooth is... on . Some mobile devices display the UAA number instead of a name. The printer looks for other units but cannot be found by other units. 6 Press . 7 Press to exit the Setup menu. You may do this ...


