
User's Guide for Windows
Page 9
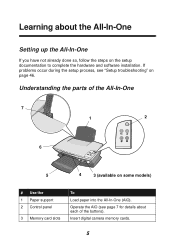
Insert digital camera memory cards. 5 Understanding the parts of the buttons). Operate the AIO (see "Setup troubleshooting" on page 46. Learning about each of the All-In-One 7 1 2 6 5 4 3 (available on the setup documentation to complete the hardware and software installation. If problems occur during the setup process, see page 7 for details about the All-In-One Setting up the All-In-One If you have not already done so, follow the steps on some models) # Use the 1 Paper support 2 Control panel 3 Memory card slots To Load paper into the All-In-One (AIO).
Insert digital camera memory cards. 5 Understanding the parts of the buttons). Operate the AIO (see "Setup troubleshooting" on page 46. Learning about each of the All-In-One 7 1 2 6 5 4 3 (available on the setup documentation to complete the hardware and software installation. If problems occur during the setup process, see page 7 for details about the All-In-One Setting up the All-In-One If you have not already done so, follow the steps on some models) # Use the 1 Paper support 2 Control panel 3 Memory card slots To Load paper into the All-In-One (AIO).
User's Guide for Windows
Page 24
...Advanced You can • Install a new print cartridge. • View shopping options for new cartridges. • Print a test page. • Clean to fix horizontal streaks. • Troubleshoot other ink problems. • Align to fix blurry edges. • Remove Japanese postcard residue. • Learn how to contact Lexmark by phone, e-mail, or... button in the lower right corner of the Printing Status window and turn printing voice notification on or off. • Download the latest software files. • Change the network printing settings. • Obtain software version information.
...Advanced You can • Install a new print cartridge. • View shopping options for new cartridges. • Print a test page. • Clean to fix horizontal streaks. • Troubleshoot other ink problems. • Align to fix blurry edges. • Remove Japanese postcard residue. • Learn how to contact Lexmark by phone, e-mail, or... button in the lower right corner of the Printing Status window and turn printing voice notification on or off. • Download the latest software files. • Change the network printing settings. • Obtain software version information.
User's Guide for Windows
Page 44
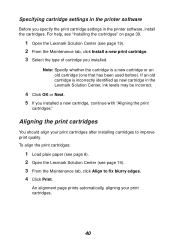
... incorrectly identified as new cartridge in the printer software, install the cartridges. An alignment page prints automatically, aligning your print cartridges after installing cartridges to fix blurry edges. 4 Click Print. Specifying cartridge settings in the printer software Before you specify the print cartridge settings in the Lexmark Solution Center, ink levels may be incorrect. 4 Click...
... incorrectly identified as new cartridge in the printer software, install the cartridges. An alignment page prints automatically, aligning your print cartridges after installing cartridges to fix blurry edges. 4 Click Print. Specifying cartridge settings in the printer software Before you specify the print cartridge settings in the Lexmark Solution Center, ink levels may be incorrect. 4 Click...
User's Guide for Windows
Page 48
... tape from both the computer and AIO on a network. 44 Did you may have administrator rights to install the software on ? Troubleshooting This section helps you solve problems you install the AIO software correctly? For help accessing the Lexmark Solution Center, see page 19. Do you try to solve the problem, check the following: Is...
... tape from both the computer and AIO on a network. 44 Did you may have administrator rights to install the software on ? Troubleshooting This section helps you solve problems you install the AIO software correctly? For help accessing the Lexmark Solution Center, see page 19. Do you try to solve the problem, check the following: Is...
User's Guide for Windows
Page 49
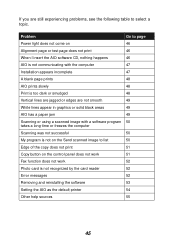
... not smooth 49 White lines appear in graphics or solid black areas 49 AIO has a paper jam 49 Scanning or using a scanned image with a software program 50 takes a long time or freezes the computer Scanning was not successful 50 My program is not on the Send scanned image to select...light does not come on 46 Alignment page or test page does not print 46 When I insert the AIO software CD, nothing happens 46 AIO is not communicating with the computer 47 Installation appears incomplete 47 A blank page prints 48 AIO prints slowly 48 Print is too dark or smudged 48 Vertical...
... not smooth 49 White lines appear in graphics or solid black areas 49 AIO has a paper jam 49 Scanning or using a scanned image with a software program 50 takes a long time or freezes the computer Scanning was not successful 50 My program is not on the Send scanned image to select...light does not come on 46 Alignment page or test page does not print 46 When I insert the AIO software CD, nothing happens 46 AIO is not communicating with the computer 47 Installation appears incomplete 47 A blank page prints 48 AIO prints slowly 48 Print is too dark or smudged 48 Vertical...

User's Guide for Windows
Page 50
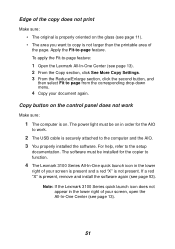
...sure the power supply is correctly inserted into the AIO (see page 8). 4 Make sure the Lexmark 3100 Series is turned off, double-click setup.exe. 46 Alignment page or test page does not... print 1 Make sure you may have during setup. When I insert the AIO software CD, nothing happens From the desktop, double-click the My Computer icon, and then double-click the ..., and then double-click the CD-ROM drive icon. For help installing print cartridges, see page 39. 2 Make sure the print cartridges are properly installed (see page 39). 3 Make sure you loaded the paper correctly ...
...sure the power supply is correctly inserted into the AIO (see page 8). 4 Make sure the Lexmark 3100 Series is turned off, double-click setup.exe. 46 Alignment page or test page does not... print 1 Make sure you may have during setup. When I insert the AIO software CD, nothing happens From the desktop, double-click the My Computer icon, and then double-click the ..., and then double-click the CD-ROM drive icon. For help installing print cartridges, see page 39. 2 Make sure the print cartridges are properly installed (see page 39). 3 Make sure you loaded the paper correctly ...
User's Guide for Windows
Page 51
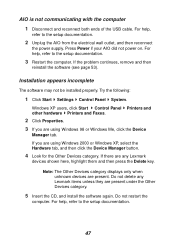
...wall outlet, and then reconnect the power supply. If you are present under the Other Devices category. 5 Insert the CD, and install the software again. Note: The Other Devices category displays only when unknown devices are using Windows 98 or Windows Me, click the Device Manager ...Lexmark items unless they are using Windows 2000 or Windows XP, select the Hardware tab, and then click the Device Manager button. 4 Look for the Other Devices category. For help , refer to the setup documentation. 47 Printers and 3 If you are present. Installation appears incomplete The software...
...wall outlet, and then reconnect the power supply. If you are present under the Other Devices category. 5 Insert the CD, and install the software again. Note: The Other Devices category displays only when unknown devices are using Windows 98 or Windows Me, click the Device Manager ...Lexmark items unless they are using Windows 2000 or Windows XP, select the Hardware tab, and then click the Device Manager button. 4 Look for the Other Devices category. For help , refer to the setup documentation. 47 Printers and 3 If you are present. Installation appears incomplete The software...

User's Guide for Windows
Page 54
...scanning resolution. My program is generally set much different than printing resolution and is not on page 47. Scanning was not successful The software may not be installed properly. Scanning resolution is much lower. Scanning, copying, and faxing troubleshooting Scanning or using a scanned image with the computer" on...from the list box, and then click Add. 5 Click Close to save your program to the Send scanned image to program list: 1 Open the Lexmark All-In-One Center (see page 13). 2 From the Scan section, click See More Scan Settings. 3 Click Display Advanced Scan Settings. 4 From...
...scanning resolution. My program is generally set much different than printing resolution and is not on page 47. Scanning was not successful The software may not be installed properly. Scanning resolution is much lower. Scanning, copying, and faxing troubleshooting Scanning or using a scanned image with the computer" on...from the list box, and then click Add. 5 Click Close to save your program to the Send scanned image to program list: 1 Open the Lexmark All-In-One Center (see page 13). 2 From the Scan section, click See More Scan Settings. 3 Click Display Advanced Scan Settings. 4 From...
User's Guide for Windows
Page 55
... right of your screen, open the All-In-One Center (see page 13). 51 The software must be installed for the AIO to work Make sure: 1 The computer is not present. Apply the Fit... you want to copy is present, remove and install the software again (see page 53). For help, refer to -page feature. To apply the Fit-to-page feature: 1 Open the Lexmark All-In-One Center (see page 13). ... 3 From the Reduce/Enlarge section, click the second button, and then select Fit to function. 4 The Lexmark 3100 Series All-In-One quick launch icon in the lower right of the page. If a red "X" is...
... right of your screen, open the All-In-One Center (see page 13). 51 The software must be installed for the AIO to work Make sure: 1 The computer is not present. Apply the Fit... you want to copy is present, remove and install the software again (see page 53). For help, refer to -page feature. To apply the Fit-to-page feature: 1 Open the Lexmark All-In-One Center (see page 13). ... 3 From the Reduce/Enlarge section, click the second button, and then select Fit to function. 4 The Lexmark 3100 Series All-In-One quick launch icon in the lower right of the page. If a red "X" is...
User's Guide for Windows
Page 56
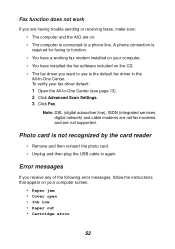
Photo card is connected to function. • You have a working fax modem installed on your computer. • You have installed the fax software included on your fax driver default: 1 Open the All-In-One Center (see page 13). 2 Click Advanced Scan Settings. 3 Click Fax. A phone connection is the ...
Photo card is connected to function. • You have a working fax modem installed on your computer. • You have installed the fax software included on your fax driver default: 1 Open the All-In-One Center (see page 13). 2 Click Advanced Scan Settings. 3 Click Fax. A phone connection is the ...
User's Guide for Windows
Page 57
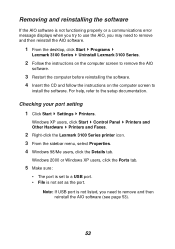
... reinstall the AIO software. 1 From the desktop, click Start Programs Lexmark 3100 Series Uninstall Lexmark 3100 Series. 2 Follow the instructions on the computer screen to remove the AIO software. 3 Restart the computer before reinstalling the software. 4 Insert the... CD and follow the instructions on the computer screen to remove and then reinstall the AIO software (see page 53). 53 Checking your port setting 1 Click Start Settings Printers. Note: If USB port is not listed, you may need to install the software...
... reinstall the AIO software. 1 From the desktop, click Start Programs Lexmark 3100 Series Uninstall Lexmark 3100 Series. 2 Follow the instructions on the computer screen to remove the AIO software. 3 Restart the computer before reinstalling the software. 4 Insert the... CD and follow the instructions on the computer screen to remove and then reinstall the AIO software (see page 53). 53 Checking your port setting 1 Click Start Settings Printers. Note: If USB port is not listed, you may need to install the software...

User's Guide for Windows
Page 62
... a memory card 24 adding text to page layout 26 adding text to photos 30 Advanced tab 20 AIO software 13 album page 26 aligning print cartridges 40 All-In-One Center, see Lexmark All-In-One Center 13 All-In-One Main Page Copy section 14 Creative Tasks section 15 Preview section... aligning 40 cleaning nozzles 41 part numbers 38 viewing ink levels of 19 wiping 41 cartridges, print aligning 40 cleaning contacts 41 cleaning nozzles 41 installing 39 part numbers 38 preserving 43 removing 38 replacing 38 choosing layout for photos 26 cleaning, print cartridge nozzles 41 coated paper loading 9 color ...
... a memory card 24 adding text to page layout 26 adding text to photos 30 Advanced tab 20 AIO software 13 album page 26 aligning print cartridges 40 All-In-One Center, see Lexmark All-In-One Center 13 All-In-One Main Page Copy section 14 Creative Tasks section 15 Preview section... aligning 40 cleaning nozzles 41 part numbers 38 viewing ink levels of 19 wiping 41 cartridges, print aligning 40 cleaning contacts 41 cleaning nozzles 41 installing 39 part numbers 38 preserving 43 removing 38 replacing 38 choosing layout for photos 26 cleaning, print cartridge nozzles 41 coated paper loading 9 color ...
User's Guide for Windows
Page 64
...turning on or off 20 W Web site, Lexmark 55 60 preserving print cartridges 43 Preview Now button 34 Preview section Preview Now button 34 Print/Copy preview 15 Scan preview 15 print cartridges aligning 40 cleaning nozzles 41 installing 39 part numbers 38 preserving 43 removing 38... 48 blank page prints 48 Printing Status window changing appearance of 20 Q Quality/Copies tab 18 R recycling Lexmark products 43 reinstalling software 53 removing print cartridges 38 removing software 53 repeat images 15 replacing print cartridges 38 S Safety information ii Save Settings menu 18 Saved Images page ...
...turning on or off 20 W Web site, Lexmark 55 60 preserving print cartridges 43 Preview Now button 34 Preview section Preview Now button 34 Print/Copy preview 15 Scan preview 15 print cartridges aligning 40 cleaning nozzles 41 installing 39 part numbers 38 preserving 43 removing 38... 48 blank page prints 48 Printing Status window changing appearance of 20 Q Quality/Copies tab 18 R recycling Lexmark products 43 reinstalling software 53 removing print cartridges 38 removing software 53 repeat images 15 replacing print cartridges 38 S Safety information ii Save Settings menu 18 Saved Images page ...


