User's Guide (7.1 MB)
Page 4
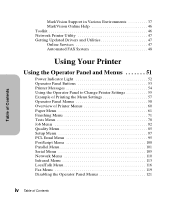
... Settings 55 Example of Printing the Menu Settings 57 Operator Panel Menus 58 Overview of Printer Menus 60 Paper Menu 61 Finishing Menu 71 Tests Menu 78 Job Menu 82 Quality Menu 85 Setup Menu 87 PCL Emul Menu 95 PostScript Menu 100 Parallel Menu 101 Serial Menu 105 Network Menu 110 Infrared Menu 113 LocalTalk Menu 116 Fax Menu 119 Disabling the Operator Panel...
... Settings 55 Example of Printing the Menu Settings 57 Operator Panel Menus 58 Overview of Printer Menus 60 Paper Menu 61 Finishing Menu 71 Tests Menu 78 Job Menu 82 Quality Menu 85 Setup Menu 87 PCL Emul Menu 95 PostScript Menu 100 Parallel Menu 101 Serial Menu 105 Network Menu 110 Infrared Menu 113 LocalTalk Menu 116 Fax Menu 119 Disabling the Operator Panel...

User's Guide (7.1 MB)
Page 45
... on page 51 to identify the display and operator panel buttons if you need help. 2 Press Menu> or until you want. The page shows current settings for the menus and a list of menu items for more information. Continue to indicate the printer is On (|) and the Ready status message ...appears on page 177 for the TESTS MENU. The page prints to press and release Menu> until the page prints. Note: See "Using the Operator Panel and Menus" on the second line. 5 Press Select to ...
... on page 51 to identify the display and operator panel buttons if you need help. 2 Press Menu> or until you want. The page shows current settings for the menus and a list of menu items for more information. Continue to indicate the printer is On (|) and the Ready status message ...appears on page 177 for the TESTS MENU. The page prints to press and release Menu> until the page prints. Note: See "Using the Operator Panel and Menus" on the second line. 5 Press Select to ...
User's Guide (7.1 MB)
Page 56
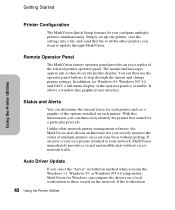
... printer. If an error occurs on the network. You can then easily identify the printer best suited for Windows 95, Windows NT 4.0, and OS/2, a full-menu display of the options installed on each printer and see a graphic of the operator panel is available. Remote Operator Panel The MarkVision remote operator panel...
... printer. If an error occurs on the network. You can then easily identify the printer best suited for Windows 95, Windows NT 4.0, and OS/2, a full-menu display of the options installed on each printer and see a graphic of the operator panel is available. Remote Operator Panel The MarkVision remote operator panel...
User's Guide (7.1 MB)
Page 60
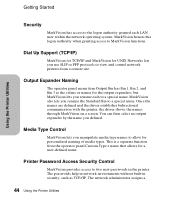
... network administrator assigns a 44 Using the Printer Utilities The passwords help in network environments without built-in the printer. Output Expander Naming The operator panel menu item Output Bin has Bin 1, Bin 2, and Bin 3 as TCP/IP. MarkVision also lets you rename the Standard Bin to the logon authority granted each...
... network administrator assigns a 44 Using the Printer Utilities The passwords help in network environments without built-in the printer. Output Expander Naming The operator panel menu item Output Bin has Bin 1, Bin 2, and Bin 3 as TCP/IP. MarkVision also lets you rename the Standard Bin to the logon authority granted each...
User's Guide (7.1 MB)
Page 61
... of the person using the printer operator panel. Property Tag Support MarkVision lets your personal computer if you may view all the menu items for the Paper Menu on one screen. Toner level sensing is able to do so. Uninstaller for MarkVision This function lets you remove MarkVision from your... in the print cartridge. Using the Printer Utilities Getting Started password to the printer to select the menu item you set values for menu items faster than using the printer, the printer location in a building, and so on. It brings up dialog boxes for different menus. Click ...
... of the person using the printer operator panel. Property Tag Support MarkVision lets your personal computer if you may view all the menu items for the Paper Menu on one screen. Toner level sensing is able to do so. Uninstaller for MarkVision This function lets you remove MarkVision from your... in the print cartridge. Using the Printer Utilities Getting Started password to the printer to select the menu item you set values for menu items faster than using the printer, the printer location in a building, and so on. It brings up dialog boxes for different menus. Click ...
User's Guide (7.1 MB)
Page 62
Toolkit If you're using Windows 3.1, the Toolkit is available from the MarkVision Printer Window menu bar and click Help Topics. To view these procedures, select Help from all MarkVision screens. If you're using DOS or OS/2 2.x, install the Toolkit ...
Toolkit If you're using Windows 3.1, the Toolkit is available from the MarkVision Printer Window menu bar and click Help Topics. To view these procedures, select Help from all MarkVision screens. If you're using DOS or OS/2 2.x, install the Toolkit ...
User's Guide (7.1 MB)
Page 67
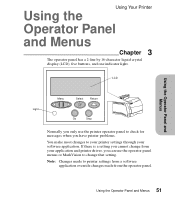
LCD Light Menu Select Return Go Stop Normally you only use the operator panel menus or MarkVision to change from the operator panel. 51 Using the Operator Panel ...
LCD Light Menu Select Return Go Stop Normally you only use the operator panel menus or MarkVision to change from the operator panel. 51 Using the Operator Panel ...
User's Guide (7.1 MB)
Page 68
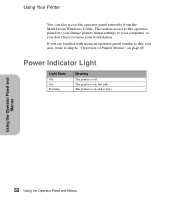
... busy. Using the Operator Panel and Menus 52 Using the Operator Panel and Menus The remote access to the operator panel lets you change printer menu settings at your computer, so you may want to skip to leave your workstation. The printer is off. Power Indicator Light Light State Off On...
... busy. Using the Operator Panel and Menus 52 Using the Operator Panel and Menus The remote access to the operator panel lets you change printer menu settings at your computer, so you may want to skip to leave your workstation. The printer is off. Power Indicator Light Light State Off On...

User's Guide (7.1 MB)
Page 69
Using Your Printer Using the Operator Panel and Menus Operator Panel Buttons Button Go Menu> and
Using Your Printer Using the Operator Panel and Menus Operator Panel Buttons Button Go Menu> and
User's Guide (7.1 MB)
Page 71
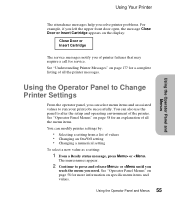
See "Understanding Printer Messages" on page 177 for a complete listing of all the menu items. You can modify printer settings by: • Selecting a setting from a list of all the printer messages. See "Operator Panel Menus" on page 58 for ... an explanation of values • Changing an On/Off setting • Changing a numerical setting To select a new value as a setting: 1 From a Ready status message, press Menu> or or Using the Operator Panel and Menus Using Your Printer The attendance messages help you solve printer problems. For example, if you left the...
See "Understanding Printer Messages" on page 177 for a complete listing of all the menu items. You can modify printer settings by: • Selecting a setting from a list of all the printer messages. See "Operator Panel Menus" on page 58 for ... an explanation of values • Changing an On/Off setting • Changing a numerical setting To select a new value as a setting: 1 From a Ready status message, press Menu> or or Using the Operator Panel and Menus Using Your Printer The attendance messages help you solve printer problems. For example, if you left the...
User's Guide (7.1 MB)
Page 72
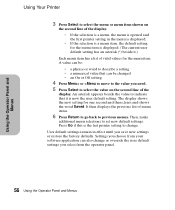
...on the second line of the display. • If the selection is a menu, the menu is opened and the first printer setting in the menu is displayed. • If the selection is a menu item, the default setting for the menu item is displayed. (The current user default setting has an asterisk (*) beside ...it.) Each menu item has a list of valid values for the menu item. A value can be changed ...
...on the second line of the display. • If the selection is a menu, the menu is opened and the first printer setting in the menu is displayed. • If the selection is a menu item, the default setting for the menu item is displayed. (The current user default setting has an asterisk (*) beside ...it.) Each menu item has a list of valid values for the menu item. A value can be changed ...

User's Guide (7.1 MB)
Page 73
... the printer power is shown on the display and remains on page 177 for the TESTS MENU. The page shows current settings for the menus and a list of menu items for more information. The message, Printing Menu Settings, is On (|) and the Ready status message appears on the display. 2 Press... Menu> or until the page prints. The printer returns to show the list of installed options. ...
... the printer power is shown on the display and remains on page 177 for the TESTS MENU. The page shows current settings for the menus and a list of menu items for more information. The message, Printing Menu Settings, is On (|) and the Ready status message appears on the display. 2 Press... Menu> or until the page prints. The printer returns to show the list of installed options. ...

User's Guide (7.1 MB)
Page 74
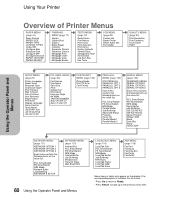
...on the printer. Additional menus are displayed if a language is activated, and if options, network adapters, and attachments are installed. Some of the menu items or values are listed in the order they only affect printer function when you configure the printer: • Paper • Finishing •...; Job • Quality • Setup • PCL Emul • PostScript • Fax PCL emulation is installed on page 60 shows the menu items in the menu item. Using the Operator Panel and Menus Using Your Printer Operator Panel Menus The printer has standard menus that list the...
...on the printer. Additional menus are displayed if a language is activated, and if options, network adapters, and attachments are installed. Some of the menu items or values are listed in the order they only affect printer function when you configure the printer: • Paper • Finishing •...; Job • Quality • Setup • PCL Emul • PostScript • Fax PCL emulation is installed on page 60 shows the menu items in the menu item. Using the Operator Panel and Menus Using Your Printer Operator Panel Menus The printer has standard menus that list the...
User's Guide (7.1 MB)
Page 75
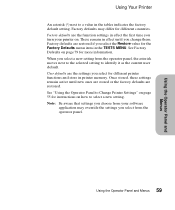
...for more information. Factory defaults are restored. Using the Operator Panel and Menus Using Your Printer An asterisk (*) next to a value in the TESTS MENU. See Factory Defaults on how to select a new setting. Note: Be aware that settings you choose from your printer on page 55 for the Factory... Defaults menu item in the tables indicates the factory default setting. When you change them. These remain in effect until new ones are stored or the ...
...for more information. Factory defaults are restored. Using the Operator Panel and Menus Using Your Printer An asterisk (*) next to a value in the TESTS MENU. See Factory Defaults on how to select a new setting. Note: Be aware that settings you choose from your printer on page 55 for the Factory... Defaults menu item in the tables indicates the factory default setting. When you change them. These remain in effect until new ones are stored or the ...
User's Guide (7.1 MB)
Page 76
...Timeout Auto Continue Jam Recovery Page Protect Print Area Display Language Alarm Control Toner Alarm Job Buffer Size Job Accounting Job Acct Limit PCL EMUL MENU (page 95) Font Source Font Name Point Size Pitch Symbol Set Orientation Lines per Page A4 Width TRAY RENUMBER Auto CR after LF ... PS SmartSwitch NPA Mode Infrared Buffer Job Buffering Window Size Transmit Delay Max Baud Rate 60 Using the Operator Panel and Menus LOCALTALK MENU (page 116) LocalTalk Port PCL SmartSwitch PS SmartSwitch NPA Mode LocalTalk Buffer Job Buffering NPA Hosts LocalTalk Name LocalTalk Addr LocalTalk Zone FAX...
...Timeout Auto Continue Jam Recovery Page Protect Print Area Display Language Alarm Control Toner Alarm Job Buffer Size Job Accounting Job Acct Limit PCL EMUL MENU (page 95) Font Source Font Name Point Size Pitch Symbol Set Orientation Lines per Page A4 Width TRAY RENUMBER Auto CR after LF ... PS SmartSwitch NPA Mode Infrared Buffer Job Buffering Window Size Transmit Delay Max Baud Rate 60 Using the Operator Panel and Menus LOCALTALK MENU (page 116) LocalTalk Port PCL SmartSwitch PS SmartSwitch NPA Mode LocalTalk Buffer Job Buffering NPA Hosts LocalTalk Name LocalTalk Addr LocalTalk Zone FAX...
User's Guide (7.1 MB)
Page 77
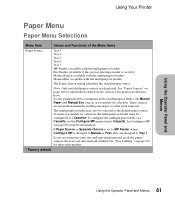
... printer model may also be configured as the default paper source. If Paper Source or Separator Source is set the Configure MP menu item to MP Feeder, when Configure MP is configured with the multipurpose feeder) The Paper Source setting identifies the default paper source... selection, the multipurpose feeder must be selected as a Cassette. Using the Operator Panel and Menus Using Your Printer Paper Menu Paper Menu Selections Menu Item Values and Functions of the Menu Items Paper Source Tray 1* Tray 2 Tray 3 Tray 4 Tray 5 MP Feeder (available with the multipurpose feeder) Env...
... printer model may also be configured as the default paper source. If Paper Source or Separator Source is set the Configure MP menu item to MP Feeder, when Configure MP is configured with the multipurpose feeder) The Paper Source setting identifies the default paper source... selection, the multipurpose feeder must be selected as a Cassette. Using the Operator Panel and Menus Using Your Printer Paper Menu Paper Menu Selections Menu Item Values and Functions of the Menu Items Paper Source Tray 1* Tray 2 Tray 3 Tray 4 Tray 5 MP Feeder (available with the multipurpose feeder) Env...
User's Guide (7.1 MB)
Page 78
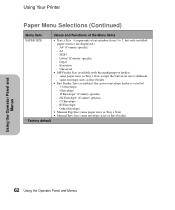
Using Your Printer Paper Menu Selections (Continued) Menu Item Values and Functions of the Menu Items PAPER SIZE • Tray x Size (x represents a tray number from 1 to 5, but only installed paper sources are displayed.) - Letter* (Country specific) - Legal - Executive - DL Envelope* (...
Using Your Printer Paper Menu Selections (Continued) Menu Item Values and Functions of the Menu Items PAPER SIZE • Tray x Size (x represents a tray number from 1 to 5, but only installed paper sources are displayed.) - Letter* (Country specific) - Legal - Executive - DL Envelope* (...
User's Guide (7.1 MB)
Page 79
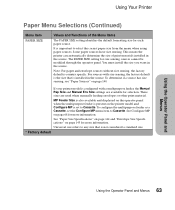
...the size you want in the source. To configure the multipurpose feeder as a Cassette, set to Cassette. Using Your Printer Paper Menu Selections (Continued) Menu Item PAPER SIZE Values and Functions of print materials installed in the source. Note: For paper and envelope sources without size sensing,... the factory default is set the Configure MP menu item to Cassette. The PAPER SIZE setting for selection. For sources with a multipurpose feeder, the Manual Pap Size and Manual Env ...
...the size you want in the source. To configure the multipurpose feeder as a Cassette, set to Cassette. Using Your Printer Paper Menu Selections (Continued) Menu Item PAPER SIZE Values and Functions of print materials installed in the source. Note: For paper and envelope sources without size sensing,... the factory default is set the Configure MP menu item to Cassette. The PAPER SIZE setting for selection. For sources with a multipurpose feeder, the Manual Pap Size and Manual Env ...
User's Guide (7.1 MB)
Page 80
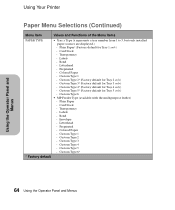
Using the Operator Panel and Menus Using Your Printer Paper Menu Selections (Continued) Menu Item Values and Functions of the Menu Items PAPER TYPE • Tray x Type (x represents a tray number from 1 to 5, but only installed paper sources are displayed.) - Letterhead - Custom Type 5* (Factory default for Tray 4 ...
Using the Operator Panel and Menus Using Your Printer Paper Menu Selections (Continued) Menu Item Values and Functions of the Menu Items PAPER TYPE • Tray x Type (x represents a tray number from 1 to 5, but only installed paper sources are displayed.) - Letterhead - Custom Type 5* (Factory default for Tray 4 ...
User's Guide (7.1 MB)
Page 81
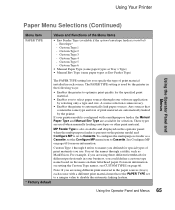
... envelopes or other print material. For more information. Using Your Printer Using the Operator Panel and Menus Paper Menu Selections (Continued) Menu Item PAPER TYPE Values and Functions of the Menu Items • Env Feeder Type (available if the optional envelope feeder is unnecessary. • Enables the ... with a different print material must have the PAPER TYPE set the names through your printer model is set the Configure MP menu item to disable the automatic linking feature. * Factory default 65 Using the Operator Panel and Menus You set to a unique value to...
... envelopes or other print material. For more information. Using Your Printer Using the Operator Panel and Menus Paper Menu Selections (Continued) Menu Item PAPER TYPE Values and Functions of the Menu Items • Env Feeder Type (available if the optional envelope feeder is unnecessary. • Enables the ... with a different print material must have the PAPER TYPE set the names through your printer model is set the Configure MP menu item to disable the automatic linking feature. * Factory default 65 Using the Operator Panel and Menus You set to a unique value to...

