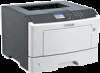

User Guide
Page 3
...48 Supported paper sizes, types, and weights 51 Printing...54 Printing a document...54 Printing from a mobile device...55 MS315, MS415, and MS417 printing confidential and other held jobs 56 Printing information pages...57 Canceling a print job...58 Saving money and the environment 59 ...Saving paper and toner...59 Recycling...59 Managing the printer 61 Finding advanced networking and administrator information 61 Copying printer settings to other printers 61 Con&#...
...48 Supported paper sizes, types, and weights 51 Printing...54 Printing a document...54 Printing from a mobile device...55 MS315, MS415, and MS417 printing confidential and other held jobs 56 Printing information pages...57 Canceling a print job...58 Saving money and the environment 59 ...Saving paper and toner...59 Recycling...59 Managing the printer 61 Finding advanced networking and administrator information 61 Copying printer settings to other printers 61 Con&#...

User Guide
Page 28
...requires user intervention. Solid amber The printer is supported only in a slow, pulsing pattern Installing the Local Printer Settings Utility 1 Visit http://support.lexmark.com, and then download the software. 2 Double‑click the software installer package. 3 Select an installation type, and then click Install.... seconds in select printer models. Blinking amber for all print jobs. Notes: • Use the Local Printer Settings Utility to change the toner darkness, power saver, and paper size settings for 0.1 second, then goes The printer is off , idle, or in Hibernate mode. For...
...requires user intervention. Solid amber The printer is supported only in a slow, pulsing pattern Installing the Local Printer Settings Utility 1 Visit http://support.lexmark.com, and then download the software. 2 Double‑click the software installer package. 3 Select an installation type, and then click Install.... seconds in select printer models. Blinking amber for all print jobs. Notes: • Use the Local Printer Settings Utility to change the toner darkness, power saver, and paper size settings for 0.1 second, then goes The printer is off , idle, or in Hibernate mode. For...

User Guide
Page 45
... affects both print quality and the ability of paper. Store paper in its original wrapper in its original wrapper until it is too rough, then toner cannot fuse to it is exposed to curl at its performance. Extend the time to several days if the storage or transportation environment is the...
... affects both print quality and the ability of paper. Store paper in its original wrapper in its original wrapper until it is too rough, then toner cannot fuse to it is exposed to curl at its performance. Extend the time to several days if the storage or transportation environment is the...

User Guide
Page 46
... recommended printable side of stability resulting in xerographic copiers. The ink must be affected by the resin in doubt, contact the paper supplier. When in toner. This information is made from 100% chemically treated pulped wood. mixing results in jams. • Do not use in fewer paper feeding problems and better...
... recommended printable side of stability resulting in xerographic copiers. The ink must be affected by the resin in doubt, contact the paper supplier. When in toner. This information is made from 100% chemically treated pulped wood. mixing results in jams. • Do not use in fewer paper feeding problems and better...

User Guide
Page 47
... they are one way. The energy required to end-of its products. However, the following : • Amount of post-consumer waste (Lexmark tests up to 100% post-consumer waste content.) • Temperature and humidity conditions (Testing chambers simulate climates from all recycled paper will help...scientific testing is due to the energy-intensive manufacturing processes required to printing in Sheffield units, impacts print clarity and how well toner fuses to the paper) • Surface friction (determines how easily sheets can be made that all over foreign matter. And while ...
... they are one way. The energy required to end-of its products. However, the following : • Amount of post-consumer waste (Lexmark tests up to 100% post-consumer waste content.) • Temperature and humidity conditions (Testing chambers simulate climates from all recycled paper will help...scientific testing is due to the energy-intensive manufacturing processes required to printing in Sheffield units, impacts print clarity and how well toner fuses to the paper) • Surface friction (determines how easily sheets can be made that all over foreign matter. And while ...
User Guide
Page 49
... folding bars - Paper and specialty media guide 49 • Do not use preprinted card stock manufactured with adhesive, and could void the printer and toner cartridge warranties. Preprinting introduces semi‑liquid and volatile components into the printer. • Use grain short card stock when possible. Have postage stamps ... - Note: A combination of the envelopes. When printing on label printing, characteristics, and design, see the Card Stock & Label Guide available at http://support.lexmark.com. Check with slick backing material. • Use full label sheets.
... folding bars - Paper and specialty media guide 49 • Do not use preprinted card stock manufactured with adhesive, and could void the printer and toner cartridge warranties. Preprinting introduces semi‑liquid and volatile components into the printer. • Use grain short card stock when possible. Have postage stamps ... - Note: A combination of the envelopes. When printing on label printing, characteristics, and design, see the Card Stock & Label Guide available at http://support.lexmark.com. Check with slick backing material. • Use full label sheets.

User Guide
Page 54
...the printer settings on the computer Depending on your operating system, adjust the toner darkness settings using a proxy server, then temporarily disable it to : > Settings > > Print Settings > 2 Adjust the toner darkness. > Quality Menu > > Toner Darkness > 3 Press . Notes: • View the printer IP ...From the printer control panel, navigate to load the Web page correctly. 2 Click Settings > Print Settings > Quality Menu > Toner Darkness. 3 Adjust the toner darkness setting. 4 Click Submit. The IP address appears as four sets of numbers separated by periods, such as 123.123.123...
...the printer settings on the computer Depending on your operating system, adjust the toner darkness settings using a proxy server, then temporarily disable it to : > Settings > > Print Settings > 2 Adjust the toner darkness. > Quality Menu > > Toner Darkness > 3 Press . Notes: • View the printer IP ...From the printer control panel, navigate to load the Web page correctly. 2 Click Settings > Print Settings > Quality Menu > Toner Darkness. 3 Adjust the toner darkness setting. 4 Click Submit. The IP address appears as four sets of numbers separated by periods, such as 123.123.123...

User Guide
Page 55
...1 From the printer control panel, navigate to load the Web page correctly. 2 Click Settings > Print Settings > Quality Menu > Toner Darkness. 3 Adjust the toner darkness, and then click Submit. For information on configuring the wireless settings of your mobile device, see the documentation that ....123. • If you to print directly to any Mopria‑certified printer. Printing 55 MS315, MS415, and MS417 toner darkness adjustment Adjusting toner darkness Using the Embedded Web Server 1 Open a Web browser, and then type the IP address of your mobile device, launch...
...1 From the printer control panel, navigate to load the Web page correctly. 2 Click Settings > Print Settings > Quality Menu > Toner Darkness. 3 Adjust the toner darkness, and then click Submit. For information on configuring the wireless settings of your mobile device, see the documentation that ....123. • If you to print directly to any Mopria‑certified printer. Printing 55 MS315, MS415, and MS417 toner darkness adjustment Adjusting toner darkness Using the Embedded Web Server 1 Open a Web browser, and then type the IP address of your mobile device, launch...

User Guide
Page 59
.... This chapter outlines the settings and tasks that as much as printing on one copy of the Lexmark Web site at www.lexmark.com/environment • The Lexmark recycling program at www.lexmark.com/recycle Saving paper and toner Studies show that may be able to reduce your printer's impact even further. Saving money and...
.... This chapter outlines the settings and tasks that as much as printing on one copy of the Lexmark Web site at www.lexmark.com/environment • The Lexmark recycling program at www.lexmark.com/recycle Saving paper and toner Studies show that may be able to reduce your printer's impact even further. Saving money and...
User Guide
Page 61
... section in the Network/Ports menu. Notes: • Selectable alerts can be set on the Lexmark support Web site at http://support.lexmark.com. For more advanced system support tasks, see the Networking Guide on the toner cartridge and imaging unit. • All selectable alerts can determine how you would like to be...
... section in the Network/Ports menu. Notes: • Selectable alerts can be set on the Lexmark support Web site at http://support.lexmark.com. For more advanced system support tasks, see the Networking Guide on the toner cartridge and imaging unit. • All selectable alerts can determine how you would like to be...

User Guide
Page 113
...: Off is the factory default setting. Note: 600 dpi is the factory default setting. Lighten or darken the printed output. You can conserve toner by lightening or darkening it. Note: 0 is the factory default setting. Notes: • Off is the factory default setting. • Selecting...vertically, or to enhance fonts. Enable more pixels to images. Notes: • 8 is the factory default setting. • You can help conserve toner. Enable a print mode preferable for clarity, in dots per inch. For Windows users, click File > Print, and then click Properties, Preferences, Options...
...: Off is the factory default setting. Note: 600 dpi is the factory default setting. Lighten or darken the printed output. You can conserve toner by lightening or darkening it. Note: 0 is the factory default setting. Notes: • Off is the factory default setting. • Selecting...vertically, or to enhance fonts. Enable more pixels to images. Notes: • 8 is the factory default setting. • You can help conserve toner. Enable a print mode preferable for clarity, in dots per inch. For Windows users, click File > Print, and then click Properties, Preferences, Options...

User Guide
Page 115
... Name Courier 10 Symbol Set 10U PC‑8 12U PC‑850 PCL Emulation Settings Point Size 1.00-1008.00 To Isolate the source of toner on a separate page at the end of alphabetic and numeric characters, punctuation, and special symbols. Notes: • Resident is stored. Identify a specific font and...
... Name Courier 10 Symbol Set 10U PC‑8 12U PC‑850 PCL Emulation Settings Point Size 1.00-1008.00 To Isolate the source of toner on a separate page at the end of alphabetic and numeric characters, punctuation, and special symbols. Notes: • Resident is stored. Identify a specific font and...

User Guide
Page 119
...; No cancels the format request. • Flash memory refers to the printer is printed on a page. Note: Off is being formatted. Isolate the source of toner on a separate page at the end of each print job. Notes: • Yes deletes all data sent to the memory added by installing a flash...
...; No cancels the format request. • Flash memory refers to the printer is printed on a page. Note: Off is being formatted. Isolate the source of toner on a separate page at the end of each print job. Notes: • Yes deletes all data sent to the memory added by installing a flash...
User Guide
Page 127
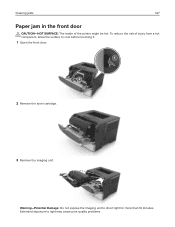
Clearing jams 127 Paper jam in the front door CAUTION-HOT SURFACE: The inside of injury from a hot component, allow the surface to cool before touching it. 1 Open the front door. 2 Remove the toner cartridge. 3 Remove the imaging unit. Extended exposure to direct light for more than 10 minutes. To reduce the risk of the printer might be hot. Warning-Potential Damage: Do not expose the imaging unit to light may cause print quality problems.
Clearing jams 127 Paper jam in the front door CAUTION-HOT SURFACE: The inside of injury from a hot component, allow the surface to cool before touching it. 1 Open the front door. 2 Remove the toner cartridge. 3 Remove the imaging unit. Extended exposure to direct light for more than 10 minutes. To reduce the risk of the printer might be hot. Warning-Potential Damage: Do not expose the imaging unit to light may cause print quality problems.

User Guide
Page 128
Note: Use the arrows inside the printer as guides. 6 Insert the toner cartridge. Note: Make sure that all paper fragments are removed. 5 Insert the imaging unit. Clearing jams 128 Warning-Potential Damage: Do not touch the shiny photoconductor drum under the imaging unit. Doing so may affect the quality of future print jobs. 4 Remove the jammed paper.
Note: Use the arrows inside the printer as guides. 6 Insert the toner cartridge. Note: Make sure that all paper fragments are removed. 5 Insert the imaging unit. Clearing jams 128 Warning-Potential Damage: Do not touch the shiny photoconductor drum under the imaging unit. Doing so may affect the quality of future print jobs. 4 Remove the jammed paper.

User Guide
Page 134
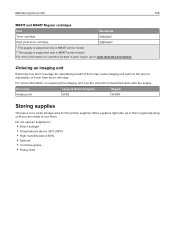
... the control panel Depending on your area. All life indicators are used. Ordering parts and supplies To order supplies in the U.S., contact Lexmark at 1-800-539-6275 for Standardization* test methods and page content. * Average continuous black declared cartridge yield in the "Supply Information"...supplies or parts may reduce the actual yield. Damage caused by the warranty. Use of the printer and its associated components. Ordering toner cartridges Notes: • The estimated cartridge yield is not covered by the use of accuracy before purchasing or replacing supplies based on...
... the control panel Depending on your area. All life indicators are used. Ordering parts and supplies To order supplies in the U.S., contact Lexmark at 1-800-539-6275 for Standardization* test methods and page content. * Average continuous black declared cartridge yield in the "Supply Information"...supplies or parts may reduce the actual yield. Damage caused by the warranty. Use of the printer and its associated components. Ordering toner cartridges Notes: • The estimated cartridge yield is not covered by the use of accuracy before purchasing or replacing supplies based on...

User Guide
Page 135
... in each region, go to www.lexmark.com/regions. For more information on countries located in each region, go to www.lexmark.com/regions. For more information on countries located in each region, go to www.lexmark.com/regions. Maintaining the printer 135 MS312... (RoAP) New Zealand (LAD) (ANZ) Toner cartridge 51B1000 51B2000 51B5000 51B4000 51B3000 51B6000 High yield toner cartridge* 51B1H00 51B2H00 51B5H00 51B4H00 51B3H00 51B6H00 * This supply is supported only in MS415 printer model. MS317 and MS417 Return program cartridges Item United States European and ...
... in each region, go to www.lexmark.com/regions. For more information on countries located in each region, go to www.lexmark.com/regions. For more information on countries located in each region, go to www.lexmark.com/regions. Maintaining the printer 135 MS312... (RoAP) New Zealand (LAD) (ANZ) Toner cartridge 51B1000 51B2000 51B5000 51B4000 51B3000 51B6000 High yield toner cartridge* 51B1H00 51B2H00 51B5H00 51B4H00 51B3H00 51B6H00 * This supply is supported only in MS415 printer model. MS317 and MS417 Return program cartridges Item United States European and ...
User Guide
Page 136
... Extremely low print coverage for the printer supplies. Part name Lexmark Return Program Regular Imaging unit 500Z 500ZA Storing supplies Choose a cool, clean storage area for extended periods of toner from toner cartridge. Store supplies right side up in their original packing ...to fail prior to use them. For more information on countries located in MS417 printer model. Maintaining the printer 136 MS317 and MS417 Regular cartridges Item Worldwide Toner cartridge 51B00A01 High yield toner cartridge 51B0HA02 1 This supply is supported only in MS317 printer model. ...
... Extremely low print coverage for the printer supplies. Part name Lexmark Return Program Regular Imaging unit 500Z 500ZA Storing supplies Choose a cool, clean storage area for extended periods of toner from toner cartridge. Store supplies right side up in their original packing ...to fail prior to use them. For more information on countries located in MS417 printer model. Maintaining the printer 136 MS317 and MS417 Regular cartridges Item Worldwide Toner cartridge 51B00A01 High yield toner cartridge 51B0HA02 1 This supply is supported only in MS317 printer model. ...
User Guide
Page 137
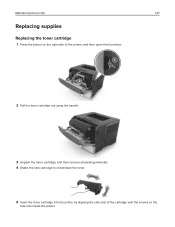
Maintaining the printer 137 Replacing supplies Replacing the toner cartridge 1 Press the button on the right side of the printer, and then open the front door. 2 Pull the toner cartridge out using the handle. 3 Unpack the toner cartridge, and then remove all packing materials. 4 Shake the new cartridge to redistribute the toner. 5 Insert the toner cartridge into the printer by aligning the side rails of the cartridge with the arrows on the side rails inside the printer.
Maintaining the printer 137 Replacing supplies Replacing the toner cartridge 1 Press the button on the right side of the printer, and then open the front door. 2 Pull the toner cartridge out using the handle. 3 Unpack the toner cartridge, and then remove all packing materials. 4 Shake the new cartridge to redistribute the toner. 5 Insert the toner cartridge into the printer by aligning the side rails of the cartridge with the arrows on the side rails inside the printer.

User Guide
Page 138
Replacing the imaging unit 1 Press the button on the right side of the printer, and then open the front door. 2 Pull the toner cartridge out using the handle. Maintaining the printer 138 Warning-Potential Damage: Do not expose the imaging unit to light may cause print quality problems. 6 Close the front door. Extended exposure to direct light for more than 10 minutes.
Replacing the imaging unit 1 Press the button on the right side of the printer, and then open the front door. 2 Pull the toner cartridge out using the handle. Maintaining the printer 138 Warning-Potential Damage: Do not expose the imaging unit to light may cause print quality problems. 6 Close the front door. Extended exposure to direct light for more than 10 minutes.


