
User Guide
Page 2
... Protected Setup...21 MS315 and MS415 Wi-Fi Protected Setup...22 Connecting MS312 to a wireless network using the printer software 23 Connecting the printer to a wireless network using the Embedded Web Server 24 Verifying printer setup...24 MS312 and MS317 printing menu settings and network setup pages 24 MS315, MS415, and MS417 printing menu settings and network setup pages 25 Using MS312 and MS317 27 Using the printer control panel...27 Understanding the colors of the Sleep button and indicator lights 28 Installing the Local Printer Settings Utility 28 Using the Local Printer Settings...
... Protected Setup...21 MS315 and MS415 Wi-Fi Protected Setup...22 Connecting MS312 to a wireless network using the printer software 23 Connecting the printer to a wireless network using the Embedded Web Server 24 Verifying printer setup...24 MS312 and MS317 printing menu settings and network setup pages 24 MS315, MS415, and MS417 printing menu settings and network setup pages 25 Using MS312 and MS317 27 Using the printer control panel...27 Understanding the colors of the Sleep button and indicator lights 28 Installing the Local Printer Settings Utility 28 Using the Local Printer Settings...

User Guide
Page 8
... setup instructions: • Connecting the printer • Installing the printer software Additional setup and instructions for using the printer: • Selecting and storing paper and specialty media • Loading paper • Configuring printer settings • Viewing and printing documents and photos • Setting up and using the printer models that are you looking for? Learning about the printer 8 Learning about the printer Using this guide This User's Guide provides general and specific information on using the printer software...
... setup instructions: • Connecting the printer • Installing the printer software Additional setup and instructions for using the printer: • Selecting and storing paper and specialty media • Loading paper • Configuring printer settings • Viewing and printing documents and photos • Setting up and using the printer models that are you looking for? Learning about the printer 8 Learning about the printer Using this guide This User's Guide provides general and specific information on using the printer software...
User Guide
Page 21
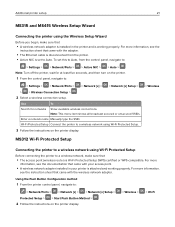
... access point. • A wireless network adapter installed in the printer and is set this to Auto, from the printer. • Active NIC is working properly. Enter a network name Manually type the SSID. To set to Auto. Use To Search for at least five seconds, and then turn on the printer. 1 From the control panel, navigate to : > Network/Ports > > Network [x] > > Network [x] Setup > Protected Setup > > Start Push Button Method > 2 Follow the instructions on the printer display. > Wireless MS312 Wi-Fi Protected Setup Connecting...
... access point. • A wireless network adapter installed in the printer and is set this to Auto, from the printer. • Active NIC is working properly. Enter a network name Manually type the SSID. To set to Auto. Use To Search for at least five seconds, and then turn on the printer. 1 From the control panel, navigate to : > Network/Ports > > Network [x] > > Network [x] Setup > Protected Setup > > Start Push Button Method > 2 Follow the instructions on the printer display. > Wireless MS312 Wi-Fi Protected Setup Connecting...

User Guide
Page 28
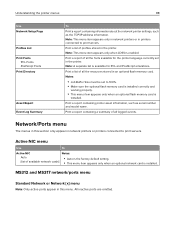
... off for all print jobs. Understanding the colors of the Sleep button and indicator lights The colors of the printer. Use the printer software to change the toner darkness, power saver, and paper size settings for 1.9 seconds in Sleep mode. Sleep button light Printer status Off The printer is in a slow, pulsing pattern Installing the Local Printer Settings Utility 1 Visit http://support.lexmark.com, and then download the software. 2 Double‑click the software installer package. 3 Select an installation type, and then click Install. 4 Click Install to start the...
... off for all print jobs. Understanding the colors of the Sleep button and indicator lights The colors of the printer. Use the printer software to change the toner darkness, power saver, and paper size settings for 1.9 seconds in Sleep mode. Sleep button light Printer status Off The printer is in a slow, pulsing pattern Installing the Local Printer Settings Utility 1 Visit http://support.lexmark.com, and then download the software. 2 Double‑click the software installer package. 3 Select an installation type, and then click Install. 4 Click Install to start the...

User Guide
Page 63
... factory defaults returns most printer settings to each menu. 1 Open a Web browser, and then type the printer IP address in the Network/Ports menu. From the printer control panel, navigate to: > Settings > > General Settings > > Factory Defaults > > Restore Now > Creating a printer control panel PIN The Panel PIN Protect menu lets you can enter up to keep a list of the current menu settings for assessing the status of restoring the printer factory default settings, then perform the Wipe All Settings option. Note: Using an Admin PIN, you restrict access to load the Web page...
... factory defaults returns most printer settings to each menu. 1 Open a Web browser, and then type the printer IP address in the Network/Ports menu. From the printer control panel, navigate to: > Settings > > General Settings > > Factory Defaults > > Restore Now > Creating a printer control panel PIN The Panel PIN Protect menu lets you can enter up to keep a list of the current menu settings for assessing the status of restoring the printer factory default settings, then perform the Wipe All Settings option. Note: Using an Admin PIN, you restrict access to load the Web page...

User Guide
Page 69
..., then print a menu settings page before restoring the factory default settings. Warning-Potential Damage: Restoring factory defaults returns most printer settings to print servers. Note: This feature is available only in network printers or printers connected to the original factory default settings. Managing the printer 69 Using Schedule Power Modes Schedule Power Modes lets you want to keep a list of the current menu settings for the display. 4 Click Submit. Using the Embedded Web Server 1 Open a Web browser, and then type the printer IP address in the Network/Ports menu...
..., then print a menu settings page before restoring the factory default settings. Warning-Potential Damage: Restoring factory defaults returns most printer settings to print servers. Note: This feature is available only in network printers or printers connected to the original factory default settings. Managing the printer 69 Using Schedule Power Modes Schedule Power Modes lets you want to keep a list of the current menu settings for the display. 4 Click Submit. Using the Embedded Web Server 1 Open a Web browser, and then type the printer IP address in the Network/Ports menu...

User Guide
Page 76
... same settings, then the trays are listed in each tray. When one tray is empty, the print job continues using the linked tray. • The A6 paper size is the U.S. Note: Only installed trays and feeders are automatically linked. Notes: • Plain Paper is the international factory default setting. • If two trays contain paper of Custom Type [x]. • Use this menu. Tray [x] Type Plain Paper Transparency Recycled Labels Bond Letterhead Preprinted Colored Paper Light Paper Heavy Paper Rough/Cotton Custom Type [x] Specify the type of paper loaded...
... same settings, then the trays are listed in each tray. When one tray is empty, the print job continues using the linked tray. • The A6 paper size is the U.S. Note: Only installed trays and feeders are automatically linked. Notes: • Plain Paper is the international factory default setting. • If two trays contain paper of Custom Type [x]. • Use this menu. Tray [x] Type Plain Paper Transparency Recycled Labels Bond Letterhead Preprinted Colored Paper Light Paper Heavy Paper Rough/Cotton Custom Type [x] Specify the type of paper loaded...

User Guide
Page 79
...jobs. Tray [x] Type Plain Paper Transparency Recycled Labels Bond Letterhead Preprinted Colored Paper Light Paper Heavy Paper Rough/Cotton Custom Type [x] Specify the type of Custom Type [x]. • Use this menu. Note: Only installed trays and feeders are listed in each tray. factory default setting. Notes: • Plain Paper is the factory default setting. • From the Paper menu, set Configure MP to Cassette for Tray 1. Notes: • Tray 1 (standard tray) is the factory default setting for Multipurpose Feeder to appear as a menu setting. Paper Size/Type menu Use...
...jobs. Tray [x] Type Plain Paper Transparency Recycled Labels Bond Letterhead Preprinted Colored Paper Light Paper Heavy Paper Rough/Cotton Custom Type [x] Specify the type of Custom Type [x]. • Use this menu. Note: Only installed trays and feeders are listed in each tray. factory default setting. Notes: • Plain Paper is the factory default setting. • From the Paper menu, set Configure MP to Cassette for Tray 1. Notes: • Tray 1 (standard tray) is the factory default setting for Multipurpose Feeder to appear as a menu setting. Paper Size/Type menu Use...
User Guide
Page 88
...MS312 and MS317 network/ports menu Standard Network or Network [x] menu Note: Only active ports appear in network printers or printers connected to print servers. Understanding the printer menus 88 Use Network Setup Page Profiles List Print Fonts PCL Fonts PostScript Fonts Print Directory Asset Report Event Log Summary To Print a report containing information about the network printer settings, such as serial number and model name. Notes: • Job Buffer Size must be set in printers connected to print servers. All inactive ports are omitted. Print a report containing...
...MS312 and MS317 network/ports menu Standard Network or Network [x] menu Note: Only active ports appear in network printers or printers connected to print servers. Understanding the printer menus 88 Use Network Setup Page Profiles List Print Fonts PCL Fonts PostScript Fonts Print Directory Asset Report Event Log Summary To Print a report containing information about the network printer settings, such as serial number and model name. Notes: • Job Buffer Size must be set in printers connected to print servers. All inactive ports are omitted. Print a report containing...

User Guide
Page 90
... wireless network. Wireless menu Note: This menu is the factory default setting. View the encryption method for the printer to use. Notes: • Ad hoc is available only in printers connected to any of the wireless connection. View the quality of the following : • Network/Ports > Standard Network > Standard Network Setup > Reports • Network/Ports > Network [x] > Network [x] Setup > Reports Use To Print Setup Page Print a report containing information about the network printer settings, such as the TCP/IP address. To access the menu, navigate to a wireless...
... wireless network. Wireless menu Note: This menu is the factory default setting. View the encryption method for the printer to use. Notes: • Ad hoc is available only in printers connected to any of the wireless connection. View the quality of the following : • Network/Ports > Standard Network > Standard Network Setup > Reports • Network/Ports > Network [x] > Network [x] Setup > Reports Use To Print Setup Page Print a report containing information about the network printer settings, such as the TCP/IP address. To access the menu, navigate to a wireless...
User Guide
Page 100
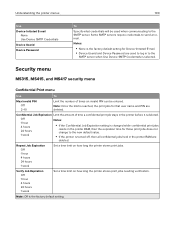
... SMTP server when Use Device SMTP Credentials is the factory default setting for Device‑Initiated E‑mail. • Device Userid and Device Password are deleted. Notes: • None is selected. Security menu MS315, MS415, and MS417 security menu Confidential Print menu Use To Max Invalid PIN Off 2-10 Limit the number of time a confidential print job stays in the printer RAM, then the expiration time for that user...
... SMTP server when Use Device SMTP Credentials is the factory default setting for Device‑Initiated E‑mail. • Device Userid and Device Password are deleted. Notes: • None is selected. Security menu MS315, MS415, and MS417 security menu Confidential Print menu Use To Max Invalid PIN Off 2-10 Limit the number of time a confidential print job stays in the printer RAM, then the expiration time for that user...

User Guide
Page 109
... Lexmark. Send anonymous device usage information to check for jammed paper automatically. Note: Auto is the factory default setting. Note: On is the factory default setting. Determine how the printer, while in idle state, reacts to a short press of the Sleep button. Understanding the printer menus Use Print Recovery Auto Continue Disabled 5-255 sec Print Recovery Jam Recovery On Off Auto Print Recovery Jam Assist On Off Print Recovery Page Protect Off On Information Sent to Lexmark Supplies and Page...
... Lexmark. Send anonymous device usage information to check for jammed paper automatically. Note: Auto is the factory default setting. Note: On is the factory default setting. Determine how the printer, while in idle state, reacts to a short press of the Sleep button. Understanding the printer menus Use Print Recovery Auto Continue Disabled 5-255 sec Print Recovery Jam Recovery On Off Auto Print Recovery Jam Assist On Off Print Recovery Page Protect Off On Information Sent to Lexmark Supplies and Page...
User Guide
Page 110
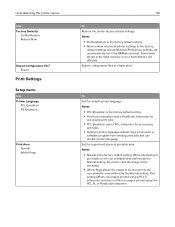
... jobs. • PCL Emulation uses a PCL interpreter for processing print jobs. • Setting a printer language default does not prevent a software program from sending print jobs that use another printer language. To Set the default printer language. Notes: • PCL Emulation is the factory default setting. Understanding the printer menus Use Factory Defaults Do Not Restore Restore Now Export Configuration File1 Export Print Settings Setup menu Use Printer Language PCL Emulation PS Emulation Print Area Normal Whole Page 110 To Restore the printer factory default settings...
... jobs. • PCL Emulation uses a PCL interpreter for processing print jobs. • Setting a printer language default does not prevent a software program from sending print jobs that use another printer language. To Set the default printer language. Notes: • PCL Emulation is the factory default setting. Understanding the printer menus Use Factory Defaults Do Not Restore Restore Now Export Configuration File1 Export Print Settings Setup menu Use Printer Language PCL Emulation PS Emulation Print Area Normal Whole Page 110 To Restore the printer factory default settings...
User Guide
Page 161
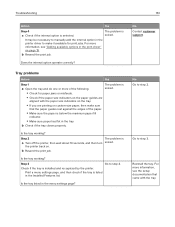
... paper size indicators on the paper guides are aligned with the tray. No Contact customer support. No Go to step 3. Reinstall the tray. the printer back on page 19. Step 3 Go to manually add the internal option in the menu settings page? b Check if the tray closes properly. Troubleshooting 161 Action Yes Step 4 a Check if the internal option is solved. It may be necessary to step 4. b Resend the print job. Step 2 The problem is installed...
... paper size indicators on the paper guides are aligned with the tray. No Contact customer support. No Go to step 3. Reinstall the tray. the printer back on page 19. Step 3 Go to manually add the internal option in the menu settings page? b Check if the tray closes properly. Troubleshooting 161 Action Yes Step 4 a Check if the internal option is solved. It may be necessary to step 4. b Resend the print job. Step 2 The problem is installed...

User Guide
Page 185
... streaked vertical lines appear on prints? Contact customer support at http://support.lexm ark.com or your service representative. The problem is solved. Do the paper texture, type, and weight match the paper in its original wrapper until you use it. Note: Paper absorbs moisture due to step 4. a Reinstall the imaging unit. 1 Remove the toner cartridge, and then the imaging unit. Step 3 a Load paper from the tray settings to match the paper loaded in the tray. • Change...
... streaked vertical lines appear on prints? Contact customer support at http://support.lexm ark.com or your service representative. The problem is solved. Do the paper texture, type, and weight match the paper in its original wrapper until you use it. Note: Paper absorbs moisture due to step 4. a Reinstall the imaging unit. 1 Remove the toner cartridge, and then the imaging unit. Step 3 a Load paper from the tray settings to match the paper loaded in the tray. • Change...
User Guide
Page 201
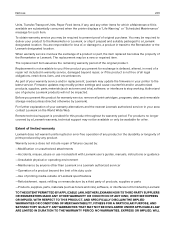
... as toners and inks), software, or interfaces not furnished by any other than Lexmark or a Lexmark authorized servicer -Operation of products, supplies or parts -Products, supplies, parts, materials (such as toners and inks), software, or interfaces to a Lexmark designated location. Notices 201 Units, Transfer/Transport Units, Paper Feed items, if any, and any product. The replacement item assumes the remaining warranty period of genuine Lexmark products will not be a new or repaired item. Remote technical support is...
... as toners and inks), software, or interfaces not furnished by any other than Lexmark or a Lexmark authorized servicer -Operation of products, supplies or parts -Products, supplies, parts, materials (such as toners and inks), software, or interfaces to a Lexmark designated location. Notices 201 Units, Transfer/Transport Units, Paper Feed items, if any, and any product. The replacement item assumes the remaining warranty period of genuine Lexmark products will not be a new or repaired item. Remote technical support is...
User Guide
Page 204
...] 151 Cartridge nearly low [88.xy] 151 Cartridge very low, [x] estimated pages remain [88.xy] 151 Cartridge, imaging unit mismatch [41.xy] 151 Change [paper source] to [custom string] load [orientation] 142, 146 Change [paper source] to [custom type name] load [orientation] 142, 146 Change [paper source] to [paper size] load [orientation] 143, 146 Change [paper source] to [paper type] [paper size] load [orientation] 143, 146 checking an unresponsive printer 158 checking the status of parts and supplies 133 checking the virtual display using the Embedded Web Server 66 cleaning exterior...
...] 151 Cartridge nearly low [88.xy] 151 Cartridge very low, [x] estimated pages remain [88.xy] 151 Cartridge, imaging unit mismatch [41.xy] 151 Change [paper source] to [custom string] load [orientation] 142, 146 Change [paper source] to [custom type name] load [orientation] 142, 146 Change [paper source] to [paper size] load [orientation] 143, 146 Change [paper source] to [paper type] [paper size] load [orientation] 143, 146 checking an unresponsive printer 158 checking the status of parts and supplies 133 checking the virtual display using the Embedded Web Server 66 cleaning exterior...

User Guide
Page 205
...find 61 Embedded Web Server- Print job canceled. 152 custom paper type assigning 42, 44 configuring 42 custom paper type name creating 43 Custom Type [x] assigning a paper type 44 Custom Type [x] name creating 43 Custom Types menu 86 customer support contacting 192 D Default Source menu 75, 79 Defective flash detected [51] 147 Defective flash memory [51] 143 device and network settings erasing 72 directory list printing 58 display troubleshooting printer display is blank 160 display, printer control panel adjusting brightness 69 documents, printing from a computer 54...
...find 61 Embedded Web Server- Print job canceled. 152 custom paper type assigning 42, 44 configuring 42 custom paper type name creating 43 Custom Type [x] assigning a paper type 44 Custom Type [x] name creating 43 Custom Types menu 86 customer support contacting 192 D Default Source menu 75, 79 Defective flash detected [51] 147 Defective flash memory [51] 143 device and network settings erasing 72 directory list printing 58 display troubleshooting printer display is blank 160 display, printer control panel adjusting brightness 69 documents, printing from a computer 54...

User Guide
Page 207
... door 129 in the standard bin 130 in trays 131 paper jams avoiding 125 paper labels loading, multipurpose feeder 38 Paper Loading menu 85 paper size setting 32 Paper Size/Type menu 76, 79 paper sizes supported by the printer 51 paper stop, using 33 Paper Texture menu 82 Paper too short [34] 145 paper type setting 32 paper types duplex support 52 supported by printer 52 where to load 52 Paper Weight menu 84 parallel port 17 Parallel port disabled [56] 155 parts checking status 133 using genuine Lexmark 134 PCL Emul menu 115, 120 PDF menu 119 Personal Identification Number method using...
... door 129 in the standard bin 130 in trays 131 paper jams avoiding 125 paper labels loading, multipurpose feeder 38 Paper Loading menu 85 paper size setting 32 Paper Size/Type menu 76, 79 paper sizes supported by the printer 51 paper stop, using 33 Paper Texture menu 82 Paper too short [34] 145 paper type setting 32 paper types duplex support 52 supported by printer 52 where to load 52 Paper Weight menu 84 parallel port 17 Parallel port disabled [56] 155 parts checking status 133 using genuine Lexmark 134 PCL Emul menu 115, 120 PDF menu 119 Personal Identification Number method using...
User Guide
Page 209
... paper 46 Serial option [x] error [54] 149 Set Date and Time menu 101 setting paper size 32, 33 paper type 32, 33 TCP/IP address 93 Universal paper size 32 setting Hibernate Timeout 65, 68 Setup menu 110 shipping the printer 141 Sleep mode adjusting 70 SMTP server not set up. Remove some. [58] 145 Contact system administrator. 149, 151 SMTP Setup menu 99 standard bin, using 33 Standard Network menu 88, 91 Standard network software error [54] 149 Standard Parallel menu 97 Standard parallel port disabled [56] 150 standard tray loading 34 Standard USB menu 95 Standard USB port disabled...
... paper 46 Serial option [x] error [54] 149 Set Date and Time menu 101 setting paper size 32, 33 paper type 32, 33 TCP/IP address 93 Universal paper size 32 setting Hibernate Timeout 65, 68 Setup menu 110 shipping the printer 141 Sleep mode adjusting 70 SMTP server not set up. Remove some. [58] 145 Contact system administrator. 149, 151 SMTP Setup menu 99 standard bin, using 33 Standard Network menu 88, 91 Standard network software error [54] 149 Standard Parallel menu 97 Standard parallel port disabled [56] 150 standard tray loading 34 Standard USB menu 95 Standard USB port disabled...

