User Manual
Page 7
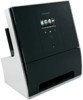
... sides of your printer, read the User's Guide carefully, and make sure you're satisfied. And if you print on both sides of the paper manually or automatically (depending on one sheet. By selecting certain printer settings or tasks, you may be delighted to print multiple pages on one side of...
... sides of your printer, read the User's Guide carefully, and make sure you're satisfied. And if you print on both sides of the paper manually or automatically (depending on one sheet. By selecting certain printer settings or tasks, you may be delighted to print multiple pages on one side of...
User Manual
Page 27
... CD or DVD drive. 3 Follow the instructions on the computer screen. Using the printer software 27 Note: Updated printer software may be available at www.lexmark.com. 2 Navigate to: Downloads > Driver Finder > select your printer > select your operating system 3 Download the driver and install the printer software. For Macintosh users 1 Close...: If you are using Mac OS X version 10.4, then restart your computer. If the installation dialog does not appear after a minute, then launch the CD manually: a Click , or click Start and then click Run.
... CD or DVD drive. 3 Follow the instructions on the computer screen. Using the printer software 27 Note: Updated printer software may be available at www.lexmark.com. 2 Navigate to: Downloads > Driver Finder > select your printer > select your operating system 3 Download the driver and install the printer software. For Macintosh users 1 Close...: If you are using Mac OS X version 10.4, then restart your computer. If the installation dialog does not appear after a minute, then launch the CD manually: a Click , or click Start and then click Run.
User Manual
Page 38
... the paper (duplexing) Printing on both sides of the paper (duplexing) automatically The automatic duplex unit, available only on both sides of the paper (duplexing) manually. Side Flip is the setting most often used. 5 Click OK to print duplex using other paper sizes, then see the instructions for printing on select...
... the paper (duplexing) Printing on both sides of the paper (duplexing) automatically The automatic duplex unit, available only on both sides of the paper (duplexing) manually. Side Flip is the setting most often used. 5 Click OK to print duplex using other paper sizes, then see the instructions for printing on select...
User Manual
Page 40
... Windows users 1 With a document open, click File > Print. 2 Click Properties, Preferences, Options, or Setup. 3 Navigate to: Advanced tab > 2-Sided Printing area > select Manual Note: The "Print Instruction Page to : Open Print Queue > Printer Setup > Driver tab or Printer Setup > Installable Options 3 From the Two-Sided Printing Dry Time ...
... Windows users 1 With a document open, click File > Print. 2 Click Properties, Preferences, Options, or Setup. 3 Navigate to: Advanced tab > 2-Sided Printing area > select Manual Note: The "Print Instruction Page to : Open Print Queue > Printer Setup > Driver tab or Printer Setup > Installable Options 3 From the Two-Sided Printing Dry Time ...
User Manual
Page 50
...printing the photos. For more information, see the LexPrint User's Guide. 3 To print the photo, tap . If you want to dry at www.lexmark.com/lexprint. • From the Settings menu screen in LexPrint, the printer is installed on your printer model, you selected on the proof sheet. 7... printer is in the print queue. 1 From the LexPrint home screen, tap , and then select a photo album. 2 Tap the photo you have to manually select your mobile device. Note: For best results, allow the prints to customize print settings, then see the LexPrint User's Guide. • The printer, ...
...printing the photos. For more information, see the LexPrint User's Guide. 3 To print the photo, tap . If you want to dry at www.lexmark.com/lexprint. • From the Settings menu screen in LexPrint, the printer is installed on your printer model, you selected on the proof sheet. 7... printer is in the print queue. 1 From the LexPrint home screen, tap , and then select a photo album. 2 Tap the photo you have to manually select your mobile device. Note: For best results, allow the prints to customize print settings, then see the LexPrint User's Guide. • The printer, ...
User Manual
Page 59
Note: You cannot make duplex copies using other paper sizes, then see the instructions for making a duplex copy manually. Making a duplex copy manually 1 Load the original document. Making a duplex copy Making a duplex copy automatically The automatic duplex unit, available only on envelopes, card stock, or photo paper. 1 Load ...
Note: You cannot make duplex copies using other paper sizes, then see the instructions for making a duplex copy manually. Making a duplex copy manually 1 Load the original document. Making a duplex copy Making a duplex copy automatically The automatic duplex unit, available only on envelopes, card stock, or photo paper. 1 Load ...
User Manual
Page 69
... OK > Add E-mail Address. History-Import a contact from the Address Book. - Note: This setting appears only when the Authentication Type is set to add a contact manually or import a contact: - If you want to change the e-mail settings 1 From the home screen, navigate to: > E-mail Setup 2 Touch each item. • Return E-mail...
... OK > Add E-mail Address. History-Import a contact from the Address Book. - Note: This setting appears only when the Authentication Type is set to add a contact manually or import a contact: - If you want to change the e-mail settings 1 From the home screen, navigate to: > E-mail Setup 2 Touch each item. • Return E-mail...
User Manual
Page 72
...: Destination > Scan to E-mail 3 Select the output file type you want to enter or select the recipients: • Enter E-mail Address-Enter the e-mail address manually. • Address Book-Touch Sort by Name or Sort by Group, and then select the contact. • History-Select the name or e-mail address from...
...: Destination > Scan to E-mail 3 Select the output file type you want to enter or select the recipients: • Enter E-mail Address-Enter the e-mail address manually. • Address Book-Touch Sort by Name or Sort by Group, and then select the contact. • History-Select the name or e-mail address from...
User Manual
Page 73
... the file name of the document > Continue • If you want to enter or select the recipients: • Enter E-mail Address-Enter the e-mail address manually. • Address Book-Touch Sort by Name or Sort by Group, and then select the contact. • History-Select the name or e-mail address from...
... the file name of the document > Continue • If you want to enter or select the recipients: • Enter E-mail Address-Enter the e-mail address manually. • Address Book-Touch Sort by Name or Sort by Group, and then select the contact. • History-Select the name or e-mail address from...
User Manual
Page 74
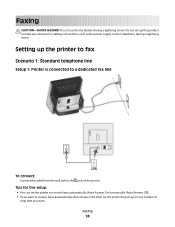
Faxing 74 Do not set up this setup: • You can set the printer to receive faxes automatically (Auto Answer On) or manually (Auto Answer Off). • If you want to receive faxes automatically (Auto Answer On), then set the printer to pick up the printer to fax ...
Faxing 74 Do not set up this setup: • You can set the printer to receive faxes automatically (Auto Answer On) or manually (Auto Answer Off). • If you want to receive faxes automatically (Auto Answer On), then set the printer to pick up the printer to fax ...
User Manual
Page 77
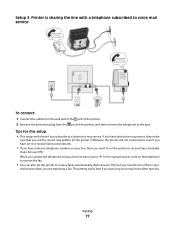
... of the printer, and then connect the telephone to a distinctive ring service. When you answer the telephone and you hear fax tones, press *9* or the manual answer code on your line, then you are expecting a fax. If you have distinctive ring service, then make sure that you are using voice mail... port. This setting works best if you need to set it to receive faxes automatically. • If you have set the printer to receive faxes manually (Auto Answer Off). Faxing 77 Tips for the printer.
... of the printer, and then connect the telephone to a distinctive ring service. When you answer the telephone and you hear fax tones, press *9* or the manual answer code on your line, then you are expecting a fax. If you have distinctive ring service, then make sure that you are using voice mail... port. This setting works best if you need to set it to receive faxes automatically. • If you have set the printer to receive faxes manually (Auto Answer Off). Faxing 77 Tips for the printer.
User Manual
Page 86
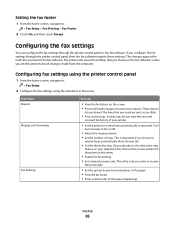
...code you configure the fax settings through the printer control panel or the fax software. Turn Auto Answer to receive faxes automatically or manually. The printer also saves the settings that you view the sent and received fax history of your telephone line, then set the .... • Print activity logs. Configuring fax settings using the selections in this menu. • Enable fax forwarding. • Set a manual answer code. If you enter to receive faxes manually. • Set the printer to print incoming faxes to : > Fax Setup > Fax Printing > Fax Footer 2 Touch On, and...
...code you configure the fax settings through the printer control panel or the fax software. Turn Auto Answer to receive faxes automatically or manually. The printer also saves the settings that you view the sent and received fax history of your telephone line, then set the .... • Print activity logs. Configuring fax settings using the selections in this menu. • Enable fax forwarding. • Set a manual answer code. If you enter to receive faxes manually. • Set the printer to print incoming faxes to : > Fax Setup > Fax Printing > Fax Footer 2 Touch On, and...
User Manual
Page 88
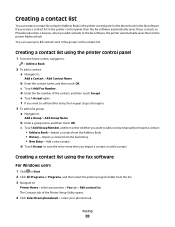
... select whether you want to save up to : Add a Group > Add Group Name b Enter a group name, and then touch OK. d Touch Accept to add a contact manually or import a contact: • Address Book-Import a contact from the Address Book. • History-Import a contact from the fax history. • New Entry-Add a new...
... select whether you want to save up to : Add a Group > Add Group Name b Enter a group name, and then touch OK. d Touch Accept to add a contact manually or import a contact: • Address Book-Import a contact from the Address Book. • History-Import a contact from the fax history. • New Entry-Add a new...

User Manual
Page 91
... you have set the printer to set a color or black-and-white fax, adjust the quality of the fax, set the printer to receive faxes manually (Auto Answer Off), then make sure that the printer is on and connected to : Printer Home > select your printer.
... you have set the printer to set a color or black-and-white fax, adjust the quality of the fax, set the printer to receive faxes manually (Auto Answer Off), then make sure that the printer is on and connected to : Printer Home > select your printer.
User Manual
Page 92
...skipped the fax setup initially, do not need to run the installer again. on the printer or *9* Note: The default code for answering faxes manually is *9*, but for the printer. If the call . Otherwise, the printer will not receive faxes even if you have multiple numbers on the telephone... attached to the printer. Receiving faxes manually 1 Make sure that Auto Answer is off: a From the home screen, navigate to: > Fax Setup > Ringing and Answering > Auto Answer b If ...
...skipped the fax setup initially, do not need to run the installer again. on the printer or *9* Note: The default code for answering faxes manually is *9*, but for the printer. If the call . Otherwise, the printer will not receive faxes even if you have multiple numbers on the telephone... attached to the printer. Receiving faxes manually 1 Make sure that Auto Answer is off: a From the home screen, navigate to: > Fax Setup > Ringing and Answering > Auto Answer b If ...
User Manual
Page 95
Adjusting the ringer volume If you set the printer to receive faxes manually, then make sure that you set to Off, especially if you subscribe to a distinctive ring service offered by your telephone network. What settings work best ...
Adjusting the ringer volume If you set the printer to receive faxes manually, then make sure that you set to Off, especially if you subscribe to a distinctive ring service offered by your telephone network. What settings work best ...
User Manual
Page 96
... import a contact. 3 Navigate to: More Options > Schedule a Fax 4 Enter the time you want to send the fax, and then touch Accept. 5 Touch to receive faxes manually (Auto Answer Off). If your high-quality fax is not being received, then try selecting a lower quality. This setting lets you receive both voice calls...
... import a contact. 3 Navigate to: More Options > Schedule a Fax 4 Enter the time you want to send the fax, and then touch Accept. 5 Touch to receive faxes manually (Auto Answer Off). If your high-quality fax is not being received, then try selecting a lower quality. This setting lets you receive both voice calls...

User Manual
Page 101
...to the same wireless network where you want to install the driver. If the installation dialog does not appear after a minute, then launch the CD manually: a Click , or click Start and then click Run. Networking 101 For Windows users 1 Close all open software programs. 2 Insert the installation...the computer screen for installing a configured printer on a new computer. If the installation dialog does not appear after a minute, then launch the CD manually: a Click , or click Start and then click Run. Installing the printer on other computer on the network. For Macintosh users 1 Close all...
...to the same wireless network where you want to install the driver. If the installation dialog does not appear after a minute, then launch the CD manually: a Click , or click Start and then click Run. Networking 101 For Windows users 1 Close all open software programs. 2 Insert the installation...the computer screen for installing a configured printer on a new computer. If the installation dialog does not appear after a minute, then launch the CD manually: a Click , or click Start and then click Run. Installing the printer on other computer on the network. For Macintosh users 1 Close all...
User Manual
Page 111
... the address field. • See the documentation that came with your access point (wireless router). All devices on the network must enter the network information manually in Web server that can find my SSID? • View the settings on the access point. 1 Open a Web browser, and then type the IP address...
... the address field. • See the documentation that came with your access point (wireless router). All devices on the network must enter the network information manually in Web server that can find my SSID? • View the settings on the access point. 1 Open a Web browser, and then type the IP address...
User Manual
Page 121
... panel, navigate to as you will be configured to the printer using on the access point. For Macintosh users 1 From the Apple menu, navigate to manually enter an address and other network information after selecting your access point.
... panel, navigate to as you will be configured to the printer using on the access point. For Macintosh users 1 From the Apple menu, navigate to manually enter an address and other network information after selecting your access point.


