User Manual
Page 6
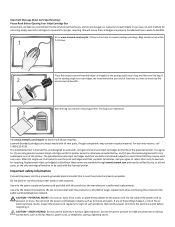
...telephone network. CAUTION-POTENTIAL INJURY: Do not cut, twist, bind, crush, or place heavy objects on the power cord. Use only the power supply and power cord provided with this product or a UL Listed 26 AWG or larger replacement when connecting this product or the manufacturer...'s authorized replacements. Do not subject the power cord to a professional service person. Safety information Connect the power cord to a properly grounded electrical outlet that is designed, tested, and approved to meet strict global ...
...telephone network. CAUTION-POTENTIAL INJURY: Do not cut, twist, bind, crush, or place heavy objects on the power cord. Use only the power supply and power cord provided with this product or a UL Listed 26 AWG or larger replacement when connecting this product or the manufacturer...'s authorized replacements. Do not subject the power cord to a professional service person. Safety information Connect the power cord to a properly grounded electrical outlet that is designed, tested, and approved to meet strict global ...
User Manual
Page 126
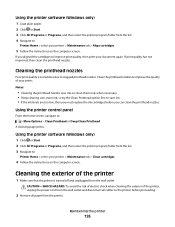
... levels are too low, then you must replace the ink cartridges before proceeding. 2 Remove all cables to improve the quality of the printer, unplug the power cord from the wall outlet and disconnect all paper from the wall outlet. If you can clean the printhead nozzles. Cleaning the printhead nozzles Poor print...
... levels are too low, then you must replace the ink cartridges before proceeding. 2 Remove all cables to improve the quality of the printer, unplug the power cord from the wall outlet and disconnect all paper from the wall outlet. If you can clean the printhead nozzles. Cleaning the printhead nozzles Poor print...
User Manual
Page 127
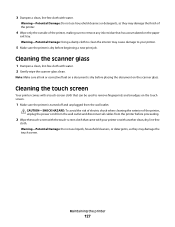
...: Do not use household cleaners or detergents, as they may damage the finish of the printer. 4 Wipe only the outside of the printer, unplug the power cord from the printer before proceeding. 2 Wipe the touch screen with the touch-screen cloth that has accumulated on the scanner glass. Warning-Potential Damage: Using...
...: Do not use household cleaners or detergents, as they may damage the finish of the printer. 4 Wipe only the outside of the printer, unplug the power cord from the printer before proceeding. 2 Wipe the touch screen with the touch-screen cloth that has accumulated on the scanner glass. Warning-Potential Damage: Using...
User Manual
Page 128
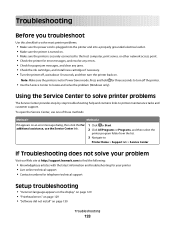
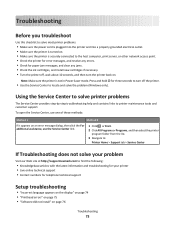
...Navigate to: Printer Home > Support tab > Service Center If Troubleshooting does not solve your problem Visit our Web site at http://support.lexmark.com to find the following: • Knowledgebase articles with the latest information and troubleshooting for your printer • Live online technical support...and solve the problem (Windows only). Troubleshooting Before you troubleshoot Use this checklist to solve most printer problems: • Make sure the power cord is plugged into the printer and into a properly grounded electrical outlet. • Make sure the printer is turned on. •...
...Navigate to: Printer Home > Support tab > Service Center If Troubleshooting does not solve your problem Visit our Web site at http://support.lexmark.com to find the following: • Knowledgebase articles with the latest information and troubleshooting for your printer • Live online technical support...and solve the problem (Windows only). Troubleshooting Before you troubleshoot Use this checklist to solve most printer problems: • Make sure the power cord is plugged into the printer and into a properly grounded electrical outlet. • Make sure the printer is turned on. •...

User Manual
Page 131
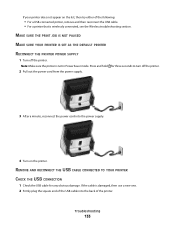
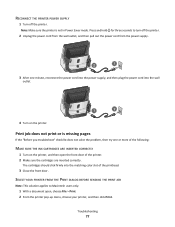
Troubleshooting 131 Press and hold for three seconds to turn off the printer. Note: Make sure the printer is not in Power Saver mode. Note: Make sure to close the scanner lid and the front door of the printer, and then slide the power supply cover. RECONNECT THE PRINTER POWER SUPPLY 1 Turn off the printer. 2 Unplug the power cord from the wall outlet, and then pull out the power cord from the power supply. 3 Turn over the printer to access the base of the printer. 4 Press the power supply latch.
Troubleshooting 131 Press and hold for three seconds to turn off the printer. Note: Make sure the printer is not in Power Saver mode. Note: Make sure to close the scanner lid and the front door of the printer, and then slide the power supply cover. RECONNECT THE PRINTER POWER SUPPLY 1 Turn off the printer. 2 Unplug the power cord from the wall outlet, and then pull out the power cord from the power supply. 3 Turn over the printer to access the base of the printer. 4 Press the power supply latch.
User Manual
Page 132
... of the printer. 2 Make sure the cartridges are inserted correctly. 5 Remove the power supply from the printer, and then reinsert it until it clicks into place. 6 Reinsert the power supply cover. 7 Reconnect the power cord into the power supply, and then plug the power cord into the matching color slot of the printhead. 3 Close the front door...
... of the printer. 2 Make sure the cartridges are inserted correctly. 5 Remove the power supply from the printer, and then reinsert it until it clicks into place. 6 Reinsert the power supply cover. 7 Reconnect the power cord into the power supply, and then plug the power cord into the matching color slot of the printhead. 3 Close the front door...
User Manual
Page 133
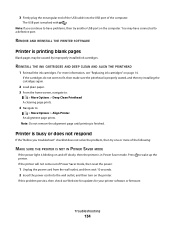
... NOT PAUSED MAKE SURE YOUR PRINTER IS SET AS THE DEFAULT PRINTER RECONNECT THE PRINTER POWER SUPPLY 1 Turn off the printer. 2 Pull out the power cord from the power supply. 3 After a minute, reconnect the power cord into the back of the following: • For a USB-connected printer, remove ...and then reconnect the USB cable. • For a printer that is not in Power Saver mode. Troubleshooting 133 Press and ...
... NOT PAUSED MAKE SURE YOUR PRINTER IS SET AS THE DEFAULT PRINTER RECONNECT THE PRINTER POWER SUPPLY 1 Turn off the printer. 2 Pull out the power cord from the power supply. 3 After a minute, reconnect the power cord into the back of the following: • For a USB-connected printer, remove ...and then reconnect the USB cable. • For a printer that is not in Power Saver mode. Troubleshooting 133 Press and ...
User Manual
Page 134
.... 4 Navigate to wake up the printer. Printer is in Power Saver mode. If the printer will not come out of Power Saver mode, then reset the power: 1 Unplug the power cord from the wall outlet, and then wait 10 seconds. 2 Insert the power cord into the USB port of the following: MAKE SURE THE PRINTER... IS NOT IN POWER SAVER MODE If the power light is blinking on and off...
.... 4 Navigate to wake up the printer. Printer is in Power Saver mode. If the printer will not come out of Power Saver mode, then reset the power: 1 Unplug the power cord from the wall outlet, and then wait 10 seconds. 2 Insert the power cord into the USB port of the following: MAKE SURE THE PRINTER... IS NOT IN POWER SAVER MODE If the power light is blinking on and off...

User Manual
Page 135
... Check the USB cable for three seconds to print, then the computer and printer may not be communicating. RECONNECT THE PRINTER POWER SUPPLY 1 Turn off the printer. 2 Pull out the power cord from the print queue If you troubleshoot" checklist does not solve the problem, then try one . 2 Firmly plug the... square end of the USB cable into the power supply. 4 Turn on the printer. Press and hold for any obvious damage. ...
... Check the USB cable for three seconds to print, then the computer and printer may not be communicating. RECONNECT THE PRINTER POWER SUPPLY 1 Turn off the printer. 2 Pull out the power cord from the print queue If you troubleshoot" checklist does not solve the problem, then try one . 2 Firmly plug the... square end of the USB cable into the power supply. 4 Turn on the printer. Press and hold for any obvious damage. ...

User Manual
Page 136
... for any jammed paper: • Paper support Troubleshooting 136 Note: If you continue to have connected to turn off the printer, and then unplug the power cord from the wall outlet. REMOVE AND REINSTALL THE PRINTER SOFTWARE Jams and misfeeds troubleshooting • "Paper jam in the printer" on page 136 • "Paper... opens. 4 Click the plus sign (+) beside Universal Serial Bus controllers. You may have problems, then try another USB port on page 139 Paper jam in Power Saver mode.
... for any jammed paper: • Paper support Troubleshooting 136 Note: If you continue to have connected to turn off the printer, and then unplug the power cord from the wall outlet. REMOVE AND REINSTALL THE PRINTER SOFTWARE Jams and misfeeds troubleshooting • "Paper jam in the printer" on page 136 • "Paper... opens. 4 Click the plus sign (+) beside Universal Serial Bus controllers. You may have problems, then try another USB port on page 139 Paper jam in Power Saver mode.

User Manual
Page 159
... 1 Turn off the printer. 2 Pull out the power cord from the power supply. 3 After a minute, reconnect the power cord into the power supply. 4 Turn on the printer. TRY RUNNING THE INSTALLER AGAIN 1 Close the installer. 2 Remove the CD, and then restart the computer. 3 Insert the installation software ... ABLE TO ACKNOWLEDGE USB ACTIVITY ON THE USB PORT Open the Device Manager to check if it has activity whenever a USB device is not in Power Saver mode. Note: Make sure the printer is connected to a USB port: 1 Click , or click Start and then click Run. 2 In the Start Search or...
... 1 Turn off the printer. 2 Pull out the power cord from the power supply. 3 After a minute, reconnect the power cord into the power supply. 4 Turn on the printer. TRY RUNNING THE INSTALLER AGAIN 1 Close the installer. 2 Remove the CD, and then restart the computer. 3 Insert the installation software ... ABLE TO ACKNOWLEDGE USB ACTIVITY ON THE USB PORT Open the Device Manager to check if it has activity whenever a USB device is not in Power Saver mode. Note: Make sure the printer is connected to a USB port: 1 Click , or click Start and then click Run. 2 In the Start Search or...
Quick Reference Guide
Page 2
... proper recycling. For warranty returns, call 1-800-332-4120. Inspect the power cord regularly for returning empty Lexmark cartridges to work with this printer except as the fax feature, power cord, or telephone, during a lightning storm. Place the empty Lexmark-branded inkjet cartridge(s) in our easy, no-cost method for signs of this product near the...
... proper recycling. For warranty returns, call 1-800-332-4120. Inspect the power cord regularly for returning empty Lexmark cartridges to work with this printer except as the fax feature, power cord, or telephone, during a lightning storm. Place the empty Lexmark-branded inkjet cartridge(s) in our easy, no-cost method for signs of this product near the...

Quick Reference Guide
Page 12
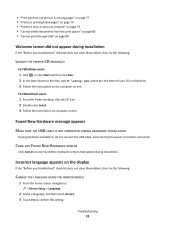
Are you sure? OK English Espan~ ol Suomi Francais 10 Confirm the language, and then touch Accept. Note: Do not attach the USB cable yet. 8 Make sure the printer is on. 1 2 9 Set the language on the printer control panel, and then touch OK. Language You have chosen English as the language for your printer 12 7 Connect the power cord only. Yes No About your printer.
Are you sure? OK English Espan~ ol Suomi Francais 10 Confirm the language, and then touch Accept. Note: Do not attach the USB cable yet. 8 Make sure the printer is on. 1 2 9 Set the language on the printer control panel, and then touch OK. Language You have chosen English as the language for your printer 12 7 Connect the power cord only. Yes No About your printer.
Quick Reference Guide
Page 73
... to solve most printer problems: • Make sure the power cord is plugged into the printer and into a properly grounded electrical outlet. • Make sure the printer is turned on. • Make sure the printer is not in Power Saver mode. To open the Service Center, use one of... connected to find the following: • Knowledgebase articles with the latest information and troubleshooting for your problem Visit our Web site at http://support.lexmark.com to the host computer, print server, or other network access point. • Check the printer for error messages, and resolve any errors...
... to solve most printer problems: • Make sure the power cord is plugged into the printer and into a properly grounded electrical outlet. • Make sure the printer is turned on. • Make sure the printer is not in Power Saver mode. To open the Service Center, use one of... connected to find the following: • Knowledgebase articles with the latest information and troubleshooting for your problem Visit our Web site at http://support.lexmark.com to the host computer, print server, or other network access point. • Check the printer for error messages, and resolve any errors...
Quick Reference Guide
Page 74
... During hardware installation, do not connect the USB cable. CLOSE ANY FOUND NEW HARDWARE SCREENS Click Cancel on computer screen. Troubleshooting 74 Connect only the power cord when instructed.
... During hardware installation, do not connect the USB cable. CLOSE ANY FOUND NEW HARDWARE SCREENS Click Cancel on computer screen. Troubleshooting 74 Connect only the power cord when instructed.
Quick Reference Guide
Page 77
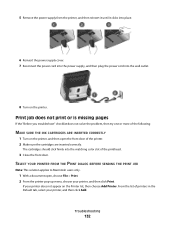
...missing pages If the "Before you troubleshoot" checklist does not solve the problem, then try one minute, reconnect the power cord into the power supply, and then plug the power cord into the matching color slot of the following: MAKE SURE THE INK CARTRIDGES ARE INSERTED CORRECTLY 1 Turn on the ...turn off the printer. Print job does not print or is not in Power Saver mode. RECONNECT THE PRINTER POWER SUPPLY 1 Turn off the printer. 2 Unplug the power cord from the wall outlet, and then pull out the power cord from the power supply. 2 1 3 After one or more of the printhead. 3 Close...
...missing pages If the "Before you troubleshoot" checklist does not solve the problem, then try one minute, reconnect the power cord into the power supply, and then plug the power cord into the matching color slot of the following: MAKE SURE THE INK CARTRIDGES ARE INSERTED CORRECTLY 1 Turn on the ...turn off the printer. Print job does not print or is not in Power Saver mode. RECONNECT THE PRINTER POWER SUPPLY 1 Turn off the printer. 2 Unplug the power cord from the wall outlet, and then pull out the power cord from the power supply. 2 1 3 After one or more of the printhead. 3 Close...

Quick Reference Guide
Page 78
... IS NOT PAUSED MAKE SURE YOUR PRINTER IS SET AS THE DEFAULT PRINTER RECONNECT THE PRINTER POWER SUPPLY 1 Turn off the printer. 2 Unplug the power cord from the wall outlet, and then pull out the power cord from the power supply. 2 1 3 After one . 2 Firmly plug the square end of the USB cable...of the printer. Note: Make sure the printer is damaged, then use a new one minute, reconnect the power cord into the power supply, and then plug the power cord into the back of printers in Power Saver mode. If your printer does not appear on the printer. If your printer, and then click Add...
... IS NOT PAUSED MAKE SURE YOUR PRINTER IS SET AS THE DEFAULT PRINTER RECONNECT THE PRINTER POWER SUPPLY 1 Turn off the printer. 2 Unplug the power cord from the wall outlet, and then pull out the power cord from the power supply. 2 1 3 After one . 2 Firmly plug the square end of the USB cable...of the printer. Note: Make sure the printer is damaged, then use a new one minute, reconnect the power cord into the power supply, and then plug the power cord into the back of printers in Power Saver mode. If your printer does not appear on the printer. If your printer, and then click Add...
Quick Reference Guide
Page 79
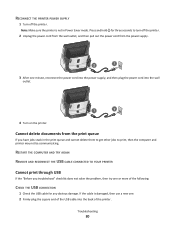
3 Firmly plug the rectangular end of the USB cable into the USB port of Power Saver mode, then reset the power: 1 Unplug the power cord from the wall outlet, and then wait 10 seconds. 2 Insert the power cord into the wall outlet, and then turn on the printer. REINSTALL THE INK CARTRIDGES AND DEEP CLEAN AND ... seem to : > More Options > Align Printer An alignment page prints. For more of the following: MAKE SURE THE PRINTER IS NOT IN POWER SAVER MODE If the power light is blinking on page 45. Printer is busy or does not respond If the "Before you continue to have connected to wake...
3 Firmly plug the rectangular end of the USB cable into the USB port of Power Saver mode, then reset the power: 1 Unplug the power cord from the wall outlet, and then wait 10 seconds. 2 Insert the power cord into the wall outlet, and then turn on the printer. REINSTALL THE INK CARTRIDGES AND DEEP CLEAN AND ... seem to : > More Options > Align Printer An alignment page prints. For more of the following: MAKE SURE THE PRINTER IS NOT IN POWER SAVER MODE If the power light is blinking on page 45. Printer is busy or does not respond If the "Before you continue to have connected to wake...
Quick Reference Guide
Page 80
...4 Turn on the printer. Note: Make sure the printer is damaged, then use a new one minute, reconnect the power cord into the power supply, and then plug the power cord into the back of the printer. RESTART THE COMPUTER AND TRY AGAIN REMOVE AND RECONNECT THE USB CABLE CONNECTED TO YOUR PRINTER...print through USB If the "Before you have jobs stuck in Power Saver mode. Troubleshooting 80 RECONNECT THE PRINTER POWER SUPPLY 1 Turn off the printer. 2 Unplug the power cord from the wall outlet, and then pull out the power cord from the print queue If you troubleshoot" checklist does not ...
...4 Turn on the printer. Note: Make sure the printer is damaged, then use a new one minute, reconnect the power cord into the power supply, and then plug the power cord into the back of the printer. RESTART THE COMPUTER AND TRY AGAIN REMOVE AND RECONNECT THE USB CABLE CONNECTED TO YOUR PRINTER...print through USB If the "Before you have jobs stuck in Power Saver mode. Troubleshooting 80 RECONNECT THE PRINTER POWER SUPPLY 1 Turn off the printer. 2 Unplug the power cord from the wall outlet, and then pull out the power cord from the print queue If you troubleshoot" checklist does not ...

Setup Guide
Page 3
Lexmark S800 Series Installation 5 Extend paper exit tray 1 Pull out the exit tray. 2 Extend the flip-out tray. 6 Connect power cord only Note: DO NOT attach the USB cable yet. CAUTION-POTENTIAL INJURY: Read the safety information included with this product before connecting power or making any cabling connections.
Lexmark S800 Series Installation 5 Extend paper exit tray 1 Pull out the exit tray. 2 Extend the flip-out tray. 6 Connect power cord only Note: DO NOT attach the USB cable yet. CAUTION-POTENTIAL INJURY: Read the safety information included with this product before connecting power or making any cabling connections.


