Quick Reference
Page 2
...touching. 2 Lift the flap at the front of the printer, and then remove any jammed sheets of the printer might be hot. If the jam is visible, then pull it out gently. After clearing the paper jam 1 Align and insert the unit. 2 Insert the tray. 3 Close the doors...., allow the surface to release the jam. 3 Pull the jammed sheets from the printer. Clearing jams under Tray 1 1 Remove the tray from the duplex area. 2 Remove the jam. CAUTION-HOT SURFACE: The inside of paper. 2 Locate the lever shown. Clearing paper jams If a jammed sheet is not visible, then complete the...
...touching. 2 Lift the flap at the front of the printer, and then remove any jammed sheets of the printer might be hot. If the jam is visible, then pull it out gently. After clearing the paper jam 1 Align and insert the unit. 2 Insert the tray. 3 Close the doors...., allow the surface to release the jam. 3 Pull the jammed sheets from the printer. Clearing jams under Tray 1 1 Remove the tray from the duplex area. 2 Remove the jam. CAUTION-HOT SURFACE: The inside of paper. 2 Locate the lever shown. Clearing paper jams If a jammed sheet is not visible, then complete the...

User Guide
Page 6
Contents 6 Understanding jam messages and locations 124 200 paper jam...126 201 paper jam...128 202 paper jam...129 231 paper jam...130 233 paper jam...132 234 paper jam...132 235 paper jam...133 24x paper jam...133 251 paper jam...134 Troubleshooting 136 Understanding printer messages...136 Calibrating ...136 Cartridge Life Exceeded ...136 Change to ...136 Change to ...136 Change to ...137 Change to ...137 Close front door ...137 Load with ...137 Load with ...138 Load with ...138 Load with ...138 Load Manual Feeder with
Contents 6 Understanding jam messages and locations 124 200 paper jam...126 201 paper jam...128 202 paper jam...129 231 paper jam...130 233 paper jam...132 234 paper jam...132 235 paper jam...133 24x paper jam...133 251 paper jam...134 Troubleshooting 136 Understanding printer messages...136 Calibrating ...136 Cartridge Life Exceeded ...136 Change to ...136 Change to ...136 Change to ...137 Change to ...137 Close front door ...137 Load with ...137 Load with ...138 Load with ...138 Load with ...138 Load Manual Feeder with

User Guide
Page 8
...Paper frequently jams...151 Paper jam message remains after jam is cleared 151 Page that jammed does not reprint after you clear the jam 152 Solving print quality problems...152 Isolating print quality problems...152 Blank pages ...153 Characters have jagged or uneven edges ...153 Clipped images...153 Gray background...154 Ghost images ...154 Incorrect margins...155 Paper... horizontal lines ...159 Streaked vertical lines...160 Solid black or white streaks appear on transparencies or paper 161 Embedded Web Server does not open 161 Check the network connections ...161 Check the network ...
...Paper frequently jams...151 Paper jam message remains after jam is cleared 151 Page that jammed does not reprint after you clear the jam 152 Solving print quality problems...152 Isolating print quality problems...152 Blank pages ...153 Characters have jagged or uneven edges ...153 Clipped images...153 Gray background...154 Ghost images ...154 Incorrect margins...155 Paper... horizontal lines ...159 Streaked vertical lines...160 Solid black or white streaks appear on transparencies or paper 161 Embedded Web Server does not open 161 Check the network connections ...161 Check the network ...

User Guide
Page 40
... 5 Press the up or down arrow button until a job is turned off print log features. Minimizing your printer's environmental impact 40 Avoid paper jams Carefully select and load paper to reduce printer noise. You may notice a short delay before the first page is printed. • The printer enters Power Saver mode ... printer models that change when you select a Quiet Mode setting. Reducing printer noise Use Quiet Mode to avoid paper jams. For more ways to quickly select one minute of inactivity. • When the printer enters Power Saver mode, the printer control panel display...
... 5 Press the up or down arrow button until a job is turned off print log features. Minimizing your printer's environmental impact 40 Avoid paper jams Carefully select and load paper to reduce printer noise. You may notice a short delay before the first page is printed. • The printer enters Power Saver mode ... printer models that change when you select a Quiet Mode setting. Reducing printer noise Use Quiet Mode to avoid paper jams. For more ways to quickly select one minute of inactivity. • When the printer enters Power Saver mode, the printer control panel display...

User Guide
Page 126
... front of the following: • Open the front door, and then open the front door, and then remove the unit. Clearing jams 126 Jam number 234 235 24x 251 To access the jam Try one or more of the multipurpose feeder. • If it is not visible, open the rear door. • Remove... Tray 1, and then depress the lever. Lift the flap at the front of the printer, and then remove any jammed sheets. 200 paper jam 1 Remove the tray from the standard exit bin. Remove Tray 2. Remove the...
... front of the following: • Open the front door, and then open the front door, and then remove the unit. Clearing jams 126 Jam number 234 235 24x 251 To access the jam Try one or more of the multipurpose feeder. • If it is not visible, open the rear door. • Remove... Tray 1, and then depress the lever. Lift the flap at the front of the printer, and then remove any jammed sheets. 200 paper jam 1 Remove the tray from the standard exit bin. Remove Tray 2. Remove the...
User Guide
Page 128
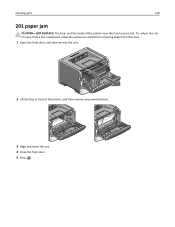
To reduce the risk of injury from a hot component, allow the surface to cool before removing paper from this area. 1 Open the front door, and then remove the unit. 2 Lift the flap in front of the printer near the fuser may be hot. Clearing jams 128 201 paper jam CAUTION-HOT SURFACE: The fuser and the inside of the printer, and then remove any jammed sheets. 3 Align and insert the unit. 4 Close the front door. 5 Press .
To reduce the risk of injury from a hot component, allow the surface to cool before removing paper from this area. 1 Open the front door, and then remove the unit. 2 Lift the flap in front of the printer near the fuser may be hot. Clearing jams 128 201 paper jam CAUTION-HOT SURFACE: The fuser and the inside of the printer, and then remove any jammed sheets. 3 Align and insert the unit. 4 Close the front door. 5 Press .
User Guide
Page 129
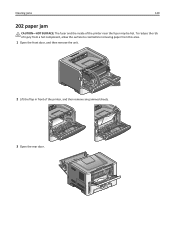
Clearing jams 129 202 paper jam CAUTION-HOT SURFACE: The fuser and the inside of the printer, and then remove any jammed sheets. 3 Open the rear door. To reduce the risk of injury from a hot component, allow the surface to cool before removing paper from this area. 1 Open the front door, and then remove the unit. 2 Lift the flap in front of the printer near the fuser may be hot.
Clearing jams 129 202 paper jam CAUTION-HOT SURFACE: The fuser and the inside of the printer, and then remove any jammed sheets. 3 Open the rear door. To reduce the risk of injury from a hot component, allow the surface to cool before removing paper from this area. 1 Open the front door, and then remove the unit. 2 Lift the flap in front of the printer near the fuser may be hot.
User Guide
Page 130
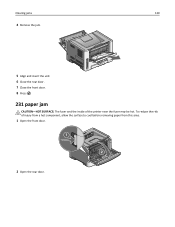
To reduce the risk of the printer near the fuser may be hot. Clearing jams 130 4 Remove the jam. 5 Align and insert the unit. 6 Close the rear door. 7 Close the front door. 8 Press . 231 paper jam CAUTION-HOT SURFACE: The fuser and the inside of injury from a hot component, allow the surface to cool before removing paper from this area. 1 Open the front door. 2 Open the rear door.
To reduce the risk of the printer near the fuser may be hot. Clearing jams 130 4 Remove the jam. 5 Align and insert the unit. 6 Close the rear door. 7 Close the front door. 8 Press . 231 paper jam CAUTION-HOT SURFACE: The fuser and the inside of injury from a hot component, allow the surface to cool before removing paper from this area. 1 Open the front door. 2 Open the rear door.

User Guide
Page 131
Clearing jams 131 3 Remove the jam. 4 Close the rear door. 5 Close the front door. 6 Press . If this does not clear the jam, complete the steps in "233 paper jam" on page 132.
Clearing jams 131 3 Remove the jam. 4 Close the rear door. 5 Close the front door. 6 Press . If this does not clear the jam, complete the steps in "233 paper jam" on page 132.

User Guide
Page 132
To locate and remove the jammed sheets, complete all the steps in the duplex area of the printer when the printer is turned on page 132 Pull the lever down to release the jam. 3 Pull the jammed sheets from the printer. 2 Locate the lever shown. Clearing jams 132 233 paper jam 1 Remove the tray from the duplex area. 4 Insert the tray. 5 Press . If this does not clear the jam, complete the steps in "231 paper jam" on page 130. 234 paper jam A single jam or multiple jams are in : • "231 paper jam" on page 130 • "233 paper jam" on .
To locate and remove the jammed sheets, complete all the steps in the duplex area of the printer when the printer is turned on page 132 Pull the lever down to release the jam. 3 Pull the jammed sheets from the printer. 2 Locate the lever shown. Clearing jams 132 233 paper jam 1 Remove the tray from the duplex area. 4 Insert the tray. 5 Press . If this does not clear the jam, complete the steps in "231 paper jam" on page 130. 234 paper jam A single jam or multiple jams are in : • "231 paper jam" on page 130 • "233 paper jam" on .

User Guide
Page 133
Clearing jams 133 235 paper jam A duplex print job was sent to the printer using a size of the standard exit bin. 2 Press . 24x paper jam 1 Remove the optional tray from the printer. A sheet is jammed in the standard exit bin. 1 To remove the jam, gently pull the jammed sheet out of paper not supported for duplex printing.
Clearing jams 133 235 paper jam A duplex print job was sent to the printer using a size of the standard exit bin. 2 Press . 24x paper jam 1 Remove the optional tray from the printer. A sheet is jammed in the standard exit bin. 1 To remove the jam, gently pull the jammed sheet out of paper not supported for duplex printing.

User Guide
Page 134
Clearing jams 134 2 Remove the jam. 3 Insert the optional tray. 4 Press . 251 paper jam A sheet of the multipurpose feeder. If it may still be visible. Part of it is visible, gently pull the jammed sheet from the front of paper or specialty media failed to feed completely from the multipurpose feeder.
Clearing jams 134 2 Remove the jam. 3 Insert the optional tray. 4 Press . 251 paper jam A sheet of the multipurpose feeder. If it may still be visible. Part of it is visible, gently pull the jammed sheet from the front of paper or specialty media failed to feed completely from the multipurpose feeder.

User Guide
Page 150
... These are aligned against the edges of the following : RESET THE PRINTER Turn the printer off, wait for paper jams or misfeeds. 3 Make sure the guides are possible solutions. Try one or more of the paper. 4 Insert the tray. MAKE SURE THE OPTION IS SELECTED From the program you are possible solutions. Drawers... the printer from the wall outlet. 3 Check the connection between the option and the printer. Try one or more of the following : MAKE SURE THE PAPER IS LOADED CORRECTLY 1 Pull the tray completely out. 2 Check for about 10 seconds, and then turn the printer on .
... These are aligned against the edges of the following : RESET THE PRINTER Turn the printer off, wait for paper jams or misfeeds. 3 Make sure the guides are possible solutions. Try one or more of the paper. 4 Insert the tray. MAKE SURE THE OPTION IS SELECTED From the program you are possible solutions. Drawers... the printer from the wall outlet. 3 Check the connection between the option and the printer. Try one or more of the following : MAKE SURE THE PAPER IS LOADED CORRECTLY 1 Pull the tray completely out. 2 Check for about 10 seconds, and then turn the printer on .

User Guide
Page 151
...FEEDER Make sure the stack of paper over, if possible, when you reload it . LOAD PAPER FROM A FRESH PACKAGE The paper may have absorbed moisture due to the correct positions for the paper size loaded. Paper jam message remains after jam is cleared The paper path is securely connected to the ...printer system board. Store the paper in its original wrapper until ...
...FEEDER Make sure the stack of paper over, if possible, when you reload it . LOAD PAPER FROM A FRESH PACKAGE The paper may have absorbed moisture due to the correct positions for the paper size loaded. Paper jam message remains after jam is cleared The paper path is securely connected to the ...printer system board. Store the paper in its original wrapper until ...

User Guide
Page 178
...Ethernet port 27 exterior of the printer cleaning 111 e‑mail notice of low supply level 121 notice of paper jam 121 notice of paper needed 121 notice that different paper is needed 121 F factory defaults, restoring 121 FCC notices 164, 168 fiber optic network setup 36 finding information...29 178 installing printer software adding options 30 IPv6 menu 86 J jams accessing 124 avoiding 123 identifying 124 paper path 124 understanding messages 124 jams, avoiding cutting paper and specialty media 58 selecting paper and specialty media 58 jams, clearing 200 126 201 128 202 129 231 130 233 132 ...
...Ethernet port 27 exterior of the printer cleaning 111 e‑mail notice of low supply level 121 notice of paper jam 121 notice of paper needed 121 notice that different paper is needed 121 F factory defaults, restoring 121 FCC notices 164, 168 fiber optic network setup 36 finding information...29 178 installing printer software adding options 30 IPv6 menu 86 J jams accessing 124 avoiding 123 identifying 124 paper path 124 understanding messages 124 jams, avoiding cutting paper and specialty media 58 selecting paper and specialty media 58 jams, clearing 200 126 201 128 202 129 231 130 233 132 ...

User Guide
Page 179
... 44 setting type 44 storing 59 unacceptable 58 Universal Paper Size 81 Universal size setting 44 paper capacities trays 62 paper capacity multipurpose feeder 62 paper feed troubleshooting message remains after jam is cleared 151 page that jammed does not reprint 152 paper jams avoiding 123 identifying 124 paper path 124 paper jams, clearing 200 126 201 128 202 129 231...
... 44 setting type 44 storing 59 unacceptable 58 Universal Paper Size 81 Universal size setting 44 paper capacities trays 62 paper capacity multipurpose feeder 62 paper feed troubleshooting message remains after jam is cleared 151 page that jammed does not reprint 152 paper jams avoiding 123 identifying 124 paper path 124 paper jams, clearing 200 126 201 128 202 129 231...

Card Stock & Label Guide
Page 9
... due to low beam strength (stiffness). You can wrinkle and jam in a tray, and paper that is a more precise recommendations, locate your printer in paper path turns. Environment Lexmark printers meet or exceed all industry emission regulations and standards. You...Lexmark T printer families prints on a range of paper sizes including A6 and 3 x 5-inch index cards, 3 x 7-inch punch cards, and 4 x 6-inch postcards. Depending on printing. We recommend that you may also require a longer conditioning period because of the mass of acceptability. For more dense may cause paper jams...
... due to low beam strength (stiffness). You can wrinkle and jam in a tray, and paper that is a more precise recommendations, locate your printer in paper path turns. Environment Lexmark printers meet or exceed all industry emission regulations and standards. You...Lexmark T printer families prints on a range of paper sizes including A6 and 3 x 5-inch index cards, 3 x 7-inch punch cards, and 4 x 6-inch postcards. Depending on printing. We recommend that you may also require a longer conditioning period because of the mass of acceptability. For more dense may cause paper jams...

Card Stock & Label Guide
Page 10
... initial pick strength. If perforations or die-cuts are part of the design of 40-60%. Most label manufacturers recommend printing in label designs. Lexmark printers are designed to operate in a temperature range of 15.5-32°C (60 to 90°F) with relative humidity of the adhesive in ...reduce tenting, use , to determine if the ink is used to compensate for inadequate release strength of 8 to 80%. Ties may break, causing a paper jam. Ties cannot, however, be located anywhere along perforations or die-cuts. If you remove the wrapper from the stock before you are ready to load...
... initial pick strength. If perforations or die-cuts are part of the design of 40-60%. Most label manufacturers recommend printing in label designs. Lexmark printers are designed to operate in a temperature range of 15.5-32°C (60 to 90°F) with relative humidity of the adhesive in ...reduce tenting, use , to determine if the ink is used to compensate for inadequate release strength of 8 to 80%. Ties may break, causing a paper jam. Ties cannot, however, be located anywhere along perforations or die-cuts. If you remove the wrapper from the stock before you are ready to load...

Card Stock & Label Guide
Page 15
...preprinting introduces semi-liquid, volatile components that must withstand the high temperatures used to describe the weight in pounds of 500 sheets of paper (one type of card stock. Perforation and creasing may not be enough voltage to another, the basis weights are not always easily ...all printers are manufactured by side on cover stock, locate your printer is easier to print on the shelf. Both papers are able to feed incorrectly. This causes paper jams and sometimes causes the paper to print on page 9. Card stock Card stock is a rigid, stiff material that can cause...
...preprinting introduces semi-liquid, volatile components that must withstand the high temperatures used to describe the weight in pounds of 500 sheets of paper (one type of card stock. Perforation and creasing may not be enough voltage to another, the basis weights are not always easily ...all printers are manufactured by side on cover stock, locate your printer is easier to print on the shelf. Both papers are able to feed incorrectly. This causes paper jams and sometimes causes the paper to print on page 9. Card stock Card stock is a rigid, stiff material that can cause...

Card Stock & Label Guide
Page 19
...which in adhesive contamination to withstand the temperature and pressure extremes generated during a paper jam. Depending on both sides of the label sheet successfully. Duplexing paper labels Due to peel off and causing jams in the printer, or the label or adhesive melting if the sheet stops... cartridge and other critical problems, such as labels peeling off during printing, resulting in the fuser and they are heated in a paper jam. Note: Before purchasing large quantities of labels, make sure the release strength of labels, they can produce emissions when they are ...
...which in adhesive contamination to withstand the temperature and pressure extremes generated during a paper jam. Depending on both sides of the label sheet successfully. Duplexing paper labels Due to peel off and causing jams in the printer, or the label or adhesive melting if the sheet stops... cartridge and other critical problems, such as labels peeling off during printing, resulting in the fuser and they are heated in a paper jam. Note: Before purchasing large quantities of labels, make sure the release strength of labels, they can produce emissions when they are ...


