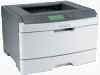

Wireless Setup Guide
Page 6
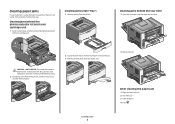
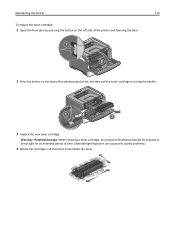
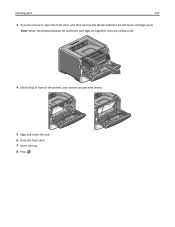
Remove the tape and packaging material from the printer. Firmly shake the cartridge side-to-side and front-toback several times to distribute toner. Pull the toner cartridge up the printer 6 Remove the unit consisting of the photoconductor kit. Setting up and out using the handle. Reinsert the unit into the printer. Press the button on the base of the photoconductor kit and the toner cartridge from the unit.
Remove the tape and packaging material from the printer. Firmly shake the cartridge side-to-side and front-toback several times to distribute toner. Pull the toner cartridge up the printer 6 Remove the unit consisting of the photoconductor kit. Setting up and out using the handle. Reinsert the unit into the printer. Press the button on the base of the photoconductor kit and the toner cartridge from the unit.

Wireless Setup Guide
Page 7
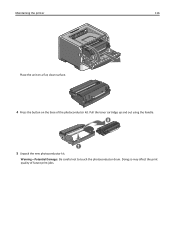
... unison when you move just the right width guide. Do not fold or crease the paper. Push the toner cartridge until it clicks into the photoconductor kit by aligning the rollers on a level surface. Close the front door. Squeeze the width guide tabs on the right guide as shown, and then slide...
... unison when you move just the right width guide. Do not fold or crease the paper. Push the toner cartridge until it clicks into the photoconductor kit by aligning the rollers on a level surface. Close the front door. Squeeze the width guide tabs on the right guide as shown, and then slide...
Quick Reference
Page 2
... door, and then open the rear door. Clearing jams under Tray 1 1 Remove the tray from the duplex area. 2 Remove the jam. Clearing jams behind the photoconductor kit and toner cartridge unit 1 Open the front door, and then remove the...
... door, and then open the rear door. Clearing jams under Tray 1 1 Remove the tray from the duplex area. 2 Remove the jam. Clearing jams behind the photoconductor kit and toner cartridge unit 1 Open the front door, and then remove the...
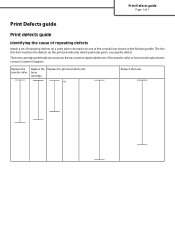
Print Defects
Page 1
... the print job indicates which particular part is causing the defect. toner cartridge. transfer roller. or Replace the fuser. Replace the Replace the Replace the photoconductor kit. The toner cartridge and the photoconductor kit are customer replaceable items. If the transfer roller or fuser needs replacement, contact Customer Support.
... the print job indicates which particular part is causing the defect. toner cartridge. transfer roller. or Replace the fuser. Replace the Replace the Replace the photoconductor kit. The toner cartridge and the photoconductor kit are customer replaceable items. If the transfer roller or fuser needs replacement, contact Customer Support.

Supplies guide
Page 2
... guide Page 2 of 2 Part name For Latin America Toner cartridge High Yield Toner Cartridge Extra High Yield Toner Cartridge Lexmark Return Program Cartridge E260A11L E360H11L E462U11L Regular cartridge E260A21L E360H21L E462U21G Ordering a photoconductor kit Depending on the display after 120,000 pages have printed to let you know it is near its end...
... guide Page 2 of 2 Part name For Latin America Toner cartridge High Yield Toner Cartridge Extra High Yield Toner Cartridge Lexmark Return Program Cartridge E260A11L E360H11L E462U11L Regular cartridge E260A21L E360H21L E462U21G Ordering a photoconductor kit Depending on the display after 120,000 pages have printed to let you know it is near its end...
User Guide
Page 5
......111 Checking the status of supplies from a network computer 111 Ordering supplies...112 Ordering toner cartridges ...112 Ordering a photoconductor kit ...113 Ordering a maintenance kit ...113 Replacing supplies...113 Replacing the toner cartridge ...113 Replacing the photoconductor kit ...115 Moving the printer...118 Moving the printer to another location...118 Shipping the printer ...118 Administrative support...
......111 Checking the status of supplies from a network computer 111 Ordering supplies...112 Ordering toner cartridges ...112 Ordering a photoconductor kit ...113 Ordering a maintenance kit ...113 Replacing supplies...113 Replacing the toner cartridge ...113 Replacing the photoconductor kit ...115 Moving the printer...118 Moving the printer to another location...118 Shipping the printer ...118 Administrative support...

User Guide
Page 113
... the display after 120,000 pages have printed to let you know the photoconductor kit is time to replace printer maintenance items. Order a maintenance kit when this time, order a photoconductor kit. When shaking the cartridge no longer improves the print quality, replace the toner... following table for the maintenance kit part number for your cartridge by printing a network setup page. Maintaining the printer 113 Part name Extra High Yield Toner Cartridge Lexmark Return Program Cartridge E462U11L Regular cartridge E462U21G Ordering a photoconductor kit The printer issues a message to...
... the display after 120,000 pages have printed to let you know the photoconductor kit is time to replace printer maintenance items. Order a maintenance kit when this time, order a photoconductor kit. When shaking the cartridge no longer improves the print quality, replace the toner... following table for the maintenance kit part number for your cartridge by printing a network setup page. Maintaining the printer 113 Part name Extra High Yield Toner Cartridge Lexmark Return Program Cartridge E462U11L Regular cartridge E462U21G Ordering a photoconductor kit The printer issues a message to...
User Guide
Page 114
Extended light exposure can cause print quality problems. 4 Rotate the cartridge in all directions to direct light for an extended period of the photoconductor kit, and then pull the toner cartridge out using the handle. 3 Unpack the new toner cartridge. Warning-Potential Damage: When replacing a toner cartridge, do not leave the photoconductor kit exposed to distribute the toner. Maintaining the printer 114 To replace the toner cartridge: 1 Open the front door by pressing the button on the left side of the printer and lowering the door. 2 Press the button on the base of time.
Extended light exposure can cause print quality problems. 4 Rotate the cartridge in all directions to direct light for an extended period of the photoconductor kit, and then pull the toner cartridge out using the handle. 3 Unpack the new toner cartridge. Warning-Potential Damage: When replacing a toner cartridge, do not leave the photoconductor kit exposed to distribute the toner. Maintaining the printer 114 To replace the toner cartridge: 1 Open the front door by pressing the button on the left side of the printer and lowering the door. 2 Press the button on the base of time.

User Guide
Page 115
...the front door by pressing the button on the left side of the printer and lowering the front door. 3 Pull the photoconductor kit and toner cartridge out of ‑life, print quality significantly decreases. The cartridge clicks into place when correctly installed. 6 ... photoconductor kit. Replacing the photoconductor kit The printer automatically notifies you should immediately order a new photoconductor kit. When 84 PC Kit life warning or 84 Replace PC Kit first appears, you before the photoconductor kit reaches a page maximum by showing 84 PC Kit life warning or 84 Replace PC Kit on...
...the front door by pressing the button on the left side of the printer and lowering the front door. 3 Pull the photoconductor kit and toner cartridge out of ‑life, print quality significantly decreases. The cartridge clicks into place when correctly installed. 6 ... photoconductor kit. Replacing the photoconductor kit The printer automatically notifies you should immediately order a new photoconductor kit. When 84 PC Kit life warning or 84 Replace PC Kit first appears, you before the photoconductor kit reaches a page maximum by showing 84 PC Kit life warning or 84 Replace PC Kit on...
User Guide
Page 116
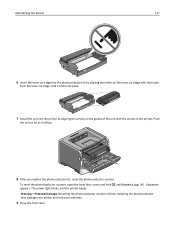
Pull the toner cartridge up and out using the handle. 5 Unpack the new photoconductor kit. Doing so may affect the print quality of the photoconductor kit. Warning-Potential Damage: Be careful not to touch the photoconductor drum. Maintaining the printer 116 Place the unit on a flat, clean surface. 4 Press the button on the base of future print jobs.
Pull the toner cartridge up and out using the handle. 5 Unpack the new photoconductor kit. Doing so may affect the print quality of the photoconductor kit. Warning-Potential Damage: Be careful not to touch the photoconductor drum. Maintaining the printer 116 Place the unit on a flat, clean surface. 4 Press the button on the base of future print jobs.
User Guide
Page 117
..., open the front door, press and hold until it will go. 8 After you replace the photoconductor kit, reset the photoconductor counter. The power light blinks, and the printer beeps. Maintaining the printer 117 6 Insert the toner cartridge into the printer by aligning the rollers ...on the guides of the unit with the tracks. Push the unit as far as it clicks into place. 7 Install the unit into the photoconductor kit by aligning the arrows on the toner cartridge with the arrows in the printer. Push the toner cartridge until Resetting PC Counter appears. Warning-Potential...
..., open the front door, press and hold until it will go. 8 After you replace the photoconductor kit, reset the photoconductor counter. The power light blinks, and the printer beeps. Maintaining the printer 117 6 Insert the toner cartridge into the printer by aligning the rollers ...on the guides of the unit with the tracks. Push the unit as far as it clicks into place. 7 Install the unit into the photoconductor kit by aligning the arrows on the toner cartridge with the arrows in the printer. Push the toner cartridge until Resetting PC Counter appears. Warning-Potential...
User Guide
Page 125
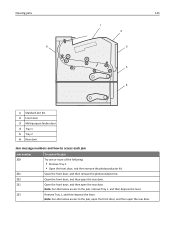
... 231 233 To access the jam Try one or more of the following: • Remove Tray 1. • Open the front door, and then remove the photoconductor kit. Open the front door, and then open the rear door. Open the front door, and then remove the...
... 231 233 To access the jam Try one or more of the following: • Remove Tray 1. • Open the front door, and then remove the photoconductor kit. Open the front door, and then open the rear door. Open the front door, and then remove the...
User Guide
Page 127
Note: When the photoconductor kit and toner cartridge are together, they are called a unit. 4 Lift the flap in front of the printer, and remove any jammed sheets. 5 Align and insert the unit. 6 Close the front door. 7 Insert the tray. 8 Press . Clearing jams 127 3 If you do not see it, open the front door, and then remove the photoconductor kit and toner cartridge (unit).
Note: When the photoconductor kit and toner cartridge are together, they are called a unit. 4 Lift the flap in front of the printer, and remove any jammed sheets. 5 Align and insert the unit. 6 Close the front door. 7 Insert the tray. 8 Press . Clearing jams 127 3 If you do not see it, open the front door, and then remove the photoconductor kit and toner cartridge (unit).

User Guide
Page 140
...stack of paper from standard bin The standard exit bin has reached its capacity. If the setting is the early warning message for the photoconductor kit. Wait for the message to select Continue and continue printing. This includes fonts, macros, and symbol sets. • All settings ... On, then the printer stops printing. The printer continues printing unless the value for the message to clear. When the PC Kit Life Warning appears, order a new photoconductor kit. Resetting the printer Wait for the Cartridge Alarm is exhausted. 1 Remove the used toner cartridge, and then install a new ...
...stack of paper from standard bin The standard exit bin has reached its capacity. If the setting is the early warning message for the photoconductor kit. Wait for the message to select Continue and continue printing. This includes fonts, macros, and symbol sets. • All settings ... On, then the printer stops printing. The printer continues printing unless the value for the message to clear. When the PC Kit Life Warning appears, order a new photoconductor kit. Resetting the printer Wait for the Cartridge Alarm is exhausted. 1 Remove the used toner cartridge, and then install a new ...

User Guide
Page 145
... until Continue appears, and then press to have scheduled maintenance done. Contact Customer Support, and report the message. 84 PC Kit life warning The photoconductor kit is low. to clear the message and continue printing. 58 Too many trays attached 1 Turn the printer off . 2 ... cord to a properly grounded outlet. 5 Turn the printer back on . • Press to clear the message and continue 84 Replace PC Kit The photoconductor kit is exhausted. Note: Optional trays lock together when stacked. Remove stacked trays one or more of the following : • Turn the printer...
... until Continue appears, and then press to have scheduled maintenance done. Contact Customer Support, and report the message. 84 PC Kit life warning The photoconductor kit is low. to clear the message and continue printing. 58 Too many trays attached 1 Turn the printer off . 2 ... cord to a properly grounded outlet. 5 Turn the printer back on . • Press to clear the message and continue 84 Replace PC Kit The photoconductor kit is exhausted. Note: Optional trays lock together when stacked. Remove stacked trays one or more of the following : • Turn the printer...
User Guide
Page 153
... until Exit Config Menu appears, and then press . For more of the following : • Remove and reinstall the toner cartridge. • Remove and reinstall the photoconductor kit.
... until Exit Config Menu appears, and then press . For more of the following : • Remove and reinstall the toner cartridge. • Remove and reinstall the photoconductor kit.
User Guide
Page 154
Try one or more of the following: THE PHOTOCONDUCTOR KIT IS DEFECTIVE Replace the photoconductor kit. CHECK THE PAPER TYPE SETTING • For Windows users: From Print Properties, make sure the Paper Type setting matches the paper loaded in the tray. &#...
Try one or more of the following: THE PHOTOCONDUCTOR KIT IS DEFECTIVE Replace the photoconductor kit. CHECK THE PAPER TYPE SETTING • For Windows users: From Print Properties, make sure the Paper Type setting matches the paper loaded in the tray. &#...

User Guide
Page 160
... component, allow the surface to feed paper for the job. Try one or more of the printer near the fuser may be caught between the photoconductor kit and the fuser. MAKE SURE THE PAPER PATH IS CLEAR Paper could be hot. CAUTION-HOT SURFACE: The fuser and the inside of the following... or feeder to cool before removing paper from this area. To reduce the risk of the printer near the fuser may be caught between the photoconductor kit and the fuser. Check the paper path around the fuser area. Clear any paper you see . THERE MAY BE EXCESS TONER IN THE PAPER PATH...
... component, allow the surface to feed paper for the job. Try one or more of the printer near the fuser may be caught between the photoconductor kit and the fuser. MAKE SURE THE PAPER PATH IS CLEAR Paper could be hot. CAUTION-HOT SURFACE: The fuser and the inside of the following... or feeder to cool before removing paper from this area. To reduce the risk of the printer near the fuser may be caught between the photoconductor kit and the fuser. Check the paper path around the fuser area. Clear any paper you see . THERE MAY BE EXCESS TONER IN THE PAPER PATH...

User Guide
Page 179
... drawer 25 550‑sheet drawer 25 firmware card 24 firmware cards 20 flash memory card 24 memory card 21 memory cards 20 ordering maintenance kit 113 toner cartridges 112 P paper characteristics 57 letterhead 59 loading, multipurpose feeder 49 preprinted forms 59 recommended print side 58 recycled 39, 59 ... by printer 60 where to load 60 Paper Weight menu 78 Parallel menu 91 parallel port 27 PCL Emul menu 106 PDF menu 106 photoconductor kit ordering 113 replacing 115 PostScript menu 106 Power Saver adjusting 41 print job canceling from Macintosh 70 canceling from the printer control panel 70 ...
... drawer 25 550‑sheet drawer 25 firmware card 24 firmware cards 20 flash memory card 24 memory card 21 memory cards 20 ordering maintenance kit 113 toner cartridges 112 P paper characteristics 57 letterhead 59 loading, multipurpose feeder 49 preprinted forms 59 recommended print side 58 recycled 39, 59 ... by printer 60 where to load 60 Paper Weight menu 78 Parallel menu 91 parallel port 27 PCL Emul menu 106 PDF menu 106 photoconductor kit ordering 113 replacing 115 PostScript menu 106 Power Saver adjusting 41 print job canceling from Macintosh 70 canceling from the printer control panel 70 ...

User Guide
Page 180
...Manual Feeder with 139 Remove paper from standard bin 140 Remove paper from standard output bin 140 Replace Cartridge 140 Replace PC Kit 140 Resetting the printer 140 Resetting without replacing may affect print quality. 140 Restoring Factory Defaults 140 Routine maintenance needed 140 ... Lexmark packaging 42 Lexmark products 42 toner cartridges 43 WEEE statement 165 Remove paper from standard bin 140 Remove paper from standard output bin 140 Repeat print jobs 67 printing from Macintosh computer 67 printing from Windows 67 Replace Cartridge 140 Replace PC Kit 140 replacing photoconductor kit ...
...Manual Feeder with 139 Remove paper from standard bin 140 Remove paper from standard output bin 140 Replace Cartridge 140 Replace PC Kit 140 Resetting the printer 140 Resetting without replacing may affect print quality. 140 Restoring Factory Defaults 140 Routine maintenance needed 140 ... Lexmark packaging 42 Lexmark products 42 toner cartridges 43 WEEE statement 165 Remove paper from standard bin 140 Remove paper from standard output bin 140 Repeat print jobs 67 printing from Macintosh computer 67 printing from Windows 67 Replace Cartridge 140 Replace PC Kit 140 replacing photoconductor kit ...


