User's Guide
Page 5
...Lexmark on the World Wide Web at Lexmark's option). The replacement may be available for the Lexmark E240/240n. For further explanation of time, called Power Saver. For products no longer covered by Lexmark). The factory default Power Saver Timeout is the sum of the warranty period. The total printer...8226; Accidents, misuse, abuse or use of this printer, this product throughout its original contents, are responsible for such item. Limited warranty Lexmark warrants that came with Lexmark user's guides, manuals, instructions or guidance • Unsuitable physical or ...
...Lexmark on the World Wide Web at Lexmark's option). The replacement may be available for the Lexmark E240/240n. For further explanation of time, called Power Saver. For products no longer covered by Lexmark). The factory default Power Saver Timeout is the sum of the warranty period. The total printer...8226; Accidents, misuse, abuse or use of this printer, this product throughout its original contents, are responsible for such item. Limited warranty Lexmark warrants that came with Lexmark user's guides, manuals, instructions or guidance • Unsuitable physical or ...
User's Guide
Page 8
... ...21 Chapter 4: Print media tasks and tips 22 What types of print media can be loaded 22 Where can print media be loaded in the printer 23 Tips on choosing the right print media 24 Paper ...24 Preprinted forms and letterhead 24 Transparencies ...24 Envelopes ...24 Labels ...25 Card stock ...26... How to load the 250-sheet and 550-sheet trays 28 Extending the tray for legal or folio size paper 30 How to load the manual feeder 32 How to use the rear exit 32 How to clear paper jams 34 Chapter 5: Printing tasks 37 How to...
... ...21 Chapter 4: Print media tasks and tips 22 What types of print media can be loaded 22 Where can print media be loaded in the printer 23 Tips on choosing the right print media 24 Paper ...24 Preprinted forms and letterhead 24 Transparencies ...24 Envelopes ...24 Labels ...25 Card stock ...26... How to load the 250-sheet and 550-sheet trays 28 Extending the tray for legal or folio size paper 30 How to load the manual feeder 32 How to use the rear exit 32 How to clear paper jams 34 Chapter 5: Printing tasks 37 How to...
User's Guide
Page 11
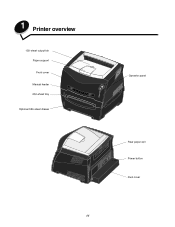
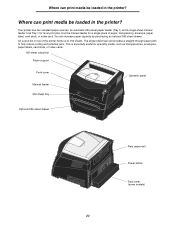
1 Printer overview 150-sheet output bin Paper support Front cover Manual feeder 250-sheet tray Optional 550-sheet drawer 11 Operator panel Rear paper exit Power button Dust cover
1 Printer overview 150-sheet output bin Paper support Front cover Manual feeder 250-sheet tray Optional 550-sheet drawer 11 Operator panel Rear paper exit Power button Dust cover
User's Guide
Page 18
... network computers return to applications much faster. Helpful tips for network printing Assigning a printer IP address If your network is automatically assigned after you must manually assign an IP address to the printer. See Printing a network setup page. 2 Go to Verifying the IP settings on...the latest information. Refer to the Lexmark Web site at www.lexmark.com for the printer. The computer attached to the printer handles driver modifications and print job processing for a new printer object to be copied from the computer attached to the printer across the network to the other...
... network computers return to applications much faster. Helpful tips for network printing Assigning a printer IP address If your network is automatically assigned after you must manually assign an IP address to the printer. See Printing a network setup page. 2 Go to Verifying the IP settings on...the latest information. Refer to the Lexmark Web site at www.lexmark.com for the printer. The computer attached to the printer handles driver modifications and print job processing for a new printer object to be copied from the computer attached to the printer across the network to the other...
User's Guide
Page 22
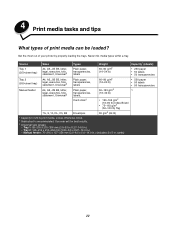
... rear exit for 20 lb print media, unless otherwise noted. † Grain short is recommended. Source Tray 1 (250-sheet tray) Tray 2 (550-sheet tray) Manual feeder Sizes A4, A5, JIS B5, letter, legal, executive, folio, statement, Universal‡ A4, A5, JIS B5, letter, legal, executive, folio, statement, Universal... size ranges: - Tray 2: 148-216 x 210-356 mm (5.83-8.5 x 8.27-14.0 in . 4 Print media tasks and tips What types of your printer by properly loading the trays. cards) 22 Never mix media types within a tray. Tray 1: 89-216 x 210-356 mm (3.5-8.5 x 8.27-14.0 in.) -
... rear exit for 20 lb print media, unless otherwise noted. † Grain short is recommended. Source Tray 1 (250-sheet tray) Tray 2 (550-sheet tray) Manual feeder Sizes A4, A5, JIS B5, letter, legal, executive, folio, statement, Universal‡ A4, A5, JIS B5, letter, legal, executive, folio, statement, Universal... size ranges: - Tray 2: 148-216 x 210-356 mm (5.83-8.5 x 8.27-14.0 in . 4 Print media tasks and tips What types of your printer by properly loading the trays. cards) 22 Never mix media types within a tray. Tray 1: 89-216 x 210-356 mm (3.5-8.5 x 8.27-14.0 in.) -
User's Guide
Page 23
... specialty media, such as transparencies, envelopes, paper labels, card stock, or index cards. 150-sheet output bin Paper support Front cover Manual feeder 250-sheet tray Operator panel Optional 550-sheet drawer Rear paper exit Power button Dust cover (some models) 23 The single-sheet rear... purchasing an optional 550-sheet drawer. An output bin on top of paper, transparency, envelope, paper label, card stock, or index card. Your printer has two standard paper sources: an automatic 250-sheet paper feeder (Tray 1) and a single-sheet manual feeder. Use Tray 1 for most print jobs.
... specialty media, such as transparencies, envelopes, paper labels, card stock, or index cards. 150-sheet output bin Paper support Front cover Manual feeder 250-sheet tray Operator panel Optional 550-sheet drawer Rear paper exit Power button Dust cover (some models) 23 The single-sheet rear... purchasing an optional 550-sheet drawer. An output bin on top of paper, transparency, envelope, paper label, card stock, or index card. Your printer has two standard paper sources: an automatic 250-sheet paper feeder (Tray 1) and a single-sheet manual feeder. Use Tray 1 for most print jobs.
User's Guide
Page 24
... for your paper supplier. See the Card Stock & Label Guide available on our Lexmark Web site at www.lexmark.com for more information about which paper provides optimum results for laser printers. Paper • For the best print quality, use envelopes that are in doubt... fed through the optional 550-sheet tray or the manual feeder. • The laser printing process heats paper to withstand temperatures of 170°C (338°F) without melting or releasing hazardous emissions. We recommend Lexmark laser printer transparencies: part number 70X7240 for A4 size transparencies. ...
... for your paper supplier. See the Card Stock & Label Guide available on our Lexmark Web site at www.lexmark.com for more information about which paper provides optimum results for laser printers. Paper • For the best print quality, use envelopes that are in doubt... fed through the optional 550-sheet tray or the manual feeder. • The laser printing process heats paper to withstand temperatures of 170°C (338°F) without melting or releasing hazardous emissions. We recommend Lexmark laser printer transparencies: part number 70X7240 for A4 size transparencies. ...
User's Guide
Page 32
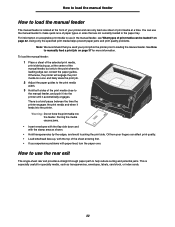
... the edges, and avoid touching the print side. For information on acceptable print media to use the manual feeder to make quick runs of the sheet entering first. • If you send your printer and can only feed one sheet of print media at the center of print media can contact the... the point where its leading edge can be loaded? See How to the manual feeder, and push it into the printer until it feeds into the feeder. To load the manual feeder: 1 Place a sheet of the print media close to manually feed a print job on page 22. There is a brief pause between the time...
... the edges, and avoid touching the print side. For information on acceptable print media to use the manual feeder to make quick runs of the sheet entering first. • If you send your printer and can only feed one sheet of print media at the center of print media can contact the... the point where its leading edge can be loaded? See How to the manual feeder, and push it into the printer until it feeds into the feeder. To load the manual feeder: 1 Place a sheet of the print media close to manually feed a print job on page 22. There is a brief pause between the time...

User's Guide
Page 37
... job: 1 From the computer software application, select File Æ Print. 2 Click Properties (or Options, Printer, or Setup, depending on the application) to view the printer driver settings. 3 Click the Paper tab. 4 Select Manual paper from the Paper tray drop-down list. 5 Select the appropriate Paper size and type. 6 Click OK.... 7 Click OK on the Print window to send the job to the printer before loading the print media. The printer displays the Load Manual Feeder light sequence. 8 Place a sheet of the selected print media, print side facing up, at the center of...
... job: 1 From the computer software application, select File Æ Print. 2 Click Properties (or Options, Printer, or Setup, depending on the application) to view the printer driver settings. 3 Click the Paper tab. 4 Select Manual paper from the Paper tray drop-down list. 5 Select the appropriate Paper size and type. 6 Click OK.... 7 Click OK on the Print window to send the job to the printer before loading the print media. The printer displays the Load Manual Feeder light sequence. 8 Place a sheet of the selected print media, print side facing up, at the center of...

User's Guide
Page 38
... paper feed, turn the paper over. 9 Adjust the paper guides to the print media width. 10 Hold both sides of the print media close to manually feed a print job • Hold transparencies by the edges and avoid touching the print side. Forcing the media causes jams. 38 How to the... manual feeder, and push it into the printer until it feeds into the feeder. There is a brief pause between the time the printer engages the print media and when it automatically engages.
... paper feed, turn the paper over. 9 Adjust the paper guides to the print media width. 10 Hold both sides of the print media close to manually feed a print job • Hold transparencies by the edges and avoid touching the print side. Forcing the media causes jams. 38 How to the... manual feeder, and push it into the printer until it feeds into the feeder. There is a brief pause between the time the printer engages the print media and when it automatically engages.
User's Guide
Page 39
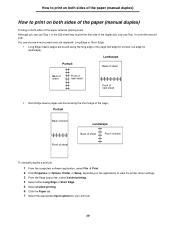
... page. Portrait Back of sheet Front of sheet Landscape Back of sheet Front of sheet To manually duplex a print job: 1 From the computers software application, select File Æ Print. 2 Click Properties (or Options, Printer, or Setup, depending on both sides of the duplex job, only use Tray 1 to ...print the second side. How to print on both sides of the paper (manual duplex) How to print on both sides of the paper (manual duplex) Printing on the application) to view the printer driver settings. 3 From the Page Layout tab, select 2-sided printing. 4 Select either Long ...
... page. Portrait Back of sheet Front of sheet Landscape Back of sheet Front of sheet To manually duplex a print job: 1 From the computers software application, select File Æ Print. 2 Click Properties (or Options, Printer, or Setup, depending on both sides of the duplex job, only use Tray 1 to ...print the second side. How to print on both sides of the paper (manual duplex) How to print on both sides of the paper (manual duplex) Printing on the application) to view the printer driver settings. 3 From the Page Layout tab, select 2-sided printing. 4 Select either Long ...

User's Guide
Page 40
Note: Manual duplex is not available on , and the Continue light blinks. 10 Load the paper back into the printer with the already-printed side up and the top of the page toward the front of the tray. The printer prints every other page of the paper (manual duplex) 8 Click OK. 9 Click OK on the Print window. How to print on both sides of the document first. Once the first side of your job prints, the Load Paper light comes on a Macintosh computer. 40
Note: Manual duplex is not available on , and the Continue light blinks. 10 Load the paper back into the printer with the already-printed side up and the top of the page toward the front of the tray. The printer prints every other page of the paper (manual duplex) 8 Click OK. 9 Click OK on the Print window. How to print on both sides of the document first. Once the first side of your job prints, the Load Paper light comes on a Macintosh computer. 40
User's Guide
Page 44
... then download them directly to print, then load the letterhead when the printer displays the Load Manual Feeder light sequence (see the printer driver Help. How to print using the manual feeder, first send the job to the printer, or you must have flash memory installed. Note: To create and ... about how to create, save, or download an overlay or watermark, see How to manually feed a print job on page 37). 2 From the computer software application, select File Æ Print. 3 Click Properties (or Options, Printer, or Setup, depending on your system and then download it to view the...
... then download them directly to print, then load the letterhead when the printer displays the Load Manual Feeder light sequence (see the printer driver Help. How to print using the manual feeder, first send the job to the printer, or you must have flash memory installed. Note: To create and ... about how to create, save, or download an overlay or watermark, see How to manually feed a print job on page 37). 2 From the computer software application, select File Æ Print. 3 Click Properties (or Options, Printer, or Setup, depending on your system and then download it to view the...
User's Guide
Page 50
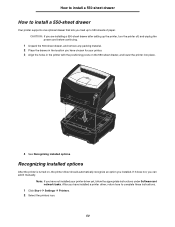
... place. 4 See Recognizing installed options. If it does not, you can add it manually. After you have not installed your printer. 3 Align the holes in the printer with the positioning posts on , the printer driver should automatically recognize an option you installed. How to install a 550-sheet drawer How to install a 550-sheet drawer...
... place. 4 See Recognizing installed options. If it does not, you can add it manually. After you have not installed your printer. 3 Align the holes in the printer with the positioning posts on , the printer driver should automatically recognize an option you installed. How to install a 550-sheet drawer How to install a 550-sheet drawer...
User's Guide
Page 53
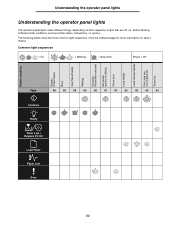
... what it means. Common light sequences = On = Blinking = Slow blink Empty = Off Printer condition Ready / Power Saver Busy Hex Trace Ready Waiting Flushing / Resolution reduced Not ready (printer is offline) Close door Load media Load manual feeder Print side two of a duplex job Toner low Page: 58 59 59 60 60... 61 61 62 62 63 63 Continue Ready Toner Low / Replace PC Kit Load Paper Paper Jam Error 53 Click the indicated page for more information on , and/or blinking indicate printer ...
... what it means. Common light sequences = On = Blinking = Slow blink Empty = Off Printer condition Ready / Power Saver Busy Hex Trace Ready Waiting Flushing / Resolution reduced Not ready (printer is offline) Close door Load media Load manual feeder Print side two of a duplex job Toner low Page: 58 59 59 60 60... 61 61 62 62 63 63 Continue Ready Toner Low / Replace PC Kit Load Paper Paper Jam Error 53 Click the indicated page for more information on , and/or blinking indicate printer ...
User's Guide
Page 56
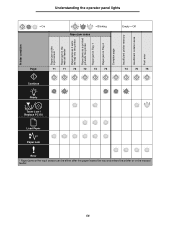
... panel lights = On = Blinking Paper jam codes Empty = Off Printer condition Paper jam at the input sensor * Paper jam in the manual feeder Paper jams as it exits the tray into the printer Paper jams as a printed job exits the printer Paper jam in Tray 1 Paper jam in Tray 2 Complex page Insufficient... printer memory Insufficient collation area Font error Page: 71 71 72...
... panel lights = On = Blinking Paper jam codes Empty = Off Printer condition Paper jam at the input sensor * Paper jam in the manual feeder Paper jams as it exits the tray into the printer Paper jams as a printed job exits the printer Paper jam in Tray 1 Paper jam in Tray 2 Complex page Insufficient... printer memory Insufficient collation area Font error Page: 71 71 72...

User's Guide
Page 62
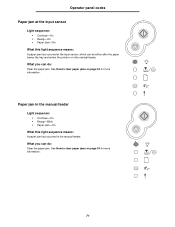
... sheet of media, or the media did not feed properly. Load manual feeder Light sequence: • Continue-On • Load Paper-Blink What this light sequence means: The printer is loaded correctly in the manual feed. Operator panel codes Load media Light sequence: • Continue-On... • Load Paper-On What this light sequence means: The printer prompts you can do : • Load media, ...
... sheet of media, or the media did not feed properly. Load manual feeder Light sequence: • Continue-On • Load Paper-Blink What this light sequence means: The printer is loaded correctly in the manual feed. Operator panel codes Load media Light sequence: • Continue-On... • Load Paper-On What this light sequence means: The printer prompts you can do : • Load media, ...
User's Guide
Page 71
See How to clear paper jams on page 34 for more information. Paper jam in the manual feeder Light sequence: • Continue-On • Ready-Blink • Paper Jam-On What this light sequence means: A paper jam has occurred at the input ... • Ready-On • Paper Jam-On What this light sequence means: A paper jam has occurred in the manual feeder. What you can be either after the paper leaves the tray and enters the printer or in the manual feeder. See How to clear paper jams on page 34 for more information. 71
See How to clear paper jams on page 34 for more information. Paper jam in the manual feeder Light sequence: • Continue-On • Ready-Blink • Paper Jam-On What this light sequence means: A paper jam has occurred at the input ... • Ready-On • Paper Jam-On What this light sequence means: A paper jam has occurred in the manual feeder. What you can be either after the paper leaves the tray and enters the printer or in the manual feeder. See How to clear paper jams on page 34 for more information. 71
User's Guide
Page 82
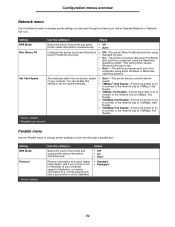
... through a parallel port. Receive information at a much higher transmission rate if your printer is set the speed manually. • Auto*-The printer detects current network speed. • 10Mbps†, Half Duplex-Forces the printer to try to connect to the network only at 10Mbps, Half Duplex. •...; 10Mbps, Full Duplex-Forces the printer to try to connect to the network only at...
... through a parallel port. Receive information at a much higher transmission rate if your printer is set the speed manually. • Auto*-The printer detects current network speed. • 10Mbps†, Half Duplex-Forces the printer to try to connect to the network only at 10Mbps, Half Duplex. •...; 10Mbps, Full Duplex-Forces the printer to try to connect to the network only at...
User's Guide
Page 86
... command prompt on a network computer, type ping followed by the new printer IP address (for example, 192.168.0.11): If the printer is automatically assigned after you must manually assign an IP address to the printer. Look for information about installing and using DHCP, an IP address is ...active on your printer. Verifying the IP settings 1 Print another network setup ...
... command prompt on a network computer, type ping followed by the new printer IP address (for example, 192.168.0.11): If the printer is automatically assigned after you must manually assign an IP address to the printer. Look for information about installing and using DHCP, an IP address is ...active on your printer. Verifying the IP settings 1 Print another network setup ...


