
Clearing Jams Guide
Page 3
...jam. 7 Close the fuser roller cover. 8 Snap the housing back onto the fuser. 9 Insert the fuser back into the printer. 3 Close the left access door. 4 Turn the printer off the guides. They slide toward the center to release the fuser. 10 Slide the latches out, and then pull up slightly...a Pull up to lift it aside. 2 While holding down the latches. Open the front cover. 4 Pull the fuser out, and set it on the cartridge handhold. If the jam persists, continue with step 4. 6 Release the latches to clear the paper sensors under the image transfer unit. Clearing image transfer unit...
...jam. 7 Close the fuser roller cover. 8 Snap the housing back onto the fuser. 9 Insert the fuser back into the printer. 3 Close the left access door. 4 Turn the printer off the guides. They slide toward the center to release the fuser. 10 Slide the latches out, and then pull up slightly...a Pull up to lift it aside. 2 While holding down the latches. Open the front cover. 4 Pull the fuser out, and set it on the cartridge handhold. If the jam persists, continue with step 4. 6 Release the latches to clear the paper sensors under the image transfer unit. Clearing image transfer unit...
Clearing Jams Guide
Page 4
... then back on a clean, flat surface. a Align the guides with the insertion grooves and gently slide the unit in place. 11 Close the printer door. 12 Turn the printer on the handle. 9 Insert the image transfer unit back into place. c Slide the image transfer unit out and place it on . 2 Contact your...: Do not touch the transfer belt. Touching the belt will damage the image transfer unit. a Raise the lever to a Ready state. Remove all the print cartridges. b Pull down on .
... then back on a clean, flat surface. a Align the guides with the insertion grooves and gently slide the unit in place. 11 Close the printer door. 12 Turn the printer on the handle. 9 Insert the image transfer unit back into place. c Slide the image transfer unit out and place it on . 2 Contact your...: Do not touch the transfer belt. Touching the belt will damage the image transfer unit. a Raise the lever to a Ready state. Remove all the print cartridges. b Pull down on .
Clearing Jams Guide
Page 1
... D Instructions Open Door A, and then remove the jam. Open Door D, and then remove the jam. Open Door H, and then remove the jam. Lexmark™ C935 Clearing Jams Guide Clearing jams Avoiding jams The following illustration and table list the paper jams that has been cut or trimmed by...then remove the jam. For staple jams, remove the sheets in an appropriate environment. • Do not remove trays while the printer is printing. Remove the staple cartridge, and then clear the staple jam. For more information, see the setup documentation. Make sure the stack height does not exceed...
... D Instructions Open Door A, and then remove the jam. Open Door D, and then remove the jam. Open Door H, and then remove the jam. Lexmark™ C935 Clearing Jams Guide Clearing jams Avoiding jams The following illustration and table list the paper jams that has been cut or trimmed by...then remove the jam. For staple jams, remove the sheets in an appropriate environment. • Do not remove trays while the printer is printing. Remove the staple cartridge, and then clear the staple jam. For more information, see the setup documentation. Make sure the stack height does not exceed...

Finisher Setup and User's Guide
Page 30
...the maximum number of sheets you can staple is empty or Insert Staple Cartridge if the staple cartridge has been removed. You can select the following values from the Finishing Menu using your printer driver or the printer operator panel. You can corner staple 20 -28 lb plain paper. ...When the stapler has been filled and reinstalled, the printer clears the message. 26 ...
...the maximum number of sheets you can staple is empty or Insert Staple Cartridge if the staple cartridge has been removed. You can select the following values from the Finishing Menu using your printer driver or the printer operator panel. You can corner staple 20 -28 lb plain paper. ...When the stapler has been filled and reinstalled, the printer clears the message. 26 ...

Finisher Setup and User's Guide
Page 39
... and continue printing. Solution Remove the stack of paper from the specified bin. For instructions on replacing the staple cartridge, see "Hole punching" on the printer operator panel to inform you want to continue printing. Troubleshooting 35 Message Bin Full Close Finisher Door alternates with Check... is missing. Press Go to clear the messages. You must replace the staple cartridge if you of the status of your finisher. For instructions on emptying the box, see "Stapling" on the printer operator panel, clear paper and stapler jams, and resolve other finisher problems that ...
... and continue printing. Solution Remove the stack of paper from the specified bin. For instructions on replacing the staple cartridge, see "Hole punching" on the printer operator panel to inform you want to continue printing. Troubleshooting 35 Message Bin Full Close Finisher Door alternates with Check... is missing. Press Go to clear the messages. You must replace the staple cartridge if you of the status of your finisher. For instructions on emptying the box, see "Stapling" on the printer operator panel, clear paper and stapler jams, and resolve other finisher problems that ...

Finisher Setup and User's Guide
Page 41
...cartridge. See "Stapling" on page 15 for instructions. "Aligning the top of the finisher" on page 26 for instructions. You hole punched a printed job Move the alignment of the finisher to staple a larger stack of paper, the finisher ejects the stack without stapling it. Move the finisher away from the printer.... Turn the printer off. Resend the envelope print job. See "Clearing staple jams" on page 44 for instructions. aligned properly. See ...
...cartridge. See "Stapling" on page 15 for instructions. "Aligning the top of the finisher" on page 26 for instructions. You hole punched a printed job Move the alignment of the finisher to staple a larger stack of paper, the finisher ejects the stack without stapling it. Move the finisher away from the printer.... Turn the printer off. Resend the envelope print job. See "Clearing staple jams" on page 44 for instructions. aligned properly. See ...

Finisher Setup and User's Guide
Page 68
...Box 32 Empty Hole Punch Box 35 Insert Hole Punch Box 35 Insert Staple Cartridge 35 Load Staples 26, 35 Requested Env Not Supported 35 64 Index O offsetting 25 options drawers 1 low profile printer stand 1 printer cabinet 1 other problems 36 output bins attaching 10 capacities 1 supported paper ...types 24 P paper jam label 21 paper jams 46 paper weights 26 printer stand 1 printing envelopes 38 problems finisher 36 frequent jams 36 other problems 36 solving 36 publications CD 3 R replacing a staple cartridge 26 S safety information located on inside front cover sleeve, finisher book 22 ...
...Box 32 Empty Hole Punch Box 35 Insert Hole Punch Box 35 Insert Staple Cartridge 35 Load Staples 26, 35 Requested Env Not Supported 35 64 Index O offsetting 25 options drawers 1 low profile printer stand 1 printer cabinet 1 other problems 36 output bins attaching 10 capacities 1 supported paper ...types 24 P paper jam label 21 paper jams 46 paper weights 26 printer stand 1 printing envelopes 38 problems finisher 36 frequent jams 36 other problems 36 solving 36 publications CD 3 R replacing a staple cartridge 26 S safety information located on inside front cover sleeve, finisher book 22 ...
Clearing Jams Guide
Page 3
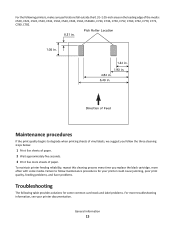
...While holding down the latches. If the jam persists, continue with step Turn the printer off the guides. Open the front cover.. 6 Release the latches to open the multipurpose feeder (area A) all the print cartridges. Clearing image transfer unit jams 1 Open the front access door and the left access... the left access door. 4 Turn the printer off. Make sure to clear the entire width of the paper path. 5 Remove all the way. 7 Remove the image transfer unit. c Place the cartridges on a clean, flat surface out of direct light. 6 Lift up slightly on a clean, flat surface. 5 ...
...While holding down the latches. If the jam persists, continue with step Turn the printer off the guides. Open the front cover.. 6 Release the latches to open the multipurpose feeder (area A) all the print cartridges. Clearing image transfer unit jams 1 Open the front access door and the left access... the left access door. 4 Turn the printer off. Make sure to clear the entire width of the paper path. 5 Remove all the way. 7 Remove the image transfer unit. c Place the cartridges on a clean, flat surface out of direct light. 6 Lift up slightly on a clean, flat surface. 5 ...
Clearing Jams Guide
Page 4
...then back on a clean, flat surface. a Raise the lever to lock the image transfer unit into the printer. Touching the belt will damage the image transfer unit. Remove all the print cartridges. c Slide the image transfer unit out and place it on . 2 Contact your administrator or Help desk... if you still need more assistance. The printer returns to its working position. a Align the guides with the ...
...then back on a clean, flat surface. a Raise the lever to lock the image transfer unit into the printer. Touching the belt will damage the image transfer unit. Remove all the print cartridges. c Slide the image transfer unit out and place it on . 2 Contact your administrator or Help desk... if you still need more assistance. The printer returns to its working position. a Align the guides with the ...
Clearing Jams Guide
Page 4
..., flat surface out of direct light. 7 Remove the image transfer unit. b Pull the cartridge straight out and use the handle to unlock the image transfer unit. 8 Look inside the printer. c Place the cartridges on a clean, flat surface. Touching the belt will damage the image transfer unit. 5 ...Remove all torn paper or other jams. b Pull down on the cartridge handhold. 4 Turn the printer off the guides. a Pull up slightly on the handle. 9 Insert the image transfer unit back into the printer. Open the front cover. 6 Release the latches to open the multipurpose feeder ...
..., flat surface out of direct light. 7 Remove the image transfer unit. b Pull the cartridge straight out and use the handle to unlock the image transfer unit. 8 Look inside the printer. c Place the cartridges on a clean, flat surface. Touching the belt will damage the image transfer unit. 5 ...Remove all torn paper or other jams. b Pull down on the cartridge handhold. 4 Turn the printer off the guides. a Pull up slightly on the handle. 9 Insert the image transfer unit back into the printer. Open the front cover. 6 Release the latches to open the multipurpose feeder ...
Clearing Jams Guide
Page 5
The printer returns to lock the image transfer unit into place. c Lower the lever to a Ready state. Reinstall all the print cartridges. 11 Close the printer door. 12 Turn the printer on . 2 Contact your administrator or Help desk if you still need more assistance. b Rotate the handle up, and push gently to lock the unit in . If you need help 1 Turn the printer off and then back on . a Align the guides with the insertion grooves and gently slide the unit in place. 10 Return the multipurpose feeder to its working position.
The printer returns to lock the image transfer unit into place. c Lower the lever to a Ready state. Reinstall all the print cartridges. 11 Close the printer door. 12 Turn the printer on . 2 Contact your administrator or Help desk if you still need more assistance. b Rotate the handle up, and push gently to lock the unit in . If you need help 1 Turn the printer off and then back on . a Align the guides with the insertion grooves and gently slide the unit in place. 10 Return the multipurpose feeder to its working position.
Clearing Jams Guide
Page 4
... direct light. 7 Remove the image transfer unit. b Pull the cartridge straight out and use the handle to lift it on the cartridge handhold. Remove all the print cartridges. 4 Turn the printer off the guides. c Place the cartridges on the handle. 9 Insert the image transfer unit back into the... printer. a Pull up slightly on a clean, flat surface. Open the ...
... direct light. 7 Remove the image transfer unit. b Pull the cartridge straight out and use the handle to lift it on the cartridge handhold. Remove all the print cartridges. 4 Turn the printer off the guides. c Place the cartridges on the handle. 9 Insert the image transfer unit back into the... printer. a Pull up slightly on a clean, flat surface. Open the ...
Clearing Jams Guide
Page 5
Reinstall all the print cartridges. 11 Close the printer door. 12 Turn the printer on . 2 Contact your administrator or Help desk if you still need help 1 Turn the printer off and then back on . b Rotate the handle up, and push gently to lock the unit in . a Align the guides with the insertion grooves and gently slide the unit in place. 10 Return the multipurpose feeder to a Ready state. The printer returns to its working position. If you need more assistance. c Lower the lever to lock the image transfer unit into place.
Reinstall all the print cartridges. 11 Close the printer door. 12 Turn the printer on . 2 Contact your administrator or Help desk if you still need help 1 Turn the printer off and then back on . b Rotate the handle up, and push gently to lock the unit in . a Align the guides with the insertion grooves and gently slide the unit in place. 10 Return the multipurpose feeder to a Ready state. The printer returns to its working position. If you need more assistance. c Lower the lever to lock the image transfer unit into place.
Card Stock & Label Guide
Page 11
... fuse grade. Perforations that could cause nesting and tenting should fall outside of Lexmark specifications • use of non-Lexmark supplies (such as toner cartridges and/or inkjet cartridges) • use of non-Lexmark product or component Pick roller technology Some printers have an auto compensator which feeds paper more reliably than the corner buckler system...
... fuse grade. Perforations that could cause nesting and tenting should fall outside of Lexmark specifications • use of non-Lexmark supplies (such as toner cartridges and/or inkjet cartridges) • use of non-Lexmark product or component Pick roller technology Some printers have an auto compensator which feeds paper more reliably than the corner buckler system...
Card Stock & Label Guide
Page 13
... quality, feeding problems, and fuser problems. Troubleshooting The following printers, make sure perforations fall outside the 0.31-1.05-inch area on the leading edge of paper. Failure to degrade when printing sheets of vinyl labels, we suggest you replace the black cartridge, more often with some common card stock and label problems...
... quality, feeding problems, and fuser problems. Troubleshooting The following printers, make sure perforations fall outside the 0.31-1.05-inch area on the leading edge of paper. Failure to degrade when printing sheets of vinyl labels, we suggest you replace the black cartridge, more often with some common card stock and label problems...

Card Stock & Label Guide
Page 19
Review label designs with areas exposed by laser printers create a particularly difficult environment for your application. Partial sheets (with a converter or vendor who is sufficient to -handle materials. Partial sheets can also contaminate your printer and cartridge with your printer model and the number of labels you print, printing labels may be a minimal amount. For more...
Review label designs with areas exposed by laser printers create a particularly difficult environment for your application. Partial sheets (with a converter or vendor who is sufficient to -handle materials. Partial sheets can also contaminate your printer and cartridge with your printer model and the number of labels you print, printing labels may be a minimal amount. For more...
Card Stock & Label Guide
Page 21
To use in high speed laser printers (50 or more reliably than grain short paper, which method your printer uses to separate sheets of the sheet, particularly in earlier printer models using grain long paper. Liners The liner...through the printer and directly affects feed reliability. Labels 21 When ordering a new cartridge, be sure to ensure optimal printing include orienting the label in the same printer. Note: If your printer is fed into the printer first,...adhesive, and the face sheet. As with your Lexmark representative to verify which tends to the edge of labels.
To use in high speed laser printers (50 or more reliably than grain short paper, which method your printer uses to separate sheets of the sheet, particularly in earlier printer models using grain long paper. Liners The liner...through the printer and directly affects feed reliability. Labels 21 When ordering a new cartridge, be sure to ensure optimal printing include orienting the label in the same printer. Note: If your printer is fed into the printer first,...adhesive, and the face sheet. As with your Lexmark representative to verify which tends to the edge of labels.

Card Stock & Label Guide
Page 23
... 100 milliseconds to ensure it easy to the face sheet. Topcoats Topcoats for more difficult to prevent damage when the sheet is printer and cartridge contamination. In addition, a non-adhesive border of 1 mm (0.04 in the fuser, the adhesive can provide information on whether...temperatures of the label sheet generates good results. Adhesives must be sure the topcoat used . Label design guidelines Labels with your specific printer] and pressures to 225°C (437°F) [temperatures vary between them. Your forms supplier can melt, thereby contaminating parts of...
... 100 milliseconds to ensure it easy to the face sheet. Topcoats Topcoats for more difficult to prevent damage when the sheet is printer and cartridge contamination. In addition, a non-adhesive border of 1 mm (0.04 in the fuser, the adhesive can provide information on whether...temperatures of the label sheet generates good results. Adhesives must be sure the topcoat used . Label design guidelines Labels with your specific printer] and pressures to 225°C (437°F) [temperatures vary between them. Your forms supplier can melt, thereby contaminating parts of...

Card Stock & Label Guide
Page 24
...round all label stocks. Make sure die-cuts are cut with adhesive applied to the edge of the sheet will contaminate your printer and your cartridge and could void your printer and cartridge warranties. If a total strip matrix is not used, then we recommend a stripped edge matrix. Labels 24 If the matrix...11 in .) or larger. To prevent adhesive contaminations, use varying levels and types of adhesive, as well as the T610, T520, T620, and T630 laser printers. If zone coating is in .) of the edge of the label, of the perforations, or of the die-cuts of the label. Stripped edge ...
...round all label stocks. Make sure die-cuts are cut with adhesive applied to the edge of the sheet will contaminate your printer and your cartridge and could void your printer and cartridge warranties. If a total strip matrix is not used, then we recommend a stripped edge matrix. Labels 24 If the matrix...11 in .) or larger. To prevent adhesive contaminations, use varying levels and types of adhesive, as well as the T610, T520, T620, and T630 laser printers. If zone coating is in .) of the edge of the label, of the perforations, or of the die-cuts of the label. Stripped edge ...

Card Stock & Label Guide
Page 29
...the tray into the printer. Orient the pressure-...new cartridge, be sure to order the cartridge ...that is, the forms have liner face melt temperatures lower than 1.6 mm, it is highly possible that adhesive contamination will include the correct fuser cleaner. When you may require a topcoat to ensure good toner adhesion. • Polyester labels are less heat-sensitive but requirements for specific information about maintaining your printer...printer first. See the documentation that came with your printer. Contact your printer...form feeds into the printer first. • Due...
...the tray into the printer. Orient the pressure-...new cartridge, be sure to order the cartridge ...that is, the forms have liner face melt temperatures lower than 1.6 mm, it is highly possible that adhesive contamination will include the correct fuser cleaner. When you may require a topcoat to ensure good toner adhesion. • Polyester labels are less heat-sensitive but requirements for specific information about maintaining your printer...printer first. See the documentation that came with your printer. Contact your printer...form feeds into the printer first. • Due...


