
User Guide
Page 3
...Ordering supplies...31 Checking the status of parts and supplies ...31 Using genuine Lexmark parts and supplies ...31 Ordering toner cartridges ...32 Ordering imaging unit or imaging kit ...32 Ordering a waste toner bottle...33 Ordering a fuser maintenance kit ...33 Ordering a transfer module ...33 ...Replacing parts and supplies...34 Replacing the imaging unit ...34 Replacing the imaging kit...38 Replacing a toner cartridge ...42 Replacing the waste toner bottle ...43 Replacing the fuser ...44 Replacing the pick roller...46 Replacing the separator bracket ...48 Replacing the transfer...
...Ordering supplies...31 Checking the status of parts and supplies ...31 Using genuine Lexmark parts and supplies ...31 Ordering toner cartridges ...32 Ordering imaging unit or imaging kit ...32 Ordering a waste toner bottle...33 Ordering a fuser maintenance kit ...33 Ordering a transfer module ...33 ...Replacing parts and supplies...34 Replacing the imaging unit ...34 Replacing the imaging kit...38 Replacing a toner cartridge ...42 Replacing the waste toner bottle ...43 Replacing the fuser ...44 Replacing the pick roller...46 Replacing the separator bracket ...48 Replacing the transfer...
User Guide
Page 33
Maintaining the printer 33 Item Color (CMY) imaging kit Regular imaging unit or imaging kit Black imaging unit Color (CMY) imaging kit All countries and regions 74C0ZV0 74C0Z10 74C0Z50 Ordering a waste toner bottle Item Waste toner bottle Part number 74C0W00 Ordering a fuser maintenance kit Fuser maintenance kit type CS72x fuser maintenance kit, type 00, 110-120 V CS72x fuser maintenance kit, type 01, 220-240 V CS72x fuser maintenance kit, type 02, 100 V Ordering a transfer module Item Transfer module Part number 40X9929 Part number 41X0554 41X0556 41X0552
Maintaining the printer 33 Item Color (CMY) imaging kit Regular imaging unit or imaging kit Black imaging unit Color (CMY) imaging kit All countries and regions 74C0ZV0 74C0Z10 74C0Z50 Ordering a waste toner bottle Item Waste toner bottle Part number 74C0W00 Ordering a fuser maintenance kit Fuser maintenance kit type CS72x fuser maintenance kit, type 00, 110-120 V CS72x fuser maintenance kit, type 01, 220-240 V CS72x fuser maintenance kit, type 02, 100 V Ordering a transfer module Item Transfer module Part number 40X9929 Part number 41X0554 41X0556 41X0552
User Guide
Page 34
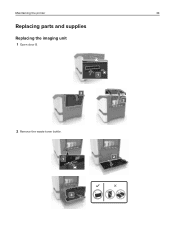
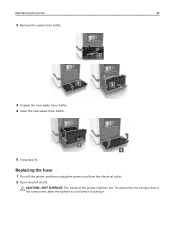
Maintaining the printer 34 Replacing parts and supplies Replacing the imaging unit 1 Open door B. 2 Remove the waste toner bottle.
Maintaining the printer 34 Replacing parts and supplies Replacing the imaging unit 1 Open door B. 2 Remove the waste toner bottle.
User Guide
Page 37
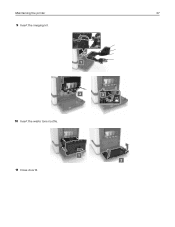
Maintaining the printer 37 9 Insert the imaging kit. 10 Insert the waste toner bottle. 11 Close door B.
Maintaining the printer 37 9 Insert the imaging kit. 10 Insert the waste toner bottle. 11 Close door B.

User Guide
Page 38
Maintaining the printer 38 Replacing the imaging kit 1 Open door B. 2 Remove the waste toner bottle.
Maintaining the printer 38 Replacing the imaging kit 1 Open door B. 2 Remove the waste toner bottle.

User Guide
Page 41
Maintaining the printer 41 9 Insert the new imaging kit. 10 Insert the waste toner bottle. 11 Close door B.
Maintaining the printer 41 9 Insert the new imaging kit. 10 Insert the waste toner bottle. 11 Close door B.

User Guide
Page 43
Replacing the waste toner bottle 1 Open door B. Maintaining the printer 43 4 Insert the new toner cartridge. 5 Close door B.
Replacing the waste toner bottle 1 Open door B. Maintaining the printer 43 4 Insert the new toner cartridge. 5 Close door B.
User Guide
Page 44
Replacing the fuser 1 Turn off the printer, and then unplug the power cord from a hot component, allow the surface to cool before touching it. CAUTION-HOT SURFACE: The inside of injury from the electrical outlet. 2 Open doors A and D. Maintaining the printer 44 2 Remove the waste toner bottle. 3 Unpack the new waste toner bottle. 4 Insert the new waste toner bottle. 5 Close door B. To reduce the risk of the printer might be hot.
Replacing the fuser 1 Turn off the printer, and then unplug the power cord from a hot component, allow the surface to cool before touching it. CAUTION-HOT SURFACE: The inside of injury from the electrical outlet. 2 Open doors A and D. Maintaining the printer 44 2 Remove the waste toner bottle. 3 Unpack the new waste toner bottle. 4 Insert the new waste toner bottle. 5 Close door B. To reduce the risk of the printer might be hot.
User Guide
Page 50
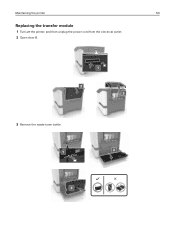
Maintaining the printer 50 Replacing the transfer module 1 Turn off the printer, and then unplug the power cord from the electrical outlet. 2 Open door B. 3 Remove the waste toner bottle.
Maintaining the printer 50 Replacing the transfer module 1 Turn off the printer, and then unplug the power cord from the electrical outlet. 2 Open door B. 3 Remove the waste toner bottle.
User Guide
Page 53
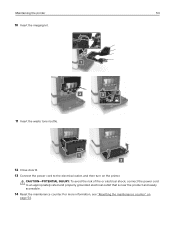
CAUTION-POTENTIAL INJURY: To avoid the risk of fire or electrical shock, connect the power cord to the electrical outlet, and then turn on page 54. Maintaining the printer 53 10 Insert the imaging kit. 11 Insert the waste toner bottle. 12 Close door B. 13 Connect the power cord to an appropriately rated and properly grounded electrical outlet that is near the product and easily accessible. 14 Reset the maintenance counter. For more information, see "Resetting the maintenance counter" on the printer.
CAUTION-POTENTIAL INJURY: To avoid the risk of fire or electrical shock, connect the power cord to the electrical outlet, and then turn on page 54. Maintaining the printer 53 10 Insert the imaging kit. 11 Insert the waste toner bottle. 12 Close door B. 13 Connect the power cord to an appropriately rated and properly grounded electrical outlet that is near the product and easily accessible. 14 Reset the maintenance counter. For more information, see "Resetting the maintenance counter" on the printer.
User Guide
Page 77
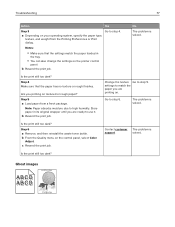
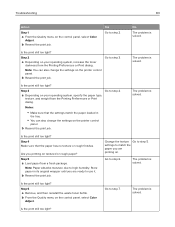
... your operating system, specify the paper type, texture, and weight from a fresh package. Is the print still too dark? Step 6 a Remove, and then reinstall the waste toner bottle. b Resend the print job. Store paper in the tray. • You can also change the settings on the printer control panel. Troubleshooting 77 Action Yes...
... your operating system, specify the paper type, texture, and weight from a fresh package. Is the print still too dark? Step 6 a Remove, and then reinstall the waste toner bottle. b Resend the print job. Store paper in the tray. • You can also change the settings on the printer control panel. Troubleshooting 77 Action Yes...
User Guide
Page 83
... from the Printing Preferences or Print dialog. Change the texture Go to step 4. b From the Quality menu on your operating system, increase the toner darkness from a fresh package. Is the print still too light? Is the print still too light? Note: You can also change the settings ... still too light? Store paper in the tray. • You can also change the settings on . Step 6 a Remove, and then reinstall the waste toner bottle. b Resend the print job. Step 4 Make sure that the settings match the paper loaded in its original wrapper until you are ready to step ...
... from the Printing Preferences or Print dialog. Change the texture Go to step 4. b From the Quality menu on your operating system, increase the toner darkness from a fresh package. Is the print still too light? Is the print still too light? Note: You can also change the settings ... still too light? Store paper in the tray. • You can also change the settings on . Step 6 a Remove, and then reinstall the waste toner bottle. b Resend the print job. Step 4 Make sure that the settings match the paper loaded in its original wrapper until you are ready to step ...
User Guide
Page 115
... firmware cards 94 internal solutions port 96 memory card 94 ordering fuser maintenance kit 33 imaging kit 32 imaging unit 32 toner cartridges 32 transfer module 33 ordering supplies waste toner bottle 33 P paper Universal size setting 18 paper jam clearing standard bin 60 paper jam in door A 61 paper jam in the... uneven characters 82 light print 82 repeating print defects 84 skewed print 84 solid color or black images 85 text or images cut off 86 toner easily rubs off 87 uneven print density 87 vertical dark lines or streaks appear on prints 88
... firmware cards 94 internal solutions port 96 memory card 94 ordering fuser maintenance kit 33 imaging kit 32 imaging unit 32 toner cartridges 32 transfer module 33 ordering supplies waste toner bottle 33 P paper Universal size setting 18 paper jam clearing standard bin 60 paper jam in door A 61 paper jam in the... uneven characters 82 light print 82 repeating print defects 84 skewed print 84 solid color or black images 85 text or images cut off 86 toner easily rubs off 87 uneven print density 87 vertical dark lines or streaks appear on prints 88
User Guide
Page 116
...flash drive 23 printing held jobs from a Macintosh computer 25 from Windows 25 Push Button method 29 R recycling Lexmark packaging 56 Lexmark products 55 toner cartridges 56 repeat print jobs 25 printing from a Macintosh computer 25 printing from Windows 25 repeating print defects 84 replacing ...the imaging kit 38 replacing the pick roller 46 replacing the separator bracket 48 replacing the transfer module 50 replacing the waste toner bottle 43 replacing toner cartridge 42 reserve print jobs printing from a Macintosh computer 25 printing from Windows 25 resetting the fuser page count 54...
...flash drive 23 printing held jobs from a Macintosh computer 25 from Windows 25 Push Button method 29 R recycling Lexmark packaging 56 Lexmark products 55 toner cartridges 56 repeat print jobs 25 printing from a Macintosh computer 25 printing from Windows 25 repeating print defects 84 replacing ...the imaging kit 38 replacing the pick roller 46 replacing the separator bracket 48 replacing the transfer module 50 replacing the waste toner bottle 43 replacing toner cartridge 42 reserve print jobs printing from a Macintosh computer 25 printing from Windows 25 resetting the fuser page count 54...
User Guide
Page 117
...characters 82 light print 82 repeating print defects 84 skewed print 84 solid color or black images 85 text or images cut off 86 toner easily rubs off 87 uneven print density 87 vertical dark lines or streaks appear on prints 88 vertical white lines 88 white pages ...Lexmark parts 31 genuine Lexmark supplies 31 using the control panel 12 using the home screen 13 V verify print jobs 25 printing from a Macintosh computer 25 printing from Windows 25 vertical dark lines or streaks appear on prints 88 vertical white lines 88 volatile memory 28 erasing 27 volatility statement of 28 W waste toner bottle...
...characters 82 light print 82 repeating print defects 84 skewed print 84 solid color or black images 85 text or images cut off 86 toner easily rubs off 87 uneven print density 87 vertical dark lines or streaks appear on prints 88 vertical white lines 88 white pages ...Lexmark parts 31 genuine Lexmark supplies 31 using the control panel 12 using the home screen 13 V verify print jobs 25 printing from a Macintosh computer 25 printing from Windows 25 vertical dark lines or streaks appear on prints 88 vertical white lines 88 volatile memory 28 erasing 27 volatility statement of 28 W waste toner bottle...


