SCS/TNe Emulation User’s Guide
Page 25
... Sess item. Change option settings as desired. 14 Select the TNe Common menu. 15 Reset all sessions by clicking on this session. If no jobs are printing, you may need to end and reset the session at the bottom of the TN3270E or TN5250E menus. 10 All option values which may be... changed remotely will then display a confirmation that settings have been submitted. 13 Repeat with the other TN3270E or TN5250E menus as desired. 11 Select the Submit...
... Sess item. Change option settings as desired. 14 Select the TNe Common menu. 15 Reset all sessions by clicking on this session. If no jobs are printing, you may need to end and reset the session at the bottom of the TN3270E or TN5250E menus. 10 All option values which may be... changed remotely will then display a confirmation that settings have been submitted. 13 Repeat with the other TN3270E or TN5250E menus as desired. 11 Select the Submit...
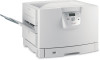
User's Guide
Page 56
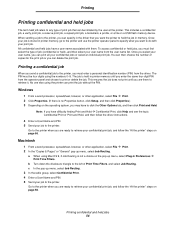
... four digits using Mac OS 9, if Job Routing is held jobs 56 Printing Printing confidential and held jobs The term held jobs have a user name associated with your job to the printer. This includes a confidential job, a verify print job, a reserve print job, a repeat print job, a bookmark, a profile, or a file on the pop-up menu, select Job Routing. Once your job is no Properties button, click Setup, and...
... four digits using Mac OS 9, if Job Routing is held jobs 56 Printing Printing confidential and held jobs The term held jobs have a user name associated with your job to the printer. This includes a confidential job, a verify print job, a reserve print job, a repeat print job, a bookmark, a profile, or a file on the pop-up menu, select Job Routing. Once your job is no Properties button, click Setup, and...
User's Guide
Page 57
..., and then press . 4 Enter your job prints, it is held jobs Held jobs such as Verify Print, Reserve Print, Repeat Print, Bookmarks, and USB flash memory files differ in memory until the appears next to the job you want to print, and then press . These jobs are printed, the Verify Print job is deleted from the "Held Jobs" menu. Printing At the printer 1 Press until Held...
..., and then press . 4 Enter your job prints, it is held jobs Held jobs such as Verify Print, Reserve Print, Repeat Print, Bookmarks, and USB flash memory files differ in memory until the appears next to the job you want to print, and then press . These jobs are printed, the Verify Print job is deleted from the "Held Jobs" menu. Printing At the printer 1 Press until Held...
User's Guide
Page 58
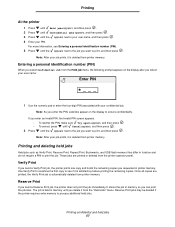
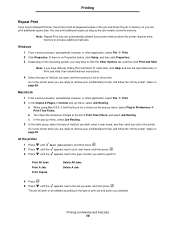
...Print All Jobs Print A Job Print Copies Delete All Jobs Delete A Job 4 Press . 5 Press until the appears next to the printer. Go to the printer when you are ready to click the Other Options tab, and then click Print and Hold. Printing Repeat Print If you send a Repeat Print job, the printer prints all requested copies of print job... and action you selected. until the appears next to the type of held jobs 58 c In the pop-up ...
...Print All Jobs Print A Job Print Copies Delete All Jobs Delete A Job 4 Press . 5 Press until the appears next to the printer. Go to the printer when you are ready to click the Other Options tab, and then click Print and Hold. Printing Repeat Print If you send a Repeat Print job, the printer prints all requested copies of print job... and action you selected. until the appears next to the type of held jobs 58 c In the pop-up ...
User's Guide
Page 163
... 143 Paper Jam message remains after clearing jam 143 print time seems long 139 tray linking does not work 140 unexpected page breaks 140 R repeat print 57 reserve print 57 S safety information 2 Secure mode 134 security 133 Sending a job to print 51 side guide 60 Simple Network Management Protocol 133... supplies fuser 87 print cartridge 87 transfer belt 87 T toner soiled clothing 92 transparencies loading input tray 60 tray linking 68, 82 U UNIX 15, 24 USB Direct interface 52 USB flash memory device 52 V verify print 57 W width guide 60 Windows 11, 18 162 Lexmark Confidential until announced ...
... 143 Paper Jam message remains after clearing jam 143 print time seems long 139 tray linking does not work 140 unexpected page breaks 140 R repeat print 57 reserve print 57 S safety information 2 Secure mode 134 security 133 Sending a job to print 51 side guide 60 Simple Network Management Protocol 133... supplies fuser 87 print cartridge 87 transfer belt 87 T toner soiled clothing 92 transparencies loading input tray 60 tray linking 68, 82 U UNIX 15, 24 USB Direct interface 52 USB flash memory device 52 V verify print 57 W width guide 60 Windows 11, 18 162 Lexmark Confidential until announced ...
Menus and Messages
Page 18
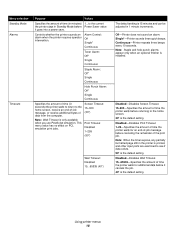
... to see if data exists. 90* is the default setting. Disabled-Disables Screen Timeout. 15-300-Specifies the amount of the print job. Disabled-Disables Print Timeout. 1-25-Specifies the amount of time the printer waits for additional data before it goes into a power save. Note:...When the timer expires, any partially formatted page still in 1 minute increments. This menu value has no effect on PCL emulation print jobs. Continuous-Printer repeats three beeps every 10 seconds. Disabled-Disables Wait Timeout. 15...65535-Specifies the amount of data from the computer. Controls whether ...
... to see if data exists. 90* is the default setting. Disabled-Disables Screen Timeout. 15-300-Specifies the amount of the print job. Disabled-Disables Print Timeout. 1-25-Specifies the amount of time the printer waits for additional data before it goes into a power save. Note:...When the timer expires, any partially formatted page still in 1 minute increments. This menu value has no effect on PCL emulation print jobs. Continuous-Printer repeats three beeps every 10 seconds. Disabled-Disables Wait Timeout. 15...65535-Specifies the amount of data from the computer. Controls whether ...
Help Menu Pages
Page 11
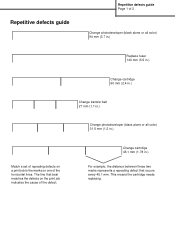
Change cartrdige 45.1 mm (1.78 in .) Match a set of repeating defects on a print job to the marks on the print job indicates the cause of the horizontal lines. The line that occurs every 45.1 mm. Repetitive defects guide Repetitive defects guide Page 1 of 2 Change photodeveloper (black ....) Change transfer belt 27 mm (1.1 in.) Change photodeveloper (black alone or all color) 31.5 mm (1.2 in .) For example, the distance between these two marks represents a repeating defect that best matches the defects on one of the defect. This means the cartridge needs replacing.
Change cartrdige 45.1 mm (1.78 in .) Match a set of repeating defects on a print job to the marks on the print job indicates the cause of the horizontal lines. The line that occurs every 45.1 mm. Repetitive defects guide Repetitive defects guide Page 1 of 2 Change photodeveloper (black ....) Change transfer belt 27 mm (1.1 in.) Change photodeveloper (black alone or all color) 31.5 mm (1.2 in .) For example, the distance between these two marks represents a repeating defect that best matches the defects on one of the defect. This means the cartridge needs replacing.

Service Manual
Page 181
...is below or above the top edge of paper, and see if an adjustment is needed , continue with the top punched hole. 3. Print and punch another sheet of the page. 4. Tighten the guide rail thumbscrews. 7. Note: Do not move the bottom of the paper...hole is useful when you hole punch a printed job on page 3-59, print and hole punch another piece of paper previously punched from their starting position. This adjustment is aligned with step 2. 2. Note: The following procedures are not aligned, repeat steps 3 through 8. Repeat steps 2 and 3. Rotate both three- ...
...is below or above the top edge of paper, and see if an adjustment is needed , continue with the top punched hole. 3. Print and punch another sheet of the page. 4. Tighten the guide rail thumbscrews. 7. Note: Do not move the bottom of the paper...hole is useful when you hole punch a printed job on page 3-59, print and hole punch another piece of paper previously punched from their starting position. This adjustment is aligned with step 2. 2. Note: The following procedures are not aligned, repeat steps 3 through 8. Repeat steps 2 and 3. Rotate both three- ...


