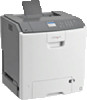

Card Stock & Label Guide
Page 23
... section for your specific printer] and pressures up to 25 psi and fuser temperatures of toner to the paper path guides, drive rollers, charge roller, photoconductor drum, transfer roller, and detack fingers, use full label sheets. Avoid using topcoats on the reference edge. Zone coating means placing the adhesive only where...
... section for your specific printer] and pressures up to 25 psi and fuser temperatures of toner to the paper path guides, drive rollers, charge roller, photoconductor drum, transfer roller, and detack fingers, use full label sheets. Avoid using topcoats on the reference edge. Zone coating means placing the adhesive only where...

Quick Reference
Page 23
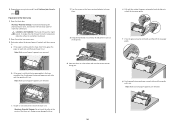
... 10 minutes. Note: Make sure all paper fragments are removed. 5 Close the front door. Warning-Potential Damage: To avoid overexposing the photoconductor units, do Inside the printer 200-201 Open the front door, and then remove the jammed paper from behind the toner cartridge area. ... feeder 250 Remove all paper from a hot component, allow the surface to cool before touching it. 23 2 If lodged under the photoconductor units. CAUTION-HOT SURFACE: The inside of injury from the multipurpose feeder, and then remove the jammed paper. 200-201 paper jams Paper...
... 10 minutes. Note: Make sure all paper fragments are removed. 5 Close the front door. Warning-Potential Damage: To avoid overexposing the photoconductor units, do Inside the printer 200-201 Open the front door, and then remove the jammed paper from behind the toner cartridge area. ... feeder 250 Remove all paper from a hot component, allow the surface to cool before touching it. 23 2 If lodged under the photoconductor units. CAUTION-HOT SURFACE: The inside of injury from the multipurpose feeder, and then remove the jammed paper. 200-201 paper jams Paper...
Quick Reference
Page 24
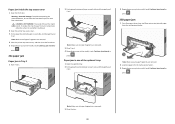
... a flat surface with the blue thumb screws facing you. CAUTION-HOT SURFACE: The inside of the fuser unit. Warning-Potential Damage: To avoid overexposing the photoconductor units, do not leave the front door open for more than 10 minutes. Note: Make sure all paper fragments are removed. d Place the fuser on...
... a flat surface with the blue thumb screws facing you. CAUTION-HOT SURFACE: The inside of the fuser unit. Warning-Potential Damage: To avoid overexposing the photoconductor units, do not leave the front door open for more than 10 minutes. Note: Make sure all paper fragments are removed. d Place the fuser on...

Quick Reference
Page 25
Note: Make sure all paper fragments are removed. Warning-Potential Damage: To avoid overexposing the photoconductors, do not leave the front doors open for more than 10 minutes. c If the jammed paper is visible under the fuser, then firmly grasp the ...
Note: Make sure all paper fragments are removed. Warning-Potential Damage: To avoid overexposing the photoconductors, do not leave the front doors open for more than 10 minutes. c If the jammed paper is visible under the fuser, then firmly grasp the ...
Quick Reference
Page 27
... your printer model, touch Continue, jam cleared or press . Paper jam inside of the printer might be hot. Warning-Potential Damage: To avoid overexposing the photoconductors, do not leave the front doors open for more than 10 minutes. Note: Make sure all paper fragments are removed. 4 Close the printer top access...
... your printer model, touch Continue, jam cleared or press . Paper jam inside of the printer might be hot. Warning-Potential Damage: To avoid overexposing the photoconductors, do not leave the front doors open for more than 10 minutes. Note: Make sure all paper fragments are removed. 4 Close the printer top access...
User's Guide
Page 6
... reuse or recycling 188 Maintaining the printer 189 Ordering parts and supplies...189 Ordering a toner cartridge...189 Ordering a photoconductor ...189 Ordering a fuser or a transfer module...190 Ordering a waste toner bottle ...190 Using genuine Lexmark parts and supplies 190 Storing supplies...191 Replacing parts and supplies...191 Replacing a toner cartridge...191 Replacing the...
... reuse or recycling 188 Maintaining the printer 189 Ordering parts and supplies...189 Ordering a toner cartridge...189 Ordering a photoconductor ...189 Ordering a fuser or a transfer module...190 Ordering a waste toner bottle ...190 Using genuine Lexmark parts and supplies 190 Storing supplies...191 Replacing parts and supplies...191 Replacing a toner cartridge...191 Replacing the...
User's Guide
Page 8
... 83.xx Replace transfer module ...228 83.xx Transfer module near life warning ...228 84.xx [Color] photoconductor nearly low ...228 84.xx [Color] photoconductor low ...228 84.xx Replace [color] photoconductor...229 84.xx [Color] photoconductor missing...229 88.xx [color] cartridge nearly low ...229 88.xx [color] cartridge low ...229 88.xx...
... 83.xx Replace transfer module ...228 83.xx Transfer module near life warning ...228 84.xx [Color] photoconductor nearly low ...228 84.xx [Color] photoconductor low ...228 84.xx Replace [color] photoconductor...229 84.xx [Color] photoconductor missing...229 88.xx [color] cartridge nearly low ...229 88.xx [color] cartridge low ...229 88.xx...
User's Guide
Page 132
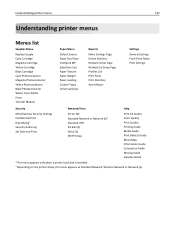
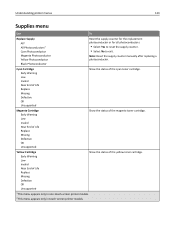
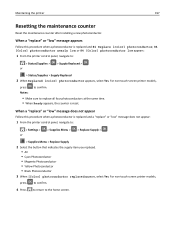
Understanding printer menus 132 Understanding printer menus Menus list Supplies Menu Replace Supply Cyan Cartridge Magenta Cartridge Yellow Cartridge Black Cartridge Cyan Photoconductor Magenta Photoconductor Yellow Photoconductor Black Photoconductor Waste Toner Bottle Fuser Transfer Module Paper Menu Default Source Paper Size/Type Configure MP Substitute Size Paper Texture Paper Weight Paper Loading Custom Types ...
Understanding printer menus 132 Understanding printer menus Menus list Supplies Menu Replace Supply Cyan Cartridge Magenta Cartridge Yellow Cartridge Black Cartridge Cyan Photoconductor Magenta Photoconductor Yellow Photoconductor Black Photoconductor Waste Toner Bottle Fuser Transfer Module Paper Menu Default Source Paper Size/Type Configure MP Substitute Size Paper Texture Paper Weight Paper Loading Custom Types ...
User's Guide
Page 133
... the magenta toner cartridge. Note: Reset the supply counter manually after replacing a photoconductor. Understanding printer menus 133 Supplies menu Use To Replace Supply All1 All Photoconductors2 Cyan Photoconductor Magenta Photoconductor Yellow Photoconductor Black Photoconductor Reset the supply counter for the replacement photoconductor or for all photoconductors. • Select Yes to reset the supply counter. • Select No...
... the magenta toner cartridge. Note: Reset the supply counter manually after replacing a photoconductor. Understanding printer menus 133 Supplies menu Use To Replace Supply All1 All Photoconductors2 Cyan Photoconductor Magenta Photoconductor Yellow Photoconductor Black Photoconductor Reset the supply counter for the replacement photoconductor or for all photoconductors. • Select Yes to reset the supply counter. • Select No...
User's Guide
Page 134
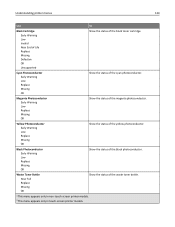
... Bottle Near Full Replace Missing OK Show the status of the magenta photoconductor. Cyan Photoconductor Early Warning Low Replace Missing OK Show the status of the black photoconductor. Black Photoconductor Early Warning Low Replace Missing OK Show the status of the cyan photoconductor. Yellow Photoconductor Early Warning Low Replace Missing OK Show the status of the...
... Bottle Near Full Replace Missing OK Show the status of the magenta photoconductor. Cyan Photoconductor Early Warning Low Replace Missing OK Show the status of the black photoconductor. Black Photoconductor Early Warning Low Replace Missing OK Show the status of the cyan photoconductor. Yellow Photoconductor Early Warning Low Replace Missing OK Show the status of the...
User's Guide
Page 189
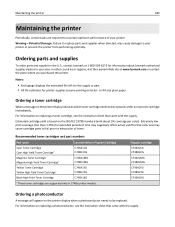
... printer or prevent the printer from performing optimally. Ordering a toner cartridge When a message on replacing a photoconductor, see the instruction sheet that came with about Lexmark authorized supplies dealers in C748x printer models. Ordering parts and supplies To order parts and supplies in the... U.S., contact Lexmark at www.lexmark.com or contact the place where you purchased the printer. For information on the printer display when a photoconductor needs to exhaustion of your printer Warning-Potential Damage: Failure to...
... printer or prevent the printer from performing optimally. Ordering a toner cartridge When a message on replacing a photoconductor, see the instruction sheet that came with about Lexmark authorized supplies dealers in C748x printer models. Ordering parts and supplies To order parts and supplies in the... U.S., contact Lexmark at www.lexmark.com or contact the place where you purchased the printer. For information on the printer display when a photoconductor needs to exhaustion of your printer Warning-Potential Damage: Failure to...

User's Guide
Page 190
... information on replacing the waste toner bottle, see the instruction sheet that you use only genuine Lexmark parts and supplies to zero after installing the four new photoconductors. Recommended part numbers Part name Fuser Transfer module Part number 40X8112 (100 V) 40X8110 (115 ...toner bottle reuse is not recommended. Maintaining the printer 190 Recommended part numbers Part name Photoconductor Photoconductor, Multi‑Pack Part number C734X20G C734X24G Notes: • All four photoconductors should be replaced. Ordering a fuser or a transfer module A message on the ...
... information on replacing the waste toner bottle, see the instruction sheet that you use only genuine Lexmark parts and supplies to zero after installing the four new photoconductors. Recommended part numbers Part name Fuser Transfer module Part number 40X8112 (100 V) 40X8110 (115 ...toner bottle reuse is not recommended. Maintaining the printer 190 Recommended part numbers Part name Photoconductor Photoconductor, Multi‑Pack Part number C734X20G C734X24G Notes: • All four photoconductors should be replaced. Ordering a fuser or a transfer module A message on the ...
User's Guide
Page 191
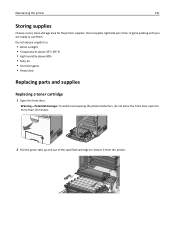
... packing until you are ready to use them. Do not expose supplies to remove it from the printer. Warning-Potential Damage: To avoid overexposing the photoconductors, do not leave the front door open for the printer supplies. Store supplies right side up and out of the specified cartridge to : • Direct...
... packing until you are ready to use them. Do not expose supplies to remove it from the printer. Warning-Potential Damage: To avoid overexposing the photoconductors, do not leave the front door open for the printer supplies. Store supplies right side up and out of the specified cartridge to : • Direct...

User's Guide
Page 194
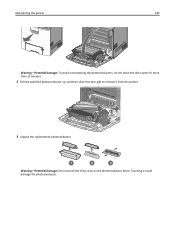
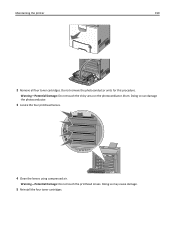
Maintaining the printer 194 6 Place the bag into the shipping box used for the replacement part. 2 1 7 Peel the recycling label off and place it on the shipping box. 1 2 8 Insert the new waste toner bottle into the printer. 1 2 Replacing a photoconductor Notes: • Replace all four photoconductors at the same time for optimum print quality. • Print quality is affected when the photoconductor is replaced without resetting the supply counter. 1 Open the front door.
Maintaining the printer 194 6 Place the bag into the shipping box used for the replacement part. 2 1 7 Peel the recycling label off and place it on the shipping box. 1 2 8 Insert the new waste toner bottle into the printer. 1 2 Replacing a photoconductor Notes: • Replace all four photoconductors at the same time for optimum print quality. • Print quality is affected when the photoconductor is replaced without resetting the supply counter. 1 Open the front door.
User's Guide
Page 195
Maintaining the printer 195 Warning-Potential Damage: To avoid overexposing the photoconductors, do not leave the door open for more than 10 minutes. 2 Pull the specified photoconductor up, and then slide it to the right to remove it could damage the photoconductor. Touching it from the printer. 2 1 3 Unpack the replacement photoconductor. 1 2 3 Warning-Potential Damage: Do not touch the shiny area on the photoconductor drum.
Maintaining the printer 195 Warning-Potential Damage: To avoid overexposing the photoconductors, do not leave the door open for more than 10 minutes. 2 Pull the specified photoconductor up, and then slide it to the right to remove it could damage the photoconductor. Touching it from the printer. 2 1 3 Unpack the replacement photoconductor. 1 2 3 Warning-Potential Damage: Do not touch the shiny area on the photoconductor drum.
User's Guide
Page 196
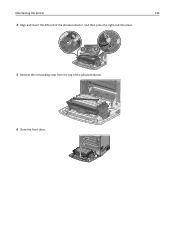
Maintaining the printer 196 4 Align and insert the left end of the photoconductor, and then press the right end into place. 1 2 5 Remove the red packing strip from the top of the photoconductor. 6 Close the front door.
Maintaining the printer 196 4 Align and insert the left end of the photoconductor, and then press the right end into place. 1 2 5 Remove the red packing strip from the top of the photoconductor. 6 Close the front door.
User's Guide
Page 197
.... When a "replace" or "low" message does not appear Follow this procedure when a photoconductor is replaced and 84 Replace [color] photoconductor, 84 [Color] photoconductor nearly low, or 84 [Color] photoconductor low appears: 1 From the printer control panel, navigate to : > Settings > or >... you replaced. • All • Cyan Photoconductor • Magenta Photoconductor • Yellow Photoconductor • Black Photoconductor 3 When [Color] photoconductor replaced appears, select Yes. Notes: • Make sure to replace all four photoconductors at the same time. • When Ready ...
.... When a "replace" or "low" message does not appear Follow this procedure when a photoconductor is replaced and 84 Replace [color] photoconductor, 84 [Color] photoconductor nearly low, or 84 [Color] photoconductor low appears: 1 From the printer control panel, navigate to : > Settings > or >... you replaced. • All • Cyan Photoconductor • Magenta Photoconductor • Yellow Photoconductor • Black Photoconductor 3 When [Color] photoconductor replaced appears, select Yes. Notes: • Make sure to replace all four photoconductors at the same time. • When Ready ...

User's Guide
Page 198
Warning-Potential Damage: To avoid overexposing the photoconductor unit or imaging unit, do not leave the front door open for more than 10 minutes. Warning-Potential Damage: Do not use household cleaners or ... printer parts Cleaning the interior of the printer Note: You may need to wipe away loose toner particles. Warning-Potential Damage: To avoid overexposing the photoconductor units, do not the leave the door open for more than 10 minutes. CAUTION-SHOCK HAZARD: To avoid the risk of electric shock when cleaning...
Warning-Potential Damage: To avoid overexposing the photoconductor unit or imaging unit, do not leave the front door open for more than 10 minutes. Warning-Potential Damage: Do not use household cleaners or ... printer parts Cleaning the interior of the printer Note: You may need to wipe away loose toner particles. Warning-Potential Damage: To avoid overexposing the photoconductor units, do not the leave the door open for more than 10 minutes. CAUTION-SHOCK HAZARD: To avoid the risk of electric shock when cleaning...
User's Guide
Page 199
Maintaining the printer 199 2 Remove all four toner cartridges. Doing so can damage the photoconductor. 3 Locate the four printhead lenses. 4 Clean the lenses using compressed air. Warning-Potential Damage: Do not touch the printhead lenses. Doing so may cause damage. 5 Reinstall the four toner cartridges. Do not remove the photoconductor units for this procedure. Warning-Potential Damage: Do not touch the shiny area on the photoconductor drum.
Maintaining the printer 199 2 Remove all four toner cartridges. Doing so can damage the photoconductor. 3 Locate the four printhead lenses. 4 Clean the lenses using compressed air. Warning-Potential Damage: Do not touch the printhead lenses. Doing so may cause damage. 5 Reinstall the four toner cartridges. Do not remove the photoconductor units for this procedure. Warning-Potential Damage: Do not touch the shiny area on the photoconductor drum.

User's Guide
Page 202
... 202-203 230 202-203 24x 250 What to access jam locations. Open the front door, and then remove the jammed paper from under the photoconductor units.
... 202-203 230 202-203 24x 250 What to access jam locations. Open the front door, and then remove the jammed paper from under the photoconductor units.


