Wireless Setup Guide
Page 8
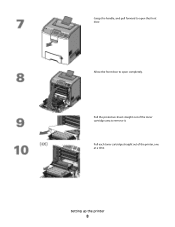
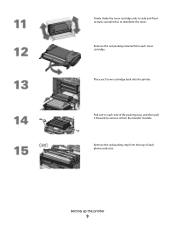
Setting up the printer 8 Grasp the handle, and pull forward to open the front door. Pull the protective sheet straight out of the printer, one at a time. Allow the front door to open completely. Pull each toner cartridge straight out of the toner cartridge area to remove it.
Setting up the printer 8 Grasp the handle, and pull forward to open the front door. Pull the protective sheet straight out of the printer, one at a time. Allow the front door to open completely. Pull each toner cartridge straight out of the toner cartridge area to remove it.
Wireless Setup Guide
Page 9
Place each toner cartridge. Remove the red packing material from the transfer module. Pull out on each photoconductor. Remove the red packing strip from the top of each side of the packing strip, and then pull it from each toner cartridge back into the printer. Setting up the printer 9 Firmly shake the toner cartridge side-to-side and frontto-back several times to remove it forward to distribute the toner.
Place each toner cartridge. Remove the red packing material from the transfer module. Pull out on each photoconductor. Remove the red packing strip from the top of each side of the packing strip, and then pull it from each toner cartridge back into the printer. Setting up the printer 9 Firmly shake the toner cartridge side-to-side and frontto-back several times to remove it forward to distribute the toner.
Quick Reference
Page 1
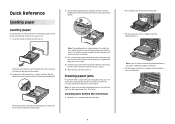
... tabs together, and then slide the length guide to the correct position for the size of paper being loaded. Straighten the edges on the printer control panel. Load the stack toward the back of the tray as shown, and then slide the guide to the correct position for the ...The length guide has a locking device. Clearing paper jams If a jammed sheet is lodged under them . Clearing jams behind the toner cartridge area. Notice the size indicators on the printer control panel. To unlock the tray, slide the button on the left as shown. To lock the tray once a length has been...
... tabs together, and then slide the length guide to the correct position for the size of paper being loaded. Straighten the edges on the printer control panel. Load the stack toward the back of the tray as shown, and then slide the guide to the correct position for the ...The length guide has a locking device. Clearing paper jams If a jammed sheet is lodged under them . Clearing jams behind the toner cartridge area. Notice the size indicators on the printer control panel. To unlock the tray, slide the button on the left as shown. To lock the tray once a length has been...
Menu Map
Page 1
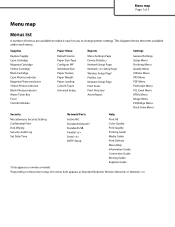
... of 3 Menu map Menus list A number of menus are available to make it easy for you to change printer settings. Supplies Replace Supply Cyan Cartridge Magenta Cartridge Yellow Cartridge Black Cartridge Cyan Photoconductor Magenta Photoconductor Yellow Photoconductor Black Photoconductor Waste Toner Box Fuser Transfer Module Paper Menu Default Source Paper Size/Type... Print Defects Menu Map Information Guide Connection Guide Moving Guide Supplies Guide 1Only appears on wireless models. 2Depending on the printer setup, this menu item appears as Standard Network, Wireless Network, or Network .
... of 3 Menu map Menus list A number of menus are available to make it easy for you to change printer settings. Supplies Replace Supply Cyan Cartridge Magenta Cartridge Yellow Cartridge Black Cartridge Cyan Photoconductor Magenta Photoconductor Yellow Photoconductor Black Photoconductor Waste Toner Box Fuser Transfer Module Paper Menu Default Source Paper Size/Type... Print Defects Menu Map Information Guide Connection Guide Moving Guide Supplies Guide 1Only appears on wireless models. 2Depending on the printer setup, this menu item appears as Standard Network, Wireless Network, or Network .

Print Quality
Page 1
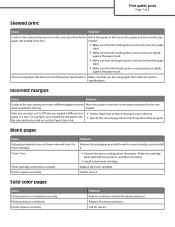
...quality problems can be solved by a clock, and then Ready appears. Resetting the Printer appears briefly, followed by replacing a supply or maintenance item that is approaching the end of paper that you are using . A toner cartridge, the transfer module, or the fuser is loaded in Tray 1. 2 Turn the... printer off. 3 From the printer control panel, press and hold and the right arrow button while turning the printer on. 4 Release both buttons when the clock appears, and...
...quality problems can be solved by a clock, and then Ready appears. Resetting the Printer appears briefly, followed by replacing a supply or maintenance item that is approaching the end of paper that you are using . A toner cartridge, the transfer module, or the fuser is loaded in Tray 1. 2 Turn the... printer off. 3 From the printer control panel, press and hold and the right arrow button while turning the printer on. 4 Release both buttons when the clock appears, and...
Print Quality
Page 4
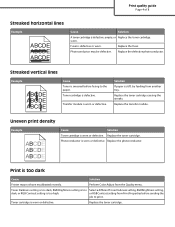
..., dark, or RGB Contrast setting is stiff, try feeding from another tray. Uneven print density Example ABCDE ABCDE ABCDE Cause Solution Toner cartridge is too dark Cause Solution Printer may be defective. Print is worn or defective. or RGB Contrast setting from the Quality menu. Photoconductor may not have recalibrated recently. Streaked...
..., dark, or RGB Contrast setting is stiff, try feeding from another tray. Uneven print density Example ABCDE ABCDE ABCDE Cause Solution Toner cartridge is too dark Cause Solution Printer may be defective. Print is worn or defective. or RGB Contrast setting from the Quality menu. Photoconductor may not have recalibrated recently. Streaked...
Print Quality
Page 5
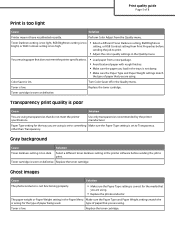
... Replace the photoconductor. The paper weight or Paper Weight setting in the Quality menu. Color Saver is low. Toner cartridge is worn or defective. Toner cartridge is worn or defective. type of paper that you are using . Print quality guide Page 5 of 8 Print ...too bright, or RGB Contrast setting is set to Transparency. Replace the toner cartridge. You are using . Gray background Cause Solution Toner darkness setting is too light Cause Solution Printer may not have recalibrated recently. Ghost images Cause Solution The photoconductor is not ...
... Replace the photoconductor. The paper weight or Paper Weight setting in the Quality menu. Color Saver is low. Toner cartridge is worn or defective. Toner cartridge is worn or defective. type of paper that you are using . Print quality guide Page 5 of 8 Print ...too bright, or RGB Contrast setting is set to Transparency. Replace the toner cartridge. You are using . Gray background Cause Solution Toner darkness setting is too light Cause Solution Printer may not have recalibrated recently. Ghost images Cause Solution The photoconductor is not ...
Print Quality
Page 6
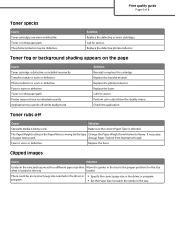
.... The photoconductor may specify off Cause Solution Specialty media is selected. Fuser is loaded in the tray. Solution Reinstall or replace the cartridge. Call for service. change Paper Texture from the Quality menu. Clipped images Cause Solution Guides in the selected tray are worn or ...type Change the Paper Weight from Normal to the proper positions for the size what is worn or defective. Toner is worn or defective. Printer may not have recalibrated recently. program. • Set the Paper Size to Rough. Print quality guide Page 6 of paper being used ...
.... The photoconductor may specify off Cause Solution Specialty media is selected. Fuser is loaded in the tray. Solution Reinstall or replace the cartridge. Call for service. change Paper Texture from the Quality menu. Clipped images Cause Solution Guides in the selected tray are worn or ...type Change the Paper Weight from Normal to the proper positions for the size what is worn or defective. Toner is worn or defective. Printer may not have recalibrated recently. program. • Set the Paper Size to Rough. Print quality guide Page 6 of paper being used ...
Print Quality
Page 7
... the tray to the proper positions for the size paper size loaded in the tray. Toner cartridge is low. Shake the cartridge back and forth several times, and then reinstall it . • Remove the toner cartridge from the printer. Blank pages Cause Packaging materials have not been removed from the paper stack. • Make...
... the tray to the proper positions for the size paper size loaded in the tray. Toner cartridge is low. Shake the cartridge back and forth several times, and then reinstall it . • Remove the toner cartridge from the printer. Blank pages Cause Packaging materials have not been removed from the paper stack. • Make...
Supplies Guide
Page 1
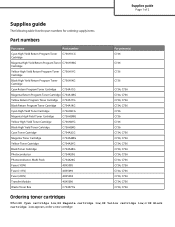
... Yield Toner Cartridge C736H2MG Yellow High Yield Toner Cartridge C736H2YG Black High Yield Toner Cartridge C736H2KG Cyan Toner Cartridge C734A2CG Magenta Toner Cartridge C734A2MG Yellow Toner Cartridge C734A2YG Black Toner Cartridge C734A2KG Photoconductor C734X20G Photoconductor, Multi-Pack C734X24G Fuser (100V) 40X5095 Fuser (115V) 40X5093 Fuser (230V) 40X5094 Transfer Module 40X5096 Waste Toner Box C734X77G For printer(s) C736 C736...
... Yield Toner Cartridge C736H2MG Yellow High Yield Toner Cartridge C736H2YG Black High Yield Toner Cartridge C736H2KG Cyan Toner Cartridge C734A2CG Magenta Toner Cartridge C734A2MG Yellow Toner Cartridge C734A2YG Black Toner Cartridge C734A2KG Photoconductor C734X20G Photoconductor, Multi-Pack C734X24G Fuser (100V) 40X5095 Fuser (115V) 40X5093 Fuser (230V) 40X5094 Transfer Module 40X5096 Waste Toner Box C734X77G For printer(s) C736 C736...
User's Guide
Page 51
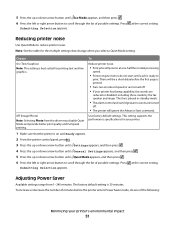
...settings that the printer is printed. • Fans run at one-half the normal processing speed. • Printer engine motors do not start until a job is placed in standby mode. • The alarm control and cartridge alarm sounds are turned off . • If your printer has faxing capability..., fax sounds are turned off . • The printer will be a short delay before the printer enters Power Saver mode, do one of the following: Minimizing your...
...settings that the printer is printed. • Fans run at one-half the normal processing speed. • Printer engine motors do not start until a job is placed in standby mode. • The alarm control and cartridge alarm sounds are turned off . • If your printer has faxing capability..., fax sounds are turned off . • The printer will be a short delay before the printer enters Power Saver mode, do one of the following: Minimizing your...

User's Guide
Page 53
... for reuse or recycling, follow the instructions that Lexmark printers are transported in Lexmark packaging is less packaging to Lexmark are either reused or demanufactured for recycling. The foam used cartridges to Lexmark for reuse or recycling. Returning Lexmark cartridges for reuse or recycling The Lexmark Cartridge Collection Program diverts millions of Lexmark cartridges from the list. 3 Follow the instructions on the...
... for reuse or recycling, follow the instructions that Lexmark printers are transported in Lexmark packaging is less packaging to Lexmark are either reused or demanufactured for recycling. The foam used cartridges to Lexmark for reuse or recycling. Returning Lexmark cartridges for reuse or recycling The Lexmark Cartridge Collection Program diverts millions of Lexmark cartridges from the list. 3 Follow the instructions on the...

User's Guide
Page 70
... works best, especially when printing bar codes. Have any way - Note: Paper labels are supported. Adhesive material contaminates the printer and could void the printer and cartridge warranties. • Do not use labels with adhesive, and could void the warranty. • If zone coating of the...on using card stock Card stock is recommended. Have an interlocking design - Note: A combination of the adhesive at http://support.lexmark.com. Label adhesives, face sheet (printable stock), and topcoats can withstand temperatures up to peel off during printing, resulting in ...
... works best, especially when printing bar codes. Have any way - Note: Paper labels are supported. Adhesive material contaminates the printer and could void the printer and cartridge warranties. • Do not use labels with adhesive, and could void the warranty. • If zone coating of the...on using card stock Card stock is recommended. Have an interlocking design - Note: A combination of the adhesive at http://support.lexmark.com. Label adhesives, face sheet (printable stock), and topcoats can withstand temperatures up to peel off during printing, resulting in ...

User's Guide
Page 77
Printing in black and white To print all text and graphics using only the black toner cartridge, set the printer to color mode based on the color content found on each page. Note: If you choose between a faster print speed or a higher toner yield. Using ... is the factory default setting. • Max Speed-Prints in slower printing if the content of pages is capable of overriding this setting. 1 From the printer control panel, press . 2 Press the up or down arrow button until Settings appears, and then press . 3 Press the up or down arrow button until Quality...
Printing in black and white To print all text and graphics using only the black toner cartridge, set the printer to color mode based on the color content found on each page. Note: If you choose between a faster print speed or a higher toner yield. Using ... is the factory default setting. • Max Speed-Prints in slower printing if the content of pages is capable of overriding this setting. 1 From the printer control panel, press . 2 Press the up or down arrow button until Settings appears, and then press . 3 Press the up or down arrow button until Quality...

User's Guide
Page 78
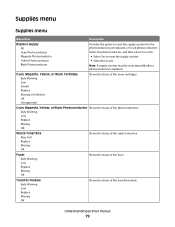
Understanding printer menus Menus list Supplies Replace Supply Cyan Cartridge Magenta Cartridge Yellow Cartridge Black Cartridge Cyan Photoconductor Magenta Photoconductor Yellow Photoconductor Black Photoconductor Waste Toner Box Fuser Transfer Module Paper Menu Default Source Paper Size/Type Configure MP Substitute Size ...Print All Color Quality Print Quality Printing Guide Media Guide Print Defects Menu Map Information Guide Connection Guide Moving Guide Supplies Guide *Depending on the printer setup, this menu item appears as Standard Network, Wireless Network, or Network . Understanding...
Understanding printer menus Menus list Supplies Replace Supply Cyan Cartridge Magenta Cartridge Yellow Cartridge Black Cartridge Cyan Photoconductor Magenta Photoconductor Yellow Photoconductor Black Photoconductor Waste Toner Box Fuser Transfer Module Paper Menu Default Source Paper Size/Type Configure MP Substitute Size ...Print All Color Quality Print Quality Printing Guide Media Guide Print Defects Menu Map Information Guide Connection Guide Moving Guide Supplies Guide *Depending on the printer setup, this menu item appears as Standard Network, Wireless Network, or Network . Understanding...
User's Guide
Page 79
... Select Yes to reset the supply counter. • Select No to exit. Cyan, Magenta, Yellow, or Black Cartridge Early Warning Low Invalid Replace Missing or Defective OK Unsupported Shows the status of the toner cartridges Cyan, Magenta, Yellow, or Black Photoconductor Shows the status of the photoconductors Early Warning Low Replace Missing... Missing OK Shows the status of the fuser Transfer module Early Warning Low Replace Missing OK Shows the status of the transfer module Understanding printer menus 79 Note: A supply counter must be reset manually after a photoconductor is replaced.
... Select Yes to reset the supply counter. • Select No to exit. Cyan, Magenta, Yellow, or Black Cartridge Early Warning Low Invalid Replace Missing or Defective OK Unsupported Shows the status of the toner cartridges Cyan, Magenta, Yellow, or Black Photoconductor Shows the status of the photoconductors Early Warning Low Replace Missing... Missing OK Shows the status of the fuser Transfer module Early Warning Low Replace Missing OK Shows the status of the transfer module Understanding printer menus 79 Note: A supply counter must be reset manually after a photoconductor is replaced.

User's Guide
Page 111
...Menu item Quiet Mode Off (Image/Photo) On (Text/Graphics) Run Initial Setup Yes No Paper Sizes US Metric Alarms Alarm Control Cartridge Alarm Description Reduces the amount of color-rich documents, set Quiet Mode to Off. • Selecting Photo from the driver may disable...means no alarm will sound. • Continuous repeats three beeps every 10 seconds. This setting is the factory default setting for Cartridge Alarm. Understanding printer menus 111 This setting supports the performance specifications for your Country selection in the initial setup wizard. • Changing this setting...
...Menu item Quiet Mode Off (Image/Photo) On (Text/Graphics) Run Initial Setup Yes No Paper Sizes US Metric Alarms Alarm Control Cartridge Alarm Description Reduces the amount of color-rich documents, set Quiet Mode to Off. • Selecting Photo from the driver may disable...means no alarm will sound. • Continuous repeats three beeps every 10 seconds. This setting is the factory default setting for Cartridge Alarm. Understanding printer menus 111 This setting supports the performance specifications for your Country selection in the initial setup wizard. • Changing this setting...

User's Guide
Page 114
... to be removed from sending print jobs that print jobs be moved into the non-printable area defined by the Normal setting, but the printer will clip the image at the Normal setting boundary. • The Whole Page setting affects only pages printed using a PCL 5e interpreter.... Note: Max Yield is the factory default setting. This setting has no effect on pages printed using only the black toner cartridge. When attempting to print text and graphics using the PCL XL or PostScript interpreter. This requirement ensures that stored jobs are obtained, the ...
... to be removed from sending print jobs that print jobs be moved into the non-printable area defined by the Normal setting, but the printer will clip the image at the Normal setting boundary. • The Whole Page setting affects only pages printed using a PCL 5e interpreter.... Note: Max Yield is the factory default setting. This setting has no effect on pages printed using only the black toner cartridge. When attempting to print text and graphics using the PCL XL or PostScript interpreter. This requirement ensures that stored jobs are obtained, the ...

User's Guide
Page 133
Maintaining the printer 133 Warning-Potential Damage: To avoid overexposing the photoconductor units, do not leave the front door open for this procedure. 3 Locate the four printhead lenses. 4 Clean the lenses using a can of compressed air. Do not remove the photoconductor units for more than 10 minutes. 2 Remove all four toner cartridges. Warning-Potential Damage: Do not touch the printhead lenses. 5 Reinstall the four toner cartridges.
Maintaining the printer 133 Warning-Potential Damage: To avoid overexposing the photoconductor units, do not leave the front door open for this procedure. 3 Locate the four printhead lenses. 4 Clean the lenses using a can of compressed air. Do not remove the photoconductor units for more than 10 minutes. 2 Remove all four toner cartridges. Warning-Potential Damage: Do not touch the printhead lenses. 5 Reinstall the four toner cartridges.

User's Guide
Page 135
... a network setup page and locate the IP address in the U.S., contact Lexmark at www.lexmark.com or contact the place where you purchased the printer. The Device Status page appears, displaying a summary of your area. Maintaining the printer 135 Estimated cartridge yield is based on letter- Ordering photoconductors When , 84 photoconductor low, or 84 photoconductor...
... a network setup page and locate the IP address in the U.S., contact Lexmark at www.lexmark.com or contact the place where you purchased the printer. The Device Status page appears, displaying a summary of your area. Maintaining the printer 135 Estimated cartridge yield is based on letter- Ordering photoconductors When , 84 photoconductor low, or 84 photoconductor...


