Wireless Setup Guide
Page 8
Y C M K Y C M Remove the toner cartridges by lifting the handles, and then gently pulling away from the imaging kit. K M C Y K M C Y Setting up the printer 8
Y C M K Y C M Remove the toner cartridges by lifting the handles, and then gently pulling away from the imaging kit. K M C Y K M C Y Setting up the printer 8
Wireless Setup Guide
Page 10
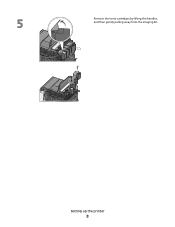
Setting up the printer 10 Y C M K K M C Y Close the front and top doors. Push the toner cartridge until it clicks into the imaging kit by aligning the rollers on the toner cartridge with the tracks. Replace the right side cover. Y C M K K M C Y Insert the toner cartridge into place.
Setting up the printer 10 Y C M K K M C Y Close the front and top doors. Push the toner cartridge until it clicks into the imaging kit by aligning the rollers on the toner cartridge with the tracks. Replace the right side cover. Y C M K K M C Y Insert the toner cartridge into place.

User's Guide
Page 37
.... 2 Find the product type you can also be adjusted by making it both easy and free for Lexmark customers to return used cartridges to Lexmark for reuse or recycling, follow the instructions that the cartridge came with your printer's environmental impact 37 These efficiencies result in your country from the list. 3 Follow the instructions on...
.... 2 Find the product type you can also be adjusted by making it both easy and free for Lexmark customers to return used cartridges to Lexmark for reuse or recycling, follow the instructions that the cartridge came with your printer's environmental impact 37 These efficiencies result in your country from the list. 3 Follow the instructions on...
User's Guide
Page 58
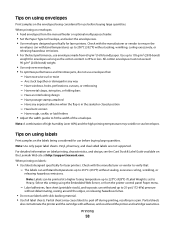
.... Vinyl, pharmacy, and dual-sided labels are not supported. When printing on labels: • Use labels designed specifically for laser printers. Check with the manufacturer or vendor to peel off during printing, resulting in a jam. Have excessive curl or twist - ...25-psi (172-kPa) pressure without sealing, excessive curling, wrinkling, or releasing hazardous emissions. Label adhesives, face sheet (printable stock), and topcoats can be printed at http://support.lexmark.com. Partial sheets may wrinkle or seal envelopes. Partial sheets also contaminate the printer and the cartridge...
.... Vinyl, pharmacy, and dual-sided labels are not supported. When printing on labels: • Use labels designed specifically for laser printers. Check with the manufacturer or vendor to peel off during printing, resulting in a jam. Have excessive curl or twist - ...25-psi (172-kPa) pressure without sealing, excessive curling, wrinkling, or releasing hazardous emissions. Label adhesives, face sheet (printable stock), and topcoats can be printed at http://support.lexmark.com. Partial sheets may wrinkle or seal envelopes. Partial sheets also contaminate the printer and the cartridge...
User's Guide
Page 64
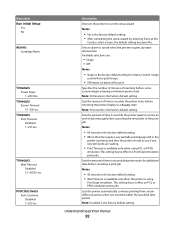
...Network Menu USB Menu Wireless Menu Note: Certain menus are not available on selected printer models. Invalid Replace Missing or Defective OK Unsupported Imaging Kit OK Replace Black Imaging Kit Replace Color Imaging Kit Defective Shows the status of the imaging kit Waste Toner Box Near Full... Replace Missing OK Shows the status of the toner cartridges Early Warning Low Note: Replace Cartridge indicates the cartridge is nearly empty, and print quality ...
...Network Menu USB Menu Wireless Menu Note: Certain menus are not available on selected printer models. Invalid Replace Missing or Defective OK Unsupported Imaging Kit OK Replace Black Imaging Kit Replace Color Imaging Kit Defective Shows the status of the imaging kit Waste Toner Box Near Full... Replace Missing OK Shows the status of the toner cartridges Early Warning Low Note: Replace Cartridge indicates the cartridge is nearly empty, and print quality ...
User's Guide
Page 82
...time period Note: Disabled is the factory default setting. Specifies the number of minutes of inactivity before canceling the remainder of time in seconds the printer waits to a Ready state Note: 30 seconds is the factory default setting. Sets the amount of the print job Notes: • 90 ...the setup wizard by selecting Done at the Country select screen, the default setting becomes No. Menu item Run Initial Setup Yes No Alarms Cartridge Alarm Timeouts Power Saver 1-240 min Timeouts Screen Timeout 15-300 sec Timeouts Print Timeout Disabled 1-255 sec Timeouts Wait Timeout Disabled 15-65535...
...time period Note: Disabled is the factory default setting. Specifies the number of minutes of inactivity before canceling the remainder of time in seconds the printer waits to a Ready state Note: 30 seconds is the factory default setting. Sets the amount of the print job Notes: • 90 ...the setup wizard by selecting Done at the Country select screen, the default setting becomes No. Menu item Run Initial Setup Yes No Alarms Cartridge Alarm Timeouts Power Saver 1-240 min Timeouts Screen Timeout 15-300 sec Timeouts Print Timeout Disabled 1-255 sec Timeouts Wait Timeout Disabled 15-65535...
User's Guide
Page 96
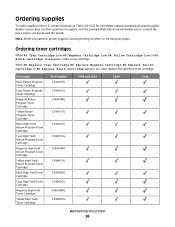
... Lexmark at www.lexmark.com or contact the place where you must replace the specified toner cartridge. When 88 Replace Cyan Cartridge, 88 Replace Magenta Cartridge, 88 Replace Yellow Cartridge, or 88 Replace Black Cartridge appears, you purchased the printer. Part name Black Return Program Toner Cartridge Cyan Return Program Toner Cartridge Magenta Return Program Toner Cartridge Yellow Return Program Toner Cartridge...
... Lexmark at www.lexmark.com or contact the place where you must replace the specified toner cartridge. When 88 Replace Cyan Cartridge, 88 Replace Magenta Cartridge, 88 Replace Yellow Cartridge, or 88 Replace Black Cartridge appears, you purchased the printer. Part name Black Return Program Toner Cartridge Cyan Return Program Toner Cartridge Magenta Return Program Toner Cartridge Yellow Return Program Toner Cartridge...
User's Guide
Page 97
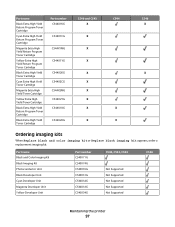
... Yield Toner Cartridge Magenta Extra High Yield Toner Cartridge Yellow Extra High Yield Toner Cartridge Black Extra High Yield Return Program Toner Cartridge Black Extra High Yield Toner Cartridge Part number C544X1KG C544X1CG C544X1MG C544X1YG C544X2KG C544X2CG C544X2MG C544X2YG C546U1KG C546U2KG C540 and C543 X X X X X X X X X X C544 X X C546 X X Ordering imaging kits When Replace black and color imaging kit...
... Yield Toner Cartridge Magenta Extra High Yield Toner Cartridge Yellow Extra High Yield Toner Cartridge Black Extra High Yield Return Program Toner Cartridge Black Extra High Yield Toner Cartridge Part number C544X1KG C544X1CG C544X1MG C544X1YG C544X2KG C544X2CG C544X2MG C544X2YG C546U1KG C546U2KG C540 and C543 X X X X X X X X X X C544 X X C546 X X Ordering imaging kits When Replace black and color imaging kit...

User's Guide
Page 102
2 Open the top door by sliding the button forward. 3 Remove the toner cartridges by lifting the handles, and then gently pulling them away from the imaging kit. 4 Remove the right side cover. Maintaining the printer 102
2 Open the top door by sliding the button forward. 3 Remove the toner cartridges by lifting the handles, and then gently pulling them away from the imaging kit. 4 Remove the right side cover. Maintaining the printer 102
User's Guide
Page 106
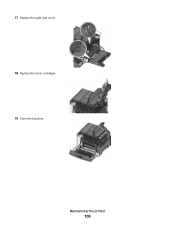
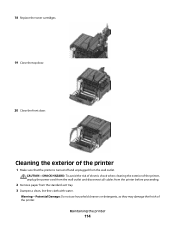
17 Replace the right side cover. 18 Replace the toner cartridges. 19 Close the top door. Maintaining the printer 106
17 Replace the right side cover. 18 Replace the toner cartridges. 19 Close the top door. Maintaining the printer 106
User's Guide
Page 107
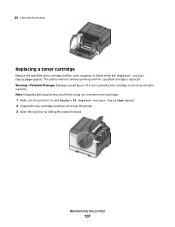
... may result from using non-Lexmark toner cartridges. 1 Make sure the printer is on and Ready or 88 Replace Cartridge appears. 2 Unpack the new cartridge, and then set it near the printer. 3 Open the top door by use of a non-Lexmark toner cartridge is replaced. The printer will not continue printing until the specified cartridge is not covered under warranty...
... may result from using non-Lexmark toner cartridges. 1 Make sure the printer is on and Ready or 88 Replace Cartridge appears. 2 Unpack the new cartridge, and then set it near the printer. 3 Open the top door by use of a non-Lexmark toner cartridge is replaced. The printer will not continue printing until the specified cartridge is not covered under warranty...
User's Guide
Page 108
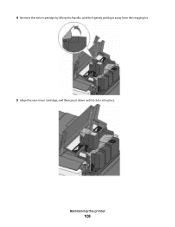
Maintaining the printer 108 4 Remove the toner cartridge by lifting the handle, and then gently pulling it away from the imaging kit. 5 Align the new toner cartridge, and then press down until it clicks into place.
Maintaining the printer 108 4 Remove the toner cartridge by lifting the handle, and then gently pulling it away from the imaging kit. 5 Align the new toner cartridge, and then press down until it clicks into place.
User's Guide
Page 110
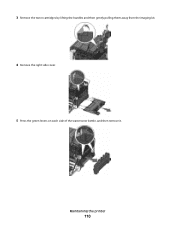
3 Remove the toner cartridges by lifting the handles and then gently pulling them away from the imaging kit. 4 Remove the right side cover. 5 Press the green levers on each side of the waste toner bottle, and then remove it. Maintaining the printer 110
3 Remove the toner cartridges by lifting the handles and then gently pulling them away from the imaging kit. 4 Remove the right side cover. 5 Press the green levers on each side of the waste toner bottle, and then remove it. Maintaining the printer 110
User's Guide
Page 114
...18 Replace the toner cartridges. 19 Close the top door. 20 Close the front door. Maintaining the printer 114 Cleaning the exterior of the printer. Warning-Potential Damage: Do not use household cleaners or detergents, as they may damage the finish of the printer 1 Make sure that the printer is turned off ...and unplugged from the standard exit tray. 3 Dampen a clean, lint-free cloth with water. CAUTION-SHOCK HAZARD: To avoid the risk of electric shock when cleaning the exterior of the printer, unplug the power cord ...
...18 Replace the toner cartridges. 19 Close the top door. 20 Close the front door. Maintaining the printer 114 Cleaning the exterior of the printer. Warning-Potential Damage: Do not use household cleaners or detergents, as they may damage the finish of the printer 1 Make sure that the printer is turned off ...and unplugged from the standard exit tray. 3 Dampen a clean, lint-free cloth with water. CAUTION-SHOCK HAZARD: To avoid the risk of electric shock when cleaning the exterior of the printer, unplug the power cord ...
User's Guide
Page 127
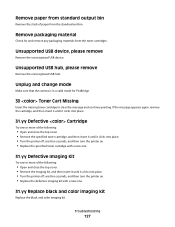
...place. • Turn the printer off , wait ten seconds, and then turn the printer on . • Replace the defective imaging kit with a new one. 31.yy Replace black and color imaging kit Replace the black and color imaging kit. If the message appears again, remove the cartridge, and then insert it ...until it clicks into place. 31.yy Defective Cartridge Try one ...
...place. • Turn the printer off , wait ten seconds, and then turn the printer on . • Replace the defective imaging kit with a new one. 31.yy Replace black and color imaging kit Replace the black and color imaging kit. If the message appears again, remove the cartridge, and then insert it ...until it clicks into place. 31.yy Defective Cartridge Try one ...
User's Guide
Page 128
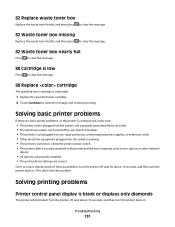
... Cancel the current print job. to make sure the paper is too short for the current print job. 32.yy Replace Unsupported Cartridge Replace the unsupported toner cartridge with a supported one. 34 Short paper The paper in the selected tray is large enough for the data being printed. •...; Cancel the current print job. 35 Insufficient memory to support Resource Save feature The printer lacks sufficient memory to save settings. For ...
... Cancel the current print job. to make sure the paper is too short for the current print job. 32.yy Replace Unsupported Cartridge Replace the unsupported toner cartridge with a supported one. 34 Short paper The paper in the selected tray is large enough for the data being printed. •...; Cancel the current print job. 35 Insufficient memory to support Resource Save feature The printer lacks sufficient memory to save settings. For ...
User's Guide
Page 131
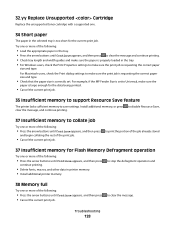
... , wait about 10 seconds, and then turn the printer back on . Solving printing problems Printer control panel display is turned on . Solving basic printer problems If there are correct. Check the printer power switch. • The printer cable is exhausted. 1 Replace the specified toner cartridge. 2 Touch Continue to the printer and the host computer, print server, option...
... , wait about 10 seconds, and then turn the printer back on . Solving printing problems Printer control panel display is turned on . Solving basic printer problems If there are correct. Check the printer power switch. • The printer cable is exhausted. 1 Replace the specified toner cartridge. 2 Touch Continue to the printer and the host computer, print server, option...
User's Guide
Page 138
..., press the arrow buttons until Prt Quality Pgs appears, and then press . THE TONER MAY BE LOW When 88 Cartridge Low appears, order a new toner cartridge. If the problem continues, the printer may have a printer part that requires adjustment or replacement. The message remains on sequence, and then Config Menu appears. 4 Press the arrow...
..., press the arrow buttons until Prt Quality Pgs appears, and then press . THE TONER MAY BE LOW When 88 Cartridge Low appears, order a new toner cartridge. If the problem continues, the printer may have a printer part that requires adjustment or replacement. The message remains on sequence, and then Config Menu appears. 4 Press the arrow...

User's Guide
Page 141
... in its original wrapper until you use it. Print irregularities Troubleshooting 141 Note: The printer has two types of the following : A TONER CARTRIDGE MAY BE DEFECTIVE Replace the defective toner cartridge. Paper curl These are possible solutions. THE PAPER HAS ABSORBED MOISTURE DUE TO HIGH ...specify the type from the Print dialog. The black and color imaging kit contains cyan, magenta, yellow, and black. THE IMAGING KIT MAY BE DEFECTIVE Replace the imaging kit. Light colored line, white line, or incorrectly colored line These are possible solutions. Try one or more of...
... in its original wrapper until you use it. Print irregularities Troubleshooting 141 Note: The printer has two types of the following : A TONER CARTRIDGE MAY BE DEFECTIVE Replace the defective toner cartridge. Paper curl These are possible solutions. THE PAPER HAS ABSORBED MOISTURE DUE TO HIGH ...specify the type from the Print dialog. The black and color imaging kit contains cyan, magenta, yellow, and black. THE IMAGING KIT MAY BE DEFECTIVE Replace the imaging kit. Light colored line, white line, or incorrectly colored line These are possible solutions. Try one or more of...

User's Guide
Page 142
... or more of the following : CALIBRATE THE COLOR The printer automatically calibrates the colors whenever a new imaging kit is detected. Troubleshooting 142 THE TONER MAY BE LOW When 88 cartridge low appears or when the print becomes faded, replace the toner cartridge. These are possible solutions. If a cartridge is too dark These are possible solutions. CHECK...
... or more of the following : CALIBRATE THE COLOR The printer automatically calibrates the colors whenever a new imaging kit is detected. Troubleshooting 142 THE TONER MAY BE LOW When 88 cartridge low appears or when the print becomes faded, replace the toner cartridge. These are possible solutions. If a cartridge is too dark These are possible solutions. CHECK...


