
User Manual
Page 6
... ...114 Replacing a black imaging kit ...117 Replacing a black and color imaging kit ...123 Replacing a toner cartridge...128 Replacing a developer unit ...130 Cleaning the exterior of the printer...135 Recycling Lexmark products...136 Moving the printer...136 Before moving the printer...136 Moving the printer to another location...136 Shipping the printer ...136 Administrative...
... ...114 Replacing a black imaging kit ...117 Replacing a black and color imaging kit ...123 Replacing a toner cartridge...128 Replacing a developer unit ...130 Cleaning the exterior of the printer...135 Recycling Lexmark products...136 Moving the printer...136 Before moving the printer...136 Moving the printer to another location...136 Shipping the printer ...136 Administrative...
User Manual
Page 71
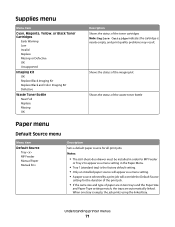
... OK Unsupported Imaging Kit OK Replace Black Imaging Kit Replace Black and Color Imaging Kit Defective Waste Toner Bottle Near Full Replace Missing OK Description Shows the status of the toner cartridges Note: Replace Cartridge indicates the cartridge is the factory default setting. • Only an installed paper source will override the Default Source setting...
... OK Unsupported Imaging Kit OK Replace Black Imaging Kit Replace Black and Color Imaging Kit Defective Waste Toner Bottle Near Full Replace Missing OK Description Shows the status of the toner cartridges Note: Replace Cartridge indicates the cartridge is the factory default setting. • Only an installed paper source will override the Default Source setting...
User Manual
Page 101
... turn the printer off while this message appears on flash memory. Calibrating The printer is performing the defragmentation operation on the display. Low Replace the toner cartridge, and then wait for the message to clear. Close door Close the upper and lower doors. Check Config ID The printer configuration ID is invalid...
... turn the printer off while this message appears on flash memory. Calibrating The printer is performing the defragmentation operation on the display. Low Replace the toner cartridge, and then wait for the message to clear. Close door Close the upper and lower doors. Check Config ID The printer configuration ID is invalid...

User Manual
Page 104
... printed pages in Tray • Press to clear the message and continue processing the second side of the following : • Remove paper from the toner cartridges. Replace cartridge Replace the toner cartridge, and then press to cancel printing. Tray Empty Try one or more of the sheet. • Press , and then press to clear the...
... printed pages in Tray • Press to clear the message and continue processing the second side of the following : • Remove paper from the toner cartridges. Replace cartridge Replace the toner cartridge, and then press to cancel printing. Tray Empty Try one or more of the sheet. • Press , and then press to clear the...

User Manual
Page 105
... on the display. Press to clear the message and continue printing. 30.yy cartridge missing Insert the missing toner cartridge to clear the message and continue printing. 31.yy Defective Cartridge Replace the defective toner cartridge with a new one. 31.yy Defective Imaging Kit Replace the defective imaging kit... with a new one. 32.yy Replace Unsupported Cartridge Replace the unsupported toner cartridge with a supported one. 34 Short paper Try one or more of the following : • Press to clear the message and...
... on the display. Press to clear the message and continue printing. 30.yy cartridge missing Insert the missing toner cartridge to clear the message and continue printing. 31.yy Defective Cartridge Replace the defective toner cartridge with a new one. 31.yy Defective Imaging Kit Replace the defective imaging kit... with a new one. 32.yy Replace Unsupported Cartridge Replace the unsupported toner cartridge with a supported one. 34 Short paper Try one or more of the following : • Press to clear the message and...

User Manual
Page 106
... the message and continue printing. • The printer cannot find the requested font. Press , and then press to cancel printing. 40 Invalid refill, change cartridge Replace the toner cartridge with a new one or more of the following: • Press to clear the message and continue printing. • Press , and then press to cancel...
... the message and continue printing. • The printer cannot find the requested font. Press , and then press to cancel printing. 40 Invalid refill, change cartridge Replace the toner cartridge with a new one or more of the following: • Press to clear the message and continue printing. • Press , and then press to cancel...
User Manual
Page 108
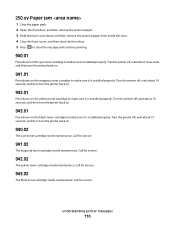
...see "Replacing the waste toner bottle" on page 114. 82.yy Waste toner box missing Replace the waste toner bottle, and then press to clear the message and continue printing. 82.yy Waste toner box nearly full Press to clear the message and continue printing. 88.yy Cartridge is low Press to... clear the message and continue printing. 88.yy Replace Cartridge Replace the toner cartridge. 200.yy Paper jam 1 Clear the paper path. 2 Press...
...see "Replacing the waste toner bottle" on page 114. 82.yy Waste toner box missing Replace the waste toner bottle, and then press to clear the message and continue printing. 82.yy Waste toner box nearly full Press to clear the message and continue printing. 88.yy Cartridge is low Press to... clear the message and continue printing. 88.yy Replace Cartridge Replace the toner cartridge. 200.yy Paper jam 1 Clear the paper path. 2 Press...
User Manual
Page 110
... maintenance. Turn the printer off , wait about 10 seconds, and then turn the printer back on. 942.01 Press down on the yellow toner cartridge to make sure it is installed properly. 250.yy Paper jam 1 Clear the paper path. 2 Open the front door, and then remove the jammed paper. 3 .... 4 Close the fuser cover, and then close the front door. 5 Press to clear the message and continue printing. 940.01 Press down on the cyan toner cartridge to make sure it is installed properly. Turn the printer off , wait about 10 seconds, and then turn the printer back on 941.01 Press...
... maintenance. Turn the printer off , wait about 10 seconds, and then turn the printer back on. 942.01 Press down on the yellow toner cartridge to make sure it is installed properly. 250.yy Paper jam 1 Clear the paper path. 2 Open the front door, and then remove the jammed paper. 3 .... 4 Close the fuser cover, and then close the front door. 5 Press to clear the message and continue printing. 940.01 Press down on the cyan toner cartridge to make sure it is installed properly. Turn the printer off , wait about 10 seconds, and then turn the printer back on 941.01 Press...

User Manual
Page 112
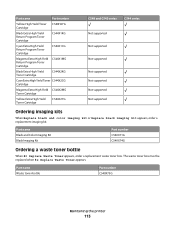
... field of your area. Ordering toner cartridges When 88 Cyan Cartridge Low, 88 Magenta Cartridge Low, 88 Yellow Cartridge Low, or 88 Black Cartridge low appears, order a new cartridge. Note: All life estimates for information about Lexmark authorized supplies dealers in your Web browser. When 88 Replace Cyan Cartridge, 88 Replace Magenta Cartridge, 88 Replace Yellow Cartridge, or 88 Replace Black...
... field of your area. Ordering toner cartridges When 88 Cyan Cartridge Low, 88 Magenta Cartridge Low, 88 Yellow Cartridge Low, or 88 Black Cartridge low appears, order a new cartridge. Note: All life estimates for information about Lexmark authorized supplies dealers in your Web browser. When 88 Replace Cyan Cartridge, 88 Replace Magenta Cartridge, 88 Replace Yellow Cartridge, or 88 Replace Black...
User Manual
Page 113
... Part number Yellow High Yield Toner C540H2YG Cartridge Black Extra High Yield Return Program Toner Cartridge C544X1KG Cyan Extra High Yield Return Program Toner Cartridge C544X1CG Magenta Extra High Yield C544X1MG Return Program Toner Cartridge Black Extra High Yield Toner Cartridge C544X2KG Cyan Extra High Yield Toner C544X2CG Cartridge Magenta Extra High Yield C544X2MG Toner Cartridge Yellow Extra High Yield Toner Cartridge C544X2YG C540 and C543...
... Part number Yellow High Yield Toner C540H2YG Cartridge Black Extra High Yield Return Program Toner Cartridge C544X1KG Cyan Extra High Yield Return Program Toner Cartridge C544X1CG Magenta Extra High Yield C544X1MG Return Program Toner Cartridge Black Extra High Yield Toner Cartridge C544X2KG Cyan Extra High Yield Toner C544X2CG Cartridge Magenta Extra High Yield C544X2MG Toner Cartridge Yellow Extra High Yield Toner Cartridge C544X2YG C540 and C543...

User Manual
Page 118
2 Open the top door. 3 Remove the toner cartridges by lifting the handles, and then gently pulling away from the imaging kit. 4 Remove the right side cover. Maintaining the printer 118
2 Open the top door. 3 Remove the toner cartridges by lifting the handles, and then gently pulling away from the imaging kit. 4 Remove the right side cover. Maintaining the printer 118

User Manual
Page 122
Maintaining the printer 122 17 Replace the waste toner bottle. 18 Replace the right side cover. 19 Replace the toner cartridges.
Maintaining the printer 122 17 Replace the waste toner bottle. 18 Replace the right side cover. 19 Replace the toner cartridges.

User Manual
Page 124
2 Open the top door. 3 Remove the toner cartridges by lifting the handles, and then gently pulling away from the imaging kit. 4 Remove the right side cover. Maintaining the printer 124
2 Open the top door. 3 Remove the toner cartridges by lifting the handles, and then gently pulling away from the imaging kit. 4 Remove the right side cover. Maintaining the printer 124

User Manual
Page 127
Maintaining the printer 127 14 Replace the waste toner bottle. 15 Replace the right side cover. 16 Replace the toner cartridges.
Maintaining the printer 127 14 Replace the waste toner bottle. 15 Replace the right side cover. 16 Replace the toner cartridges.
User Manual
Page 128
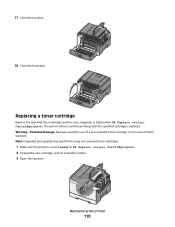
... use of a non-Lexmark toner cartridge is replaced. K M C Y Maintaining the printer 128 Y C M K Note: Degraded print quality may result from using non-Lexmark toner cartridges. 1 Make sure the printer is on and Ready or 88 Replace Cartridge appears. 2 Unpack the new cartridge, and set it near the printer. 3 Open the top door. Replacing a toner cartridge Replace the specified toner cartridge (yellow, cyan, magenta...
... use of a non-Lexmark toner cartridge is replaced. K M C Y Maintaining the printer 128 Y C M K Note: Degraded print quality may result from using non-Lexmark toner cartridges. 1 Make sure the printer is on and Ready or 88 Replace Cartridge appears. 2 Unpack the new cartridge, and set it near the printer. 3 Open the top door. Replacing a toner cartridge Replace the specified toner cartridge (yellow, cyan, magenta...

User Manual
Page 129
Y C M K 4 Remove the toner cartridge by lifting the handle, and then gently pulling away from the imaging kit. Y K M C 5 Align the new toner cartridge, and then press down until it is all the way into the slot. Y K M C Maintaining the printer 129 Y C M K
Y C M K 4 Remove the toner cartridge by lifting the handle, and then gently pulling away from the imaging kit. Y K M C 5 Align the new toner cartridge, and then press down until it is all the way into the slot. Y K M C Maintaining the printer 129 Y C M K
User Manual
Page 131
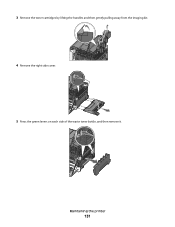
3 Remove the toner cartridges by lifting the handles and then gently pulling away from the imaging kit. 4 Remove the right side cover. 5 Press the green levers on each side of the waste toner bottle, and then remove it. Maintaining the printer 131
3 Remove the toner cartridges by lifting the handles and then gently pulling away from the imaging kit. 4 Remove the right side cover. 5 Press the green levers on each side of the waste toner bottle, and then remove it. Maintaining the printer 131
User Manual
Page 135
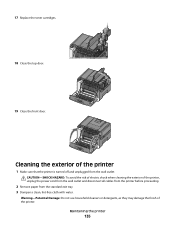
... the power cord from the wall outlet and disconnect all cables from the printer before proceeding. 2 Remove paper from the wall outlet. 17 Replace the toner cartridges. 18 Close the top door. 19 Close the front door. Warning-Potential Damage: Do not use household cleaners or detergents, as they may damage the...
... the power cord from the wall outlet and disconnect all cables from the printer before proceeding. 2 Remove paper from the wall outlet. 17 Replace the toner cartridges. 18 Close the top door. 19 Close the front door. Warning-Potential Damage: Do not use household cleaners or detergents, as they may damage the...
User Manual
Page 148
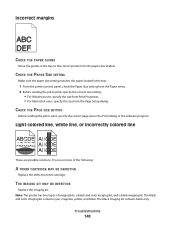
... kit. THE IMAGING KIT MAY BE DEFECTIVE Replace the imaging kit. Troubleshooting 148 Note: The printer has two types of the following: A TONER CARTRIDGE MAY BE DEFECTIVE Replace the defective toner cartridge. Incorrect margins CHECK THE PAPER GUIDES Move the guides in the tray to print, specify the correct size setting: • For Windows...
... kit. THE IMAGING KIT MAY BE DEFECTIVE Replace the imaging kit. Troubleshooting 148 Note: The printer has two types of the following: A TONER CARTRIDGE MAY BE DEFECTIVE Replace the defective toner cartridge. Incorrect margins CHECK THE PAPER GUIDES Move the guides in the tray to print, specify the correct size setting: • For Windows...
User Manual
Page 152
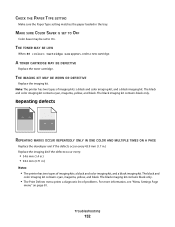
A TONER CARTRIDGE MAY BE DEFECTIVE Replace the toner cartridge. Troubleshooting 152 THE IMAGING KIT MAY BE WORN OR DEFECTIVE Replace the imaging kit. The black imaging kit contains black only. Note: The printer has .... • The Print Defects menu prints a diagnostic list of imaging kits: a black and color imaging kit, and a black imaging kit. THE TONER MAY BE LOW When 88 Cartridge Low appears, order a new cartridge. The black and color imaging kit contains cyan, magenta, yellow, and black. ) ) ) ) CHECK THE PAPER TYPE SETTING Make sure the...
A TONER CARTRIDGE MAY BE DEFECTIVE Replace the toner cartridge. Troubleshooting 152 THE IMAGING KIT MAY BE WORN OR DEFECTIVE Replace the imaging kit. The black imaging kit contains black only. Note: The printer has .... • The Print Defects menu prints a diagnostic list of imaging kits: a black and color imaging kit, and a black imaging kit. THE TONER MAY BE LOW When 88 Cartridge Low appears, order a new cartridge. The black and color imaging kit contains cyan, magenta, yellow, and black. ) ) ) ) CHECK THE PAPER TYPE SETTING Make sure the...


