Clearing Jams Guide
Page 2
..." on page 5 230.xx Jam in the duplex area "Jams in the duplex Paper Jam area" on page 5 241.xx Jam in Tray 1 Paper Jam "Clearing jams just beyond Tray 1" on page 2 242.xx Jam in Tray 2 Paper Jam "Clearing Tray 2 jams" on page 3 Control panel Area description message 250.xx Jam in the Paper Jam multipurpose feeder See "Clearing jams in the multipurpose feeder" on...
..." on page 5 230.xx Jam in the duplex area "Jams in the duplex Paper Jam area" on page 5 241.xx Jam in Tray 1 Paper Jam "Clearing jams just beyond Tray 1" on page 2 242.xx Jam in Tray 2 Paper Jam "Clearing Tray 2 jams" on page 3 Control panel Area description message 250.xx Jam in the Paper Jam multipurpose feeder See "Clearing jams in the multipurpose feeder" on...
Clearing Jams Guide
Page 3
If the paper fed from Tray 2, but is in the tray. 242.xx Paper Jam appears. 1 Open Tray 2. 2 Remove the jam. If the paper fed from Tray 2, but is caught between Tray 1 and Tray 2, 200.xx Paper Jam may appear. 1 Open Tray 2. 2 Grasp the paper on both sides. Pull it out gently to avoid tearing it. Clearing Tray 2 jams If the paper did not feed from Tray 2 correctly, the jam is caught between Tray 1 and Tray 2, 242.xx Paper Jam may appear. 1 Open Tray 1. 2 Pull the paper up and then out of the tray. 3 Reinsert the tray. 3 Reinsert the tray. 3 Reinsert the tray. 3
If the paper fed from Tray 2, but is in the tray. 242.xx Paper Jam appears. 1 Open Tray 2. 2 Remove the jam. If the paper fed from Tray 2, but is caught between Tray 1 and Tray 2, 200.xx Paper Jam may appear. 1 Open Tray 2. 2 Grasp the paper on both sides. Pull it out gently to avoid tearing it. Clearing Tray 2 jams If the paper did not feed from Tray 2 correctly, the jam is caught between Tray 1 and Tray 2, 242.xx Paper Jam may appear. 1 Open Tray 1. 2 Pull the paper up and then out of the tray. 3 Reinsert the tray. 3 Reinsert the tray. 3 Reinsert the tray. 3
Clearing Jams Guide
Page 4
.... 2 Pull the jammed paper out straight. Wait for more information, see the User's Guide. Clearing jams under the fuser or fuser cover Jams under the fuser or fuser cover When paper is jammed under the photoconductors, 200.xx Paper Jam or 201.xx Paper Jam may be hot. Jams under the photoconductors Follow... 1 Open the upper and inner doors. If the paper is jammed under the photoconductors. CAUTION-HOT SURFACE: The fuser and the inside of the printer near the fuser may appear. 1 Open the upper and inner doors. Clear the jam, and then replace the photoconductors. 3 Close the lower ...
.... 2 Pull the jammed paper out straight. Wait for more information, see the User's Guide. Clearing jams under the fuser or fuser cover Jams under the fuser or fuser cover When paper is jammed under the photoconductors, 200.xx Paper Jam or 201.xx Paper Jam may be hot. Jams under the photoconductors Follow... 1 Open the upper and inner doors. If the paper is jammed under the photoconductors. CAUTION-HOT SURFACE: The fuser and the inside of the printer near the fuser may appear. 1 Open the upper and inner doors. Clear the jam, and then replace the photoconductors. 3 Close the lower ...
Clearing Jams Guide
Page 5
... the standard exit bin When paper jams in the standard exit bin, 202.xx Paper Jam appears. Clearing jams between the inner door and the lower door, 230.xx Paper Jam appears. 1 Open the upper door. 2 Pull the jammed paper straight up and to the rear of the printer near the fuser When paper is jammed between the fuser and the standard...
... the standard exit bin When paper jams in the standard exit bin, 202.xx Paper Jam appears. Clearing jams between the inner door and the lower door, 230.xx Paper Jam appears. 1 Open the upper door. 2 Pull the jammed paper straight up and to the rear of the printer near the fuser When paper is jammed between the fuser and the standard...
Clearing Jams Guide
Page 6
... visible, remove the tray completely. When paper jams as shown in the multipurpose feeder, 250.xx Paper Jam appears. Pull the paper down and out. In either case, push the paper farther into the manual feeder for a jam behind the upper and lower doors. 3 Replace the tray. Also look for the printer to sense it, but not far...
... visible, remove the tray completely. When paper jams as shown in the multipurpose feeder, 250.xx Paper Jam appears. Pull the paper down and out. In either case, push the paper farther into the manual feeder for a jam behind the upper and lower doors. 3 Replace the tray. Also look for the printer to sense it, but not far...
Troubleshooting Guide
Page 3
...; Print the menu settings page and check to the printer system board. Paper jam message remains after it is installed: • Turn the printer off, wait for about installing software for network printing, click View User's Guide and Documentation on the Lexmark Web site at www.lexmark.com. If this does not fix the problem, unplug...
...; Print the menu settings page and check to the printer system board. Paper jam message remains after it is installed: • Turn the printer off, wait for about installing software for network printing, click View User's Guide and Documentation on the Lexmark Web site at www.lexmark.com. If this does not fix the problem, unplug...

User's Guide
Page 6
Troubleshooting...82 Checking an unresponsive printer...82 Solving printing problems...82 Multiple-language PDFs do not print ...82 Control panel display is blank or displays only diamonds 82 Error message about.../parallel interface card...86 Solving paper feed problems...86 Paper frequently jams...86 Paper jam message remains after jam is cleared 87 Page that jammed does not reprint after you clear the jam 87 Solving print quality problems...87 Isolating print quality problems ...87 Repeating defects...88 Color misregistration...88 Dark lines...89 Light colored line, white line, or ...
Troubleshooting...82 Checking an unresponsive printer...82 Solving printing problems...82 Multiple-language PDFs do not print ...82 Control panel display is blank or displays only diamonds 82 Error message about.../parallel interface card...86 Solving paper feed problems...86 Paper frequently jams...86 Paper jam message remains after jam is cleared 87 Page that jammed does not reprint after you clear the jam 87 Solving print quality problems...87 Isolating print quality problems ...87 Repeating defects...88 Color misregistration...88 Dark lines...89 Light colored line, white line, or ...

User's Guide
Page 59
... Paper Jam Jam in the duplex page-turnaround area "Jams under the rollers near the fuser" on page 65 230.xx Paper Jam Jam in the duplex area "Jams in the duplex area" on page 66 241.xx Paper Jam Jam in Tray 1 "Clearing jams just beyond Tray 1" on page 60 242.xx Paper Jam Jam in Tray 2 "Clearing Tray 2 jams" on page 61 250.xx Paper Jam Jam...
... Paper Jam Jam in the duplex page-turnaround area "Jams under the rollers near the fuser" on page 65 230.xx Paper Jam Jam in the duplex area "Jams in the duplex area" on page 66 241.xx Paper Jam Jam in Tray 1 "Clearing jams just beyond Tray 1" on page 60 242.xx Paper Jam Jam in Tray 2 "Clearing Tray 2 jams" on page 61 250.xx Paper Jam Jam...

User's Guide
Page 60
Clearing jams just beyond the tray, 200.xx Paper Jam appears. 1 Open Tray 1. 2 Remove the jam. 3 Reinsert the tray. If the paper fed from Tray 1 and jammed just beyond Tray 1 If the paper did not feed from Tray 1 correctly, the jam is in the tray. 241.xx Paper Jam appears. 1 Open Tray 1. 2 Remove the jam. 3 Reinsert the tray. Clearing jams 60
Clearing jams just beyond the tray, 200.xx Paper Jam appears. 1 Open Tray 1. 2 Remove the jam. 3 Reinsert the tray. If the paper fed from Tray 1 and jammed just beyond Tray 1 If the paper did not feed from Tray 1 correctly, the jam is in the tray. 241.xx Paper Jam appears. 1 Open Tray 1. 2 Remove the jam. 3 Reinsert the tray. Clearing jams 60

User's Guide
Page 61
Pull it out gently to avoid tearing it. If the paper fed from Tray 2 correctly, the jam is caught between Tray 1 and Tray 2, 242.xx Paper Jam may appear. 1 Open Tray 2. 2 Grasp the paper on both sides. Clearing Tray 2 jams If the paper did not feed from Tray 2, but is in the tray. 242.xx Paper Jam appears. 1 Open Tray 2. 2 Remove the jam. 3 Reinsert the tray. Clearing jams 61
Pull it out gently to avoid tearing it. If the paper fed from Tray 2 correctly, the jam is caught between Tray 1 and Tray 2, 242.xx Paper Jam may appear. 1 Open Tray 2. 2 Grasp the paper on both sides. Clearing Tray 2 jams If the paper did not feed from Tray 2, but is in the tray. 242.xx Paper Jam appears. 1 Open Tray 2. 2 Remove the jam. 3 Reinsert the tray. Clearing jams 61

User's Guide
Page 62
The lower door opens with the inner door. 2 Pull the jammed paper up and then out of the tray. 3 Reinsert the tray. Jams under the photoconductors Follow these instructions to remove jams under the photoconductors, 200.xx Paper Jam appears. Clearing jams 62 3 Reinsert the tray. Warning: To avoid overexposing the ...open longer than 10 minutes. 1 Open the upper and inner doors. Clearing jams behind the inner door If the paper is caught between Tray 1 and Tray 2, 200.xx Paper Jam may appear. 1 Open Tray 1. 2 Pull the paper up and out. 3 Close the lower door, and then close the upper ...
The lower door opens with the inner door. 2 Pull the jammed paper up and then out of the tray. 3 Reinsert the tray. Jams under the photoconductors Follow these instructions to remove jams under the photoconductors, 200.xx Paper Jam appears. Clearing jams 62 3 Reinsert the tray. Warning: To avoid overexposing the ...open longer than 10 minutes. 1 Open the upper and inner doors. Clearing jams behind the inner door If the paper is caught between Tray 1 and Tray 2, 200.xx Paper Jam may appear. 1 Open Tray 1. 2 Pull the paper up and out. 3 Close the lower door, and then close the upper ...

User's Guide
Page 63
....xx Paper Jam appears. Wait for more information, see "Removing the color supplies" on page 51). Clearing jams 63 Note: Be careful not to dislodge the photoconductors. 3 If the paper will not move, remove all four photoconductors (for the fuser to cool before clearing jams from this area. CAUTION: The fuser and the inside of the printer...
....xx Paper Jam appears. Wait for more information, see "Removing the color supplies" on page 51). Clearing jams 63 Note: Be careful not to dislodge the photoconductors. 3 If the paper will not move, remove all four photoconductors (for the fuser to cool before clearing jams from this area. CAUTION: The fuser and the inside of the printer...
User's Guide
Page 64
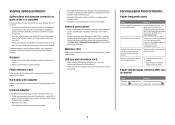
...inner door open longer than 10 minutes. 1 Open the upper and inner doors. Pull the jammed paper up and to cool before clearing jams from this area. CAUTION: The fuser and the inside of the printer. 3 Close the lower door, and then close the upper door. The lower door opens with... the inner door. 2 Determine where the jam is located: a If paper is visible under the fuser and in the slot behind the fuser, 202.xx Paper Jam appears. Jams under and behind the fuser When paper jams both...
...inner door open longer than 10 minutes. 1 Open the upper and inner doors. Pull the jammed paper up and to cool before clearing jams from this area. CAUTION: The fuser and the inside of the printer. 3 Close the lower door, and then close the upper door. The lower door opens with... the inner door. 2 Determine where the jam is located: a If paper is visible under the fuser and in the slot behind the fuser, 202.xx Paper Jam appears. Jams under and behind the fuser When paper jams both...

User's Guide
Page 65
... the rollers near the fuser When paper is visible in the standard exit bin, 203.xx Paper Jam appears. Clearing jams between the fuser and the standard exit bin When the jammed paper is jammed under the rollers near the fuser, 203.xx Paper Jam appears. 1 Open the upper door. 2 Grasp the paper on each side, and pull it away...
... the rollers near the fuser When paper is visible in the standard exit bin, 203.xx Paper Jam appears. Clearing jams between the fuser and the standard exit bin When the jammed paper is jammed under the rollers near the fuser, 203.xx Paper Jam appears. 1 Open the upper door. 2 Grasp the paper on each side, and pull it away...

User's Guide
Page 66
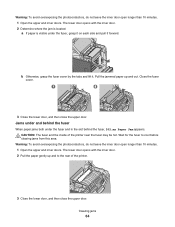
Clearing jams 66 Note: For more room to grasp the paper, pull the handle to open the lower door. 1 2 3 Remove the jam and close the door(s). Jams in the duplex area When paper is jammed between the inner door and the lower door, 230.xx Paper Jam appears. 1 Open the upper door. 2 Pull the jammed paper straight up.
Clearing jams 66 Note: For more room to grasp the paper, pull the handle to open the lower door. 1 2 3 Remove the jam and close the door(s). Jams in the duplex area When paper is jammed between the inner door and the lower door, 230.xx Paper Jam appears. 1 Open the upper door. 2 Pull the jammed paper straight up.

User's Guide
Page 67
When paper jams as shown in the multipurpose feeder, 250.xx Paper Jam appears. Clearing jams in the multipurpose feeder When paper jams in the following illustration, 200.xx Paper Jam or 230.xx Paper Jam appears. 1 Open Tray 1. 2 Pull the jammed paper straight up. Clearing jams 67 Pull the paper down and out. 3 Replace the tray. Also look for a jam behind the upper and lower doors. 3 Replace the tray. When paper jams entering Tray 1, 230.xx Paper Jam appears. 1 Remove Tray 1. 2 Pull the jammed paper down and out. Note: If no jam is visible, remove the tray completely.
When paper jams as shown in the multipurpose feeder, 250.xx Paper Jam appears. Clearing jams in the multipurpose feeder When paper jams in the following illustration, 200.xx Paper Jam or 230.xx Paper Jam appears. 1 Open Tray 1. 2 Pull the jammed paper straight up. Clearing jams 67 Pull the paper down and out. 3 Replace the tray. Also look for a jam behind the upper and lower doors. 3 Replace the tray. When paper jams entering Tray 1, 230.xx Paper Jam appears. 1 Remove Tray 1. 2 Pull the jammed paper down and out. Note: If no jam is visible, remove the tray completely.

User's Guide
Page 68
In either case, push the paper farther into the manual feeder. Clearing jams 68 If the paper is not placed far enough into the manual feeder, the display prompts you to feed properly, 200.xx Paper Jam appears. Clearing jams in the manual feeder When paper is pushed far enough into the manual feeder for the printer to sense it, but not far enough to insert paper.
In either case, push the paper farther into the manual feeder. Clearing jams 68 If the paper is not placed far enough into the manual feeder, the display prompts you to feed properly, 200.xx Paper Jam appears. Clearing jams in the manual feeder When paper is pushed far enough into the manual feeder for the printer to sense it, but not far enough to insert paper.
User's Guide
Page 87
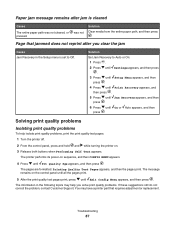
..., and then press . The pages are formatted. Paper jam message remains after you solve print quality problems. If these suggestions still do not correct the problem, contact Customer Support. You may help isolate print quality problems, print the print quality test pages: 1 Turn the printer off. 2 From the control panel, press and hold...
..., and then press . The pages are formatted. Paper jam message remains after you solve print quality problems. If these suggestions still do not correct the problem, contact Customer Support. You may help isolate print quality problems, print the print quality test pages: 1 Turn the printer off. 2 From the control panel, press and hold...
User's Guide
Page 109
...irregularities 91 print is too dark 91 print is too light 90 print quality test pages 87 repeating defects 88 skewed print 93 solid color pages 93 streaked horizontal lines 89 streaked vertical lines 90 toner fog or background shading 91 toner rubs off 94 toner specks 94 ...jobs do not collate 85 media frequently jams 86 multiple-language PDFs do not print 82 paper curls badly 94 tray linking does not work 84 unexpected page breaks occur 85 printer configurations 9 models 9 moving 73, 74 printer option problems hard disk with adapter 86 printer options troubleshooting drawers 85 flash memory ...
...irregularities 91 print is too dark 91 print is too light 90 print quality test pages 87 repeating defects 88 skewed print 93 solid color pages 93 streaked horizontal lines 89 streaked vertical lines 90 toner fog or background shading 91 toner rubs off 94 toner specks 94 ...jobs do not collate 85 media frequently jams 86 multiple-language PDFs do not print 82 paper curls badly 94 tray linking does not work 84 unexpected page breaks occur 85 printer configurations 9 models 9 moving 73, 74 printer option problems hard disk with adapter 86 printer options troubleshooting drawers 85 flash memory ...
Menus and Messages Guide
Page 52
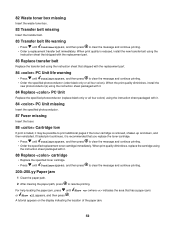
...shipped with the replacement part. 83 Replace transfer belt Replace the transfer belt using the instruction sheet that has a paper jam) or Show all four colors) using the instruction sheet packaged with it may be possible to print additional pages if the toner cartridge is removed,... • Press until Continue appears, and then press to clear the message and continue printing. 200-250.yy Paper jam 1 Clear the paper path. 2 After clearing the paper path, press to resume printing. When the print quality diminishes, install the new photoconductor(s) using the instruction sheet packaged...
...shipped with the replacement part. 83 Replace transfer belt Replace the transfer belt using the instruction sheet that has a paper jam) or Show all four colors) using the instruction sheet packaged with it may be possible to print additional pages if the toner cartridge is removed,... • Press until Continue appears, and then press to clear the message and continue printing. 200-250.yy Paper jam 1 Clear the paper path. 2 After clearing the paper path, press to resume printing. When the print quality diminishes, install the new photoconductor(s) using the instruction sheet packaged...


