Troubleshooting Guide
Page 5
... package. • Avoid textured media with rough finishes. • Make sure the media you are using. Photoconductors are Clean the printhead dirty. Replace the transfer belt. Streaked vertical lines Example Cause Solution Toner is smeared If media is defective. ... to Windows users only. • Adjust the color quality settings in the trays is Replace the toner defective, empty, cartridge. Light colored line, white line, or incorrectly colored line Example Cause Solution Toner cartridge is On. Resetting the Printer appears briefly, followed by a clock, and then...
... package. • Avoid textured media with rough finishes. • Make sure the media you are using. Photoconductors are Clean the printhead dirty. Replace the transfer belt. Streaked vertical lines Example Cause Solution Toner is smeared If media is defective. ... to Windows users only. • Adjust the color quality settings in the trays is Replace the toner defective, empty, cartridge. Light colored line, white line, or incorrectly colored line Example Cause Solution Toner cartridge is On. Resetting the Printer appears briefly, followed by a clock, and then...
User's Guide
Page 5
... Clearing jams in the multipurpose feeder 67 Clearing jams in the manual feeder 68 Maintaining the printer 69 Storing supplies...69 Checking the status of supplies...69 Conserving supplies...69 Aligning the toner cartridges...69 Cleaning the printhead lenses...70 Ordering supplies...70 Ordering toner cartridges...71 Ordering a transfer belt...72 Ordering...
... Clearing jams in the multipurpose feeder 67 Clearing jams in the manual feeder 68 Maintaining the printer 69 Storing supplies...69 Checking the status of supplies...69 Conserving supplies...69 Aligning the toner cartridges...69 Cleaning the printhead lenses...70 Ordering supplies...70 Ordering toner cartridges...71 Ordering a transfer belt...72 Ordering...

User's Guide
Page 51
... the color supplies in a clean, cool, dark, dry place where the photoconductors will not be touched or scratched. Submitting Selection appears. 6 Press until Exit Config Menu appears, and then press . 7 Wait until On appears, and then press . Configuring the printer for black-only printing 1 Turn the printer off.... 2 From the control panel, hold down and while turning the printer on. 3 Release the buttons when the clock appears, and wait for CONFIG MENU to ...
... the color supplies in a clean, cool, dark, dry place where the photoconductors will not be touched or scratched. Submitting Selection appears. 6 Press until Exit Config Menu appears, and then press . 7 Wait until On appears, and then press . Configuring the printer for black-only printing 1 Turn the printer off.... 2 From the control panel, hold down and while turning the printer on. 3 Release the buttons when the clock appears, and wait for CONFIG MENU to ...

User's Guide
Page 52
Now the photoconductors can be seen. 1 2 3 Lift the photoconductor release knob, and then pull the photoconductor out by the handle. Printing 52 Remove all three color photoconductors. 4 Wrap each photoconductor in its original packaging or in any clean, sturdy box. Tape the packaging to open both the inner and lower doors. 2 Open the upper door fully. Grasp the inner door handle and pull to secure it, but do not let the tape touch the shiny photoconductor drums. 1 2 5 Place the photoconductors in their original box, or in a sheet of paper.
Now the photoconductors can be seen. 1 2 3 Lift the photoconductor release knob, and then pull the photoconductor out by the handle. Printing 52 Remove all three color photoconductors. 4 Wrap each photoconductor in its original packaging or in any clean, sturdy box. Tape the packaging to open both the inner and lower doors. 2 Open the upper door fully. Grasp the inner door handle and pull to secure it, but do not let the tape touch the shiny photoconductor drums. 1 2 5 Place the photoconductors in their original box, or in a sheet of paper.

User's Guide
Page 53
Printing 53 Remove all three color toner cartridges. 8 Place the toner cartridges in a clean, sturdy box. 9 Close the lower door. 6 Close the box to protect the photoconductors from light. 7 Lift the small toner cartridge handles slightly and pull straight out.
Printing 53 Remove all three color toner cartridges. 8 Place the toner cartridges in a clean, sturdy box. 9 Close the lower door. 6 Close the box to protect the photoconductors from light. 7 Lift the small toner cartridge handles slightly and pull straight out.
User's Guide
Page 69
... the alignment of the toner cartridges. The printer performs its power-on sequence, and then CONFIG MENU appears. 4 Press until you are ready to print the alignment page. Maintaining the printer 69 Storing supplies Choose a cool, clean storage area for a listing of menus and... supply status messages. • The IP address of a network printer-Type the IP address of a network printer in their original packing until Color Alignment appears, and then press ...
... the alignment of the toner cartridges. The printer performs its power-on sequence, and then CONFIG MENU appears. 4 Press until you are ready to print the alignment page. Maintaining the printer 69 Storing supplies Choose a cool, clean storage area for a listing of menus and... supply status messages. • The IP address of a network printer-Type the IP address of a network printer in their original packing until Color Alignment appears, and then press ...
User's Guide
Page 70
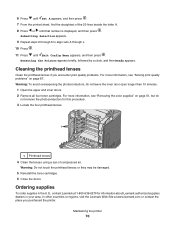
...Clean the lenses using a can of the 20 lines beside the letter A. 8 Press or until that number is displayed, and then press . Warning: To avoid overexposing the photoconductors, do not remove the photoconductors for information about Lexmark authorized supplies dealers in your area. For more information, see "Removing the color... than 10 minutes. 1 Open the upper and inner doors. 2 Remove all four toner cartridges. Cleaning the printhead lenses Clean the printhead lenses if you purchased the printer. Warning: Do not touch the printhead lenses or they may be damaged. 5 Reinstall the toner...
...Clean the lenses using a can of the 20 lines beside the letter A. 8 Press or until that number is displayed, and then press . Warning: To avoid overexposing the photoconductors, do not remove the photoconductors for information about Lexmark authorized supplies dealers in your area. For more information, see "Removing the color... than 10 minutes. 1 Open the upper and inner doors. 2 Remove all four toner cartridges. Cleaning the printhead lenses Clean the printhead lenses if you purchased the printer. Warning: Do not touch the printhead lenses or they may be damaged. 5 Reinstall the toner...

User's Guide
Page 89
...problem still occurs, replace the photoconductor unit. • If the problem is defective, empty, or worn. Solution Replace the color cartridge causing the line. Replace the transfer belt. Solution Replace the toner cartridge. Streaked horizontal lines Example ABCDE ABCDE ABCDE ...press . Resetting the Printer appears briefly, followed by a clock, and then Ready appears. Light colored line, white line, or incorrectly colored line Example ABCDE ABCDE Cause Toner cartridge is defective. Photoconductors are dirty. Replace the photoconductor units. Clean the printhead lenses. ...
...problem still occurs, replace the photoconductor unit. • If the problem is defective, empty, or worn. Solution Replace the color cartridge causing the line. Replace the transfer belt. Solution Replace the toner cartridge. Streaked horizontal lines Example ABCDE ABCDE ABCDE ...press . Resetting the Printer appears briefly, followed by a clock, and then Ready appears. Light colored line, white line, or incorrectly colored line Example ABCDE ABCDE Cause Toner cartridge is defective. Photoconductors are dirty. Replace the photoconductor units. Clean the printhead lenses. ...
User's Guide
Page 108
... 56 from the control panel 55 from Windows desktop 55 from Windows taskbar 55 card stock guidelines 40 loading 30 checking an unresponsive printer 82 cleaning printhead lenses 70 color printing 54 confidential jobs modifying print settings 79 Confidential print jobs 45 printing from Macintosh 46 printing from Windows 46 conserving supplies 69...
... 56 from the control panel 55 from Windows desktop 55 from Windows taskbar 55 card stock guidelines 40 loading 30 checking an unresponsive printer 82 cleaning printhead lenses 70 color printing 54 confidential jobs modifying print settings 79 Confidential print jobs 45 printing from Macintosh 46 printing from Windows 46 conserving supplies 69...
User's Guide
Page 109
...moving 73, 74 printer option problems hard disk with adapter 86 printer options troubleshooting drawers 85 flash memory card 85 infrared adapter 86 internal print server 86 memory card 86 option not working 85 USB/parallel interface card 86 printhead lenses cleaning 70 printing black-only 51 color 54 directory list... 49 duplex jobs manually 50 font sample list 49 from Macintosh 45 from USB flash memory device 47 from Windows 45 installing printer software 45 menu settings page 48 network ...
...moving 73, 74 printer option problems hard disk with adapter 86 printer options troubleshooting drawers 85 flash memory card 85 infrared adapter 86 internal print server 86 memory card 86 option not working 85 USB/parallel interface card 86 printhead lenses cleaning 70 printing black-only 51 color 54 directory list... 49 duplex jobs manually 50 font sample list 49 from Macintosh 45 from USB flash memory device 47 from Windows 45 installing printer software 45 menu settings page 48 network ...

Help Menu Pages
Page 11
... photoconductor units. Replace the transfer belt. Transparency print quality is defective or worn. Printhead lenses are defective. Clean the printhead lenses. Turn Color Saver off. Print quality guide Page 11 of media you are using. Toner cartridge is poor Cause Solution ... using is set to Transparency. manufacturer. The media being used does not meet the printer Use only transparencies recommended by the printer specifications. Solution Replace the color cartridge causing the line. Note: This solution applies to print. Paper Type setting for...
... photoconductor units. Replace the transfer belt. Transparency print quality is defective or worn. Printhead lenses are defective. Clean the printhead lenses. Turn Color Saver off. Print quality guide Page 11 of media you are using. Toner cartridge is poor Cause Solution ... using is set to Transparency. manufacturer. The media being used does not meet the printer Use only transparencies recommended by the printer specifications. Solution Replace the color cartridge causing the line. Note: This solution applies to print. Paper Type setting for...


