User's Guide
Page 3
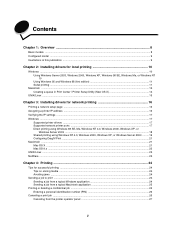
... 98 (first edition 11 Serial printing ...11 Macintosh ...13 Creating a queue in Print Center / Printer Setup Utility (Mac OS X 14 UNIX/Linux ...15 Chapter 3: Installing drivers for network printing 16 Printing a network setup page ...16 Assigning a printer IP address ...16 Verifying the IP settings... Shared printing using Windows NT 4.0, Windows 2000, Windows XP, or Windows Server 2003 ......... 19 Configuring Drag'N'Print ...21 Macintosh ...21 Mac OS X ...21 Mac OS 9.x ...22 UNIX/Linux ...23 NetWare ...23 Chapter 4: Printing ...24 Tips for successful printing ...24 Tips on storing media ......
... 98 (first edition 11 Serial printing ...11 Macintosh ...13 Creating a queue in Print Center / Printer Setup Utility (Mac OS X 14 UNIX/Linux ...15 Chapter 3: Installing drivers for network printing 16 Printing a network setup page ...16 Assigning a printer IP address ...16 Verifying the IP settings... Shared printing using Windows NT 4.0, Windows 2000, Windows XP, or Windows Server 2003 ......... 19 Configuring Drag'N'Print ...21 Macintosh ...21 Mac OS X ...21 Mac OS 9.x ...22 UNIX/Linux ...23 NetWare ...23 Chapter 4: Printing ...24 Tips for successful printing ...24 Tips on storing media ......
User's Guide
Page 13
...the windows. 7 Print a test page to a USB-attached printer, create a desktop printer icon (Mac OS 9) or create a queue in Using Windows 95 and Windows 98 (first edition). 1 Insert the drivers CD. Setting parameters in the printer. b Select the printer just added. d Click Print Test Page.... Look for USB printing. Macintosh 13 a Click Start Æ Settings Æ Printers. Macintosh Mac OS 9.x or later is complete. To print...
...the windows. 7 Print a test page to a USB-attached printer, create a desktop printer icon (Mac OS 9) or create a queue in Using Windows 95 and Windows 98 (first edition). 1 Insert the drivers CD. Setting parameters in the printer. b Select the printer just added. d Click Print Test Page.... Look for USB printing. Macintosh 13 a Click Start Æ Settings Æ Printers. Macintosh Mac OS 9.x or later is complete. To print...

User's Guide
Page 14
... and click Continue. Macintosh 14 Note: A PPD for the printer is also available in a downloadable software package on the Lexmark Web site at www.lexmark.com. 4 Do one of the following : • If the USB-attached printer appears in the Printer List, quit ... to the Macintosh computer. a Insert the drivers CD. Installing drivers for local printing Creating a queue in a downloadable software package on the Lexmark Web site at www.lexmark.com. 2 Do one of the following : • For Mac OS 9.0: Open Apple LaserWriter. • For Mac OS 9.1-9.x: Open Applications, and click Utilities....
... and click Continue. Macintosh 14 Note: A PPD for the printer is also available in a downloadable software package on the Lexmark Web site at www.lexmark.com. 4 Do one of the following : • If the USB-attached printer appears in the Printer List, quit ... to the Macintosh computer. a Insert the drivers CD. Installing drivers for local printing Creating a queue in a downloadable software package on the Lexmark Web site at www.lexmark.com. 2 Do one of the following : • For Mac OS 9.0: Open Apple LaserWriter. • For Mac OS 9.1-9.x: Open Applications, and click Utilities....
User's Guide
Page 21
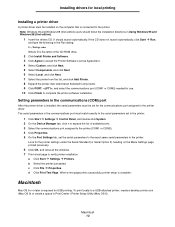
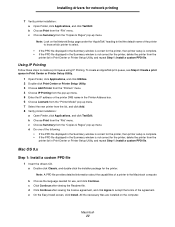
...and click Agree to accept the terms of a printer to the Macintosh computer. Installing drivers for network printing Configuring Drag'N'Print Note: Drag'N'Print™ support is installed on the computer. Mac OS X Step 1: Install a custom PPD file 1 Install a PostScript Printer Description ... the printer. Macintosh Note: A PostScript Printer Description (PPD) file provides detailed information about the capabilities of the agreement. a Insert the drivers CD. b Double-click the installer package for all printers. f On the Easy Install screen, click Install. e Select a Destination, and...
...and click Agree to accept the terms of a printer to the Macintosh computer. Installing drivers for network printing Configuring Drag'N'Print Note: Drag'N'Print™ support is installed on the computer. Mac OS X Step 1: Install a custom PPD file 1 Install a PostScript Printer Description ... the printer. Macintosh Note: A PostScript Printer Description (PPD) file provides detailed information about the capabilities of the agreement. a Insert the drivers CD. b Double-click the installer package for all printers. f On the Easy Install screen, click Install. e Select a Destination, and...
User's Guide
Page 22
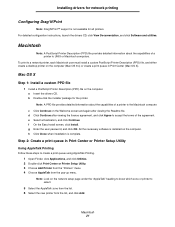
...or the printer DNS name in the Summary window is complete. • If the PPD file displayed in the Printer Address box. 6 Choose Lexmark from the "File" menu. a Double-click Classic, and double-click the installer package for network printing 7 Verify printer installation: a Open Finder..., click Applications, and click TextEdit. c Choose Summary from the "File" menu. Mac OS 9.x Step 1: Install a custom PPD file 1 Insert the drivers CD. b Choose Print from the "Printer Model" pop-up menu. Note: Look on the computer.
...or the printer DNS name in the Summary window is complete. • If the PPD file displayed in the Printer Address box. 6 Choose Lexmark from the "File" menu. a Double-click Classic, and double-click the installer package for network printing 7 Verify printer installation: a Open Finder..., click Applications, and click TextEdit. c Choose Summary from the "File" menu. Mac OS 9.x Step 1: Install a custom PPD file 1 Insert the drivers CD. b Choose Print from the "Printer Model" pop-up menu. Note: Look on the computer.

User's Guide
Page 25
...confidential job 25 b Turn down the disclosure triangle to print a confidential job. The PIN must be four digits using Mac OS 9, if Job Routing is not a choice on the drivers CD which shipped with these steps or for more information, see the topic Confidential Print or Print and Hold. The job...on the pop-up menu. 4 Click OK or Print to send the job to the printer, the user can print the job. Continue with the Lexmark custom drivers that the job does not print until the specific user is actually a folder since its sub-selections contain print jobs. 6 Press . 7 Press ...
...confidential job 25 b Turn down the disclosure triangle to print a confidential job. The PIN must be four digits using Mac OS 9, if Job Routing is not a choice on the drivers CD which shipped with these steps or for more information, see the topic Confidential Print or Print and Hold. The job...on the pop-up menu. 4 Click OK or Print to send the job to the printer, the user can print the job. Continue with the Lexmark custom drivers that the job does not print until the specific user is actually a folder since its sub-selections contain print jobs. 6 Press . 7 Press ...
User's Guide
Page 144
...identification number (PIN) 112 photoconductor units storing 81 photoconductor units, replacing 83 PIN 112 entering at the printer 26 entering from the driver 25 for confidential jobs 25 Power Saver adjusting 107 disabling 108 preprinted forms 37 Print and Hold function 110 print job canceling from printer... operator panel 27 from Windows desktop 27 from Windows taskbar 27 Mac OS 9.x 27 Mac OS X 27 sending to print 24 Print Quality Test Pages, printing 29 printer model type 105 overview basic model 8 configured models...
...identification number (PIN) 112 photoconductor units storing 81 photoconductor units, replacing 83 PIN 112 entering at the printer 26 entering from the driver 25 for confidential jobs 25 Power Saver adjusting 107 disabling 108 preprinted forms 37 Print and Hold function 110 print job canceling from printer... operator panel 27 from Windows desktop 27 from Windows taskbar 27 Mac OS 9.x 27 Mac OS X 27 sending to print 24 Print Quality Test Pages, printing 29 printer model type 105 overview basic model 8 configured models...

