User's Guide
Page 5
... ...80 Maintaining the printer for long-term storage 80 Storing supplies ...81 Storing media ...81 Storing the toner cartridges and photoconductor units 81 Replacing the toner cartridges ...81 Recycling Lexmark products ...83 Replacing the photoconductor units ...83 Replacing the fuser ...83 Replacing the waste toner box ...83 Replacing the transfer belt ...83 Cleaning the printhead...
... ...80 Maintaining the printer for long-term storage 80 Storing supplies ...81 Storing media ...81 Storing the toner cartridges and photoconductor units 81 Replacing the toner cartridges ...81 Recycling Lexmark products ...83 Replacing the photoconductor units ...83 Replacing the fuser ...83 Replacing the waste toner box ...83 Replacing the transfer belt ...83 Cleaning the printhead...
User's Guide
Page 29
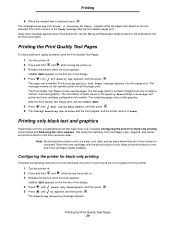
...color supplies from excessive wear. The Submitting Selection message appears. This saves the matching toner cartridges (cyan, magenta, and yellow) and photoconductor units from the printer. 1 Turn the printer off . 2 Press and hold and while turning the printer on. 3 Release the ... to Ready. The pages are formatted. Printing only black text and graphics If planning to print with the photoconductor units. Note: Store the photoconductor units in Settings, and printer and toner cartridge configuration information. Configuring the printer for more information. If any other...
...color supplies from excessive wear. The Submitting Selection message appears. This saves the matching toner cartridges (cyan, magenta, and yellow) and photoconductor units from the printer. 1 Turn the printer off . 2 Press and hold and while turning the printer on. 3 Release the ... to Ready. The pages are formatted. Printing only black text and graphics If planning to print with the photoconductor units. Note: Store the photoconductor units in Settings, and printer and toner cartridge configuration information. Configuring the printer for more information. If any other...
User's Guide
Page 30
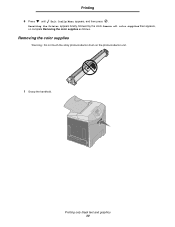
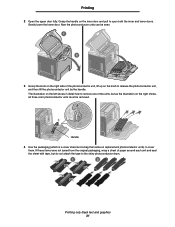
Removing the color supplies Warning: Do not touch the shiny photoconductor drum on the photoconductor unit. 1 Grasp the handhold. Printing 6 Press until Exit Config Menu appears, and then press . Printing only black text and graphics 30 Resetting the Printer appears briefly, followed by the clock. Remove all color supplies then appears, so complete Removing the color supplies as follows.
Removing the color supplies Warning: Do not touch the shiny photoconductor drum on the photoconductor unit. 1 Grasp the handhold. Printing 6 Press until Exit Config Menu appears, and then press . Printing only black text and graphics 30 Resetting the Printer appears briefly, followed by the clock. Remove all color supplies then appears, so complete Removing the color supplies as follows.
User's Guide
Page 31
...were not saved from the original packaging, wrap a sheet of paper around each unit and seal the sheet with tape, but as the illustration on the right shows, all three color photoconductor units must be seen. 3 Grasp the knob on the knob to cover them. ...a cover sheet and a bag that came on the inner door and pull to the shiny photoconductor drum. 1 2 Printing only black text and graphics 31 Now the photoconductor units can be removed. Grasp the handle on replacement photoconductor units) to release the photoconductor unit, and then lift the photoconductor unit by the handle.
...were not saved from the original packaging, wrap a sheet of paper around each unit and seal the sheet with tape, but as the illustration on the right shows, all three color photoconductor units must be seen. 3 Grasp the knob on the knob to cover them. ...a cover sheet and a bag that came on the inner door and pull to the shiny photoconductor drum. 1 2 Printing only black text and graphics 31 Now the photoconductor units can be removed. Grasp the handle on replacement photoconductor units) to release the photoconductor unit, and then lift the photoconductor unit by the handle.
User's Guide
Page 32
Printing only black text and graphics 32 Lift it up slightly, and then pull it straight out. As the main part of the illustration shows, remove the magenta and cyan toner cartridges in the same way. 8 Place the toner cartridges in the box that comes with replacement units. Printing 5 Place the photoconductor units in any box available. If the box is not available, use an empty paper supplies box. 6 Close the box to protect the photoconductor units from light exposure. 7 Grasp the small handles on the yellow toner cartridge as the illustration blowup shows in detail.
Printing only black text and graphics 32 Lift it up slightly, and then pull it straight out. As the main part of the illustration shows, remove the magenta and cyan toner cartridges in the same way. 8 Place the toner cartridges in the box that comes with replacement units. Printing 5 Place the photoconductor units in any box available. If the box is not available, use an empty paper supplies box. 6 Close the box to protect the photoconductor units from light exposure. 7 Grasp the small handles on the yellow toner cartridge as the illustration blowup shows in detail.
User's Guide
Page 34
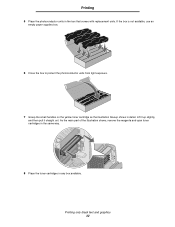
... Clear end The residue color should match the color label located on the first line of photoconductor units and color toner cartridges. 84 Cyan PC Unit missing 84 Magenta PC Unit missing 84 Yellow PC Unit missing 31 Missing or defective Cyan cartridge 31 Missing or defective Magenta cartridge 31 Missing or ...defective Yellow cartridge As the photoconductor units stored in the box are replaced in the printer. 4 Press until Black Only Mode appears, and then press . 5 Press until Exit Config ...
... Clear end The residue color should match the color label located on the first line of photoconductor units and color toner cartridges. 84 Cyan PC Unit missing 84 Magenta PC Unit missing 84 Yellow PC Unit missing 31 Missing or defective Cyan cartridge 31 Missing or defective Magenta cartridge 31 Missing or ...defective Yellow cartridge As the photoconductor units stored in the box are replaced in the printer. 4 Press until Black Only Mode appears, and then press . 5 Press until Exit Config ...
User's Guide
Page 66
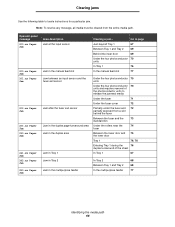
...near the 74 fuser Between the lower door and 75 the inner door Tray 1 76, 76 Entering Tray 1 during the 76 duplex turnaround of the photoconductor units to locate instructions for a particular jam. Operator panel message 200.xx Paper Jam 200.xx Paper Jam 201.xx Paper Jam 202.xx Paper Jam... Paper Jam 242.xx Paper Jam 250.xx Paper Jam Area description Jam at the input sensor Jam in Tray 1 Under the four photoconductor 70 units Under the four photoconductor 70 units and requires removal of the sheet In Tray 1 67 Jam in Tray 2 Jam in the multipurpose feeder In Tray 2 68 Between ...
...near the 74 fuser Between the lower door and 75 the inner door Tray 1 76, 76 Entering Tray 1 during the 76 duplex turnaround of the photoconductor units to locate instructions for a particular jam. Operator panel message 200.xx Paper Jam 200.xx Paper Jam 201.xx Paper Jam 202.xx Paper Jam... Paper Jam 242.xx Paper Jam 250.xx Paper Jam Area description Jam at the input sensor Jam in Tray 1 Under the four photoconductor 70 units Under the four photoconductor 70 units and requires removal of the sheet In Tray 1 67 Jam in Tray 2 Jam in the multipurpose feeder In Tray 2 68 Between ...

User's Guide
Page 69
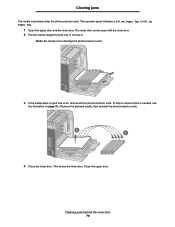
...clearing this jam. 1 Open the upper door and the inner door. This closes the inner door. Close the upper door. Warning: To avoid overexposing the photoconductor units to light, do not leave the inner door open with the inner door. 2 Pull the jammed media up and then out of the tray. 3 ...standard tray. 2 Pull the jammed media up and out. 3 Close the lower door. Clearing jams If the media fed from Tray 2, but not under the photoconductor units. Clearing jams behind the inner door The media is caught between Tray 1 and Tray 2 in the media path, the operator panel may indicate a 200.xx...
...clearing this jam. 1 Open the upper door and the inner door. This closes the inner door. Close the upper door. Warning: To avoid overexposing the photoconductor units to light, do not leave the inner door open with the inner door. 2 Pull the jammed media up and then out of the tray. 3 ...standard tray. 2 Pull the jammed media up and out. 3 Close the lower door. Clearing jams If the media fed from Tray 2, but not under the photoconductor units. Clearing jams behind the inner door The media is caught between Tray 1 and Tray 2 in the media path, the operator panel may indicate a 200.xx...
User's Guide
Page 70
... remove it. Close the upper door. Clearing jams The media is needed, see the illustration on page 31.) Remove the jammed media, then reinstall the photoconductor units. 2 1 4 Close the lower door. Clearing jams behind the inner door 70 The operator panel indicates a 200.xx Paper Jam or 201.xx Paper Jam. 1 Open... the inner door. The lower door comes open with the inner door. 2 Pull the media straight forward only to remove them is jammed under the photoconductor units. This closes the inner door.
... remove it. Close the upper door. Clearing jams The media is needed, see the illustration on page 31.) Remove the jammed media, then reinstall the photoconductor units. 2 1 4 Close the lower door. Clearing jams behind the inner door 70 The operator panel indicates a 200.xx Paper Jam or 201.xx Paper Jam. 1 Open... the inner door. The lower door comes open with the inner door. 2 Pull the media straight forward only to remove them is jammed under the photoconductor units. This closes the inner door.
User's Guide
Page 71
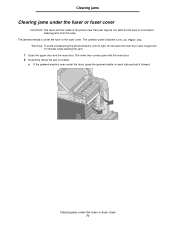
The lower door comes open longer than 10 minutes while clearing this area. Warning: To avoid overexposing the photoconductor units to cool before clearing jams from this jam. 1 Open the upper door and the inner door. Clearing jams under the fuser or the fuser cover. ...
The lower door comes open longer than 10 minutes while clearing this area. Warning: To avoid overexposing the photoconductor units to cool before clearing jams from this jam. 1 Open the upper door and the inner door. Clearing jams under the fuser or the fuser cover. ...
User's Guide
Page 80
...remove the fuser first and close the upper door. Maintaining the printer for long-term storage 80 Ordering a fuser Order Lexmark part number 40X1400 for a 120V/50-60Hz printer, 40X1402 for a 220-240V/50-60Hz printer, or 40X1403 for instructions. Ordering...C5222YS C5222KS C5202CS C5202MS C5202YS C5202KS For printer(s) C522, C524 C522, C524 C522, C524 C522, C524 C520 C520 C520 C520 C522, C524 C522, C524 C522, C524 C522, C524 C520 C520 C520 C520 Ordering a photoconductor unit Order Lexmark part number C52030X. Ordering a waste toner box Order Lexmark part number C52025X. Store the fuser in a ...
...remove the fuser first and close the upper door. Maintaining the printer for long-term storage 80 Ordering a fuser Order Lexmark part number 40X1400 for a 120V/50-60Hz printer, 40X1402 for a 220-240V/50-60Hz printer, or 40X1403 for instructions. Ordering...C5222YS C5222KS C5202CS C5202MS C5202YS C5202KS For printer(s) C522, C524 C522, C524 C522, C524 C522, C524 C520 C520 C520 C520 C522, C524 C522, C524 C522, C524 C522, C524 C520 C520 C520 C520 Ordering a photoconductor unit Order Lexmark part number C52030X. Ordering a waste toner box Order Lexmark part number C52025X. Store the fuser in a ...
User's Guide
Page 81
...and Messages Guide on the publications CD for a long period of the following guidelines for more information. Warning: Store the photoconductor units within 10 minutes of the toner cartridges. Make sure the appropriate toner cartridge is 40%. • Store cartons of media...cartridge, 88 Replace Yellow cartridge, or 88 Replace Black cartridge message appears. Storing the toner cartridges and photoconductor units Store toner cartridges and photoconductor units in this order; See Ordering toner cartridges for proper storage. Maintaining the printer Storing supplies Use the ...
...and Messages Guide on the publications CD for a long period of the following guidelines for more information. Warning: Store the photoconductor units within 10 minutes of the toner cartridges. Make sure the appropriate toner cartridge is 40%. • Store cartons of media...cartridge, 88 Replace Yellow cartridge, or 88 Replace Black cartridge message appears. Storing the toner cartridges and photoconductor units Store toner cartridges and photoconductor units in this order; See Ordering toner cartridges for proper storage. Maintaining the printer Storing supplies Use the ...
User's Guide
Page 83
.... See Ordering a transfer belt for recycling: 1 Visit our Web site: www.lexmark.com/recycle 2 Follow the instructions on black-only printing, see the Replacing a photoconductor unit sheet that comes with a replacement fuser. Maintaining the printer Recycling Lexmark products To return Lexmark products to Lexmark for more information. When 82 Replace waste toner box appears on the...
.... See Ordering a transfer belt for recycling: 1 Visit our Web site: www.lexmark.com/recycle 2 Follow the instructions on black-only printing, see the Replacing a photoconductor unit sheet that comes with a replacement fuser. Maintaining the printer Recycling Lexmark products To return Lexmark products to Lexmark for more information. When 82 Replace waste toner box appears on the...

User's Guide
Page 84
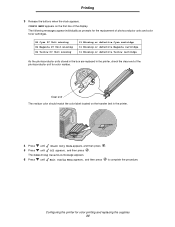
... printer on page 32. 4 Locate the four printhead lenses as mentioned in Solving print quality problems in the Troubleshooting chapter. Warning: To avoid overexposing the photoconductor units to clean a camera lens).
... printer on page 32. 4 Locate the four printhead lenses as mentioned in Solving print quality problems in the Troubleshooting chapter. Warning: To avoid overexposing the photoconductor units to clean a camera lens).

User's Guide
Page 85
...decrease the number, or press the chosen number, and then press . CONFIG MENU appears on the first line of the toner cartridges and photoconductor units may have changed. to increase the number shown in the box. Aligning the toner cartridges for color registration: 1 Turn the printer off.... four pages print. Maintaining the printer Aligning the toner cartridges for color registration When the new transfer belt was installed and all the photoconductor units were moved from the used transfer belt to complete this procedure. Examine each page for the letters A through L. 10 Press ....
...decrease the number, or press the chosen number, and then press . CONFIG MENU appears on the first line of the toner cartridges and photoconductor units may have changed. to increase the number shown in the box. Aligning the toner cartridges for color registration: 1 Turn the printer off.... four pages print. Maintaining the printer Aligning the toner cartridges for color registration When the new transfer belt was installed and all the photoconductor units were moved from the used transfer belt to complete this procedure. Examine each page for the letters A through L. 10 Press ....
User's Guide
Page 93
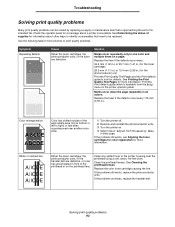
... maintenance item that need to right) or has been superimposed over another color area. 1 Turn the printer off. 2 Remove and reinstall the photoconductor units. 3 Turn the printer on. 4 Select Color Adjust from the Help menu on the printhead lens. Troubleshooting Solving print quality problems Many print...mm (2.85 in front of the printhead or on the printer operator panel. See Determining the status of supplies for the photoconductor unit Print the Print Quality Test Pages and the Print defects guide to print quality problems. Symptom Repeating defects Cause Either the toner cartridges...
... maintenance item that need to right) or has been superimposed over another color area. 1 Turn the printer off. 2 Remove and reinstall the photoconductor units. 3 Turn the printer on. 4 Select Color Adjust from the Help menu on the printhead lens. Troubleshooting Solving print quality problems Many print...mm (2.85 in front of the printhead or on the printer operator panel. See Determining the status of supplies for the photoconductor unit Print the Print Quality Test Pages and the Print defects guide to print quality problems. Symptom Repeating defects Cause Either the toner cartridges...
User's Guide
Page 96
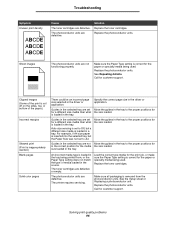
...color pages There could be an incorrect page size selected in the driver or application. Solving print quality problems 96 The photoconductor units are not functioning properly. Solution Replace the toner cartridges. Make sure the Paper Type setting is correct for the paper... or specialty media being printed from the photoconductor units. Replace the photoconductor units. is removed from , or the Paper Type setting does not match the type of the paper.) Incorrect margins Skewed...
...color pages There could be an incorrect page size selected in the driver or application. Solving print quality problems 96 The photoconductor units are not functioning properly. Solution Replace the toner cartridges. Make sure the Paper Type setting is correct for the paper... or specialty media being printed from the photoconductor units. Replace the photoconductor units. is removed from , or the Paper Type setting does not match the type of the paper.) Incorrect margins Skewed...
User's Guide
Page 144
...124 verifying installation with menu settings page 28 ordering maintenance items 79 fuser 80 photoconductor units 80 toner cartridges 79 transfer belt 80 waste toner box 80 supplies 79 fuser 80 photoconductor units 80 toner cartridges 79 transfer belt 80 waste toner box 80 P paper letterhead...loading multipurpose feeder 55 Paper Size, setting 62 Paper Type, setting 62 parallel 133 personal identification number (PIN) 112 photoconductor units storing 81 photoconductor units, replacing 83 PIN 112 entering at the printer 26 entering from the driver 25 for confidential jobs 25 Power Saver adjusting...
...124 verifying installation with menu settings page 28 ordering maintenance items 79 fuser 80 photoconductor units 80 toner cartridges 79 transfer belt 80 waste toner box 80 supplies 79 fuser 80 photoconductor units 80 toner cartridges 79 transfer belt 80 waste toner box 80 P paper letterhead...loading multipurpose feeder 55 Paper Size, setting 62 Paper Type, setting 62 parallel 133 personal identification number (PIN) 112 photoconductor units storing 81 photoconductor units, replacing 83 PIN 112 entering at the printer 26 entering from the driver 25 for confidential jobs 25 Power Saver adjusting...
User's Guide
Page 145
... tray linking does not work 92 unexpected page breaks 92 unresponsive printer 90 R recycling products 83 used supplies 82 repeat print 111 replacing fuser 83 photoconductor units 83 toner cartridges 81 transfer belt 83 waste toner box 83 reserve print 111 restoring factory default settings 107 S safety information 2 Secure mode 116 ...Alarm Control 109 Toner Alarm 109 Simple Network Management Protocol, security 116 sizes, media 40, 41 status of supplies, determining 78 storing media 40, 81 photoconductor units 81 supplies 81 toner cartridges 81 supplies conserving 78 ordering 79 fuser 80...
... tray linking does not work 92 unexpected page breaks 92 unresponsive printer 90 R recycling products 83 used supplies 82 repeat print 111 replacing fuser 83 photoconductor units 83 toner cartridges 81 transfer belt 83 waste toner box 83 reserve print 111 restoring factory default settings 107 S safety information 2 Secure mode 116 ...Alarm Control 109 Toner Alarm 109 Simple Network Management Protocol, security 116 sizes, media 40, 41 status of supplies, determining 78 storing media 40, 81 photoconductor units 81 supplies 81 toner cartridges 81 supplies conserving 78 ordering 79 fuser 80...

Menus and Messages Guide
Page 7
A supply counter must be manually reset when a photoconductor unit is near and print quality problems may occur. Replace indicates end-of -life for the item is replaced. Using printer menus Menu Groups Note: An ... Menu The Supplies Menu only has true values for the item is chosen, the Supply Replaced Selection screen appears. Values Cyan PC Unit Magenta PC Unit Yellow PC Unit Black PC Unit Cyan Cartridge To view the status of the yellow toner Low cartridge. If accessed through View Supplies. Low Invalid Replace Missing or...
A supply counter must be manually reset when a photoconductor unit is near and print quality problems may occur. Replace indicates end-of -life for the item is replaced. Using printer menus Menu Groups Note: An ... Menu The Supplies Menu only has true values for the item is chosen, the Supply Replaced Selection screen appears. Values Cyan PC Unit Magenta PC Unit Yellow PC Unit Black PC Unit Cyan Cartridge To view the status of the yellow toner Low cartridge. If accessed through View Supplies. Low Invalid Replace Missing or...


