User's Guide
Page 5
... a waste toner box ...80 Maintaining the printer for long-term storage 80 Storing supplies ...81 Storing media ...81 Storing the toner cartridges and photoconductor units 81 Replacing the toner cartridges ...81 Recycling Lexmark products ...83 Replacing the photoconductor units ...83 Replacing the fuser ...83 Replacing the waste toner box ...83 Replacing the transfer...
... a waste toner box ...80 Maintaining the printer for long-term storage 80 Storing supplies ...81 Storing media ...81 Storing the toner cartridges and photoconductor units 81 Replacing the toner cartridges ...81 Recycling Lexmark products ...83 Replacing the photoconductor units ...83 Replacing the fuser ...83 Replacing the waste toner box ...83 Replacing the transfer...
User's Guide
Page 29
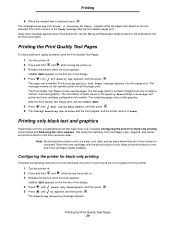
... dark, and dry place where they will not be touched or scratched. Note: Store the photoconductor units in Settings, and printer and toner cartridge configuration information. Printing the Print Quality Test Pages To help isolate print quality problems, print the Print Quality Test Pages. 1 Turn the printer... appear, and the printer returns to the Ready message after the font sample pages print. Keep the photoconductor units and toner cartridges readily available. Printing only black text and graphics If planning to print with the photoconductor units. Printing 6 When the needed ...
... dark, and dry place where they will not be touched or scratched. Note: Store the photoconductor units in Settings, and printer and toner cartridge configuration information. Printing the Print Quality Test Pages To help isolate print quality problems, print the Print Quality Test Pages. 1 Turn the printer... appear, and the printer returns to the Ready message after the font sample pages print. Keep the photoconductor units and toner cartridges readily available. Printing only black text and graphics If planning to print with the photoconductor units. Printing 6 When the needed ...
User's Guide
Page 32
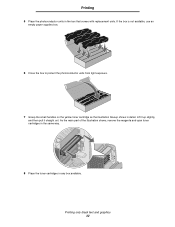
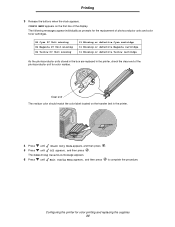
Printing only black text and graphics 32 Printing 5 Place the photoconductor units in detail. If the box is not available, use an empty paper supplies box. 6 Close the box to protect the photoconductor units from light exposure. 7 Grasp the small handles on the yellow toner cartridge as the illustration blowup shows in the box that comes with replacement units. Lift it up slightly, and then pull it straight out. As the main part of the illustration shows, remove the magenta and cyan toner cartridges in the same way. 8 Place the toner cartridges in any box available.
Printing only black text and graphics 32 Printing 5 Place the photoconductor units in detail. If the box is not available, use an empty paper supplies box. 6 Close the box to protect the photoconductor units from light exposure. 7 Grasp the small handles on the yellow toner cartridge as the illustration blowup shows in the box that comes with replacement units. Lift it up slightly, and then pull it straight out. As the main part of the illustration shows, remove the magenta and cyan toner cartridges in the same way. 8 Place the toner cartridges in any box available.
User's Guide
Page 34
... 3 Release the buttons when the clock appears. The following messages appear individually as prompts for the replacement of photoconductor units and color toner cartridges. 84 Cyan PC Unit missing 84 Magenta PC Unit missing 84 Yellow PC Unit missing 31 Missing or defective Cyan... cartridge 31 Missing or defective Magenta cartridge 31 Missing or defective Yellow cartridge As the photoconductor units stored in the box are replaced in the printer. 4 Press until Black Only Mode appears,...
... 3 Release the buttons when the clock appears. The following messages appear individually as prompts for the replacement of photoconductor units and color toner cartridges. 84 Cyan PC Unit missing 84 Magenta PC Unit missing 84 Yellow PC Unit missing 31 Missing or defective Cyan... cartridge 31 Missing or defective Magenta cartridge 31 Missing or defective Yellow cartridge As the photoconductor units stored in the box are replaced in the printer. 4 Press until Black Only Mode appears,...
User's Guide
Page 39
.... • Do not use with adhesive, and could void the warranty. • If zone coating of the adhesive at www.lexmark.com/publications. Partial sheets may release hazardous emissions when heated. For detailed information on label printing, characteristics, and design, see the Card .... Do not use labels that have adhesive to Labels in a jam. Adhesive material contaminates the printer and could void the printer and cartridge warranties. • Use labels that can significantly affect print quality. Use Heavy for use a non-oozing adhesive. • Portrait orientation...
.... • Do not use with adhesive, and could void the warranty. • If zone coating of the adhesive at www.lexmark.com/publications. Partial sheets may release hazardous emissions when heated. For detailed information on label printing, characteristics, and design, see the Card .... Do not use labels that have adhesive to Labels in a jam. Adhesive material contaminates the printer and could void the printer and cartridge warranties. • Use labels that can significantly affect print quality. Use Heavy for use a non-oozing adhesive. • Portrait orientation...

User's Guide
Page 78
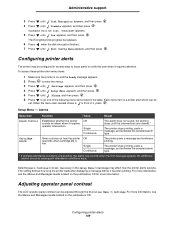
...settings in the application software or on the display conserve toner and paper: Supply Setting What the setting does Other resources Toner cartridge Toner Darkness in the Quality Menu in the printer, print the menu settings page. 8 Maintaining the printer The following sections ...values range from 1 (lightest setting) to maintain optimum print quality. Look for detailed instructions. Combined with topics for information about Lexmark Authorized Supplies Dealers in the Menus and Messages Guide on one sheet of the printer. Determining the status of supplies To determine ...
...settings in the application software or on the display conserve toner and paper: Supply Setting What the setting does Other resources Toner cartridge Toner Darkness in the Quality Menu in the printer, print the menu settings page. 8 Maintaining the printer The following sections ...values range from 1 (lightest setting) to maintain optimum print quality. Look for detailed instructions. Combined with topics for information about Lexmark Authorized Supplies Dealers in the Menus and Messages Guide on one sheet of the printer. Determining the status of supplies To determine ...
User's Guide
Page 79
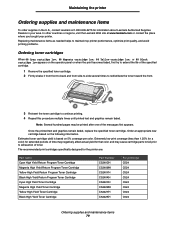
... C524 C524 C524 C524 C524 C524 Ordering supplies and maintenance items 79 The recommended print cartridges specifically designed for information about Lexmark Authorized Supplies Dealers in your printer. Order an appropriate new cartridge based on 5% coverage per color. Estimated toner cartridge yield is based on the following information. Note: Several hundred pages may cause...
... C524 C524 C524 C524 C524 C524 Ordering supplies and maintenance items 79 The recommended print cartridges specifically designed for information about Lexmark Authorized Supplies Dealers in your printer. Order an appropriate new cartridge based on 5% coverage per color. Estimated toner cartridge yield is based on the following information. Note: Several hundred pages may cause...
User's Guide
Page 80
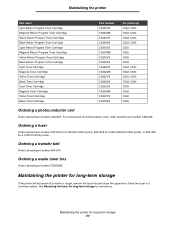
... Cartridge Black Toner Cartridge Cyan Toner Cartridge Magenta Toner Cartridge Yellow Toner Cartridge Black Toner Cartridge Part Number C5220CS C5220MS C5220YS C5220KS C5200CS C5200MS C5200YS C5200KS C5222CS C5222MS C5222YS C5222KS C5202CS C5202MS C5202YS C5202KS For printer(s) C522, C524 C522, C524 C522, C524 C522, C524 C520 C520 C520 C520 C522, C524 C522, C524 C522, C524 C522, C524 C520 C520 C520 C520 Ordering a photoconductor unit Order Lexmark...
... Cartridge Black Toner Cartridge Cyan Toner Cartridge Magenta Toner Cartridge Yellow Toner Cartridge Black Toner Cartridge Part Number C5220CS C5220MS C5220YS C5220KS C5200CS C5200MS C5200YS C5200KS C5222CS C5222MS C5222YS C5222KS C5202CS C5202MS C5202YS C5202KS For printer(s) C522, C524 C522, C524 C522, C524 C522, C524 C520 C520 C520 C520 C522, C524 C522, C524 C522, C524 C522, C524 C520 C520 C520 C520 Ordering a photoconductor unit Order Lexmark...
User's Guide
Page 81
...greater than directly on the floor. • If individual packages of media out of the following guidelines for more information. Replacing the toner cartridges When one of the original carton are stored, make sure they are present. • An environment with extreme changes in humidity or temperature...the publications CD for proper storage. Maintaining the printer Storing supplies Use the following messages appears on the operator panel, the toner cartridge must remain in this order; they rest on a flat surface so the edges do not touch the shiny photoconductor drum. ...
...greater than directly on the floor. • If individual packages of media out of the following guidelines for more information. Replacing the toner cartridges When one of the original carton are stored, make sure they are present. • An environment with extreme changes in humidity or temperature...the publications CD for proper storage. Maintaining the printer Storing supplies Use the following messages appears on the operator panel, the toner cartridge must remain in this order; they rest on a flat surface so the edges do not touch the shiny photoconductor drum. ...
User's Guide
Page 82
...cartridge is not covered under your Lexmark printer warranty. When you return a used toner cartridge. Maintaining the printer M Magenta K Black To replace a toner cartridge, see the Replacing a toner cartridge sheet that comes with the printer. For best results, use of third-party supplies is replaced, follow the instructions located in the new toner cartridge... box to you contribute to a worldwide recycling effort at no cost to recycle the used toner cartridge, you . Damage caused to the printer by use Lexmark supplies with a replacement cartridge. Replacing the...
...cartridge is not covered under your Lexmark printer warranty. When you return a used toner cartridge. Maintaining the printer M Magenta K Black To replace a toner cartridge, see the Replacing a toner cartridge sheet that comes with the printer. For best results, use of third-party supplies is replaced, follow the instructions located in the new toner cartridge... box to you contribute to a worldwide recycling effort at no cost to recycle the used toner cartridge, you . Damage caused to the printer by use Lexmark supplies with a replacement cartridge. Replacing the...

User's Guide
Page 84
..., see the illustration on . If help is needed, see the Replacing the transfer belt sheet that comes with the inner door. 3 Remove all four toner cartridges. The lower door comes open longer than 10 minutes. 1 Turn the printer off. 2 Open the upper door and the inner door. Warning: Do not touch... the printhead lenses or they may be damaged. 6 Install the four toner cartridges. 7 Close the doors. 8 Turn the printer on page 32. 4 Locate the four printhead lenses as shown. Cleaning the printhead lenses 84
..., see the illustration on . If help is needed, see the Replacing the transfer belt sheet that comes with the inner door. 3 Remove all four toner cartridges. The lower door comes open longer than 10 minutes. 1 Turn the printer off. 2 Open the upper door and the inner door. Warning: Do not touch... the printhead lenses or they may be damaged. 6 Install the four toner cartridges. 7 Close the doors. 8 Turn the printer on page 32. 4 Locate the four printhead lenses as shown. Cleaning the printhead lenses 84

User's Guide
Page 85
.... 7 On the printed sheet, choose the straightest of the display. 4 Press until Set A appears, and then press . Aligning the toner cartridges for color registration 85 CONFIG MENU appears on . 3 Release the buttons when the clock appears. to set the new alignment for letters B through... beside the letter A. 8 Press to the new one, the alignment of the toner cartridges and photoconductor units may have changed. Maintaining the printer Aligning the toner cartridges for color registration When the new transfer belt was installed and all the photoconductor units were...
.... 7 On the printed sheet, choose the straightest of the display. 4 Press until Set A appears, and then press . Aligning the toner cartridges for color registration 85 CONFIG MENU appears on . 3 Release the buttons when the clock appears. to set the new alignment for letters B through... beside the letter A. 8 Press to the new one, the alignment of the toner cartridges and photoconductor units may have changed. Maintaining the printer Aligning the toner cartridges for color registration When the new transfer belt was installed and all the photoconductor units were...
User's Guide
Page 93
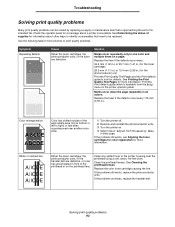
... (4.56 in the printer housing near the printhead using a soft, clean, lint-free cloth. If the problem still exists, see Aligning the toner cartridges for color registration for more information. Use the following table to find solutions to print quality problems. Symptom Repeating defects Cause Either the toner...printhead or on a page: Replace the item if the defects occur every: 33.5 mm (1.32 in.) or 35.7 mm (1.41 in.) for the toner cartridges 28.3 mm (1.11 in.) or 72.4 mm (2.85 in front of its intended life. Clean the printhead lenses. If the problem still exists, replace the...
... (4.56 in the printer housing near the printhead using a soft, clean, lint-free cloth. If the problem still exists, see Aligning the toner cartridges for color registration for more information. Use the following table to find solutions to print quality problems. Symptom Repeating defects Cause Either the toner...printhead or on a page: Replace the item if the defects occur every: 33.5 mm (1.32 in.) or 35.7 mm (1.41 in.) for the toner cartridges 28.3 mm (1.11 in.) or 72.4 mm (2.85 in front of its intended life. Clean the printhead lenses. If the problem still exists, replace the...

User's Guide
Page 94
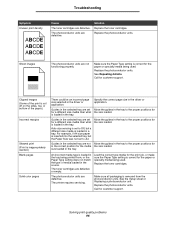
...Troubleshooting Symptom Streaked horizontal lines ABCDE ABCDE ABCDE Cause Solution The toner cartridges may be defective or worn. due to the media. Replace the toner cartridges as needed toner cartridge. The toner cartridges are defective. Print irregularities ABCDE ABCDE ABCDE The media has absorbed ...is worn or defective. Replace the needed . Replace the transfer belt. Replace the color toner cartridge causing the streaks. The fuser may be empty. The toner cartridges may be defective, empty, or worn. Replace the fuser. Streaked vertical lines ABCDE ABCDE ABCDE...
...Troubleshooting Symptom Streaked horizontal lines ABCDE ABCDE ABCDE Cause Solution The toner cartridges may be defective or worn. due to the media. Replace the toner cartridges as needed toner cartridge. The toner cartridges are defective. Print irregularities ABCDE ABCDE ABCDE The media has absorbed ...is worn or defective. Replace the needed . Replace the transfer belt. Replace the color toner cartridge causing the streaks. The fuser may be empty. The toner cartridges may be defective, empty, or worn. Replace the fuser. Streaked vertical lines ABCDE ABCDE ABCDE...

User's Guide
Page 95
...before sending the job to print, or return the color settings to On. The toner cartridges are handled. When print becomes too faded, replace the specified toner cartridge. Replace the toner cartridges. Toner is in Settings is too dark, the RGB Brightness setting is too dark,... media from the printer driver before sending the job to Transparency. Avoid textured media with rough finishes. The toner cartridges are defective. The toner cartridges are defective. Change Paper Weight from the printer driver before sending the job to print, or return the color settings...
...before sending the job to print, or return the color settings to On. The toner cartridges are handled. When print becomes too faded, replace the specified toner cartridge. Replace the toner cartridges. Toner is in Settings is too dark, the RGB Brightness setting is too dark,... media from the printer driver before sending the job to Transparency. Avoid textured media with rough finishes. The toner cartridges are defective. The toner cartridges are defective. Change Paper Weight from the printer driver before sending the job to print, or return the color settings...
User's Guide
Page 96
... of the paper.) Incorrect margins Skewed print (Print is loaded in the selected tray are defective or empty. Replace the toner cartridges. Replace the photoconductor units. Replace the photoconductor units. Call for customer support. Auto size sensing is correct for the size loaded... units are set to the proper positions for in a tray. Troubleshooting Symptom Uneven print density ABCDE ABCDE ABCDE Cause The toner cartridges are defective. Make sure the Paper Type setting is correct for a different size media than what is loaded in the correct position...
... of the paper.) Incorrect margins Skewed print (Print is loaded in the selected tray are defective or empty. Replace the toner cartridges. Replace the photoconductor units. Replace the photoconductor units. Call for customer support. Auto size sensing is correct for the size loaded... units are set to the proper positions for in a tray. Troubleshooting Symptom Uneven print density ABCDE ABCDE ABCDE Cause The toner cartridges are defective. Make sure the Paper Type setting is correct for a different size media than what is loaded in the correct position...
User's Guide
Page 109
... the publications CD. To access these printer alert menu items: 1 Make sure the printer is on how the printer responds when cartridge life is a printer alert which can be lost. Cartridge Alarm Gives a choice on and the Ready message appears. 2 Press to notify the user when it , press . Alarms Menu item Function...
... the publications CD. To access these printer alert menu items: 1 Make sure the printer is on how the printer responds when cartridge life is a printer alert which can be lost. Cartridge Alarm Gives a choice on and the Ready message appears. 2 Press to notify the user when it , press . Alarms Menu item Function...
User's Guide
Page 140
...operating in your product to the Remarketer or Lexmark, or ship it prepaid and suitably packaged to the requirements of all print cartridges, programs, data, and removable storage media (unless directed otherwise by Lexmark). To obtain warranty service you present this...warranty period, contact a Remarketer or Lexmark for such item. You should transfer proof of Limited Warranty for warranty service, remove all legal obligations, restrictions, liens, and encumbrances. Statement of original purchase and this product for Lexmark C520, C522, and C524 Lexmark International, Inc.
...operating in your product to the Remarketer or Lexmark, or ship it prepaid and suitably packaged to the requirements of all print cartridges, programs, data, and removable storage media (unless directed otherwise by Lexmark). To obtain warranty service you present this...warranty period, contact a Remarketer or Lexmark for such item. You should transfer proof of Limited Warranty for warranty service, remove all legal obligations, restrictions, liens, and encumbrances. Statement of original purchase and this product for Lexmark C520, C522, and C524 Lexmark International, Inc.

User's Guide
Page 143
... labels guidelines 39 loading 55 printer maintenance 39 letterhead 37 guidelines 37 loading in multipurpose feeder 55 page orientation 37 printing 37 Lexmark Authorized Supplies Dealers 78 linking, trays 45 Linux 15, 23 loading card stock 55 envelopes 56 letterhead 55 standard tray letterhead 49...M Macintosh 13 sending a print job 25 Index to print to a network printer 21 USB printing 13 maintaining the printer 78 toner cartridges, storing 81 manual feed slot guidelines 58 location 50 media guidelines 35 letterhead 37 letterhead, printing 37 loading multipurpose feeder 53 letterhead guidelines ...
... labels guidelines 39 loading 55 printer maintenance 39 letterhead 37 guidelines 37 loading in multipurpose feeder 55 page orientation 37 printing 37 Lexmark Authorized Supplies Dealers 78 linking, trays 45 Linux 15, 23 loading card stock 55 envelopes 56 letterhead 55 standard tray letterhead 49...M Macintosh 13 sending a print job 25 Index to print to a network printer 21 USB printing 13 maintaining the printer 78 toner cartridges, storing 81 manual feed slot guidelines 58 location 50 media guidelines 35 letterhead 37 letterhead, printing 37 loading multipurpose feeder 53 letterhead guidelines ...
User's Guide
Page 144
... verifying installation with menu settings page 28 ordering maintenance items 79 fuser 80 photoconductor units 80 toner cartridges 79 transfer belt 80 waste toner box 80 supplies 79 fuser 80 photoconductor units 80 toner cartridges 79 transfer belt 80 waste toner box 80 P paper letterhead 37 loading manual feed slot 58 multipurpose...
... verifying installation with menu settings page 28 ordering maintenance items 79 fuser 80 photoconductor units 80 toner cartridges 79 transfer belt 80 waste toner box 80 supplies 79 fuser 80 photoconductor units 80 toner cartridges 79 transfer belt 80 waste toner box 80 P paper letterhead 37 loading manual feed slot 58 multipurpose...


