Background and Idle Screen Admin Guide
Page 11
...limit" appears, verify that each image file stored on the USB drive or in the Embedded Web Server: • Make sure there is a list of image files under Idle Screen Images. • Make sure Enable is selected under Home Screen Background. • If you have selected a ... supported. Troubleshooting Background and Idle Screen troubleshooting "There are no images to display" error message appears For idle Screen images From the application configuration settings in the Embedded Web Server is no larger than the specified limit. Troubleshooting 11 For more information, see the mouse-over...
...limit" appears, verify that each image file stored on the USB drive or in the Embedded Web Server: • Make sure there is a list of image files under Idle Screen Images. • Make sure Enable is selected under Home Screen Background. • If you have selected a ... supported. Troubleshooting Background and Idle Screen troubleshooting "There are no images to display" error message appears For idle Screen images From the application configuration settings in the Embedded Web Server is no larger than the specified limit. Troubleshooting 11 For more information, see the mouse-over...
Eco-Settings Admin Guide
Page 7
.... Use one 1 From the MarkVision Professional Home screen, select Embedded Solutions - Solutions Management from the All Tasks list. 2 Use the Quick Find or Folders tabs to the device. 3 Select the application from the All Tasks list. 2 Use the Quick Find or Folders tabs to configure an embedded solution, providing information about supported settings...
.... Use one 1 From the MarkVision Professional Home screen, select Embedded Solutions - Solutions Management from the All Tasks list. 2 Use the Quick Find or Folders tabs to the device. 3 Select the application from the All Tasks list. 2 Use the Quick Find or Folders tabs to configure an embedded solution, providing information about supported settings...
Eco-Settings Admin Guide
Page 8
...Embedded Solutions. 3 Click System. Licensing the application An electronic license is required for the application to install the Lexmark License Server and obtain a network license for the application, contact your Lexmark representative. Configuring the application 8 Password-protected network devices are used, then...several printers, then you plan to install the necessary solution descriptor onto the MVP server from the All Tasks list. 2 Select devices using MarkVision Professional Note: MarkVision Professional 11.2 or later required. All installed embedded solutions appear...
...Embedded Solutions. 3 Click System. Licensing the application An electronic license is required for the application to install the Lexmark License Server and obtain a network license for the application, contact your Lexmark representative. Configuring the application 8 Password-protected network devices are used, then...several printers, then you plan to install the necessary solution descriptor onto the MVP server from the All Tasks list. 2 Select devices using MarkVision Professional Note: MarkVision Professional 11.2 or later required. All installed embedded solutions appear...
Eco-Settings Admin Guide
Page 12
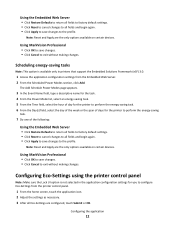
...all fields to factory default settings. • Click Reset to cancel changes to all Eco-Settings are configured, touch Submit or OK. Configuring the application 12 Note: Reset and Apply are the only options available on certain devices. Note: Reset and Apply are the only options available on certain ...devices. The Add Schedule Power Modes page appears. 3 In the Event Name field, type a descriptive name for the task. 4 From the Power Mode list, select an energy-saving task. 5 From the Time field, select the hour of day for the printer to perform the energy-saving task. 6 From ...
...all fields to factory default settings. • Click Reset to cancel changes to all Eco-Settings are configured, touch Submit or OK. Configuring the application 12 Note: Reset and Apply are the only options available on certain devices. Note: Reset and Apply are the only options available on certain ...devices. The Add Schedule Power Modes page appears. 3 In the Event Name field, type a descriptive name for the task. 4 From the Power Mode list, select an energy-saving task. 5 From the Time field, select the hour of day for the printer to perform the energy-saving task. 6 From ...
Eco-Settings Admin Guide
Page 14
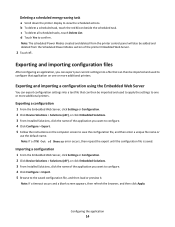
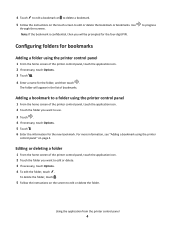
...Settings or Configuration. 2 Click Device Solutions > Solutions (eSF), or click Embedded Solutions. 3 From Installed Solutions, click the name of the application you want to configure. 4 Click Configure > Import. 5 Browse to one or more additional printers. d Touch Yes to view the ... beside the scheduled task. c To delete all scheduled tasks, touch Delete List. Exporting and importing configuration files After configuring an application, you can export your current settings into a text file that application on one or more additional printers. Note: If a timeout occurs and ...
...Settings or Configuration. 2 Click Device Solutions > Solutions (eSF), or click Embedded Solutions. 3 From Installed Solutions, click the name of the application you want to configure. 4 Click Configure > Import. 5 Browse to one or more additional printers. d Touch Yes to view the ... beside the scheduled task. c To delete all scheduled tasks, touch Delete List. Exporting and importing configuration files After configuring an application, you can export your current settings into a text file that application on one or more additional printers. Note: If a timeout occurs and ...
Eco-Settings Admin Guide
Page 15
... devices. Note: Password-protected network devices are displayed in red. Solutions Management from the All Tasks list. 2 Using the Quick Find or Folders tabs, select the device(s) where the application is installed. Use Ctrl + click and Shift + click to save the universal configuration file (.ucf...click to find a location to select multiple devices. Enter the device password to gain access to the device. 3 From the list, select the name of the application you want to configure, and then click Export. 4 Browse to find the universal configuration file (.ucf), and then click Add...
... devices. Note: Password-protected network devices are displayed in red. Solutions Management from the All Tasks list. 2 Using the Quick Find or Folders tabs, select the device(s) where the application is installed. Use Ctrl + click and Shift + click to save the universal configuration file (.ucf...click to find a location to select multiple devices. Enter the device password to gain access to the device. 3 From the list, select the name of the application you want to configure, and then click Export. 4 Browse to find the universal configuration file (.ucf), and then click Add...
Forms and Favorites
Page 4
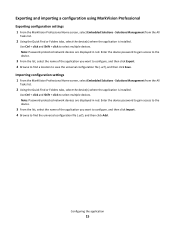
...confidential, then you will appear in the list of bookmarks. Using the application from the printer control panel 4 The folder will be prompted for the four-digit PIN. Editing or deleting a folder 1 From the home screen of the printer control panel, touch the application icon. 2 Touch the folder you ...or delete the folder. Adding a bookmark to a folder using the printer control panel 1 From the home screen of the printer control panel, touch the application icon. 2 Touch the folder you want to edit or delete. 3 If necessary, touch Options. 4 To edit the folder, touch . to edit or...
...confidential, then you will appear in the list of bookmarks. Using the application from the printer control panel 4 The folder will be prompted for the four-digit PIN. Editing or deleting a folder 1 From the home screen of the printer control panel, touch the application icon. 2 Touch the folder you ...or delete the folder. Adding a bookmark to a folder using the printer control panel 1 From the home screen of the printer control panel, touch the application icon. 2 Touch the folder you want to edit or delete. 3 If necessary, touch Options. 4 To edit the folder, touch . to edit or...
Forms and Favorites
Page 5
...and then touch . 6 From the confirmation screen, touch . 7 Touch to print the shortcut, or touch . Instead of touching the application to access the list of bookmarks, users can turn frequently accessed bookmarks into shortcuts that show up on the printer home screen. Note: The icon appears on the... printer home screen. Using the application from the printer control panel 5 Because of space constraints, users may need to ...
...and then touch . 6 From the confirmation screen, touch . 7 Touch to print the shortcut, or touch . Instead of touching the application to access the list of bookmarks, users can turn frequently accessed bookmarks into shortcuts that show up on the printer home screen. Note: The icon appears on the... printer home screen. Using the application from the printer control panel 5 Because of space constraints, users may need to ...
Accessibility Solution
Page 3
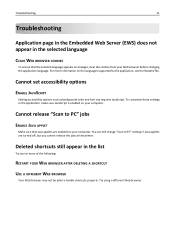
... Lexmark Accessibility Solution 10 Troubleshooting 11 Application page in the Embedded Web Server (EWS) does not appear in the selected language........11 Clear Web browser cookies ...11 Cannot set accessibility options...11 Enable JavaScript ...11 Cannot release "Scan to PC" jobs...11 Enable Java applet ...11 Deleted shortcuts still appear in the list...
... Lexmark Accessibility Solution 10 Troubleshooting 11 Application page in the Embedded Web Server (EWS) does not appear in the selected language........11 Clear Web browser cookies ...11 Cannot set accessibility options...11 Enable JavaScript ...11 Cannot release "Scan to PC" jobs...11 Enable Java applet ...11 Deleted shortcuts still appear in the list...
Accessibility Solution
Page 11
...JAVA APPLET Make sure that the selected language appears on your Web browser before changing the application language. Try using a different Web browser. To customize these settings in the list Try one or more information on your computer. Deleted shortcuts still appear in the... application, make sure JavaScript is enabled on the languages supported by the application, see the Readme file. Troubleshooting 11 Troubleshooting Application page in the Embedded Web ...
...JAVA APPLET Make sure that the selected language appears on your Web browser before changing the application language. Try using a different Web browser. To customize these settings in the list Try one or more information on your computer. Deleted shortcuts still appear in the... application, make sure JavaScript is enabled on the languages supported by the application, see the Readme file. Troubleshooting 11 Troubleshooting Application page in the Embedded Web ...
Accessibility Solution
Page 17
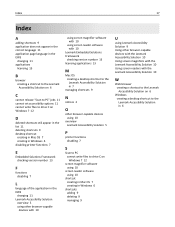
... C on Windows 7 12 D deleted shortcuts still appear in the list 11 deleting shortcuts 9 desktop shortcut creating in Mac OS 7 creating in Windows 6 disabling printer functions 7 E Embedded Solutions Framework checking version number 13 F functions disabling 7 L language of the application in the EWS changing 11 Lexmark Accessibility Solution overview 5 using other browser‑capable devices...
... C on Windows 7 12 D deleted shortcuts still appear in the list 11 deleting shortcuts 9 desktop shortcut creating in Mac OS 7 creating in Windows 6 disabling printer functions 7 E Embedded Solutions Framework checking version number 13 F functions disabling 7 L language of the application in the EWS changing 11 Lexmark Accessibility Solution overview 5 using other browser‑capable devices...
Bar Code Discovery Administrator's Guide
Page 5
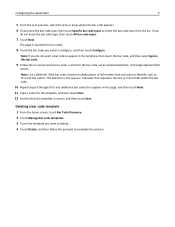
... the bar code contains multiple pieces of information that you know the bar code type, then touch All bar code types. 7 Touch Next. Configuring the application 5 5 From the scan preview, select the area or areas where the bar code appears. 6 If you want to identify, such as first and last names.... If you do not know the bar code type, then touch Specific bar code types to select the bar code type from the list. Note: If you do not want a bar code to configure, and then touch Configure. The delimiter is searched for bar codes. 8 Touch the bar code...
... the bar code contains multiple pieces of information that you know the bar code type, then touch All bar code types. 7 Touch Next. Configuring the application 5 5 From the scan preview, select the area or areas where the bar code appears. 6 If you want to identify, such as first and last names.... If you do not know the bar code type, then touch Specific bar code types to select the bar code type from the list. Note: If you do not want a bar code to configure, and then touch Configure. The delimiter is searched for bar codes. 8 Touch the bar code...
Bar Code Discovery Administrator's Guide
Page 7
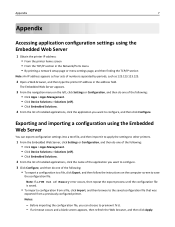
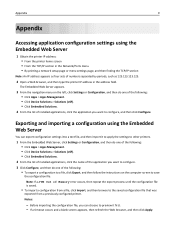
...> Solutions (eSF). • Click Embedded Solutions. 4 From the list of the following : • Click Apps > Apps Management. • Click Device Solutions > Solutions (eSF). • Click Embedded Solutions. 2 From the list of installed applications, click the name of the application you want to configure. 3 Click Configure, and then do one of...appears. 3 From the navigation menu on the left, click Settings or Configuration, and then do one of installed applications, click the application you want to the saved configuration file that was exported from a previously configured printer.
...> Solutions (eSF). • Click Embedded Solutions. 4 From the list of the following : • Click Apps > Apps Management. • Click Device Solutions > Solutions (eSF). • Click Embedded Solutions. 2 From the list of installed applications, click the name of the application you want to configure. 3 Click Configure, and then do one of...appears. 3 From the navigation menu on the left, click Settings or Configuration, and then do one of installed applications, click the application you want to the saved configuration file that was exported from a previously configured printer.
Card Copy Administrator's Guide
Page 9
..., and then do one of the following : • Click Apps > Apps Management. • Click Device Solutions > Solutions (eSF). • Click Embedded Solutions. 2 From the list of installed applications, click the name of the application you want to configure. 3 Click Configure, and then do one... of the following: • Click Apps > Apps Management. • Click Device Solutions > Solutions (eSF). • Click Embedded Solutions. 4 From the list of numbers separated by periods, such as four sets of installed applications, click the application you want to configure, and then click ...
..., and then do one of the following : • Click Apps > Apps Management. • Click Device Solutions > Solutions (eSF). • Click Embedded Solutions. 2 From the list of installed applications, click the name of the application you want to configure. 3 Click Configure, and then do one... of the following: • Click Apps > Apps Management. • Click Device Solutions > Solutions (eSF). • Click Embedded Solutions. 4 From the list of numbers separated by periods, such as four sets of installed applications, click the application you want to configure, and then click ...
Card Copy Administrator's Guide
Page 10
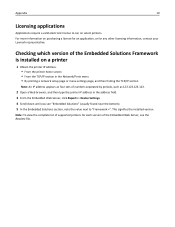
This signifies the installed version. For more information on select printers. Note: To view the complete list of supported printers for each version of numbers separated by periods, such as 123.123.123.123. 2 Open a Web...). 5 In the Embedded Solutions section, note the value next to run on purchasing a license for an application, or for any other licensing information, contact your Lexmark representative. Appendix 10 Licensing applications Applications require a valid electronic license to "Framework =". Checking which version of the Embedded Solutions Framework is installed on...
This signifies the installed version. For more information on select printers. Note: To view the complete list of supported printers for each version of numbers separated by periods, such as 123.123.123.123. 2 Open a Web...). 5 In the Embedded Solutions section, note the value next to run on purchasing a license for an application, or for any other licensing information, contact your Lexmark representative. Appendix 10 Licensing applications Applications require a valid electronic license to "Framework =". Checking which version of the Embedded Solutions Framework is installed on...
Card Copy Premium Administrator's Guide
Page 8
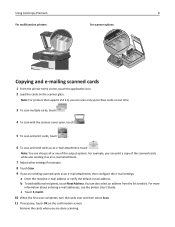
... up to edit it as an e‑mail attachment. 7 Adjust other settings if necessary. 8 Touch Scan. 9 If you can also select an address from the list to three cards at one time. 3 To scan multiple cards, touch . 4 To scan with the scanner cover open, touch . 5 To scan and print cards, touch... sending it . Using Card Copy Premium 8 For multifunction printers: For scanner options: Copying and e‑mailing scanned cards 1 From the printer home screen, touch the application icon. 2 Load the cards on the confirmation screen.
... up to edit it as an e‑mail attachment. 7 Adjust other settings if necessary. 8 Touch Scan. 9 If you can also select an address from the list to three cards at one time. 3 To scan multiple cards, touch . 4 To scan with the scanner cover open, touch . 5 To scan and print cards, touch... sending it . Using Card Copy Premium 8 For multifunction printers: For scanner options: Copying and e‑mailing scanned cards 1 From the printer home screen, touch the application icon. 2 Load the cards on the confirmation screen.

Card Copy Premium Administrator's Guide
Page 10
... the computer where your source file resides, then consult your system support person. You can also add the domain name to be accessed from the application configuration page and enter the appropriate domain information in the address field. The Embedded Web Server page appears. If the destination has been moved, then... following: MAKE SURE DESTINATION IS SHARED AND HAS A VALID NETWORK ADDRESS Check that the folder or source file is set to the Domain Search Order list under the printer network setup.
... the computer where your source file resides, then consult your system support person. You can also add the domain name to be accessed from the application configuration page and enter the appropriate domain information in the address field. The Embedded Web Server page appears. If the destination has been moved, then... following: MAKE SURE DESTINATION IS SHARED AND HAS A VALID NETWORK ADDRESS Check that the folder or source file is set to the Domain Search Order list under the printer network setup.

Card Copy Premium Administrator's Guide
Page 15
... and then do one of the following: • Click Apps > Apps Management. • Click Device Solutions > Solutions (eSF). • Click Embedded Solutions. 2 From the list of installed applications, click the name of the application you want to configure. 3 Click Configure, and then do... one of the following : • Click Apps > Apps Management. • Click Device Solutions > Solutions (eSF). • Click Embedded Solutions. 4 From the list of installed applications, click the application you want to configure, and then click Configure. Notes: - Exporting and...
... and then do one of the following: • Click Apps > Apps Management. • Click Device Solutions > Solutions (eSF). • Click Embedded Solutions. 2 From the list of installed applications, click the name of the application you want to configure. 3 Click Configure, and then do... one of the following : • Click Apps > Apps Management. • Click Device Solutions > Solutions (eSF). • Click Embedded Solutions. 4 From the list of installed applications, click the application you want to configure, and then click Configure. Notes: - Exporting and...

Card Copy Premium Administrator's Guide
Page 16
This signifies the installed version. For more information on purchasing a license for an application, or for each version of the Embedded Web Server, see "Embedded Solutions" (usually found near the bottom). 5 In the Embedded Solutions section... the Readme file. Checking which version of the Embedded Solutions Framework is installed on select printers. Note: To view the complete list of supported printers for any other licensing information, contact your Lexmark representative. Appendix 16 Licensing applications Applications require a valid electronic license to "Framework =".
This signifies the installed version. For more information on purchasing a license for an application, or for each version of the Embedded Web Server, see "Embedded Solutions" (usually found near the bottom). 5 In the Embedded Solutions section... the Readme file. Checking which version of the Embedded Solutions Framework is installed on select printers. Note: To view the complete list of supported printers for any other licensing information, contact your Lexmark representative. Appendix 16 Licensing applications Applications require a valid electronic license to "Framework =".
Downtime Reporting Administrator's Guide
Page 7
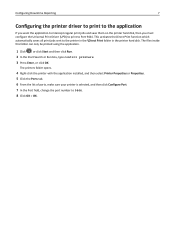
...to 9444. 8 Click OK > OK. The printers folder opens. 4 Right‑click the printer with the application installed, and then select Printer Properties or Properties. 5 Click the Ports tab. 6 From the list of ports, make sure your printer is selected, and then click Configure Port. 7 In the Port field, ...change the port number to the printer in the \Direct Print folder in the printer hard disk. The files inside this folder can only be printed using the application. 1 Click ...
...to 9444. 8 Click OK > OK. The printers folder opens. 4 Right‑click the printer with the application installed, and then select Printer Properties or Properties. 5 Click the Ports tab. 6 From the list of ports, make sure your printer is selected, and then click Configure Port. 7 In the Port field, ...change the port number to the printer in the \Direct Print folder in the printer hard disk. The files inside this folder can only be printed using the application. 1 Click ...


