User's Guide
Page 7
..., or specialty media 93 Banner paper jams...94 Error messages...94 Black Ink Low/Color Ink Low/Photo Ink Low 94 Clear Paper Jam...94 Clear ADF Jam...94 Left Cartridge Error/Right Cartridge Error 94 Cartridge Error...95 Clear Carrier Jam...95 Left Cartridge Missing/Right Cartridge Missing 96 Error: 1104...96 Alignment Problem...97 Fax Error...97...
..., or specialty media 93 Banner paper jams...94 Error messages...94 Black Ink Low/Color Ink Low/Photo Ink Low 94 Clear Paper Jam...94 Clear ADF Jam...94 Left Cartridge Error/Right Cartridge Error 94 Cartridge Error...95 Clear Carrier Jam...95 Left Cartridge Missing/Right Cartridge Missing 96 Error: 1104...96 Alignment Problem...97 Fax Error...97...
User's Guide
Page 23
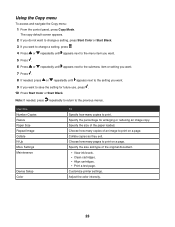
... enlarging or reducing an image copy. Adjust the color intensity. 23 Note: If needed , press or repeatedly until appears next to the setting you want. 9 If you want to print. Specify the size of the original document. • View ink levels. • Clean cartridges. • Align cartridges. • Print a test page. Choose how many...
... enlarging or reducing an image copy. Adjust the color intensity. 23 Note: If needed , press or repeatedly until appears next to the setting you want. 9 If you want to print. Specify the size of the original document. • View ink levels. • Clean cartridges. • Align cartridges. • Print a test page. Choose how many...

User's Guide
Page 24
...you want appears. 8 Press . 9 If needed , press repeatedly to return to save the setting for future use, press . 11 Press Start Color or Start Black. Note: If needed , press or repeatedly until appears next to the submenu item you want or the setting you want appears....the control panel, press Fax Mode. Use this Original Size Maintenance Device Setup To Specify the size of the original. • View ink levels. • Clean cartridges. • Align cartridges. • Print a test page. Customize printer settings. Using the Scan menu To access and navigate the Scan menu: 1 From ...
...you want appears. 8 Press . 9 If needed , press repeatedly to return to save the setting for future use, press . 11 Press Start Color or Start Black. Note: If needed , press or repeatedly until appears next to the submenu item you want or the setting you want appears....the control panel, press Fax Mode. Use this Original Size Maintenance Device Setup To Specify the size of the original. • View ink levels. • Clean cartridges. • Align cartridges. • Print a test page. Customize printer settings. Using the Scan menu To access and navigate the Scan menu: 1 From ...
User's Guide
Page 25
...: For more information, see "Sending a fax while listening to a call through a speaker on page 52. Customize settings for receiving a fax. • View ink levels. • Clean cartridges. • Align cartridges. • Print a test page. Dial a telephone number while listening to save the setting for future use, press . 10 Press Start Black. This is...
...: For more information, see "Sending a fax while listening to a call through a speaker on page 52. Customize settings for receiving a fax. • View ink levels. • Clean cartridges. • Align cartridges. • Print a test page. Dial a telephone number while listening to save the setting for future use, press . 10 Press Start Black. This is...
User's Guide
Page 30
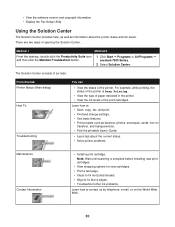
..., while printing, the status of the printer is complete before installing new print cartridges. • View shopping options for new cartridges. • Print a test page. • Clean to fix horizontal streaks. • Align to fix blurry edges. • Troubleshoot other ink problems. Learn how to : • Scan, copy, fax, and print. • Find... 1 Method 2 From the desktop, double-click the Productivity Suite icon, and then click the Maintain/Troubleshoot button. 1 Click Start Œ Programs or All Programs Œ Lexmark 7300 Series. 2 Select Solution Center.
..., while printing, the status of the printer is complete before installing new print cartridges. • View shopping options for new cartridges. • Print a test page. • Clean to fix horizontal streaks. • Align to fix blurry edges. • Troubleshoot other ink problems. Learn how to : • Scan, copy, fax, and print. • Find... 1 Method 2 From the desktop, double-click the Productivity Suite icon, and then click the Maintain/Troubleshoot button. 1 Click Start Œ Programs or All Programs Œ Lexmark 7300 Series. 2 Select Solution Center.
User's Guide
Page 72
... next to Maintenance. 5 Press . 6 Press or repeatedly until appears next to Align Cartridges. 7 Press . If print quality has not improved, clean the print cartridge nozzles. If you aligned the cartridges to two more times. A page prints, forcing ink through the print cartridge nozzles to clean them. 8 Print the document again to verify that the print...
... next to Maintenance. 5 Press . 6 Press or repeatedly until appears next to Align Cartridges. 7 Press . If print quality has not improved, clean the print cartridge nozzles. If you aligned the cartridges to two more times. A page prints, forcing ink through the print cartridge nozzles to clean them. 8 Print the document again to verify that the print...

User's Guide
Page 73
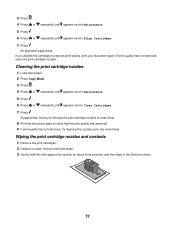
Note: Make sure all ink or corrective fluid on a document is still not satisfactory, replace the print cartridges. Preserving the print cartridges • Keep a new cartridge in its own storage unit when not in use. Cleaning the scanner glass 1 Dampen a clean, lint-free cloth with water. 2 Gently ...the contacts for an extended period of the cloth, repeat step 3 and step 4. 6 Let the nozzles and contacts dry completely. 7 Reinsert the print cartridges. 8 Print the document again. 9 If the print quality does not improve, clean the print nozzles. For more times. 11 If print quality is...
Note: Make sure all ink or corrective fluid on a document is still not satisfactory, replace the print cartridges. Preserving the print cartridges • Keep a new cartridge in its own storage unit when not in use. Cleaning the scanner glass 1 Dampen a clean, lint-free cloth with water. 2 Gently ...the contacts for an extended period of the cloth, repeat step 3 and step 4. 6 Let the nozzles and contacts dry completely. 7 Reinsert the print cartridges. 8 Print the document again. 9 If the print quality does not improve, clean the print nozzles. For more times. 11 If print quality is...
User's Guide
Page 77
... displayed, see "Error messages" on page 94. Check the ink levels, and install a new print cartridge if necessary. 77 If the Power button light is not on, see "Error messages" on page 94. 1 Close all New Hardware Found screens. 3 Insert the ... drive icon. 5 If necessary, double-click setup.exe. 6 Follow the instructions on the computer screen to install the software. 1 Visit our Web site at www.lexmark.com to check for the latest software. 2 Click drivers & downloads. 3 Click Find Drivers and Downloads. 4 Select your printer family. 5 Select your printer model. 6 Select your...
... displayed, see "Error messages" on page 94. Check the ink levels, and install a new print cartridge if necessary. 77 If the Power button light is not on, see "Error messages" on page 94. 1 Close all New Hardware Found screens. 3 Insert the ... drive icon. 5 If necessary, double-click setup.exe. 6 Follow the instructions on the computer screen to install the software. 1 Visit our Web site at www.lexmark.com to check for the latest software. 2 Click drivers & downloads. 3 Click Find Drivers and Downloads. 4 Select your printer family. 5 Select your printer model. 6 Select your...
User's Guide
Page 80
... accepts ink differently and prints with graphics or images • Photo paper • Coated or glossy paper • Transparency • Labels • Envelopes • Iron-on page 100. 2 If the software still does not install correctly, visit our Web site at www.lexmark.com ...pages • Dark print • Faded print • Incorrect colors • Light and dark bands in print • Skewed lines • Smudges • Streaks • White lines in print Check the ink levels, and install a new print cartridge if necessary. c Select your printer family. a Click drivers &...
... accepts ink differently and prints with graphics or images • Photo paper • Coated or glossy paper • Transparency • Labels • Envelopes • Iron-on page 100. 2 If the software still does not install correctly, visit our Web site at www.lexmark.com ...pages • Dark print • Faded print • Incorrect colors • Light and dark bands in print • Skewed lines • Smudges • Streaks • White lines in print Check the ink levels, and install a new print cartridge if necessary. c Select your printer family. a Click drivers &...
User's Guide
Page 83
... error message is displayed, see "Scanning clear images from a newspaper, magazine, or glossy paper, see "Error messages" on page 71. Check the ink levels and install a new print cartridge if necessary. If the quality of the original is dirty, gently wipe it with a clean, lint-free cloth dampened with water. f Select the... unit. 2 Remove any obstruction keeping the scanner unit open. 3 Lower the scanner unit. If you want to lighten or darken the copy. 5 Press . 6 Press Start Color or Start Black.
... error message is displayed, see "Scanning clear images from a newspaper, magazine, or glossy paper, see "Error messages" on page 71. Check the ink levels and install a new print cartridge if necessary. If the quality of the original is dirty, gently wipe it with a clean, lint-free cloth dampened with water. f Select the... unit. 2 Remove any obstruction keeping the scanner unit open. 3 Lower the scanner unit. If you want to lighten or darken the copy. 5 Press . 6 Press Start Color or Start Black.
User's Guide
Page 88
... receiving number. 2 Scan the original document one page at a time. If the printer memory is set for faxing, press Fax Mode. Check the ink levels, and install a new cartridge if necessary. Setup appears. 4 Press . 5 Press or repeatedly until Fax Forward appears. 6 Press . 7 Press or repeatedly to see "Setting the distinctive ring" on...
... receiving number. 2 Scan the original document one page at a time. If the printer memory is set for faxing, press Fax Mode. Check the ink levels, and install a new cartridge if necessary. Setup appears. 4 Press . 5 Press or repeatedly until Fax Forward appears. 6 Press . 7 Press or repeatedly to see "Setting the distinctive ring" on...

User's Guide
Page 89
... setting. 1 Listen for the number that you want appears. 9 Press to save this means it has been programmed for a dial tone. Check the ink levels, and install a new print cartridge if necessary. 89 If you used a Speed Dial button: • Check to make sure it did not recognize the dial tone. 2 From...
... setting. 1 Listen for the number that you want appears. 9 Press to save this means it has been programmed for a dial tone. Check the ink levels, and install a new print cartridge if necessary. 89 If you used a Speed Dial button: • Check to make sure it did not recognize the dial tone. 2 From...
User's Guide
Page 90
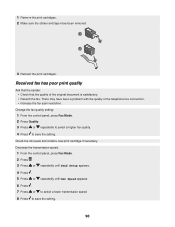
There may have been removed. 1 2 3 Reinsert the print cartridges. Check the ink levels and install a new print cartridge if necessary. Change the fax quality setting: 1 From the control panel, press Fax Mode. 2 Press Quality. 3 Press or repeatedly to select a higher fax...5 Press or repeatedly until Max Speed appears. 6 Press . 7 Press or to select a lower transmission speed. 8 Press to save the setting. 90 1 Remove the print cartridges. 2 Make sure the sticker and tape have been a problem with the quality of the original document is satisfactory. • Resend the fax.
There may have been removed. 1 2 3 Reinsert the print cartridges. Check the ink levels and install a new print cartridge if necessary. Change the fax quality setting: 1 From the control panel, press Fax Mode. 2 Press Quality. 3 Press or repeatedly to select a higher fax...5 Press or repeatedly until Max Speed appears. 6 Press . 7 Press or to select a lower transmission speed. 8 Press to save the setting. 90 1 Remove the print cartridges. 2 Make sure the sticker and tape have been a problem with the quality of the original document is satisfactory. • Resend the fax.
User's Guide
Page 94
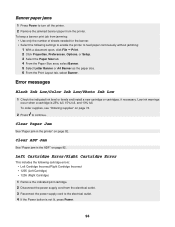
... not lit, press Power. 94 Error messages Black Ink Low/Color Ink Low/Photo Ink Low 1 Check the indicated ink level or levels and install a new cartridge or cartridges, if necessary. Clear Paper Jam See "Paper jam in the ADF" on page 92. To order ...only the number of sheets needed for the banner. • Select the following cartridge errors: • Left Cartridge Incorrect/Right Cartridge Incorrect • 1205 (Left Cartridge) • 1206 (Right Cartridge) 1 Remove the indicated print cartridge. 2 Disconnect the power supply cord from the electrical outlet. 3 Reconnect the power...
... not lit, press Power. 94 Error messages Black Ink Low/Color Ink Low/Photo Ink Low 1 Check the indicated ink level or levels and install a new cartridge or cartridges, if necessary. Clear Paper Jam See "Paper jam in the ADF" on page 92. To order ...only the number of sheets needed for the banner. • Select the following cartridge errors: • Left Cartridge Incorrect/Right Cartridge Incorrect • 1205 (Left Cartridge) • 1206 (Right Cartridge) 1 Remove the indicated print cartridge. 2 Disconnect the power supply cord from the electrical outlet. 3 Reconnect the power...
User's Guide
Page 108
... 65 ADF exit tray 18 input tray 18 loading documents 38 paper capacity 39 scanning multiple pages 47 album page, creating 64 aligning print cartridges 71 alignment problem 97 All-In-One Center Maintain/Troubleshoot link 29 opening 27 Saved Images tab 29 Scanning & Copying tab 28 answering machine... 72 installing 70 preserving 73 removing 69 wiping 72 cleaning print cartridge nozzles 72 clear ADF jam error 94 clear carrier jam error message 95 clear paper jam error 94 coated paper, loading 35 collating copies 41, 44 color ink low error 94 configuring network printer 67 connecting the printer to...
... 65 ADF exit tray 18 input tray 18 loading documents 38 paper capacity 39 scanning multiple pages 47 album page, creating 64 aligning print cartridges 71 alignment problem 97 All-In-One Center Maintain/Troubleshoot link 29 opening 27 Saved Images tab 29 Scanning & Copying tab 28 answering machine... 72 installing 70 preserving 73 removing 69 wiping 72 cleaning print cartridge nozzles 72 clear ADF jam error 94 clear carrier jam error message 95 clear paper jam error 94 coated paper, loading 35 collating copies 41, 44 color ink low error 94 configuring network printer 67 connecting the printer to...
User's Guide
Page 109
... 96 error messages alignment problem 97 black ink low 94 cartridge error 95 clear ADF jam 94 clear carrier jam 95 clear paper jam 94 color ink low 94 error 1104 96 failed to connect 97 fax error 97 fax mode unsupported 97 left cartridge error 94 left cartridge missing 96 memory full 100 phone line... busy 99 photo ink low 94 remote fax error 98 right cartridge error 94 right cartridge missing 96 EXT port 19...
... 96 error messages alignment problem 97 black ink low 94 cartridge error 95 clear ADF jam 94 clear carrier jam 95 clear paper jam 94 color ink low 94 error 1104 96 failed to connect 97 fax error 97 fax mode unsupported 97 left cartridge error 94 left cartridge missing 96 memory full 100 phone line... busy 99 photo ink low 94 remote fax error 98 right cartridge error 94 right cartridge missing 96 EXT port 19...
User's Guide
Page 110
...19 peer-to-peer method 66 Phone Book, using 56 phone line busy error message 99 photo cards, loading 37 Photo Editor, using 32 photo ink low error 94 photo paper, loading 35 photos adding text captions 65 album page 64 editing 32 loading on the scanner glass 39 printing 63... printing 43 power button is not lit 76 power supply port 19 premium paper, loading 35 Preview section 28 previewing photos 29 print cartridge nozzles, cleaning 72 print cartridges aligning 71 cleaning 72 installing 70 preserving 73 removing 69 wiping 72 Print Layout tab changing document type 32 duplexing 32 Print Properties...
...19 peer-to-peer method 66 Phone Book, using 56 phone line busy error message 99 photo cards, loading 37 Photo Editor, using 32 photo ink low error 94 photo paper, loading 35 photos adding text captions 65 album page 64 editing 32 loading on the scanner glass 39 printing 63... printing 43 power button is not lit 76 power supply port 19 premium paper, loading 35 Preview section 28 previewing photos 29 print cartridge nozzles, cleaning 72 print cartridges aligning 71 cleaning 72 installing 70 preserving 73 removing 69 wiping 72 Print Layout tab changing document type 32 duplexing 32 Print Properties...
User's Guide
Page 111
...using an answering machine 53 recycling WEEE statement 103 recycling Lexmark products 74 reducing an image 45 remote fax error 98 removing print cartridges 69 repeating an image 45 reports, fax activity 54 reverse page order 41 right cartridge error 94 right cartridge missing error 96 ring patterns, setting 57 S safety ...quality 83 scanner unit does not close 83 troubleshooting, error messages alignment problem 97 black ink low 94 cartridge error 95 clear ADF jam 94 clear carrier jam 95 clear paper jam 94 color ink low 94 error 1104 96 failed to connect 97 fax error 97 fax mode unsupported 97...
...using an answering machine 53 recycling WEEE statement 103 recycling Lexmark products 74 reducing an image 45 remote fax error 98 removing print cartridges 69 repeating an image 45 reports, fax activity 54 reverse page order 41 right cartridge error 94 right cartridge missing error 96 ring patterns, setting 57 S safety ...quality 83 scanner unit does not close 83 troubleshooting, error messages alignment problem 97 black ink low 94 cartridge error 95 clear ADF jam 94 clear carrier jam 95 clear paper jam 94 color ink low 94 error 1104 96 failed to connect 97 fax error 97 fax mode unsupported 97...

