User's Guide
Page 6
... Achieving better print quality...71 Improving print quality...71 Aligning print cartridges...71 Cleaning the print cartridge nozzles...72 Wiping the print cartridge nozzles and contacts 72 Preserving the print cartridges...73 Cleaning the scanner glass...73 Ordering supplies...74 Recycling Lexmark products...74 Troubleshooting...75 Setup troubleshooting...75 Incorrect language appears on the display...
... Achieving better print quality...71 Improving print quality...71 Aligning print cartridges...71 Cleaning the print cartridge nozzles...72 Wiping the print cartridge nozzles and contacts 72 Preserving the print cartridges...73 Cleaning the scanner glass...73 Ordering supplies...74 Recycling Lexmark products...74 Troubleshooting...75 Setup troubleshooting...75 Incorrect language appears on the display...
User's Guide
Page 7
... 93 Banner paper jams...94 Error messages...94 Black Ink Low/Color Ink Low/Photo Ink Low 94 Clear Paper Jam...94 Clear ADF Jam...94 Left Cartridge Error/Right Cartridge Error 94 Cartridge Error...95 Clear Carrier Jam...95 Left Cartridge Missing/Right Cartridge Missing 96 Error: 1104...96 Alignment Problem...97 Fax Error...97...
... 93 Banner paper jams...94 Error messages...94 Black Ink Low/Color Ink Low/Photo Ink Low 94 Clear Paper Jam...94 Clear ADF Jam...94 Left Cartridge Error/Right Cartridge Error 94 Cartridge Error...95 Clear Carrier Jam...95 Left Cartridge Missing/Right Cartridge Missing 96 Error: 1104...96 Alignment Problem...97 Fax Error...97...
User's Guide
Page 11
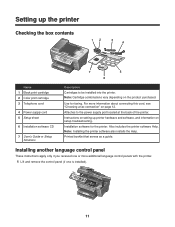
...this cord, see "Choosing a fax connection" on page 12. Note: Cartridge combinations vary depending on setting up the printer Checking the box contents 12 3 4 x 7 5 6 Name 1 Black print cartridge 2 Color print cartridge 3 Telephone cord 4 Power supply cord 5 Setup sheet 6 Installation software CD... 7 User's Guide or Setup Solutions Description Cartridges to the power supply port located at the back of the printer....
...this cord, see "Choosing a fax connection" on page 12. Note: Cartridge combinations vary depending on setting up the printer Checking the box contents 12 3 4 x 7 5 6 Name 1 Black print cartridge 2 Color print cartridge 3 Telephone cord 4 Power supply cord 5 Setup sheet 6 Installation software CD... 7 User's Guide or Setup Solutions Description Cartridges to the power supply port located at the back of the printer....
User's Guide
Page 18
.... For more information, see "Using the control panel" on the scanner glass. Place these items on page 20. Access the scanner glass. Access the print cartridges. 18 Operate the printer.
.... For more information, see "Using the control panel" on the scanner glass. Place these items on page 20. Access the scanner glass. Access the print cartridges. 18 Operate the printer.
User's Guide
Page 23
... Customize printer settings. Specify the percentage for future use, press . 10 Press Start Color or Start Black. Specify the size of the original document. • View ink levels. • Clean cartridges. • Align cartridges. • Print a test page. Specify the size and type of the paper ...loaded. Note: If needed , press or repeatedly until appears next to the submenu item or setting you want to print on a page. Adjust the color intensity. 23 Using...
... Customize printer settings. Specify the percentage for future use, press . 10 Press Start Color or Start Black. Specify the size of the original document. • View ink levels. • Clean cartridges. • Align cartridges. • Print a test page. Specify the size and type of the paper ...loaded. Note: If needed , press or repeatedly until appears next to the submenu item or setting you want to print on a page. Adjust the color intensity. 23 Using...

User's Guide
Page 24
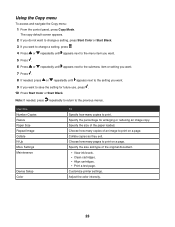
...the setting you want. 10 If you want to save the setting for future use, press . 11 Press Start Color or Start Black. Customize printer settings. Using the Fax menu To access and navigate the Fax menu: 1 From... the control panel, press Fax Mode. The fax default screen appears. 2 If you do not want to change a setting, press Start Color or Start Black. 4 If you want to change a setting, press . 4 Press or repeatedly until appears next to the menu item... the size of the original. • View ink levels. • Clean cartridges. • Align cartridges. • Print a test page.
...the setting you want. 10 If you want to save the setting for future use, press . 11 Press Start Color or Start Black. Customize printer settings. Using the Fax menu To access and navigate the Fax menu: 1 From... the control panel, press Fax Mode. The fax default screen appears. 2 If you do not want to change a setting, press Start Color or Start Black. 4 If you want to change a setting, press . 4 Press or repeatedly until appears next to the menu item... the size of the original. • View ink levels. • Clean cartridges. • Align cartridges. • Print a test page.
User's Guide
Page 25
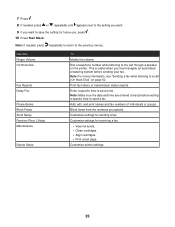
... you specify. Add, edit, and print names and fax numbers of individuals or groups. Customize settings for receiving a fax. • View ink levels. • Clean cartridges. • Align cartridges. • Print a test page.
... you specify. Add, edit, and print names and fax numbers of individuals or groups. Customize settings for receiving a fax. • View ink levels. • Clean cartridges. • Align cartridges. • Print a test page.
User's Guide
Page 26
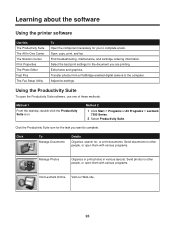
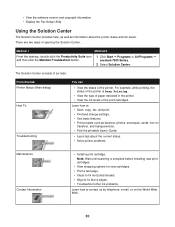
.... Transfer photos from a PictBridge-enabled digital camera to the computer. Method 2 1 Click Start ΠPrograms or All Programs ΠLexmark 7300 Series. 2 Select Productivity Suite. Edit photos and graphics. Send photos to other people, or open them with various programs. Visit...Fast Pics The Fax Setup Utility To Open the component necessary for the task you want to complete. Find troubleshooting, maintenance, and cartridge ordering information. Select the best print settings for , or print documents. Click To Manage Documents Details Organize, search for the document...
.... Transfer photos from a PictBridge-enabled digital camera to the computer. Method 2 1 Click Start ΠPrograms or All Programs ΠLexmark 7300 Series. 2 Select Productivity Suite. Edit photos and graphics. Send photos to other people, or open them with various programs. Visit...Fast Pics The Fax Setup Utility To Open the component necessary for the task you want to complete. Find troubleshooting, maintenance, and cartridge ordering information. Select the best print settings for , or print documents. Click To Manage Documents Details Organize, search for the document...
User's Guide
Page 30
... • Print projects such as information about the current status. • Solve printer problems. Maintenance Contact Information • Install a print cartridge. Note: Wait until scanning is Busy Printing. • View the type of paper detected in the printer. • View the ink ...desktop, double-click the Productivity Suite icon, and then click the Maintain/Troubleshoot button. 1 Click Start Œ Programs or All Programs Œ Lexmark 7300 Series. 2 Select Solution Center. Learn how to contact us by telephone, e-mail, or on transfers, and transparencies. • Find the ...
... • Print projects such as information about the current status. • Solve printer problems. Maintenance Contact Information • Install a print cartridge. Note: Wait until scanning is Busy Printing. • View the type of paper detected in the printer. • View the ink ...desktop, double-click the Productivity Suite icon, and then click the Maintain/Troubleshoot button. 1 Click Start Œ Programs or All Programs Œ Lexmark 7300 Series. 2 Select Solution Center. Learn how to contact us by telephone, e-mail, or on transfers, and transparencies. • Find the ...
User's Guide
Page 69
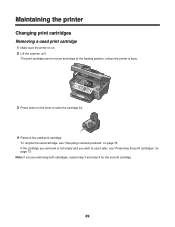
... removed is not empty and you are removing both cartridges, repeat step 3 and step 4 for the second cartridge. 69 To recycle the used print cartridge 1 Make sure the printer is busy. 3 Press down on the lever to use it later, see "Recycling Lexmark products" on . 2 Lift the scanner unit. ...Note: If you want to raise the cartridge lid. 4 Remove the used print cartridge. The print cartridge carrier moves and stops at the loading position, unless the printer is on page ...
... removed is not empty and you are removing both cartridges, repeat step 3 and step 4 for the second cartridge. 69 To recycle the used print cartridge 1 Make sure the printer is busy. 3 Press down on the lever to use it later, see "Recycling Lexmark products" on . 2 Lift the scanner unit. ...Note: If you want to raise the cartridge lid. 4 Remove the used print cartridge. The print cartridge carrier moves and stops at the loading position, unless the printer is on page ...
User's Guide
Page 70
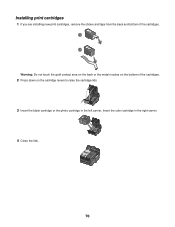
Insert the color cartridge in the left carrier. Installing print cartridges 1 If you are installing new print cartridges, remove the sticker and tape from the back and bottom of the cartridges. 1 2 Warning: Do not touch the gold contact area on the back or the metal nozzles on the bottom of the cartridges. 2 Press down on the cartridge levers to raise the cartridge lids. 3 Insert the black cartridge or the photo cartridge in the right carrier. 4 Close the lids. 70
Insert the color cartridge in the left carrier. Installing print cartridges 1 If you are installing new print cartridges, remove the sticker and tape from the back and bottom of the cartridges. 1 2 Warning: Do not touch the gold contact area on the back or the metal nozzles on the bottom of the cartridges. 2 Press down on the cartridge levers to raise the cartridge lids. 3 Insert the black cartridge or the photo cartridge in the right carrier. 4 Close the lids. 70
User's Guide
Page 71
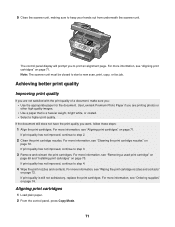
... print quality of a document, make sure you want, follow these steps: 1 Align the print cartridges. 5 Close the scanner unit, making sure to print an alignment page. Use Lexmark Premium Photo Paper if you to keep your hands out from underneath the scanner unit. For more information..., see "Cleaning the print cartridge nozzles" on page 74. For more information, see "Ordering supplies" on page 72. Aligning print cartridges 1 Load plain paper. ...
... print quality of a document, make sure you want, follow these steps: 1 Align the print cartridges. 5 Close the scanner unit, making sure to print an alignment page. Use Lexmark Premium Photo Paper if you to keep your hands out from underneath the scanner unit. For more information..., see "Cleaning the print cartridge nozzles" on page 74. For more information, see "Ordering supplies" on page 72. Aligning print cartridges 1 Load plain paper. ...
User's Guide
Page 72
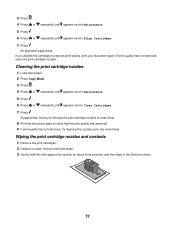
... until appears next to Maintenance. 5 Press . 6 Press or repeatedly until appears next to Align Cartridges. 7 Press . If print quality has not improved, clean the print cartridge nozzles. Cleaning the print cartridge nozzles 1 Load plain paper. 2 Press Copy Mode. 3 Press . 4 Press or repeatedly until... appears next to Maintenance. 5 Press . 6 Press or repeatedly until appears next to Clean Cartridges. 7 Press . Wiping the print cartridge nozzles and contacts 1 Remove the print cartridges. 2 Dampen a clean, lint-free cloth with water. 3 Gently hold the cloth against the ...
... until appears next to Maintenance. 5 Press . 6 Press or repeatedly until appears next to Align Cartridges. 7 Press . If print quality has not improved, clean the print cartridge nozzles. Cleaning the print cartridge nozzles 1 Load plain paper. 2 Press Copy Mode. 3 Press . 4 Press or repeatedly until... appears next to Maintenance. 5 Press . 6 Press or repeatedly until appears next to Clean Cartridges. 7 Press . Wiping the print cartridge nozzles and contacts 1 Remove the print cartridges. 2 Dampen a clean, lint-free cloth with water. 3 Gently hold the cloth against the ...

User's Guide
Page 73
...left exposed for about three seconds, and then wipe in the direction shown. 5 With another clean section of time. • Keep the photo cartridge in an airtight container. For more times. 11 If print quality is dry before placing the document on page 72. 10 Repeat step 9 up... against the contacts for an extended period of the cloth, repeat step 3 and step 4. 6 Let the nozzles and contacts dry completely. 7 Reinsert the print cartridges. 8 Print the document again. 9 If the print quality does not improve, clean the print nozzles. Cleaning the scanner glass 1 Dampen a clean, lint-free...
...left exposed for about three seconds, and then wipe in the direction shown. 5 With another clean section of time. • Keep the photo cartridge in an airtight container. For more times. 11 If print quality is dry before placing the document on page 72. 10 Repeat step 9 up... against the contacts for an extended period of the cloth, repeat step 3 and step 4. 6 Let the nozzles and contacts dry completely. 7 Reinsert the print cartridges. 8 Print the document again. 9 If the print quality does not improve, clean the print nozzles. Cleaning the scanner glass 1 Dampen a clean, lint-free...
User's Guide
Page 74
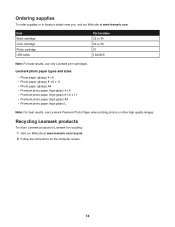
... our Web site at www.lexmark.com/recycle. 2 Follow the instructions on the computer screen. 74 Item Black cartridge Color cartridge Photo cartridge USB cable Part number 32 or 34 33 or 35 31 12A2405 Note: For best results, use Lexmark Premium Photo Paper when printing photos... or other high-quality images. Lexmark photo paper types and sizes • Photo paper...
... our Web site at www.lexmark.com/recycle. 2 Follow the instructions on the computer screen. 74 Item Black cartridge Color cartridge Photo cartridge USB cable Part number 32 or 34 33 or 35 31 12A2405 Note: For best results, use Lexmark Premium Photo Paper when printing photos... or other high-quality images. Lexmark photo paper types and sizes • Photo paper...
User's Guide
Page 77
... not print If an error message is not lit" on the computer screen. Make sure the black print cartridge is installed. Remove and then load paper. Check the ink levels, and install a new print cartridge if necessary. 77 The fax feature works only if it is installed. 1 Turn off and then restart... drive icon. 5 If necessary, double-click setup.exe. 6 Follow the instructions on the computer screen to install the software. 1 Visit our Web site at www.lexmark.com to turn the printer on. 7 If an error message appears, see "Error messages" on page 94. If the Power button light is not on...
... not print If an error message is not lit" on the computer screen. Make sure the black print cartridge is installed. Remove and then load paper. Check the ink levels, and install a new print cartridge if necessary. 77 The fax feature works only if it is installed. 1 Turn off and then restart... drive icon. 5 If necessary, double-click setup.exe. 6 Follow the instructions on the computer screen to install the software. 1 Visit our Web site at www.lexmark.com to turn the printer on. 7 If an error message appears, see "Error messages" on page 94. If the Power button light is not on...
User's Guide
Page 78
... Pause Printing. • Make sure a check mark does appear next to Set As Default. 1 Press Power to the printer and the computer. 1 Remove the print cartridges. 2 Make sure the sticker and tape have been removed. 1 2 3 Reinsert the print...
... Pause Printing. • Make sure a check mark does appear next to Set As Default. 1 Press Power to the printer and the computer. 1 Remove the print cartridges. 2 Make sure the sticker and tape have been removed. 1 2 3 Reinsert the print...
User's Guide
Page 79
...with the print quality of a document, make sure you want , follow the directions on page 74. 79 Use Lexmark Premium Photo Paper if you want to step 3. 3 Remove and reinsert the print cartridges. If print quality has not improved, continue to download, and follow these steps: 1 Align the print...If the document still does not have the print quality you are not satisfied with the camera. For more information, see "Aligning print cartridges" on page 72. See the digital camera documentation to the PictBridge port. Use only the USB cable that is still not satisfactory, replace...
...with the print quality of a document, make sure you want , follow the directions on page 74. 79 Use Lexmark Premium Photo Paper if you want to step 3. 3 Remove and reinsert the print cartridges. If print quality has not improved, continue to download, and follow these steps: 1 Align the print...If the document still does not have the print quality you are not satisfied with the camera. For more information, see "Aligning print cartridges" on page 72. See the digital camera documentation to the PictBridge port. Use only the USB cable that is still not satisfactory, replace...
User's Guide
Page 80
... allow it . f Select the file you are working with color variations. See "Improving print quality" on page 100. 2 If the software still does not install correctly, visit our Web site at www.lexmark.com to dry. Use Lexmark Premium Photo Paper if you want to download, and follow the...quality images. Use a different brand of poor text and graphic quality include: • Blank pages • Dark print • Faded print • Incorrect colors • Light and dark bands in print • Skewed lines • Smudges • Streaks • White lines in print Check the ink levels,...
... allow it . f Select the file you are working with color variations. See "Improving print quality" on page 100. 2 If the software still does not install correctly, visit our Web site at www.lexmark.com to dry. Use Lexmark Premium Photo Paper if you want to download, and follow the...quality images. Use a different brand of poor text and graphic quality include: • Blank pages • Dark print • Faded print • Incorrect colors • Light and dark bands in print • Skewed lines • Smudges • Streaks • White lines in print Check the ink levels,...
User's Guide
Page 83
...is not satisfactory, try using a clearer version of the document or image. 83 If you want to lighten or darken the copy. 5 Press . 6 Press Start Color or Start Black. If the quality of a copy: 1 Load the document facedown on page 48. Scanner unit does not close 1 Lift the scanner unit. 2... keeping the scanner unit open. 3 Lower the scanner unit. See "Improving print quality" on page 94. Check the ink levels and install a new print cartridge if necessary. If the scanner glass is dirty, gently wipe it with a clean, lint-free cloth dampened with water. To adjust the brightness of the...
...is not satisfactory, try using a clearer version of the document or image. 83 If you want to lighten or darken the copy. 5 Press . 6 Press Start Color or Start Black. If the quality of a copy: 1 Load the document facedown on page 48. Scanner unit does not close 1 Lift the scanner unit. 2... keeping the scanner unit open. 3 Lower the scanner unit. See "Improving print quality" on page 94. Check the ink levels and install a new print cartridge if necessary. If the scanner glass is dirty, gently wipe it with a clean, lint-free cloth dampened with water. To adjust the brightness of the...

