
User's Guide
Page 6
... 89 Despeckling a photo ...89 Changing the Brightness / Contrast settings of a photo 90 Applying a color effect to a photo ...90 Changing the Exposure setting of a photo 90 Removing wavy patterns from scanned photos, magazines, or newspapers 90 Printing photos...91 Printing photos from a CD or removable storage device... control printing photos 95 Printing photos from a digital camera using DPOF 96 Printing photos by date range...96 Printing photos using color effects...96 Creating and viewing a slideshow...97 Copying...98 Understanding the Copy menu...98 Copying on both sides of the paper ...
... 89 Despeckling a photo ...89 Changing the Brightness / Contrast settings of a photo 90 Applying a color effect to a photo ...90 Changing the Exposure setting of a photo 90 Removing wavy patterns from scanned photos, magazines, or newspapers 90 Printing photos...91 Printing photos from a CD or removable storage device... control printing photos 95 Printing photos from a digital camera using DPOF 96 Printing photos by date range...96 Printing photos using color effects...96 Creating and viewing a slideshow...97 Copying...98 Understanding the Copy menu...98 Copying on both sides of the paper ...
User's Guide
Page 7
... the computer 108 Understanding the Scan menu...108 Scanning to a computer over a network 109 Saving a scanned image on the computer 109 Scanning clear images from magazines or newspapers 110 Changing the Productivity Studio scan settings 110 Adding a file to an e-mail message 111 Adding a new scanned image to an e-mail message 111 Scanning documents or images for...
... the computer 108 Understanding the Scan menu...108 Scanning to a computer over a network 109 Saving a scanned image on the computer 109 Scanning clear images from magazines or newspapers 110 Changing the Productivity Studio scan settings 110 Adding a file to an e-mail message 111 Adding a new scanned image to an e-mail message 111 Scanning documents or images for...
User's Guide
Page 9
...down too quickly ...159 A blank or incorrect page prints...159 Characters on printout are missing or unexpected 159 Colors on printout are faded or differ from colors on the screen 160 Glossy photo paper or transparencies stick together 160 Page prints with different fonts ...160 Print...cannot communicate with computers over peer-to-peer network 168 Printer is not able to communicate with the computer 169 Problems when copying, scanning, or faxing 169 Wrong printer is attached ...170 Updating the printer software ...170 Bidirectional communication is not established 170 Experiencing poor ...
...down too quickly ...159 A blank or incorrect page prints...159 Characters on printout are missing or unexpected 159 Colors on printout are faded or differ from colors on the screen 160 Glossy photo paper or transparencies stick together 160 Page prints with different fonts ...160 Print...cannot communicate with computers over peer-to-peer network 168 Printer is not able to communicate with the computer 169 Problems when copying, scanning, or faxing 169 Wrong printer is attached ...170 Updating the printer software ...170 Bidirectional communication is not established 170 Experiencing poor ...
User's Guide
Page 10
... copies ...180 Copied item does not match the original item 180 Scan troubleshooting...180 Scanner does not respond ...180 Scan was not successful ...181 Scanning takes too long or freezes the computer 181 Poor scanned image quality ...182 Partial document or photo scans ...182 Cannot scan to a computer over a network 182 Fax troubleshooting...183 Cannot send...
... copies ...180 Copied item does not match the original item 180 Scan troubleshooting...180 Scanner does not respond ...180 Scan was not successful ...181 Scanning takes too long or freezes the computer 181 Poor scanned image quality ...182 Partial document or photo scans ...182 Cannot scan to a computer over a network 182 Fax troubleshooting...183 Cannot send...
User's Guide
Page 14
...). 2 Double-click the printer Help icon. 4 Click Yes. your printer) Note: If necessary, click ŒAll Programs Œ • Troubleshooting problems with photos Lexmark 6500 Series. • Scanning (if supported by your printer) 3 Click User's Guide. • Making copies (if supported by your printer) If the link to the User's Guide is...
...). 2 Double-click the printer Help icon. 4 Click Yes. your printer) Note: If necessary, click ŒAll Programs Œ • Troubleshooting problems with photos Lexmark 6500 Series. • Scanning (if supported by your printer) 3 Click User's Guide. • Making copies (if supported by your printer) If the link to the User's Guide is...
User's Guide
Page 18
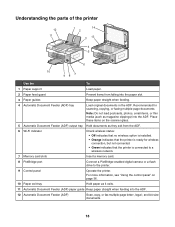
... Hold paper as it exits. 11 Automatic Document Feeder (ADF) paper guide Keep paper straight when feeding into the ADF. 12 Automatic Document Feeder (ADF) Scan, copy, or fax multiple-page letter-, legal-, and A4-size documents. 18 For more information, see "Using the control panel" on the scanner glass. 5 Automatic... ADF. 6 Wi-Fi indicator Check wireless status: • Off indicates that no wireless option is installed. • Orange indicates that the printer is ready for scanning, copying, or faxing multiple-page documents.
... Hold paper as it exits. 11 Automatic Document Feeder (ADF) paper guide Keep paper straight when feeding into the ADF. 12 Automatic Document Feeder (ADF) Scan, copy, or fax multiple-page letter-, legal-, and A4-size documents. 18 For more information, see "Using the control panel" on the scanner glass. 5 Automatic... ADF. 6 Wi-Fi indicator Check wireless status: • Off indicates that no wireless option is installed. • Orange indicates that the printer is ready for scanning, copying, or faxing multiple-page documents.
User's Guide
Page 37
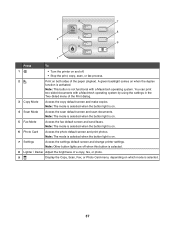
...Note: The mode is selected when the button light is activated. Note: Other button lights are off . • Stop the print, copy, scan, or fax process. 2 Print on both sides of the Print dialog. 3 Copy Mode Access the copy default screen and make copies. Note: ... (duplex). You can print two-sided documents with a Macintosh operating system. Note: The mode is selected when the button light is on. 4 Scan Mode Access the scan default screen and scan documents. 3 7 A4 8 2 5 9 6 1 Press To 1 • Turn the printer on and off when this button is selected. 8 ...
...Note: The mode is selected when the button light is activated. Note: Other button lights are off . • Stop the print, copy, scan, or fax process. 2 Print on both sides of the Print dialog. 3 Copy Mode Access the copy default screen and make copies. Note: ... (duplex). You can print two-sided documents with a Macintosh operating system. Note: The mode is selected when the button light is on. 4 Scan Mode Access the scan default screen and scan documents. 3 7 A4 8 2 5 9 6 1 Press To 1 • Turn the printer on and off when this button is selected. 8 ...

User's Guide
Page 38
... paper. 4 • Increase a number. • Enter a space between letters or numbers. • Scroll through menus, submenus, or settings on the display. 5 • Cancel a print, copy, scan, or fax job in progress. • Clear a fax number or end a fax transmission and return to the fax default screen. • Exit a menu or submenu...
... paper. 4 • Increase a number. • Enter a space between letters or numbers. • Scroll through menus, submenus, or settings on the display. 5 • Cancel a print, copy, scan, or fax job in progress. • Clear a fax number or end a fax transmission and return to the fax default screen. • Exit a menu or submenu...

User's Guide
Page 39
... you have already begun entering the number. 4 Phone Book Access any of the programmed Speed Dial numbers (1-89) or Group Dial numbers (90-99). 5 Start Color Start a color copy, scan, fax, or photo print job, depending on which mode is selected. 6 Start Black Start a black-and-white copy..., scan, fax, or photo print job, depending on which mode is turned off the power but will return to the default settings when a memory card or ...
... you have already begun entering the number. 4 Phone Book Access any of the programmed Speed Dial numbers (1-89) or Group Dial numbers (90-99). 5 Start Color Start a color copy, scan, fax, or photo print job, depending on which mode is selected. 6 Start Black Start a black-and-white copy..., scan, fax, or photo print job, depending on which mode is turned off the power but will return to the default settings when a memory card or ...
User's Guide
Page 44
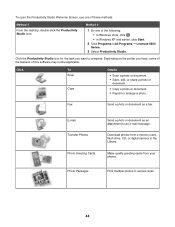
Click To Scan Copy Details • Scan a photo or document. • Save, edit, or share a photo or document. • Copy a photo or document. • Reprint or enlarge a photo. Photo Packages Print multiple ... Welcome Screen, use one of the following: • In Windows Vista, click . • In Windows XP and earlier, click Start. 2 Click Programs orAll Programs Œ Lexmark 6500 Series. 3 Select Productivity Studio. Click the Productivity Studio icon for the task you have, some of the features of this software may not be...
Click To Scan Copy Details • Scan a photo or document. • Save, edit, or share a photo or document. • Copy a photo or document. • Reprint or enlarge a photo. Photo Packages Print multiple ... Welcome Screen, use one of the following: • In Windows Vista, click . • In Windows XP and earlier, click Start. 2 Click Programs orAll Programs Œ Lexmark 6500 Series. 3 Select Productivity Studio. Click the Productivity Studio icon for the task you have, some of the features of this software may not be...

User's Guide
Page 45
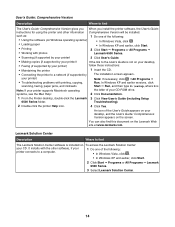
... Order print cartridges. • Find maintenance information. • Select other Solution Center tabs for more information, including how to change printer settings and troubleshooting. Print, scan, copy, and fax. - At the bottom left corner of the following methods. Click To Poster Details Print a photo as printing photos, troubleshooting printing problems, installing... To open . 1 Do one of the following : • In Windows Vista, click . • In Windows XP and earlier, click Start. 2 Click Programs orAll Programs Œ Lexmark 6500 Series. 3 Select Solution Center.
... Order print cartridges. • Find maintenance information. • Select other Solution Center tabs for more information, including how to change printer settings and troubleshooting. Print, scan, copy, and fax. - At the bottom left corner of the following methods. Click To Poster Details Print a photo as printing photos, troubleshooting printing problems, installing... To open . 1 Do one of the following : • In Windows Vista, click . • In Windows XP and earlier, click Start. 2 Click Programs orAll Programs Œ Lexmark 6500 Series. 3 Select Solution Center.
User's Guide
Page 46
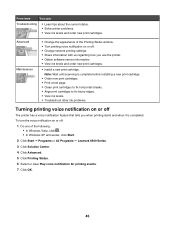
...: • In Windows Vista, click . • In Windows XP and earlier, click Start. 2 Click Start Œ Programs or All Programs Œ Lexmark 6500 Series. 3 Click Solution Center. 4 Click Advanced. 5 Click Printing Status. 6 Select or clear Play voice notification for printing events. 7 Click OK. ...46 Note: Wait until scanning is completed. To turn the voice notification on or off : 1 Do one of the Printing Status window. • Turn printing voice notification on ...
...: • In Windows Vista, click . • In Windows XP and earlier, click Start. 2 Click Start Œ Programs or All Programs Œ Lexmark 6500 Series. 3 Click Solution Center. 4 Click Advanced. 5 Click Printing Status. 6 Select or clear Play voice notification for printing events. 7 Click OK. ...46 Note: Wait until scanning is completed. To turn the voice notification on or off : 1 Do one of the Printing Status window. • Turn printing voice notification on ...
User's Guide
Page 63
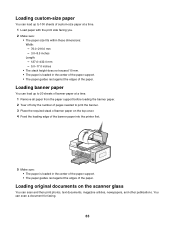
You can scan and then print photos, text documents, magazine articles, newspapers, and other publications. Loading original documents on the top cover. 4 Feed the leading edge of the ... paper. Loading banner paper You can load up to print the banner. 3 Place the required stack of banner paper on the scanner glass You can scan a document for faxing. 63
You can scan and then print photos, text documents, magazine articles, newspapers, and other publications. Loading original documents on the top cover. 4 Feed the leading edge of the ... paper. Loading banner paper You can load up to print the banner. 3 Place the required stack of banner paper on the scanner glass You can scan a document for faxing. 63
User's Guide
Page 64
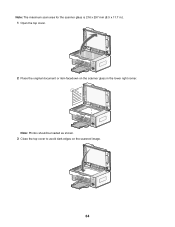
Note: The maximum scan area for the scanner glass is 216 x 297 mm (8.5 x 11.7 in the lower right corner. Note: Photos should be loaded as shown. 3 Close the top cover to avoid dark edges on the scanner glass in .). 1 Open the top cover. 2 Place the original document or item facedown on the scanned image. 64
Note: The maximum scan area for the scanner glass is 216 x 297 mm (8.5 x 11.7 in the lower right corner. Note: Photos should be loaded as shown. 3 Close the top cover to avoid dark edges on the scanner glass in .). 1 Open the top cover. 2 Place the original document or item facedown on the scanned image. 64

User's Guide
Page 65
... glass. 2 Adjust the paper guide on the Automatic Document Feeder tray against the edge of an original document into the Automatic Document Feeder tray for scanning, copying, and faxing. Automatic Document Feeder paper capacity Load up to 25 sheets of the paper. 65 Loading original documents into the Automatic Document Feeder...
... glass. 2 Adjust the paper guide on the Automatic Document Feeder tray against the edge of an original document into the Automatic Document Feeder tray for scanning, copying, and faxing. Automatic Document Feeder paper capacity Load up to 25 sheets of the paper. 65 Loading original documents into the Automatic Document Feeder...
User's Guide
Page 72
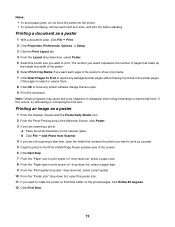
.... Printing an image as a poster. 5 Drag the photo to the Print a Multi-Page Poster preview area of the Welcome Screen, click Poster. 3 If you are scanning a photo: a Place the photo facedown on the scanner glass. Printing a document as it exits, and let it fits better on " drop-down list, select a paper... on the printed pages, click Rotate 90 degrees. 12 Click Print Now. 72 The number you select represents the number of pages that are not scanning a new item, open . 9 Print the document. If this occurs, try decreasing or increasing the font size.
.... Printing an image as a poster. 5 Drag the photo to the Print a Multi-Page Poster preview area of the Welcome Screen, click Poster. 3 If you are scanning a photo: a Place the photo facedown on the scanner glass. Printing a document as it exits, and let it fits better on " drop-down list, select a paper... on the printed pages, click Rotate 90 degrees. 12 Click Print Now. 72 The number you select represents the number of pages that are not scanning a new item, open . 9 Print the document. If this occurs, try decreasing or increasing the font size.

User's Guide
Page 80
Menu item Action Proof Sheet Print and then scan a proof sheet: • for all photos on the display ... needed. 5 If necessary, press repeatedly to return to the previous menus and make other setting selections. 6 Press Start Color or Start Black. Save Photos • Save photos stored on a memory card or flash drive to the computer. &#...time. Layout1 Select borderless or bordered, center one photo on a page. Photo Effects1 Apply automatic image enhancement or color effects to a flash drive. Paper Setup1, 2 Specify the size and type of photos to factory default setting ...
Menu item Action Proof Sheet Print and then scan a proof sheet: • for all photos on the display ... needed. 5 If necessary, press repeatedly to return to the previous menus and make other setting selections. 6 Press Start Color or Start Black. Save Photos • Save photos stored on a memory card or flash drive to the computer. &#...time. Layout1 Select borderless or bordered, center one photo on a page. Photo Effects1 Apply automatic image enhancement or color effects to a flash drive. Paper Setup1, 2 Specify the size and type of photos to factory default setting ...
User's Guide
Page 90
..., click the check box, and then move the slider to edit. 2 With an image open, click the Enhancements tab. 3 Click Color Effects. 4 Apply a color effect. Note: You can select sepia, antique brown, black and white, or antique grey. 5 Click OK. You can let the ... click Cancel to select the image you correct lighting irregularities in your image. Removing wavy patterns from scanned photos, magazines, or newspapers Descreening helps to remove wavy (moire) patterns from images scanned from magazines or newspapers, click Remove Patterns. 5 From the drop-down list, select the patterns ...
..., click the check box, and then move the slider to edit. 2 With an image open, click the Enhancements tab. 3 Click Color Effects. 4 Apply a color effect. Note: You can select sepia, antique brown, black and white, or antique grey. 5 Click OK. You can let the ... click Cancel to select the image you correct lighting irregularities in your image. Removing wavy patterns from scanned photos, magazines, or newspapers Descreening helps to remove wavy (moire) patterns from images scanned from magazines or newspapers, click Remove Patterns. 5 From the drop-down list, select the patterns ...

User's Guide
Page 93
...photos to print. 3 Press or repeatedly until Print Photos appears. 4 Press . 5 Press or repeatedly until Print All Photos appears. 6 Press Start Color or Start Black. One or more proof sheets print. 10 Follow the instructions on the memory device using the proof sheet 1 Load plain letter- or... photos you want to print. 3 Press or repeatedly until Proof Sheet appears. 4 Press . 5 Press or repeatedly until Scan Proof Sheet appears. 13 Press . 14 Press Start Color or Start Black to print. Note: When making selections, make sure you completely fill in the circles. 11 Load the ...
...photos to print. 3 Press or repeatedly until Print Photos appears. 4 Press . 5 Press or repeatedly until Print All Photos appears. 6 Press Start Color or Start Black. One or more proof sheets print. 10 Follow the instructions on the memory device using the proof sheet 1 Load plain letter- or... photos you want to print. 3 Press or repeatedly until Proof Sheet appears. 4 Press . 5 Press or repeatedly until Scan Proof Sheet appears. 13 Press . 14 Press Start Color or Start Black to print. Note: When making selections, make sure you completely fill in the circles. 11 Load the ...

User's Guide
Page 99
...4 From the control panel, press Copy Mode. 5 Adjust the copy settings. The printer scans the next page-or the other side facedown on the scanner glass, and then press . Note: If you want to... Scan another page?, press to save your settings temporarily. 99 Copying on both sides of the paper...menu item 2-Sided 6 Press to choose Yes. 9 Place the next page facedown on the scanner glass. The printer scans the first page of the original document. Note: You can load up to save your settings temporarily. 7 Press ....
...4 From the control panel, press Copy Mode. 5 Adjust the copy settings. The printer scans the next page-or the other side facedown on the scanner glass, and then press . Note: If you want to... Scan another page?, press to save your settings temporarily. 99 Copying on both sides of the paper...menu item 2-Sided 6 Press to choose Yes. 9 Place the next page facedown on the scanner glass. The printer scans the first page of the original document. Note: You can load up to save your settings temporarily. 7 Press ....


