Setup Sheet
Page 1
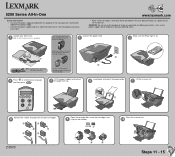
... . 3 Before you continue, remove the photo cartridge from the print cartridges. 8 Open the cartridge lids, insert the cartridges, and 9 snap the lids closed. Load paper and adjust the paper guide. 6 Lift the scanner unit. 7 Remove the sticker and tape from the print cartridge storage unit. Your All-In-One may need to a professional service person. Lift the paper support and extend 5 the paper exit tray. Reminder: Save the print cartridge storage unit to protect unused cartridges. 4 Press to scroll...
... . 3 Before you continue, remove the photo cartridge from the print cartridges. 8 Open the cartridge lids, insert the cartridges, and 9 snap the lids closed. Load paper and adjust the paper guide. 6 Lift the scanner unit. 7 Remove the sticker and tape from the print cartridge storage unit. Your All-In-One may need to a professional service person. Lift the paper support and extend 5 the paper exit tray. Reminder: Save the print cartridge storage unit to protect unused cartridges. 4 Press to scroll...
Setup Sheet
Page 2
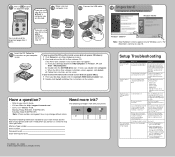
... the instructions on the All-In-One, and then into the connector on the screen. If you are using . Windows 98/Me You may change without a computer, you are finished. b Double-click the CD-ROM drive icon. Reconnect the power cord by pushing it ready when you faster: Machine Type number Serial number Date purchased Store where purchased The following cartridges work with your User's Guide. Connect the USB cable. 13...
... the instructions on the All-In-One, and then into the connector on the screen. If you are using . Windows 98/Me You may change without a computer, you are finished. b Double-click the CD-ROM drive icon. Reconnect the power cord by pushing it ready when you faster: Machine Type number Serial number Date purchased Store where purchased The following cartridges work with your User's Guide. Connect the USB cable. 13...

