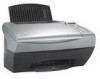
X5150 All-In-One Series User's Guide
Page 4
Maintenance 38 Replacing the print cartridges 38 Aligning the print cartridges 42 Cleaning the print cartridge nozzles 42 Wiping the print cartridge nozzles and contacts 44 Preserving the print cartridges 45 Ordering supplies 45 Troubleshooting 46 Setup troubleshooting 46 General troubleshooting 46 Other help sources 65 Notices 66 Statement of Limited Warranty 68 Index 70 iv
Maintenance 38 Replacing the print cartridges 38 Aligning the print cartridges 42 Cleaning the print cartridge nozzles 42 Wiping the print cartridge nozzles and contacts 44 Preserving the print cartridges 45 Ordering supplies 45 Troubleshooting 46 Setup troubleshooting 46 General troubleshooting 46 Other help sources 65 Notices 66 Statement of Limited Warranty 68 Index 70 iv

X5150 All-In-One Series User's Guide
Page 7
... paper feeds correctly into the All-In-One. Load paper in the All-In-One. Supply power to change cartridges, unlock the scanner, or lock the scanner. • Change cartridges. • Unlock the scanner. • Lock the scanner. Keep the scanner unit open to the All-In-One. Understanding the operator panel The operator panel...
... paper feeds correctly into the All-In-One. Load paper in the All-In-One. Supply power to change cartridges, unlock the scanner, or lock the scanner. • Change cartridges. • Unlock the scanner. • Lock the scanner. Keep the scanner unit open to the All-In-One. Understanding the operator panel The operator panel...
X5150 All-In-One Series User's Guide
Page 11
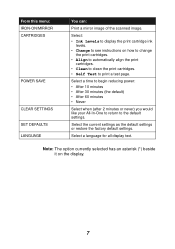
Select a language for all display text. Select: • Ink Levels to display the print cartridge ink levels. • Change to see instructions on the display. 7 Select the current settings as the default settings or restore the factory default settings. Select a ... default) • After 60 minutes • Never Select when (after 2 minutes or never) you would like your All-In-One to return to print a test page. From this menu: IRON-ON/MIRROR CARTRIDGES POWER SAVE CLEAR SETTINGS SET DEFAULTS LANGUAGE You can: Print a mirror image of the scanned image. Note: The option...
Select a language for all display text. Select: • Ink Levels to display the print cartridge ink levels. • Change to see instructions on the display. 7 Select the current settings as the default settings or restore the factory default settings. Select a ... default) • After 60 minutes • Never Select when (after 2 minutes or never) you would like your All-In-One to return to print a test page. From this menu: IRON-ON/MIRROR CARTRIDGES POWER SAVE CLEAR SETTINGS SET DEFAULTS LANGUAGE You can: Print a mirror image of the scanned image. Note: The option...
X5150 All-In-One Series User's Guide
Page 16
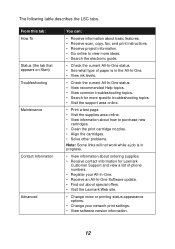
... print cartridge nozzles. • Align the cartridges. • Solve other problems. Note: Some links will not work while a job is in progress. • View information about ordering supplies. • Receive contact information for Lexmark Customer Support and view a list of phone numbers. • Register your All-In-One. • Receive an All-In-One Software...
... print cartridge nozzles. • Align the cartridges. • Solve other problems. Note: Some links will not work while a job is in progress. • View information about ordering supplies. • Receive contact information for Lexmark Customer Support and view a list of phone numbers. • Register your All-In-One. • Receive an All-In-One Software...

X5150 All-In-One Series User's Guide
Page 42
The print cartridge carrier moves and stops at the loading position unless the All-In-One is on. 2 Lift the scanner unit until the scanner support keeps it open. Maintenance Replacing the print cartridges The Lexmark X5100 Series uses the following cartridges: Item: Black cartridge Color cartridge Part number: 82 83 or 88 Note: For information about ordering supplies, see page 45. 1 Make sure the All-In-One is busy. 38
The print cartridge carrier moves and stops at the loading position unless the All-In-One is on. 2 Lift the scanner unit until the scanner support keeps it open. Maintenance Replacing the print cartridges The Lexmark X5100 Series uses the following cartridges: Item: Black cartridge Color cartridge Part number: 82 83 or 88 Note: For information about ordering supplies, see page 45. 1 Make sure the All-In-One is busy. 38

X5150 All-In-One Series User's Guide
Page 43
3 Squeeze the tabs on the cartridges. 39 Warning: Do NOT touch the gold contact area on the cartridge lids, and then lift the lids. 4 Remove the old cartridges. Store them in an air-tight container or dispose of them. 5 If you are installing new cartridges, remove the foam, stickers, and transparent tape from the bottom of the cartridges.
3 Squeeze the tabs on the cartridges. 39 Warning: Do NOT touch the gold contact area on the cartridge lids, and then lift the lids. 4 Remove the old cartridges. Store them in an air-tight container or dispose of them. 5 If you are installing new cartridges, remove the foam, stickers, and transparent tape from the bottom of the cartridges.

X5150 All-In-One Series User's Guide
Page 44
6 Insert the new cartridges, and then snap the lids closed. 7 Lift the scanner unit and push the scanner support back while lowering the scanner unit until it is completely closed. 40
6 Insert the new cartridges, and then snap the lids closed. 7 Lift the scanner unit and push the scanner support back while lowering the scanner unit until it is completely closed. 40
X5150 All-In-One Series User's Guide
Page 45
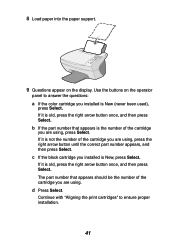
...button once, and then press Select. The part number that appears is the number of the cartridge you are using . Continue with "Aligning the print cartridges" to answer the questions: a If the color cartridge you installed is New (never been used), press Select. b If the part number that ...appears should be the number of the cartridge you are using , press the right arrow button until the ...
...button once, and then press Select. The part number that appears is the number of the cartridge you are using . Continue with "Aligning the print cartridges" to answer the questions: a If the color cartridge you installed is New (never been used), press Select. b If the part number that ...appears should be the number of the cartridge you are using , press the right arrow button until the ...
X5150 All-In-One Series User's Guide
Page 46
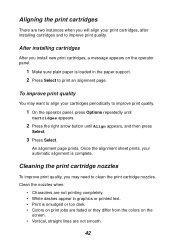
... smooth. 42 After installing cartridges After you install new print cartridges, a message appears on the screen. • Vertical, straight lines are two instances when you may want to align your automatic alignment is loaded in graphics or printed text. • Print is smudged or too dark. • Colors on print jobs are faded...
... smooth. 42 After installing cartridges After you install new print cartridges, a message appears on the screen. • Vertical, straight lines are two instances when you may want to align your automatic alignment is loaded in graphics or printed text. • Print is smudged or too dark. • Colors on print jobs are faded...
X5150 All-In-One Series User's Guide
Page 47
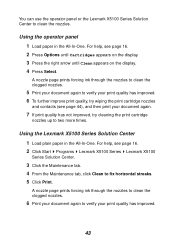
...For help , see page 16. 2 Press Options until Cartridges appears on the display. 3 Press the right arrow until Clean appears on the display. 4 Press Select. Using the Lexmark X5100 Series Solution Center 1 Load plain paper in the All-In-One. Using the operator panel 1 Load paper in the All... your print quality has improved. 6 To further improve print quality, try cleaning the print cartridge nozzles up to fix horizontal streaks. 5 Click Print. You can use the operator panel or the Lexmark X5100 Series Solution Center to verify your document again. 7 If print quality has not improved...
...For help , see page 16. 2 Press Options until Cartridges appears on the display. 3 Press the right arrow until Clean appears on the display. 4 Press Select. Using the Lexmark X5100 Series Solution Center 1 Load plain paper in the All-In-One. Using the operator panel 1 Load paper in the All... your print quality has improved. 6 To further improve print quality, try cleaning the print cartridge nozzles up to fix horizontal streaks. 5 Click Print. You can use the operator panel or the Lexmark X5100 Series Solution Center to verify your document again. 7 If print quality has not improved...

X5150 All-In-One Series User's Guide
Page 48
... (this prevents the colors in one direction. Contacts 44 For help, see page 44), and then print your document again. 8 If print quality has not improved, try cleaning the print cartridge nozzles up to two more times. Gently blot and wipe dry in the color cartridge from mixing). 7 To further improve print quality, try wiping...
... (this prevents the colors in one direction. Contacts 44 For help, see page 44), and then print your document again. 8 If print quality has not improved, try cleaning the print cartridge nozzles up to two more times. Gently blot and wipe dry in the color cartridge from mixing). 7 To further improve print quality, try wiping...
X5150 All-In-One Series User's Guide
Page 49
... you are ready to install it. • Do not remove a print cartridge from the All-In-One except to the All-In-One. Lexmark does not recommend use Lexmark supplies. Item: Black cartridge Color cartridge USB cable Part number: 82 83 or 88 12A2405 45 Lexmark's All-In-One warranty does not cover repair of failures or damage caused by...
... you are ready to install it. • Do not remove a print cartridge from the All-In-One except to the All-In-One. Lexmark does not recommend use Lexmark supplies. Item: Black cartridge Color cartridge USB cable Part number: 82 83 or 88 12A2405 45 Lexmark's All-In-One warranty does not cover repair of failures or damage caused by...
X5150 All-In-One Series User's Guide
Page 51
...and foam from the bottom of the print cartridges. To purchase a USB cable, part number 12A2405, visit the Lexmark Web site at www.lexmark.com. • Both your computer and your All-In-One are on. • The Lexmark X5100 Series is set as your All-In-One and an electrical outlet. For help , see... page 38. For help installing the cartridges, see page 39. • ...
...and foam from the bottom of the print cartridges. To purchase a USB cable, part number 12A2405, visit the Lexmark Web site at www.lexmark.com. • Both your computer and your All-In-One are on. • The Lexmark X5100 Series is set as your All-In-One and an electrical outlet. For help , see... page 38. For help installing the cartridges, see page 39. • ...

X5150 All-In-One Series User's Guide
Page 53
... paper feeds without problems, make sure your document is the default fax driver in Print Properties. To check All-In-One status: 1 Click Start Settings Printers. 2 Double-click the Lexmark X5100 Series icon, and then click Printer. 3 Make sure no check mark appears next to make sure: •...before you want to use an envelope size supported by the All-In-One and select that size before stacking. • Use a transparency or photo paper designed for an inkjet printer. Document does not print • Make sure the cartridges are not supported. For help , see page 51. • The...
... paper feeds without problems, make sure your document is the default fax driver in Print Properties. To check All-In-One status: 1 Click Start Settings Printers. 2 Double-click the Lexmark X5100 Series icon, and then click Printer. 3 Make sure no check mark appears next to make sure: •...before you want to use an envelope size supported by the All-In-One and select that size before stacking. • Use a transparency or photo paper designed for an inkjet printer. Document does not print • Make sure the cartridges are not supported. For help , see page 51. • The...

X5150 All-In-One Series User's Guide
Page 55
...8226; Clean the nozzles. Note: Make sure all paper sizes except A4 - 3.37 mm (0.133 in.) each for A4 size paper 51 • Test the cartridge alignment. Characters are clean. Use these minimum settings: • Left and right margins: - 6.35 mm (0.25 in.) each for all ink or corrective fluid on... regular paper, select the Quick Copy setting from the Document/Quality tab of Print Properties, Preferences, or from the All-In-One Center. • The paper is dry before handling the paper. • You select the correct paper type and size in the extreme left, ...
...8226; Clean the nozzles. Note: Make sure all paper sizes except A4 - 3.37 mm (0.133 in.) each for A4 size paper 51 • Test the cartridge alignment. Characters are clean. Use these minimum settings: • Left and right margins: - 6.35 mm (0.25 in.) each for all ink or corrective fluid on... regular paper, select the Quick Copy setting from the Document/Quality tab of Print Properties, Preferences, or from the All-In-One Center. • The paper is dry before handling the paper. • You select the correct paper type and size in the extreme left, ...
X5150 All-In-One Series User's Guide
Page 56
... To check the ink level in the color cartridge choose Color Ink. 5 Press Stop/Clear to return to Normal quality. • Top margin: 1.7 mm (0.067 in.) • Bottom margin: 16.51 mm (0.65 in.) Colors are faded or not printing completely • Use a different color setting. • Use a different brand... To check the ink levels from the Lexmark Solution Center, see page 11. To check the ink levels from the operator panel: 1 Press Options until Cartridges appears on the display. 2 Press the right arrow button until Language appears on the All-In-One display is not the language you prefer...
... To check the ink level in the color cartridge choose Color Ink. 5 Press Stop/Clear to return to Normal quality. • Top margin: 1.7 mm (0.067 in.) • Bottom margin: 16.51 mm (0.65 in.) Colors are faded or not printing completely • Use a different color setting. • Use a different brand... To check the ink levels from the Lexmark Solution Center, see page 11. To check the ink levels from the operator panel: 1 Press Options until Cartridges appears on the display. 2 Press the right arrow button until Language appears on the All-In-One display is not the language you prefer...
X5150 All-In-One Series User's Guide
Page 61
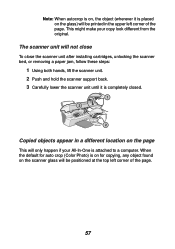
The scanner unit will not close To close the scanner unit after installing cartridges, unlocking the scanner bed, or removing a paper jam, follow these steps: 1 Using both hands, lift the scanner unit. 2 Push and hold the scanner support back. 3 ...) will only happen if your copy look different from the original. Note: When autocrop is on, the object (wherever it is on for auto crop (Color Photo) is completely closed. Copied objects appear in the upper left corner of the page. This might make your All-In...
The scanner unit will not close To close the scanner unit after installing cartridges, unlocking the scanner bed, or removing a paper jam, follow these steps: 1 Using both hands, lift the scanner unit. 2 Push and hold the scanner support back. 3 ...) will only happen if your copy look different from the original. Note: When autocrop is on, the object (wherever it is on for auto crop (Color Photo) is completely closed. Copied objects appear in the upper left corner of the page. This might make your All-In...
X5150 All-In-One Series User's Guide
Page 63
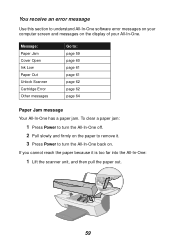
... Open Ink Low Paper Out Unlock Scanner Cartridge Error Other messages Go to turn the All-In-One off. 2 Pull slowly and firmly on the display of your computer screen and messages on the paper to remove it is too far into the All-In-One: 1 Lift the scanner unit, and then pull... Power to : page 59 page 60 page 61 page 61 page 62 page 62 page 64 Paper Jam message Your All-In-One has a paper jam. To clear a paper jam: 1 Press Power to turn the All-In-One back on. You receive an error message Use this section to understand All-In...
... Open Ink Low Paper Out Unlock Scanner Cartridge Error Other messages Go to turn the All-In-One off. 2 Pull slowly and firmly on the display of your computer screen and messages on the paper to remove it is too far into the All-In-One: 1 Lift the scanner unit, and then pull... Power to : page 59 page 60 page 61 page 61 page 62 page 62 page 64 Paper Jam message Your All-In-One has a paper jam. To clear a paper jam: 1 Press Power to turn the All-In-One back on. You receive an error message Use this section to understand All-In...
X5150 All-In-One Series User's Guide
Page 65
...panel: An Ink Low message (Color Ink Low, Black Ink Low, or both of these messages appears, you from the Lexmark Web site at www.lexmark.com. Ordering supplies, see page 38. - Installing a new cartridge, see page 45. For help : - Paper Out message Your All-In-One is 25% full or less.... to print. For help . 61 Installing a new cartridge, see page 59 for help ,...
...panel: An Ink Low message (Color Ink Low, Black Ink Low, or both of these messages appears, you from the Lexmark Web site at www.lexmark.com. Ordering supplies, see page 38. - Installing a new cartridge, see page 45. For help : - Paper Out message Your All-In-One is 25% full or less.... to print. For help . 61 Installing a new cartridge, see page 59 for help ,...
X5150 All-In-One Series User's Guide
Page 66
... page 38. • Order cartridges, see page 2. 3 Pull the scanner lock toward you to unlock the scanner. 4 Using both hands to lift the scanner unit until it open. To unlock it: 1 Press Power to turn the All-In-One off. 2 Use both hands, lift the scanner unit. 5 Push and hold the scanner... support back. 6 Lower the scanner unit until the scanner support holds it is completely closed. 7 Press Power to turn the All-In-One back on. Unlock Scanner message The scanner is the scanner lock. To the left and beside the scanner support is locked.
... page 38. • Order cartridges, see page 2. 3 Pull the scanner lock toward you to unlock the scanner. 4 Using both hands to lift the scanner unit until it open. To unlock it: 1 Press Power to turn the All-In-One off. 2 Use both hands, lift the scanner unit. 5 Push and hold the scanner... support back. 6 Lower the scanner unit until the scanner support holds it is completely closed. 7 Press Power to turn the All-In-One back on. Unlock Scanner message The scanner is the scanner lock. To the left and beside the scanner support is locked.

