
User's Guide
Page 2
... • Windows users-See the User's Guide. • Macintosh users-If your product supports Macintosh, see the Mac Help installed with the use of other than those described in the user documentation, to a professional service person. The safety features of specific Lexmark components. Connect ...to meet strict global safety standards with the printer software. Operating system notice All features and functions are operating system-dependent. Lexmark is near the product and easily accessible. CAUTION: Do not set up this product or the manufacturer's authorized replacement power ...
... • Windows users-See the User's Guide. • Macintosh users-If your product supports Macintosh, see the Mac Help installed with the use of other than those described in the user documentation, to a professional service person. The safety features of specific Lexmark components. Connect ...to meet strict global safety standards with the printer software. Operating system notice All features and functions are operating system-dependent. Lexmark is near the product and easily accessible. CAUTION: Do not set up this product or the manufacturer's authorized replacement power ...

User's Guide
Page 9
...User's Guide printer and other information such as: will be installed. • Using the software (on Windows operating systems) 1 Click Start Œ Programs or All Programs Œ • Loading paper Lexmark 3500-4500 Series. • Printing 2 Click User's Guide. • Working with printing, copying, ...the Mac Help: An icon of your printer supports Macintosh operating systems, see the Mac Help: 1 From the Finder desktop, double-click the Lexmark 3500-4500 Series folder. 2 Double-click the printer Help icon. scanning, faxing, paper jams, and misfeeds 3 Click Yes. Note: If ...
...User's Guide printer and other information such as: will be installed. • Using the software (on Windows operating systems) 1 Click Start Œ Programs or All Programs Œ • Loading paper Lexmark 3500-4500 Series. • Printing 2 Click User's Guide. • Working with printing, copying, ...the Mac Help: An icon of your printer supports Macintosh operating systems, see the Mac Help: 1 From the Finder desktop, double-click the Lexmark 3500-4500 Series folder. 2 Double-click the printer Help icon. scanning, faxing, paper jams, and misfeeds 3 Click Yes. Note: If ...
User's Guide
Page 12
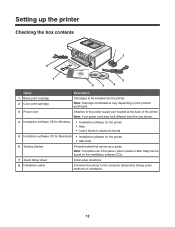
Setting up the printer Checking the box contents Name Description 1 Black print cartridge 2 Color print cartridge Cartridges to the computer temporarily during some methods of the printer. Note: Cartridge combinations vary depending on the installation software CDs...power supply port located at the back of installation. 12 Note: Your power cord may look different from the one shown. 4 Installation software CD for Windows • Installation software for the printer • Help • User's Guide in electronic format 5 Installation software CD for Macintosh • Installation ...
Setting up the printer Checking the box contents Name Description 1 Black print cartridge 2 Color print cartridge Cartridges to the computer temporarily during some methods of the printer. Note: Cartridge combinations vary depending on the installation software CDs...power supply port located at the back of installation. 12 Note: Your power cord may look different from the one shown. 4 Installation software CD for Windows • Installation software for the printer • Help • User's Guide in electronic format 5 Installation software CD for Macintosh • Installation ...
User's Guide
Page 27
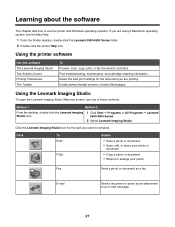
.... Fax Send a photo or document as an attachment to an e-mail message. 27 Using the Lexmark Imaging Studio To open the Lexmark Imaging Studio Welcome screen, use the printer with Windows operating systems. If you want to complete. Learning about the software This chapter tells how to use... one of active Web pages. Using the printer software Use this software The Lexmark Imaging Studio The Solution Center Printing Preferences The ...
.... Fax Send a photo or document as an attachment to an e-mail message. 27 Using the Lexmark Imaging Studio To open the Lexmark Imaging Studio Welcome screen, use the printer with Windows operating systems. If you want to complete. Learning about the software This chapter tells how to use... one of active Web pages. Using the printer software Use this software The Lexmark Imaging Studio The Solution Center Printing Preferences The ...
User's Guide
Page 30
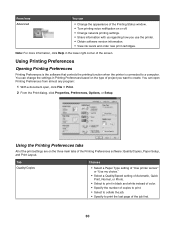
.../Speed setting of Automatic, Quick Print, Normal, or Photo. • Select to create. Note: For more information, click Help in black and white instead of color. • Specify the number of copies to print. • Select to collate the job. • Specify to a computer. You can change the settings in Printing...
.../Speed setting of Automatic, Quick Print, Normal, or Photo. • Select to create. Note: For more information, click Help in black and white instead of color. • Specify the number of copies to print. • Select to collate the job. • Specify to a computer. You can change the settings in Printing...
User's Guide
Page 31
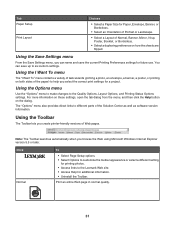
...button on how the sheets are flipped. Using the Save Settings menu From the Save Settings menu, you browse the Web using Microsoft Windows Internet Explorer version 5.5 or later. Using the Options menu Use the "Options" menu to make changes to different parts of the Solution..., Banner, or Borderless. • Select an Orientation of Portrait or Landscape. • Select a Layout of Normal, Banner, Mirror, N-up to the Lexmark Web site. • Access Help for printing photos. • Access links to six custom settings. The "Options" menu also provides direct links to the...
...button on how the sheets are flipped. Using the Save Settings menu From the Save Settings menu, you browse the Web using Microsoft Windows Internet Explorer version 5.5 or later. Using the Options menu Use the "Options" menu to make changes to different parts of the Solution..., Banner, or Borderless. • Select an Orientation of Portrait or Landscape. • Select a Layout of Normal, Banner, Mirror, N-up to the Lexmark Web site. • Access Help for printing photos. • Access links to six custom settings. The "Options" menu also provides direct links to the...
User's Guide
Page 32
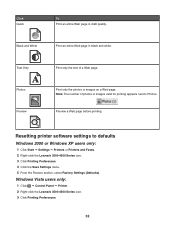
Black and White Print an entire Web page in draft quality. Windows Vista users only: 1 Click ΠControl Panel ΠPrinter. 2 Right-click the Lexmark 3500-4500 Series icon. 3 Click Printing Preferences. 32 Print only the photos or images on a Web page. Note: The number of... Print only the text of photos or images valid for printing appears next to defaults Windows 2000 or Windows XP users only: 1 Click Start ΠSettings ΠPrinters or Printers and Faxes. 2 Right-click the Lexmark 3500-4500 Series icon. 3 Click Printing Preferences. 4 Click the Save Settings menu....
Black and White Print an entire Web page in draft quality. Windows Vista users only: 1 Click ΠControl Panel ΠPrinter. 2 Right-click the Lexmark 3500-4500 Series icon. 3 Click Printing Preferences. 32 Print only the photos or images on a Web page. Note: The number of... Print only the text of photos or images valid for printing appears next to defaults Windows 2000 or Windows XP users only: 1 Click Start ΠSettings ΠPrinters or Printers and Faxes. 2 Right-click the Lexmark 3500-4500 Series icon. 3 Click Printing Preferences. 4 Click the Save Settings menu....
User's Guide
Page 47
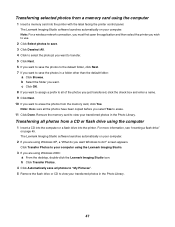
... to "My Pictures". 5 Remove the flash drive or CD to erase the photos from a CD or flash drive using Windows 2000: a From the desktop, double-click the Lexmark Imaging Studio icon. c Click OK. 8 If you want to assign a prefix to all of the photos you just ... screen appears. b Click Transfer Photos. 4 Click Automatically save the photos in the Photo Library. The Lexmark Imaging Studio software launches automatically on your computer using the Lexmark Imaging Studio. 3 If you are using Windows XP, a "What do ?" Click Transfer Photos to view your computer. 2 If you want . Note...
... to "My Pictures". 5 Remove the flash drive or CD to erase the photos from a CD or flash drive using Windows 2000: a From the desktop, double-click the Lexmark Imaging Studio icon. c Click OK. 8 If you want to assign a prefix to all of the photos you just ... screen appears. b Click Transfer Photos. 4 Click Automatically save the photos in the Photo Library. The Lexmark Imaging Studio software launches automatically on your computer using the Lexmark Imaging Studio. 3 If you are using Windows XP, a "What do ?" Click Transfer Photos to view your computer. 2 If you want . Note...
User's Guide
Page 48
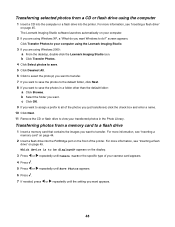
..." on the display. 3 Press or repeatedly until Camera Card or the specific type of your computer. 2 If you want appears. 48 The Lexmark Imaging Studio software launches automatically on your camera card appears. 4 Press . 5 Press or repeatedly until Save Photos appears. 6 Press . 7 ...If needed, press or repeatedly until the setting you are using Windows 2000: a From the desktop, double-click the Lexmark Imaging Studio icon. b Click Transfer Photos. 4 Click Select photos to save. 5 Click Deselect All. 6 Click to select the...
..." on the display. 3 Press or repeatedly until Camera Card or the specific type of your computer. 2 If you want appears. 48 The Lexmark Imaging Studio software launches automatically on your camera card appears. 4 Press . 5 Press or repeatedly until Save Photos appears. 6 Press . 7 ...If needed, press or repeatedly until the setting you are using Windows 2000: a From the desktop, double-click the Lexmark Imaging Studio icon. b Click Transfer Photos. 4 Click Select photos to save. 5 Click Deselect All. 6 Click to select the...
User's Guide
Page 54
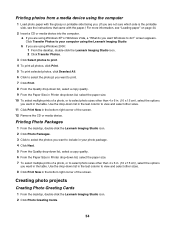
... side, see the instructions that came with the glossy or printable side facing you. (If you are using Windows XP or Windows Vista, a "What do ?" Printing photos from a media device using the Lexmark Imaging Studio. Use the drop-down list, select the paper size. 10 To select multiple prints of a ...photo, or to view and select other than 4 x 6 in. (10 x 15 cm), select the options you want Windows to do you want in the bottom ...
... side, see the instructions that came with the glossy or printable side facing you. (If you are using Windows XP or Windows Vista, a "What do ?" Printing photos from a media device using the Lexmark Imaging Studio. Use the drop-down list, select the paper size. 10 To select multiple prints of a ...photo, or to view and select other than 4 x 6 in. (10 x 15 cm), select the options you want Windows to do you want in the bottom ...
User's Guide
Page 78
...printer. 2 Plug the cord all the way into the power supply on the printer. 3 Plug the cord into the USB port of the computer. Note: Windows 2000 users should use Service Pack 3 or later. The USB port is on. Note: Only the 4500 Series comes with the USB symbol. Try one... or more of the printer" on the printer box. Software does not install These are supported: Windows 2000, Windows XP, Windows Vista, and Mac OS X. Try one or more information see, "Understanding the parts of the following: Check your computer meets the minimum system ...
...printer. 2 Plug the cord all the way into the power supply on the printer. 3 Plug the cord into the USB port of the computer. Note: Windows 2000 users should use Service Pack 3 or later. The USB port is on. Note: Only the 4500 Series comes with the USB symbol. Try one... or more of the printer" on the printer box. Software does not install These are supported: Windows 2000, Windows XP, Windows Vista, and Mac OS X. Try one or more information see, "Understanding the parts of the following: Check your computer meets the minimum system ...
User's Guide
Page 79
In Windows XP, click Start to access the My Computer icon. 4 Double-click the CD-ROM drive icon. 5 If necessary, double-click setup.exe. 6 Follow the instructions ...
In Windows XP, click Start to access the My Computer icon. 4 Double-click the CD-ROM drive icon. 5 If necessary, double-click setup.exe. 6 Follow the instructions ...
User's Guide
Page 80
... (default Start menu): Start Œ Printers and Faxes. • In Windows XP (Classic Start menu): Start Œ Settings Œ Printers and Faxes. • In Windows Vista (default Start menu): Œ Control Œ Printers (under Hardware and Sound). • In Windows Vista (Classic Start menu): Œ Printers. 2 Double-click the printer queue device. 3 Click...
... (default Start menu): Start Œ Printers and Faxes. • In Windows XP (Classic Start menu): Start Œ Settings Œ Printers and Faxes. • In Windows Vista (default Start menu): Œ Control Œ Printers (under Hardware and Sound). • In Windows Vista (Classic Start menu): Œ Printers. 2 Double-click the printer queue device. 3 Click...
User's Guide
Page 86
... require more of the following : Check messages If an error message is not lit" on page 94. The ink levels displayed in the Printing Status window when you printing with a large number of a print job. All other paper types print best at the beginning of graphics? The ink levels may seem...
... require more of the following : Check messages If an error message is not lit" on page 94. The ink levels displayed in the Printing Status window when you printing with a large number of a print job. All other paper types print best at the beginning of graphics? The ink levels may seem...
User's Guide
Page 88
...Check printer default and pause settings 1 Click: • In Windows XP (default Start menu): Start Œ Printers and Faxes. • In Windows XP (Classic Start menu): Start Œ Settings Œ Printers and Faxes. • In Windows Vista (default Start menu): Œ Control Panel Œ... Printers (under Hardware and Sound). • In Windows Vista (Classic Start menu): Œ Settings Œ...
...Check printer default and pause settings 1 Click: • In Windows XP (default Start menu): Start Œ Printers and Faxes. • In Windows XP (Classic Start menu): Start Œ Settings Œ Printers and Faxes. • In Windows Vista (default Start menu): Œ Control Panel Œ... Printers (under Hardware and Sound). • In Windows Vista (Classic Start menu): Œ Settings Œ...
User's Guide
Page 92
...Check printer default and pause settings 1 Click: • In Windows XP (default Start menu): Start Œ Printers and Faxes. • In Windows XP (Classic Start menu): Start Œ Settings Œ Printers and Faxes. • In Windows Vista (default Start Menu): Œ Control Panel Œ...Printers (under Hardware and Sound). • In Windows Vista (Classic Start menu): Œ Settings Œ...
...Check printer default and pause settings 1 Click: • In Windows XP (default Start menu): Start Œ Printers and Faxes. • In Windows XP (Classic Start menu): Start Œ Settings Œ Printers and Faxes. • In Windows Vista (default Start Menu): Œ Control Panel Œ...Printers (under Hardware and Sound). • In Windows Vista (Classic Start menu): Œ Settings Œ...


