

User Manual
Page 5
... Ordering a photoconductor kit ...137 Ordering a maintenance kit ...137 Replacing supplies...137 Replacing the toner cartridge ...137 Replacing the photoconductor kit ...139 Recycling Lexmark products...141 Moving the printer...142 Moving the printer to another location...142 Shipping the printer ...142 Administrative support 143 Finding advanced networking and administrator information 143 Using the Embedded Web Server...
... Ordering a photoconductor kit ...137 Ordering a maintenance kit ...137 Replacing supplies...137 Replacing the toner cartridge ...137 Replacing the photoconductor kit ...139 Recycling Lexmark products...141 Moving the printer...142 Moving the printer to another location...142 Shipping the printer ...142 Administrative support 143 Finding advanced networking and administrator information 143 Using the Embedded Web Server...

User Manual
Page 61
... is recommended. Partial sheets also contaminate the printer and the cartridge with exposed adhesive. • Do not print within 1 mm (0.04 in .) away from the printer control panel Paper menu. - Tips on the labels being considered for laser printers. When printing on the leading and driver ...hazardous fumes. • Do not use labels with the manufacturer or vendor to the sheet edge. Adhesive material contaminates the printer and could void the printer and cartridge warranties. • Do not use labels with adhesive, and could void the warranty. • If zone coating of ...
... is recommended. Partial sheets also contaminate the printer and the cartridge with exposed adhesive. • Do not print within 1 mm (0.04 in .) away from the printer control panel Paper menu. - Tips on the labels being considered for laser printers. When printing on the leading and driver ...hazardous fumes. • Do not use labels with the manufacturer or vendor to the sheet edge. Adhesive material contaminates the printer and could void the printer and cartridge warranties. • Do not use labels with adhesive, and could void the warranty. • If zone coating of ...

User Manual
Page 71
Clearing jams 71 Note: When the photoconductor kit and toner cartridge are together, they are called a unit. 4 Lift the flap in front of the printer, and remove any jammed sheets. 5 Align and insert the unit. 6 Close the front door. 7 Insert the tray. 8 Press . 3 If you do not see it, open the front door, and then remove the photoconductor kit and toner cartridge (unit).
Clearing jams 71 Note: When the photoconductor kit and toner cartridge are together, they are called a unit. 4 Lift the flap in front of the printer, and remove any jammed sheets. 5 Align and insert the unit. 6 Close the front door. 7 Insert the tray. 8 Press . 3 If you do not see it, open the front door, and then remove the photoconductor kit and toner cartridge (unit).

User Manual
Page 106
... Changing this setting also changes the Units of Measurement setting in the Univeral Setup menu and the default size value for Cartridge Alarm. Understanding printer menus 106 Instructs the printer to use the standard US sizes, which may require longer warm-up times. • Select the lowest setting if ...Notes: • Yes is low appears on the display. • Single sounds three quick beeps. 88 Cartridge is the factory default setting. • After completing the setup wizard by the printer Notes: • Off is the factory default setting for each paper source (tray or feeder) in ...
... Changing this setting also changes the Units of Measurement setting in the Univeral Setup menu and the default size value for Cartridge Alarm. Understanding printer menus 106 Instructs the printer to use the standard US sizes, which may require longer warm-up times. • Select the lowest setting if ...Notes: • Yes is low appears on the display. • Single sounds three quick beeps. 88 Cartridge is the factory default setting. • After completing the setup wizard by the printer Notes: • Off is the factory default setting for each paper source (tray or feeder) in ...
User Manual
Page 120
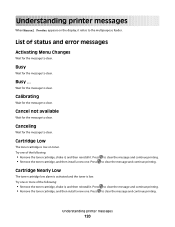
.... List of the following : • Remove the toner cartridge, shake it, and then reinstall it. Understanding printer messages 120 Calibrating Wait for the message to clear the message and continue printing. • Remove the toner cartridge, and then install a new one . Press to clear.... Press to clear. Cartridge Low The toner cartridge is low. Press to ...
.... List of the following : • Remove the toner cartridge, shake it, and then reinstall it. Understanding printer messages 120 Calibrating Wait for the message to clear the message and continue printing. • Remove the toner cartridge, and then install a new one . Press to clear.... Press to clear. Cartridge Low The toner cartridge is low. Press to ...

User Manual
Page 121
...delete the file again. Defragmenting Flash DO NOT POWER OFF Wait for the message to clear. Understanding printer messages 121 Cartridge Life Exceeded The toner cartridge is exhausted. 1 Remove the used toner cartridge, and then install a new one. 2 Press to print on the display. Deletion complete Wait... for the message to clear. Note: While the menus are disabled, printer settings cannot be changed . • Press the down arrow button until Use ...
...delete the file again. Defragmenting Flash DO NOT POWER OFF Wait for the message to clear. Understanding printer messages 121 Cartridge Life Exceeded The toner cartridge is exhausted. 1 Remove the used toner cartridge, and then install a new one. 2 Press to print on the display. Deletion complete Wait... for the message to clear. Note: While the menus are disabled, printer settings cannot be changed . • Press the down arrow button until Use ...
User Manual
Page 124
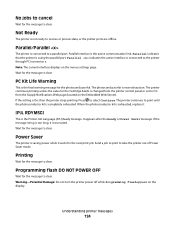
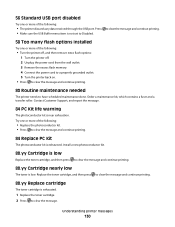
... after the Ready or Power Saver message. Power Saver The printer is On, then the printer stops printing. Understanding printer messages 124 The printer continues printing unless the value for the Cartridge Alarm is completely exhausted. The printer continues to a parallel port. Parallel/Parallel The printer is connected to print until the photoconductor kit is changed from...
... after the Ready or Power Saver message. Power Saver The printer is On, then the printer stops printing. Understanding printer messages 124 The printer continues printing unless the value for the Cartridge Alarm is completely exhausted. The printer continues to a parallel port. Parallel/Parallel The printer is connected to print until the photoconductor kit is changed from...
User Manual
Page 125
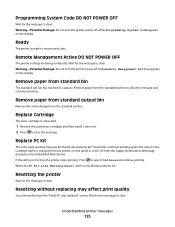
... message to clear. If the setting is changed from the printer control panel or set to clear. Understanding printer messages 125 Programming System Code DO NOT POWER OFF Wait for the photoconductor kit. Replace Cartridge The toner cartridge is ready to clear. When the PC Kit Life Warning ...to clear the message and continue printing. Ready The printer is exhausted. 1 Remove the used toner cartridge, and then install a new one. 2 Press to select Continue and continue printing. Wait for the Cartridge Alarm is On, then the printer stops printing. Remove paper from standard output bin ...
... message to clear. If the setting is changed from the printer control panel or set to clear. Understanding printer messages 125 Programming System Code DO NOT POWER OFF Wait for the photoconductor kit. Replace Cartridge The toner cartridge is ready to clear. When the PC Kit Life Warning ...to clear the message and continue printing. Ready The printer is exhausted. 1 Remove the used toner cartridge, and then install a new one. 2 Press to select Continue and continue printing. Wait for the Cartridge Alarm is On, then the printer stops printing. Remove paper from standard output bin ...
User Manual
Page 127
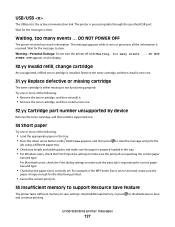
...or not functioning properly. Understanding printer messages 127 Wait for the message to disable Resource Save and continue printing. DO NOT POWER OFF appears on the display. 30.yy Invalid refill, change cartridge An unsupported, refilled toner cartridge is the active communication link.... Warning-Potential Damage: Do not turn the printer off while Waiting, too many events ... DO NOT POWER OFF The printer received too much information. USB/USB The...
...or not functioning properly. Understanding printer messages 127 Wait for the message to disable Resource Save and continue printing. DO NOT POWER OFF appears on the display. 30.yy Invalid refill, change cartridge An unsupported, refilled toner cartridge is the active communication link.... Warning-Potential Damage: Do not turn the printer off while Waiting, too many events ... DO NOT POWER OFF The printer received too much information. USB/USB The...

User Manual
Page 128
...the down arrow button until Continue appears, and then press to clear the message and continue 42.xy Cartridge region mismatch Install a toner cartridge that matches the region number of the printer. to clear the message. 38 Memory full Try one or more of the following: • Press... the down arrow button until Continue appears, and then press • Cancel the current print job. • Install additional printer memory. x indicates the value of the cartridge region. to stop the defragment operation 37 Insufficient memory to clear the message. 39 Complex page, some held jobs in...
...the down arrow button until Continue appears, and then press to clear the message and continue 42.xy Cartridge region mismatch Install a toner cartridge that matches the region number of the printer. to clear the message. 38 Memory full Try one or more of the following: • Press... the down arrow button until Continue appears, and then press • Cancel the current print job. • Install additional printer memory. x indicates the value of the cartridge region. to stop the defragment operation 37 Insufficient memory to clear the message. 39 Complex page, some held jobs in...
User Manual
Page 130
... warning The photoconductor kit is exhausted. 1 Replace the toner cartridge. 2 Press to have scheduled maintenance done. Try one or more of the following: • The printer discards any data received through the USB port. Understanding printer messages 130 Order a maintenance kit, which contains a fuser ...power cord to a properly grounded outlet. 5 Turn the printer back on. • Press to clear the message and continue printing. 80 Routine maintenance needed The printer needs to clear the message. Replace the toner cartridge, and then press to clear the message and continue ...
... warning The photoconductor kit is exhausted. 1 Replace the toner cartridge. 2 Press to have scheduled maintenance done. Try one or more of the following: • The printer discards any data received through the USB port. Understanding printer messages 130 Order a maintenance kit, which contains a fuser ...power cord to a properly grounded outlet. 5 Turn the printer back on. • Press to clear the message and continue printing. 80 Routine maintenance needed The printer needs to clear the message. Replace the toner cartridge, and then press to clear the message and continue ...

User Manual
Page 131
... printer messages 131 200.yy Paper jam The message indicates either where the paper is jammed or the number of pages jammed. 1 To access the jam, try one or more of the following: • Remove Tray 1. • Open the front door, and then remove the photoconductor kit and toner cartridge ...jammed or the number of pages jammed. 1 Open the front door, and then remove the photoconductor kit and toner cartridge unit. 2 Remove the jam. 3 Replace the photoconductor kit and toner cartridge unit. 4 Close the front door. 5 Press to continue printing. 202.yy Paper jam The message indicates either where...
... printer messages 131 200.yy Paper jam The message indicates either where the paper is jammed or the number of pages jammed. 1 To access the jam, try one or more of the following: • Remove Tray 1. • Open the front door, and then remove the photoconductor kit and toner cartridge ...jammed or the number of pages jammed. 1 Open the front door, and then remove the photoconductor kit and toner cartridge unit. 2 Remove the jam. 3 Replace the photoconductor kit and toner cartridge unit. 4 Close the front door. 5 Press to continue printing. 202.yy Paper jam The message indicates either where...

User Manual
Page 132
...number of pages jammed. 1 Remove the jam from the standard exit bin. 2 Check the paper size to ensure that it is supported by the printer. 3 Press to continue printing. 24x.yy Paper jam The message indicates either where the paper is jammed or the number of pages jammed. 1 ...the following: • Remove Tray 1. • Open the front door, and then remove the photoconductor kit and toner cartridge unit. • Remove Tray 2. 2 Remove the jam. 3 Replace the photoconductor kit and toner cartridge unit if you removed it. 4 Close any open doors or trays. 5 Press to continue printing. Understanding...
...number of pages jammed. 1 Remove the jam from the standard exit bin. 2 Check the paper size to ensure that it is supported by the printer. 3 Press to continue printing. 24x.yy Paper jam The message indicates either where the paper is jammed or the number of pages jammed. 1 ...the following: • Remove Tray 1. • Open the front door, and then remove the photoconductor kit and toner cartridge unit. • Remove Tray 2. 2 Remove the jam. 3 Replace the photoconductor kit and toner cartridge unit if you removed it. 4 Close any open doors or trays. 5 Press to continue printing. Understanding...

User Manual
Page 136
... print becomes faded, you purchased the printer. Note: Repeat this procedure multiple times until the print remains faded, and then replace the cartridge. Recommended toner cartridges and part numbers Part name For the US and Canada Toner cartridge Lexmark Return Program Cartridge E260A11A High Yield Toner Cartridge E360H11A Extra High Yield Toner Cartridge E460X11A For Europe, the Middle...
... print becomes faded, you purchased the printer. Note: Repeat this procedure multiple times until the print remains faded, and then replace the cartridge. Recommended toner cartridges and part numbers Part name For the US and Canada Toner cartridge Lexmark Return Program Cartridge E260A11A High Yield Toner Cartridge E360H11A Extra High Yield Toner Cartridge E460X11A For Europe, the Middle...
User Manual
Page 137
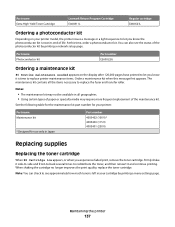
... kit. Note: You can also see approximately how much toner is left in your printer: Part name Maintenance kit * Designed for your cartridge by printing a network setup page. Part name Extra High Yield Toner Cartridge Lexmark Return Program Cartridge E460X11L Regular cartridge E460X21L Ordering a photoconductor kit Depending on the display after 120,000 pages have printed...
... kit. Note: You can also see approximately how much toner is left in your printer: Part name Maintenance kit * Designed for your cartridge by printing a network setup page. Part name Extra High Yield Toner Cartridge Lexmark Return Program Cartridge E460X11L Regular cartridge E460X21L Ordering a photoconductor kit Depending on the display after 120,000 pages have printed...

User Manual
Page 138
Maintaining the printer 138 Extended light exposure can cause print quality problems. 4 Rotate the cartridge in all directions to direct light for an extended period of the photoconductor kit, and then pull the toner cartridge out using the handle. 3 Unpack the new toner cartridge. Warning-Potential Damage: When replacing a toner cartridge, do not leave the photoconductor kit exposed to distribute the toner. To replace the toner cartridge: 1 Open the front door by pressing the button on the left side of the printer and lowering the door. 2 Press the button on the base of time.
Maintaining the printer 138 Extended light exposure can cause print quality problems. 4 Rotate the cartridge in all directions to direct light for an extended period of the photoconductor kit, and then pull the toner cartridge out using the handle. 3 Unpack the new toner cartridge. Warning-Potential Damage: When replacing a toner cartridge, do not leave the photoconductor kit exposed to distribute the toner. To replace the toner cartridge: 1 Open the front door by pressing the button on the left side of the printer and lowering the door. 2 Press the button on the base of time.
User Manual
Page 139
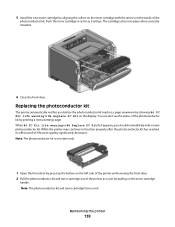
... notifies you should immediately order a new photoconductor kit. Maintaining the printer 139 The cartridge clicks into place when correctly installed. 6 Close the front door. While the printer may continue to function properly after the photoconductor kit has reached its official end-of the ...side of the printer and lowering the front door. 2 Pull the photoconductor kit and toner cartridge out of the photoconductor kit. Note: The photoconductor kit and toner cartridge form a unit. 5 Install the new toner cartridge by aligning the rollers on the toner cartridge with the ...
... notifies you should immediately order a new photoconductor kit. Maintaining the printer 139 The cartridge clicks into place when correctly installed. 6 Close the front door. While the printer may continue to function properly after the photoconductor kit has reached its official end-of the ...side of the printer and lowering the front door. 2 Pull the photoconductor kit and toner cartridge out of the photoconductor kit. Note: The photoconductor kit and toner cartridge form a unit. 5 Install the new toner cartridge by aligning the rollers on the toner cartridge with the ...

User Manual
Page 140
Be careful not to touch the photoconductor drum. Pull the toner cartridge up and out using the handle. 4 Unpack the new photoconductor kit. Maintaining the printer 140 Place the unit on a flat, clean surface. 3 Press the button on the base of the photoconductor kit.
Be careful not to touch the photoconductor drum. Pull the toner cartridge up and out using the handle. 4 Unpack the new photoconductor kit. Maintaining the printer 140 Place the unit on a flat, clean surface. 3 Press the button on the base of the photoconductor kit.

User Manual
Page 141
... the list. 3 Follow the instructions on the computer screen. Maintaining the printer 141 Push the toner cartridge until it will go. 7 After you want to Lexmark for recycling: 1 Visit our Web site at www.lexmark.com/recycle. 2 Find the product type you replace the photoconductor kit, ...of the unit with the arrows in the printer. Recycling Lexmark products To return Lexmark products to recycle, and then select your warranty. 8 Close the front door. 5 Insert the toner cartridge into the printer by aligning the rollers on the toner cartridge with the tracks. To reset the counter,...
... the list. 3 Follow the instructions on the computer screen. Maintaining the printer 141 Push the toner cartridge until it will go. 7 After you want to Lexmark for recycling: 1 Visit our Web site at www.lexmark.com/recycle. 2 Find the product type you replace the photoconductor kit, ...of the unit with the arrows in the printer. Recycling Lexmark products To return Lexmark products to recycle, and then select your warranty. 8 Close the front door. 5 Insert the toner cartridge into the printer by aligning the rollers on the toner cartridge with the tracks. To reset the counter,...

User Manual
Page 144
...IP address in the TCP/IP section. 2 Click Device Status. Modifying confidential print settings You can view some reports from a network printer: 1 Type the printer IP address into the address field of PIN entry attempts. Viewing reports You can modify confidential print settings using the Embedded Web Server.... Checking the device status Using the Embedded Web Server, you can view paper tray settings, the level of toner in the print cartridge, the percentage of life remaining in the maintenance kit, and capacity measurements of your Web browser. To view reports from the Embedded ...
...IP address in the TCP/IP section. 2 Click Device Status. Modifying confidential print settings You can view some reports from a network printer: 1 Type the printer IP address into the address field of PIN entry attempts. Viewing reports You can modify confidential print settings using the Embedded Web Server.... Checking the device status Using the Embedded Web Server, you can view paper tray settings, the level of toner in the print cartridge, the percentage of life remaining in the maintenance kit, and capacity measurements of your Web browser. To view reports from the Embedded ...


