Quick Reference
Page 1
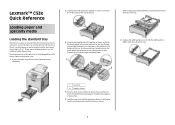
... to lightly touch the side of the tray as the 250-sheet tray, and the optional 550-sheet tray (Tray 2). Do not fold or crease the paper. Proper paper loading prevents jams and facilitates trouble-free printing. Notice the size indicators in the window in Tray 1. Lexmark™ C53x Quick Reference Loading paper and specialty media Loading the standard tray The printer has two trays to help position the guide. Load the paper or specialty media used for the size of the tray. Notice the load lines...
... to lightly touch the side of the tray as the 250-sheet tray, and the optional 550-sheet tray (Tray 2). Do not fold or crease the paper. Proper paper loading prevents jams and facilitates trouble-free printing. Notice the size indicators in the window in Tray 1. Lexmark™ C53x Quick Reference Loading paper and specialty media Loading the standard tray The printer has two trays to help position the guide. Load the paper or specialty media used for the size of the tray. Notice the load lines...
Quick Reference
Page 2
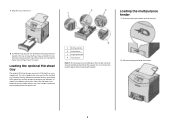
... control panel. Loading the multipurpose feeder 1 Push the multipurpose feeder latch to be completely removed from the support unit. When the 550-sheet tray is loaded for the first time or when a new size is loaded. This tray is loaded again, the tray does not need to the right. 8 If a different type of a 550-sheet tray and a support unit. Loading the optional 550-sheet tray The optional 550-sheet drawer consists of paper was loaded than the type previously loaded in the tray, change the Paper Type setting...
... control panel. Loading the multipurpose feeder 1 Push the multipurpose feeder latch to be completely removed from the support unit. When the 550-sheet tray is loaded for the first time or when a new size is loaded. This tray is loaded again, the tray does not need to the right. 8 If a different type of a 550-sheet tray and a support unit. Loading the optional 550-sheet tray The optional 550-sheet drawer consists of paper was loaded than the type previously loaded in the tray, change the Paper Type setting...
Quick Reference
Page 3
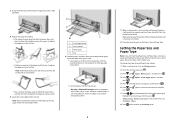
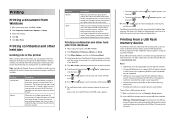
... the print side of possible paper types. Note: Do not exceed the maximum stack height by forcing paper under the stack height limiter. • Load envelopes with stamps, clasps, snaps, windows, coated linings, or self-stick adhesives. Warning-Potential Damage: Never use envelopes with the flap side up. To change the Paper Size and Paper Type settings: 1 Make sure the printer is on a level surface. • Hold transparencies by the printer. Paper Size/Type appears...
... the print side of possible paper types. Note: Do not exceed the maximum stack height by forcing paper under the stack height limiter. • Load envelopes with stamps, clasps, snaps, windows, coated linings, or self-stick adhesives. Warning-Potential Damage: Never use envelopes with the flap side up. To change the Paper Size and Paper Type settings: 1 Make sure the printer is on a level surface. • Hold transparencies by the printer. Paper Size/Type appears...
Quick Reference
Page 4
... choose to see the Lexmark Web site at the printer are automatically deleted from memory after they print. Repeat and Reserve jobs continue to be four digits using the numbers 0-9. The job is similar to print or delete the job. Many USB flash memory devices are not supported. • USB devices must be held jobs from Windows 1 With a document open , click File ª Print. 2 Click Properties, Preferences, Options, or Setup. 3 Adjust the settings. 4 Click OK. 5 Click OK...
... choose to see the Lexmark Web site at the printer are automatically deleted from memory after they print. Repeat and Reserve jobs continue to be four digits using the numbers 0-9. The job is similar to print or delete the job. Many USB flash memory devices are not supported. • USB devices must be held jobs from Windows 1 With a document open , click File ª Print. 2 Click Properties, Preferences, Options, or Setup. 3 Adjust the settings. 4 Click OK. 5 Click OK...
Quick Reference
Page 5
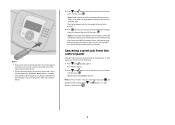
... USB flash memory device as held jobs. Once the other jobs, Printer Busy appears. The display prompts you want to print, and then press . File names are appended by the extension type (for the number of copies to be printed. 4 Press to print only one copy, or enter the number of copies using the numeric keypad, and then press . If you leave the USB flash memory device in the printer after leaving the initial USB menu...
... USB flash memory device as held jobs. Once the other jobs, Printer Busy appears. The display prompts you want to print, and then press . File names are appended by the extension type (for the number of copies to be printed. 4 Press to print only one copy, or enter the number of copies using the numeric keypad, and then press . If you leave the USB flash memory device in the printer after leaving the initial USB menu...

