
User Manual
Page 36
... Middle East, and Africa2 E250A21E Toner Cartridge 3,500 standard pages2 E250A11E Return Program Toner Cartridge 3,500 standard pages2 E352H21E High Yield Toner Cartridge 9,000 standard pages2 E352H11E High Yield Return Program Toner Cartridge 9,000 standard pages2 For Latin America4 E250A21L Toner Cartridge 3,500 standard pages3 E250A11L Return Program Toner Cartridge 3,500 standard pages3 E352H21L High Yield Toner Cartridge 9,000 standard pages3 E352H11L High Yield...
... Middle East, and Africa2 E250A21E Toner Cartridge 3,500 standard pages2 E250A11E Return Program Toner Cartridge 3,500 standard pages2 E352H21E High Yield Toner Cartridge 9,000 standard pages2 E352H11E High Yield Return Program Toner Cartridge 9,000 standard pages2 For Latin America4 E250A21L Toner Cartridge 3,500 standard pages3 E250A11L Return Program Toner Cartridge 3,500 standard pages3 E352H21L High Yield Toner Cartridge 9,000 standard pages3 E352H11L High Yield...

User Manual
Page 37
Changing a toner cartridge 1 Turn the printer off. 2 Press the button on the left side of the printer to have a new toner cartridge available when the current one no longer prints satisfactorily. You need to release and lower the front door. Ordering supplies 37 You can print a few hundred pages after the 88 Toner low message appears. Maintaining the printer Ordering a toner cartridge When the 88 Toner low message appears, you should order a new toner cartridge.
Changing a toner cartridge 1 Turn the printer off. 2 Press the button on the left side of the printer to have a new toner cartridge available when the current one no longer prints satisfactorily. You need to release and lower the front door. Ordering supplies 37 You can print a few hundred pages after the 88 Toner low message appears. Maintaining the printer Ordering a toner cartridge When the 88 Toner low message appears, you should order a new toner cartridge.
User Manual
Page 38
a Press the release button on page 42. 5 Firmly shake the toner cartridge in all directions to distribute the toner. Note: You can use the packing material from the new toner cartridge to ship the old toner cartridge back to remove the toner cartridge. 1 2 4 Unpack the new toner cartridge. For more information, see Recycling Lexmark products on the base of the print cartridge assembly. Maintaining the printer 3 Remove the toner cartridge. Ordering supplies 38 b Grasp the handle, pulling up and out to Lexmark for recycling.
a Press the release button on page 42. 5 Firmly shake the toner cartridge in all directions to distribute the toner. Note: You can use the packing material from the new toner cartridge to ship the old toner cartridge back to remove the toner cartridge. 1 2 4 Unpack the new toner cartridge. For more information, see Recycling Lexmark products on the base of the print cartridge assembly. Maintaining the printer 3 Remove the toner cartridge. Ordering supplies 38 b Grasp the handle, pulling up and out to Lexmark for recycling.

User Manual
Page 39
...warning message appears, you before the photoconductor kit reaches this point. Maintaining the printer 6 Install the new toner cartridge by aligning the white rollers on the toner cartridge with your photoconductor kit. Photoconductor kit end-of -life (approximately 30,000 pages), print quality begins to... the printer, the printer stops operating after the 84 Replace Photoconductor message appears. The toner cartridge clicks into place when correctly installed. 7 Close the front door. 8 Turn the printer back on. To avoid having the printer...
...warning message appears, you before the photoconductor kit reaches this point. Maintaining the printer 6 Install the new toner cartridge by aligning the white rollers on the toner cartridge with your photoconductor kit. Photoconductor kit end-of -life (approximately 30,000 pages), print quality begins to... the printer, the printer stops operating after the 84 Replace Photoconductor message appears. The toner cartridge clicks into place when correctly installed. 7 Close the front door. 8 Turn the printer back on. To avoid having the printer...

User Manual
Page 40
... pull up and out. Note: Do not press the button on the print cartridge assembly 1 2 3 Place the print cartridge assembly on a flat, clean surface. 3 Remove the toner cartridge: a Press the button on the left side of the print cartridge assembly. c Grasp the toner cartridge handle, and pull up and out. 1 2 4 Unpack the new photoconductor kit. b Lower the... extended period of -life 40 Photoconductor kit end-of time. Extended light exposure can cause print quality problems. 1 Turn the printer off. 2 Remove the print cartridge assembly.
... pull up and out. Note: Do not press the button on the print cartridge assembly 1 2 3 Place the print cartridge assembly on a flat, clean surface. 3 Remove the toner cartridge: a Press the button on the left side of the print cartridge assembly. c Grasp the toner cartridge handle, and pull up and out. 1 2 4 Unpack the new photoconductor kit. b Lower the... extended period of -life 40 Photoconductor kit end-of time. Extended light exposure can cause print quality problems. 1 Turn the printer off. 2 Remove the print cartridge assembly.

User Manual
Page 41
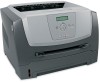
... Photoconductor kit end-of-life 41 For more information, see Printing the menu settings page on the tracks of the photoconductor and pushing the toner cartridge in as far as it will go . 7 Close the front door. 8 Turn the printer back on. 9 Reset the photoconductor counter ...the instruction sheet that shipped with the white arrows on page 26. Maintaining the printer 5 Install the toner cartridge into the printer by aligning the white rollers on the toner cartridge with the new photoconductor kit). If Photoconductor is listed under Warnings, the photoconductor counter has not been ...
... Photoconductor kit end-of-life 41 For more information, see Printing the menu settings page on the tracks of the photoconductor and pushing the toner cartridge in as far as it will go . 7 Close the front door. 8 Turn the printer back on. 9 Reset the photoconductor counter ...the instruction sheet that shipped with the white arrows on page 26. Maintaining the printer 5 Install the toner cartridge into the printer by aligning the white rollers on the toner cartridge with the new photoconductor kit). If Photoconductor is listed under Warnings, the photoconductor counter has not been ...
User Manual
Page 55
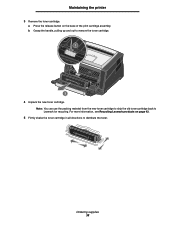
Action • The toner in the toner cartridge may be printed. For more details, see Understanding print media guidelines on the • Replace the photoconductor kit. than the page size of the job to be low. • Change the Toner Darkness setting in the Quality menu. • Change the Brightness ... table may help prevent this, do not correct the problem, call for service. If the problem continues, contact the Lexmark Customer Support Center at http://support.lexmark.com. Open and close the front door to make sure it is on an uneven print surface, change the Paper ...
Action • The toner in the toner cartridge may be printed. For more details, see Understanding print media guidelines on the • Replace the photoconductor kit. than the page size of the job to be low. • Change the Toner Darkness setting in the Quality menu. • Change the Brightness ... table may help prevent this, do not correct the problem, call for service. If the problem continues, contact the Lexmark Customer Support Center at http://support.lexmark.com. Open and close the front door to make sure it is on an uneven print surface, change the Paper ...
User Manual
Page 56
... the ink can withstand temperatures of 210°C (410°F). • Replace the photoconductor kit or toner cartridge. Action • Make sure the packaging material is removed from the photoconductor kit. • Check the photoconductor kit and toner cartridge to 600 dpi, 1200 dpi, or 2400 Image Q. • Enable Enhance Fine Lines. • If...
... the ink can withstand temperatures of 210°C (410°F). • Replace the photoconductor kit or toner cartridge. Action • Make sure the packaging material is removed from the photoconductor kit. • Check the photoconductor kit and toner cartridge to 600 dpi, 1200 dpi, or 2400 Image Q. • Enable Enhance Fine Lines. • If...

User Manual
Page 59
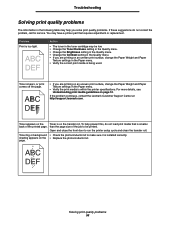
Cleaning the printhead lens 59 Note: Do not press the button on the print cartridge assembly. 1 2 3 Place the print cartridge assembly on the toner cartridge handle. Troubleshooting Cleaning the printhead lens Some print quality problems can be solved by cleaning the printhead lens. 1 Turn the printer off. 2 Press the button on the left side of the printer to release and lower the front door. 3 Remove the print cartridge assembly by pulling on a flat, clean surface. 4 Locate the glass printhead lens within the recessed area in the top of the printer.
Cleaning the printhead lens 59 Note: Do not press the button on the print cartridge assembly. 1 2 3 Place the print cartridge assembly on the toner cartridge handle. Troubleshooting Cleaning the printhead lens Some print quality problems can be solved by cleaning the printhead lens. 1 Turn the printer off. 2 Press the button on the left side of the printer to release and lower the front door. 3 Remove the print cartridge assembly by pulling on a flat, clean surface. 4 Locate the glass printhead lens within the recessed area in the top of the printer.

User Manual
Page 69
... warranty service The warranty period starts on a third party claim. Before you based on the date of original purchase as toners and inks), software, or interfaces not furnished by any Suppliers and Remarketers of liability Your sole remedy under this limited warranty... A PARTICULAR PURPOSE, AND SATISFACTORY QUALITY. Extent of limited warranty Lexmark does not warrant uninterrupted or error-free operation of all print cartridges, programs, data, and removable storage media (unless directed otherwise by Lexmark). ALL INFORMATION, SPECIFICATIONS, PRICES, AND SERVICES ARE SUBJECT TO ...
... warranty service The warranty period starts on a third party claim. Before you based on the date of original purchase as toners and inks), software, or interfaces not furnished by any Suppliers and Remarketers of liability Your sole remedy under this limited warranty... A PARTICULAR PURPOSE, AND SATISFACTORY QUALITY. Extent of limited warranty Lexmark does not warrant uninterrupted or error-free operation of all print cartridges, programs, data, and removable storage media (unless directed otherwise by Lexmark). ALL INFORMATION, SPECIFICATIONS, PRICES, AND SERVICES ARE SUBJECT TO ...

User Manual
Page 72
... paper tray adjustment 19 photoconductor kit changing 40 end-of-life 39 ordering 39 recycling 42 preprinted forms 13 print cartridge See toner cartridge print media jams avoiding 17 print media specifications 11 printer settings 7 printhead lens, cleaning 59 printing 18 problems control ...Protocol 63 supplies conserving 35 recycling 42 storing 35 supplies ordering maintenance kit 42 photoconductor kit 39 toner cartridge 37 system board accessing 28 system password setting 63 T toner cartridge changing 37 ordering 37 recycling 42 translated label 8 transparencies 14 tray linking 24 W warranty 68...
... paper tray adjustment 19 photoconductor kit changing 40 end-of-life 39 ordering 39 recycling 42 preprinted forms 13 print cartridge See toner cartridge print media jams avoiding 17 print media specifications 11 printer settings 7 printhead lens, cleaning 59 printing 18 problems control ...Protocol 63 supplies conserving 35 recycling 42 storing 35 supplies ordering maintenance kit 42 photoconductor kit 39 toner cartridge 37 system board accessing 28 system password setting 63 T toner cartridge changing 37 ordering 37 recycling 42 translated label 8 transparencies 14 tray linking 24 W warranty 68...

