User's Guide
Page 7
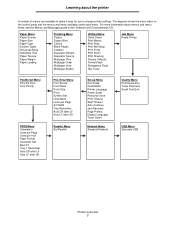
...-mode Quiet Mode Printer Language Power Saver Resource Save Print Timeout Wait Timeout Auto Continue Jam Recovery Page Protect Display Language Toner Alarm Network Menu Standard Network Quality Menu Print Resolution Toner Darkness Small Font Enh. USB Menu Standard USB Printer overview 7 Learning about menus and menu items, see the Menus and...
...-mode Quiet Mode Printer Language Power Saver Resource Save Print Timeout Wait Timeout Auto Continue Jam Recovery Page Protect Display Language Toner Alarm Network Menu Standard Network Quality Menu Print Resolution Toner Darkness Small Font Enh. USB Menu Standard USB Printer overview 7 Learning about menus and menu items, see the Menus and...

User's Guide
Page 12
... xerographic paper is still in the printer fuser • Preprinted papers that can cause paper feeding or print quality issues. Recycled paper Lexmark supportsUS executive order 13101 which strongly encourages the use with your paper supplier, and/or test small quantities before printing to be found ... use of paper directly affects print quality. however, smoothness between 100 and 300 Sheffield points; If the paper is too rough, the toner does not fuse to the alignment of the paper fibers in degraded paper handling. If the paper is too smooth, it can degrade ...
... xerographic paper is still in the printer fuser • Preprinted papers that can cause paper feeding or print quality issues. Recycled paper Lexmark supportsUS executive order 13101 which strongly encourages the use with your paper supplier, and/or test small quantities before printing to be found ... use of paper directly affects print quality. however, smoothness between 100 and 300 Sheffield points; If the paper is too rough, the toner does not fuse to the alignment of the paper fibers in degraded paper handling. If the paper is too smooth, it can degrade ...
User's Guide
Page 13
... Documentation CD.) • Make sure the paper is not above the maximum paper fill indicators. Improper loading may cause jams. • Do not use in toner. Use papers printed with rough or heavily textured surfaces. Inks that has been cut or trimmed by the resin in xerographic copiers. Selecting print media...
... Documentation CD.) • Make sure the paper is not above the maximum paper fill indicators. Improper loading may cause jams. • Do not use in toner. Use papers printed with rough or heavily textured surfaces. Inks that has been cut or trimmed by the resin in xerographic copiers. Selecting print media...
User's Guide
Page 35
... key operator. Values for your area. Supply Toner Print media Menu selection item Toner Darkness in the Defaults à Quality Menu Multipage Print in the Defaults à Finishing Menu Duplex in the U.S., contact Lexmark at www.lexmark.com, or contact the place where you bought...What the setting does Lets you conserve toner and paper. In other countries or regions, visit the Lexmark Web site at 1-800-539-6275 for information about Lexmark Authorized Supplies Dealers in your printer. In the U.S., contact Lexmark at www.lexmark.com, or contact the place where you...
... key operator. Values for your area. Supply Toner Print media Menu selection item Toner Darkness in the Defaults à Quality Menu Multipage Print in the Defaults à Finishing Menu Duplex in the U.S., contact Lexmark at www.lexmark.com, or contact the place where you bought...What the setting does Lets you conserve toner and paper. In other countries or regions, visit the Lexmark Web site at 1-800-539-6275 for information about Lexmark Authorized Supplies Dealers in your printer. In the U.S., contact Lexmark at www.lexmark.com, or contact the place where you...
User's Guide
Page 36
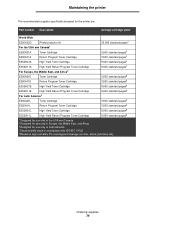
... Wide E250X22G Photoconductor kit 30,000 standard pages† For the USA and Canada1 E250A21A Toner Cartridge 3,500 standard pages1 E250A11A Return Program Toner Cartridge 3,500 standard pages1 E352H21A High Yield Toner Cartridge 9,000 standard pages1 E352H11A High Yield Return Program Toner Cartridge 9,000 standard pages1 For Europe, the Middle East, and Africa2 E250A21E...
... Wide E250X22G Photoconductor kit 30,000 standard pages† For the USA and Canada1 E250A21A Toner Cartridge 3,500 standard pages1 E250A11A Return Program Toner Cartridge 3,500 standard pages1 E352H21A High Yield Toner Cartridge 9,000 standard pages1 E352H11A High Yield Return Program Toner Cartridge 9,000 standard pages1 For Europe, the Middle East, and Africa2 E250A21E...

User's Guide
Page 37
You need to release and lower the front door. Ordering supplies 37 Changing a toner cartridge 1 Turn the printer off. 2 Press the button on the left side of the printer to have a new toner cartridge available when the current one no longer prints satisfactorily. You can print a few hundred pages after the 88 Toner low message appears. Maintaining the printer Ordering a toner cartridge When the 88 Toner low message appears, you should order a new toner cartridge.
You need to release and lower the front door. Ordering supplies 37 Changing a toner cartridge 1 Turn the printer off. 2 Press the button on the left side of the printer to have a new toner cartridge available when the current one no longer prints satisfactorily. You can print a few hundred pages after the 88 Toner low message appears. Maintaining the printer Ordering a toner cartridge When the 88 Toner low message appears, you should order a new toner cartridge.

User's Guide
Page 38
Note: You can use the packing material from the new toner cartridge to ship the old toner cartridge back to remove the toner cartridge. 4 Unpack the new toner cartridge. For more information, see Recycling Lexmark products on the base of the print cartridge assembly. a Press the release button on page42. 5 Firmly shake the toner cartridge in all directions to distribute the toner. Maintaining the printer 3 Remove the toner cartridge. b Grasp the handle, pulling up and out to Lexmark for recycling. Ordering supplies 38
Note: You can use the packing material from the new toner cartridge to ship the old toner cartridge back to remove the toner cartridge. 4 Unpack the new toner cartridge. For more information, see Recycling Lexmark products on the base of the print cartridge assembly. a Press the release button on page42. 5 Firmly shake the toner cartridge in all directions to distribute the toner. Maintaining the printer 3 Remove the toner cartridge. b Grasp the handle, pulling up and out to Lexmark for recycling. Ordering supplies 38
User's Guide
Page 39
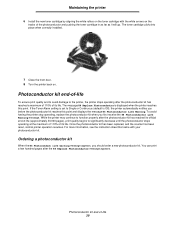
...pages), print quality begins to significantly decrease until the photoconductor stops operating at the maximum of 110% of its life. If the Toner Alarm setting is set to the printer, the printer stops operating after the 84 Replace Photoconductor message appears. Once the photoconductor kit ...in as far as it will go. Maintaining the printer 6 Install the new toner cartridge by aligning the white rollers on the toner cartridge with your photoconductor kit. Photoconductor kit end-of its life. The toner cartridge clicks into place when correctly installed. 7 Close the front door. 8...
...pages), print quality begins to significantly decrease until the photoconductor stops operating at the maximum of 110% of its life. If the Toner Alarm setting is set to the printer, the printer stops operating after the 84 Replace Photoconductor message appears. Once the photoconductor kit ...in as far as it will go. Maintaining the printer 6 Install the new toner cartridge by aligning the white rollers on the toner cartridge with your photoconductor kit. Photoconductor kit end-of its life. The toner cartridge clicks into place when correctly installed. 7 Close the front door. 8...

User's Guide
Page 40
Note: Do not press the button on the print cartridge assembly Place the print cartridge assembly on a flat, clean surface. 3 Remove the toner cartridge: a Press the button on the left side of the printer to direct light for an extended period of time. a Press the button on...kit, do not leave the new photoconductor kit exposed to release the front door. c Grasp the toner cartridge handle, and pull up and out. 4 Unpack the new photoconductor kit. b Lower the front door. b Grasp the toner cartridge handle, and pull up and out. Extended light exposure can cause print quality problems. 1...
Note: Do not press the button on the print cartridge assembly Place the print cartridge assembly on a flat, clean surface. 3 Remove the toner cartridge: a Press the button on the left side of the printer to direct light for an extended period of time. a Press the button on...kit, do not leave the new photoconductor kit exposed to release the front door. c Grasp the toner cartridge handle, and pull up and out. 4 Unpack the new photoconductor kit. b Lower the front door. b Grasp the toner cartridge handle, and pull up and out. Extended light exposure can cause print quality problems. 1...

User's Guide
Page 41
Photoconductor kit end-of the photoconductor and pushing the toner cartridge in as far as it will go. For more information, see the instruction sheet that shipped with the white arrows on the tracks of -... the front door. 8 Turn the printer back on. 9 Reset the photoconductor counter (see Printing the menu settings page on page26. Maintaining the printer 5 Install the toner cartridge into the printer by aligning the white rollers on the...
Photoconductor kit end-of the photoconductor and pushing the toner cartridge in as far as it will go. For more information, see the instruction sheet that shipped with the white arrows on the tracks of -... the front door. 8 Turn the printer back on. 9 Reset the photoconductor counter (see Printing the menu settings page on page26. Maintaining the printer 5 Install the toner cartridge into the printer by aligning the white rollers on the...
User's Guide
Page 55
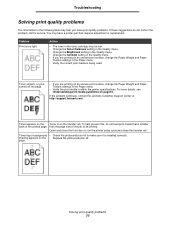
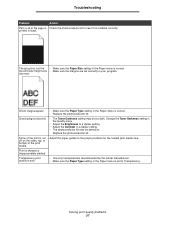
...Paper Weight and Paper Texture settings in the Paper menu. • Verify the print media is installed correctly. Action • The toner in the toner cartridge may help prevent this, do not correct the problem, call for service. For more details, see Understanding print media guidelines ... the page size of the printed page. page. If the problem continues, contact the Lexmark Customer Support Center at http://support.lexmark.com . Problem Print is on the Toner is too light. Toner fog or background • Check the photoconductor kit to run the printer setup cycle and...
...Paper Weight and Paper Texture settings in the Paper menu. • Verify the print media is installed correctly. Action • The toner in the toner cartridge may help prevent this, do not correct the problem, call for service. For more details, see Understanding print media guidelines ... the page size of the printed page. page. If the problem continues, contact the Lexmark Customer Support Center at http://support.lexmark.com . Problem Print is on the Toner is too light. Toner fog or background • Check the photoconductor kit to run the printer setup cycle and...
User's Guide
Page 56
... using preprinted forms, make sure the lines per inch (lpi) setting is removed from the photoconductor kit. • Check the photoconductor kit and toner cartridge to 600 dpi, 1200 dpi, or 2400 Image Q. • Enable Enhance Fine Lines. • If you are using downloaded fonts, ...are supported by the printer, the host computer, and the application. Troubleshooting Problem Entire page is too dark. • Change the Toner Darkness setting in the Quality menu. • Change the Brightness setting in the Quality menu. • Change the Contrast setting in the application...
... using preprinted forms, make sure the lines per inch (lpi) setting is removed from the photoconductor kit. • Check the photoconductor kit and toner cartridge to 600 dpi, 1200 dpi, or 2400 Image Q. • Enable Enhance Fine Lines. • If you are using downloaded fonts, ...are supported by the printer, the host computer, and the application. Troubleshooting Problem Entire page is too dark. • Change the Toner Darkness setting in the Quality menu. • Change the Brightness setting in the Quality menu. • Change the Contrast setting in the application...
User's Guide
Page 57
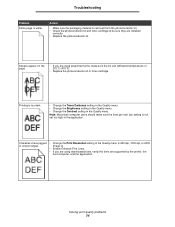
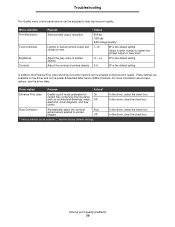
... black. Adjust the paper guides to a darker setting. • The photoconductor kit may be defective. Solving print quality problems 57 Gray background prints. • The Toner Darkness setting may be too dark. Transparency print quality is poor. • Use only transparencies recommended by the printer manufacturer. • Make sure the Paper...
... black. Adjust the paper guides to a darker setting. • The photoconductor kit may be defective. Solving print quality problems 57 Gray background prints. • The Toner Darkness setting may be too dark. Transparency print quality is poor. • Use only transparencies recommended by the printer manufacturer. • Make sure the Paper...
User's Guide
Page 58
...are available on the driver and on the printer Embedded Web Server (EWS) interface. Select a lower number to lighten the printed output or save toner. -6 - +6 0* is the default setting. 0-5 0* is the default setting. For more information about these options, see the driver Help... is the default setting. Solving print quality problems 58 Lighten or darken printed output and conserve toner. Adjust the contrast of printed objects. Menu selection Print Resolution Toner Darkness Brightness Contrast Purpose Select printed output resolution. In the driver, clear the check box. ...
...are available on the driver and on the printer Embedded Web Server (EWS) interface. Select a lower number to lighten the printed output or save toner. -6 - +6 0* is the default setting. 0-5 0* is the default setting. For more information about these options, see the driver Help... is the default setting. Solving print quality problems 58 Lighten or darken printed output and conserve toner. Adjust the contrast of printed objects. Menu selection Print Resolution Toner Darkness Brightness Contrast Purpose Select printed output resolution. In the driver, clear the check box. ...

User's Guide
Page 59
Place the print cartridge assembly on a flat, clean surface. 4 Locate the glass printhead lens within the recessed area in the top of the printer to release and lower the front door. 3 Remove the print cartridge assembly by pulling on the toner cartridge handle. Cleaning the printhead lens 59 Troubleshooting Cleaning the printhead lens Some print quality problems can be solved by cleaning the printhead lens. 1 Turn the printer off. 2 Press the button on the left side of the printer. Note: Do not press the button on the print cartridge assembly.
Place the print cartridge assembly on a flat, clean surface. 4 Locate the glass printhead lens within the recessed area in the top of the printer to release and lower the front door. 3 Remove the print cartridge assembly by pulling on the toner cartridge handle. Cleaning the printhead lens 59 Troubleshooting Cleaning the printhead lens Some print quality problems can be solved by cleaning the printhead lens. 1 Turn the printer off. 2 Press the button on the left side of the printer. Note: Do not press the button on the print cartridge assembly.
User's Guide
Page 62
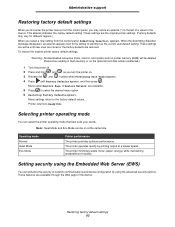
... are the original printer settings. (Factory defaults may vary for different regions.) When you may notice an asterisk (*) to Ready state. The printer minimizes waste (toner, paper, energy) while maintaining acceptable print quality. Menu settings return to select the desired menu option. 6 Restoring Factory Defaults appears. Restoring factory default settings 62...
... are the original printer settings. (Factory defaults may vary for different regions.) When you may notice an asterisk (*) to Ready state. The printer minimizes waste (toner, paper, energy) while maintaining acceptable print quality. Menu settings return to select the desired menu option. 6 Restoring Factory Defaults appears. Restoring factory default settings 62...
User's Guide
Page 69
...of products, supplies or parts • Products, supplies, parts, materials (such as toners and inks), software, or interfaces not furnished by any Suppliers and Remarketers of remedies also applies to a Lexmark designated location. For further explanation of failures caused by: • Modification or unauthorized ...printer shall end earlier if it was intended. Warranty service does not include repair of your area contact Lexmark o n the World Wide Web at Lexmark's option). Lexmark's liability for actual damages from any claim by you may not be available or only be a new ...
...of products, supplies or parts • Products, supplies, parts, materials (such as toners and inks), software, or interfaces not furnished by any Suppliers and Remarketers of remedies also applies to a Lexmark designated location. For further explanation of failures caused by: • Modification or unauthorized ...printer shall end earlier if it was intended. Warranty service does not include repair of your area contact Lexmark o n the World Wide Web at Lexmark's option). Lexmark's liability for actual damages from any claim by you may not be available or only be a new ...

User's Guide
Page 72
...paper tray adjustment 19 photoconductor kit changing 40 end-of-life 39 ordering 39 recycling 42 preprinted forms 13 print cartridge See toner cartridge print media jams avoiding 17 print media specifications 11 printer settings 7 printhead lens, cleaning 59 printing 18 problems control ...Protocol 63 supplies conserving 35 recycling 42 storing 35 supplies ordering maintenance kit 42 photoconductor kit 39 toner cartridge 37 system board accessing 28 system password setting 63 T toner cartridge changing 37 ordering 37 recycling 42 translated label 8 transparencies 14 tray linking 24 W warranty...
...paper tray adjustment 19 photoconductor kit changing 40 end-of-life 39 ordering 39 recycling 42 preprinted forms 13 print cartridge See toner cartridge print media jams avoiding 17 print media specifications 11 printer settings 7 printhead lens, cleaning 59 printing 18 problems control ...Protocol 63 supplies conserving 35 recycling 42 storing 35 supplies ordering maintenance kit 42 photoconductor kit 39 toner cartridge 37 system board accessing 28 system password setting 63 T toner cartridge changing 37 ordering 37 recycling 42 translated label 8 transparencies 14 tray linking 24 W warranty...

