User Manual
Page 4
... paper ...47 Selecting paper...47 Selecting preprinted forms and letterhead...47 Storing paper...48 Supported paper sizes, types, and weights...48 Paper sizes supported by the printer ...48 Paper types supported by the printer...50 Paper types and weights supported by the printer ...50 Paper capacities...52 Using recycled paper and other office papers...
... paper ...47 Selecting paper...47 Selecting preprinted forms and letterhead...47 Storing paper...48 Supported paper sizes, types, and weights...48 Paper sizes supported by the printer ...48 Paper types supported by the printer...50 Paper types and weights supported by the printer ...50 Paper capacities...52 Using recycled paper and other office papers...
User Manual
Page 6
... color imaging kit ...123 Replacing a toner cartridge...128 Replacing a developer unit ...130 Cleaning the exterior of the printer...135 Recycling Lexmark products...136 Moving the printer...136 Before moving the printer...136 Moving the printer to another location...136 Shipping the printer ...136 Administrative... support 137 Restoring the factory default settings...137 Adjusting Power Saver...137 Using the Embedded Web Server...138 Setting up e-mail alerts...
... color imaging kit ...123 Replacing a toner cartridge...128 Replacing a developer unit ...130 Cleaning the exterior of the printer...135 Recycling Lexmark products...136 Moving the printer...136 Before moving the printer...136 Moving the printer to another location...136 Shipping the printer ...136 Administrative... support 137 Restoring the factory default settings...137 Adjusting Power Saver...137 Using the Embedded Web Server...138 Setting up e-mail alerts...
User Manual
Page 7
... Transparency print quality is poor...154 Uneven print density...155 Solving color quality problems...155 Color misregistration...155 FAQ about color printing...156 Contacting Customer Support...159 Contents 7
... Transparency print quality is poor...154 Uneven print density...155 Solving color quality problems...155 Color misregistration...155 FAQ about color printing...156 Contacting Customer Support...159 Contents 7
User Manual
Page 10
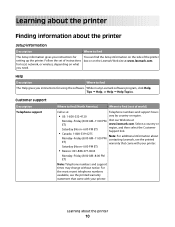
... gives you need. Monday-Friday (8:00 AM-11:00 PM Visit our Web site at www.lexmark.com. Select a country or Saturday (Noon-6:00 PM ET) region, and then select the Customer Support link. • Canada: 1-800-539-6275 Note: For additional information about Monday-Friday (8:00... what you instructions for You can find the Setup information on the side of instructions box or on the Lexmark Web site at ET) www.lexmark.com. Customer support Description Telephone support Where to find (North America) Where to find The Setup information gives you instructions for using the software....
... gives you need. Monday-Friday (8:00 AM-11:00 PM Visit our Web site at www.lexmark.com. Select a country or Saturday (Noon-6:00 PM ET) region, and then select the Customer Support link. • Canada: 1-800-539-6275 Note: For additional information about Monday-Friday (8:00... what you instructions for You can find the Setup information on the side of instructions box or on the Lexmark Web site at ET) www.lexmark.com. Customer support Description Telephone support Where to find (North America) Where to find The Setup information gives you instructions for using the software....
User Manual
Page 11
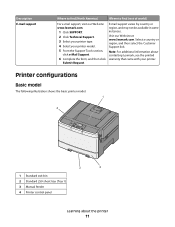
...find (rest of world) For e-mail support, visit our Web site: www.lexmark.com. 1 Click SUPPORT. 2 Click Technical Support. 3 Select your printer type. 4 Select your printer. Select a country or region, and then select the Customer Support link. Printer configurations Basic model The ...Standard 250-sheet tray (Tray 1) 3 Manual feeder 4 Printer control panel Learning about contacting Lexmark, see the printed warranty that came with your printer model. 5 From the Support Tools section, click e-Mail Support. 6 Complete the form, and then click Submit Request. Visit our Web site at www...
...find (rest of world) For e-mail support, visit our Web site: www.lexmark.com. 1 Click SUPPORT. 2 Click Technical Support. 3 Select your printer type. 4 Select your printer. Select a country or region, and then select the Customer Support link. Printer configurations Basic model The ...Standard 250-sheet tray (Tray 1) 3 Manual feeder 4 Printer control panel Learning about contacting Lexmark, see the printed warranty that came with your printer model. 5 From the Support Tools section, click e-Mail Support. 6 Complete the form, and then click Submit Request. Visit our Web site at www...

User Manual
Page 23
Installing hardware options Installing a 650-sheet duo drawer The printer supports one optional drawer, which allows an additional 650 sheets of paper to move it safely. If you are accessing the system board or installing optional ...
Installing hardware options Installing a 650-sheet duo drawer The printer supports one optional drawer, which allows an additional 650 sheets of paper to move it safely. If you are accessing the system board or installing optional ...
User Manual
Page 26
Consult a system support person for a solution, and then print another network setup page. Setting up the printer software Installing printer software A printer driver is "Not Connected," the LAN ...
Consult a system support person for a solution, and then print another network setup page. Setting up the printer software Installing printer software A printer driver is "Not Connected," the LAN ...
User Manual
Page 28
... your network uses more information on configuring 802.1X security, see the Networking Guide on the Software and Documentation CD. WEP key If your system support person if you will not have any installed hardware options, and then click Apply Changes. Select the key currently in the provided spaces. In Mac...
... your network uses more information on configuring 802.1X security, see the Networking Guide on the Software and Documentation CD. WEP key If your system support person if you will not have any installed hardware options, and then click Apply Changes. Select the key currently in the provided spaces. In Mac...
User Manual
Page 35
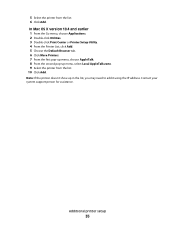
Contact your system support person for assistance. 5 Select the printer from the list. 10 Click Add. Additional printer setup 35 In Mac OS X version 10.4 and earlier 1 From the ...
Contact your system support person for assistance. 5 Select the printer from the list. 10 Click Add. Additional printer setup 35 In Mac OS X version 10.4 and earlier 1 From the ...
User Manual
Page 37
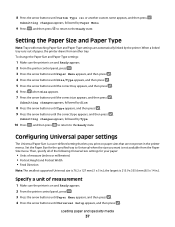
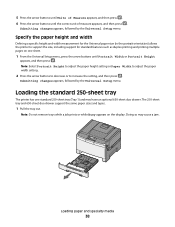
... specialty media 37 When a linked tray runs out of measure (inches or millimeters) • Portrait Height and Portrait Width • Feed Direction Note: The smallest supported Universal size is a user-defined setting that are automatically linked by Paper Menu. 9 Press , and then press to return to the Ready state. Configuring Universal...
... specialty media 37 When a linked tray runs out of measure (inches or millimeters) • Portrait Height and Portrait Width • Feed Direction Note: The smallest supported Universal size is a user-defined setting that are automatically linked by Paper Menu. 9 Press , and then press to return to the Ready state. Configuring Universal...
User Manual
Page 38
...to adjust the paper height setting or Paper Width to adjust the paper width setting. 2 Press the arrow buttons to decrease or to support the size, including support for the Universal paper size (in the portrait orientation) allows the printer to increase the setting, and then press . The 250-sheet... tray and 650-sheet duo drawer support the same paper sizes and types. 1 Pull the tray out. Loading paper and specialty media 38 Submitting changes appears, followed by the Universal Setup...
...to adjust the paper height setting or Paper Width to adjust the paper width setting. 2 Press the arrow buttons to decrease or to support the size, including support for the Universal paper size (in the portrait orientation) allows the printer to increase the setting, and then press . The 250-sheet... tray and 650-sheet duo drawer support the same paper sizes and types. 1 Pull the tray out. Loading paper and specialty media 38 Submitting changes appears, followed by the Universal Setup...
User Manual
Page 48
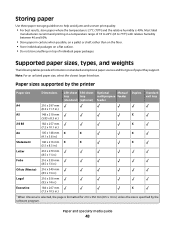
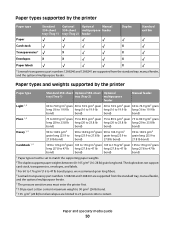
... sizes, types, and weights The following tables provide information on top of paper they support. Note: For an unlisted paper size, select the closest larger listed size. Most label manufacturers recommend printing in a temperature range of 18 to 24°C (...
... sizes, types, and weights The following tables provide information on top of paper they support. Note: For an unlisted paper size, select the closest larger listed size. Most label manufacturers recommend printing in a temperature range of 18 to 24°C (...
User Manual
Page 50
...(Tray 2) feeder Duplex Standard exit bin Card stock X Transparencies* X X Envelopes X X X Paper labels X * Lexmark transparency part numbers 12A8240 and 12A8241 are supported from the standard tray, manual feeder, and the optional multipurpose feeder. 5 The pressure sensitive area must be set to ... lb bond) paper, we recommend grain long fibers. 4 Lexmark transparency part numbers 12A8240 and 12A8241 are supported from the standard tray, manual feeder, and the optional multipurpose feeder. Paper types supported by the printer Paper type Standard 250-sheet Optional 550-sheet...
...(Tray 2) feeder Duplex Standard exit bin Card stock X Transparencies* X X Envelopes X X X Paper labels X * Lexmark transparency part numbers 12A8240 and 12A8241 are supported from the standard tray, manual feeder, and the optional multipurpose feeder. 5 The pressure sensitive area must be set to ... lb bond) paper, we recommend grain long fibers. 4 Lexmark transparency part numbers 12A8240 and 12A8241 are supported from the standard tray, manual feeder, and the optional multipurpose feeder. Paper types supported by the printer Paper type Standard 250-sheet Optional 550-sheet...
User Manual
Page 51
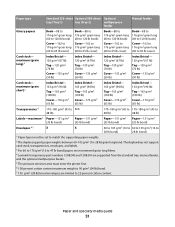
... types must enter the printer first. 6 100 percent cotton content maximum weight is 90 g/m2 (24 lb) bond. 7 105 g/m2 (28 lb) bond envelopes are supported from the standard tray, manual feeder, and the optional multipurpose feeder. 5 The pressure sensitive area must be set to match the... between 60-105 g/m2 (16-28 lb) grain long bond. The duplex does not support card stock, transparencies, envelopes, and labels. 3 For 60 to 176 g/m2 (16 to 47 lb bond) paper, we recommend grain long fibers. 4 Lexmark transparency part numbers 12A8240 and 12A8241 are limited to 65 lb cover) Card stock...
... types must enter the printer first. 6 100 percent cotton content maximum weight is 90 g/m2 (24 lb) bond. 7 105 g/m2 (28 lb) bond envelopes are supported from the standard tray, manual feeder, and the optional multipurpose feeder. 5 The pressure sensitive area must be set to match the... between 60-105 g/m2 (16-28 lb) grain long bond. The duplex does not support card stock, transparencies, envelopes, and labels. 3 For 60 to 176 g/m2 (16 to 47 lb bond) paper, we recommend grain long fibers. 4 Lexmark transparency part numbers 12A8240 and 12A8241 are limited to 65 lb cover) Card stock...
User Manual
Page 52
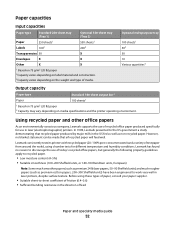
Using recycled paper and other office papers As an environmentally conscious company, Lexmark supports the use of recycled office paper produced specifically for different temperature and humidity conditions. Optional multipurpose tray 100 sheets1 502 50 10 ...75 g/m2 (20 lb) paper 2Capacity varies depending on label material and construction. 3Capacity varies depending on media specifications and the printer operating environment. Lexmark consistently tests its printers with recycled paper (20-100% post-consumer waste) and a variety of test paper from around the world, using these ...
Using recycled paper and other office papers As an environmentally conscious company, Lexmark supports the use of recycled office paper produced specifically for different temperature and humidity conditions. Optional multipurpose tray 100 sheets1 502 50 10 ...75 g/m2 (20 lb) paper 2Capacity varies depending on label material and construction. 3Capacity varies depending on media specifications and the printer operating environment. Lexmark consistently tests its printers with recycled paper (20-100% post-consumer waste) and a variety of test paper from around the world, using these ...
User Manual
Page 59
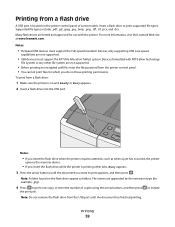
...from a flash drive: 1 Make sure the printer is located on the printer control panel of copies using the arrow buttons, and then press to print supported file types. Printing from a flash drive A USB port is on and Ready or Busy appears. 2 Insert a flash drive into the USB port. ...Devices formatted with the printer. For more information, visit the Lexmark Web site at www.lexmark.com. File names are not supported. • Before printing an encrypted .pdf file, enter the file password from the USB port until the document you do...
...from a flash drive: 1 Make sure the printer is located on the printer control panel of copies using the arrow buttons, and then press to print supported file types. Printing from a flash drive A USB port is on and Ready or Busy appears. 2 Insert a flash drive into the USB port. ...Devices formatted with the printer. For more information, visit the Lexmark Web site at www.lexmark.com. File names are not supported. • Before printing an encrypted .pdf file, enter the file password from the USB port until the document you do...
User Manual
Page 63
... stuck together or damaged in any exposed adhesive when the flap is printing. Have an interlocking design - For more information, see "Paper types and weights supported by the printer" on page 50. • Do not load wrinkled, creased, damp, bent, or curled paper. • Flex, fan, and straighten paper before loading...
... stuck together or damaged in any exposed adhesive when the flap is printing. Have an interlocking design - For more information, see "Paper types and weights supported by the printer" on page 50. • Do not load wrinkled, creased, damp, bent, or curled paper. • Flex, fan, and straighten paper before loading...
User Manual
Page 64
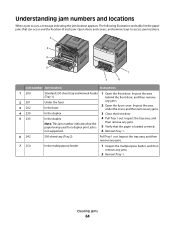
... then remove any jams. 3 Close the front door. 4 Pull Tray 1 out. The following illustration and table list the paper jams that the paper is not supported. 1 Open the front door. Open doors and covers, and remove trays to access jam locations. 3 2 4 5 1 7 6 Jam number Jam location Instructions 1 200 2 201 3 202 4 230 5 235...
... then remove any jams. 3 Close the front door. 4 Pull Tray 1 out. The following illustration and table list the paper jams that the paper is not supported. 1 Open the front door. Open doors and covers, and remove trays to access jam locations. 3 2 4 5 1 7 6 Jam number Jam location Instructions 1 200 2 201 3 202 4 230 5 235...

User Manual
Page 75
... relative texture of the transparencies loaded in a specific tray Notes: • Normal is the factory default setting. • Settings appear only if card stock is supported. Card Stock Texture Smooth Normal Rough Specifies the relative texture of the card stock loaded in a specific tray Note: Normal is the factory default setting...
... relative texture of the transparencies loaded in a specific tray Notes: • Normal is the factory default setting. • Settings appear only if card stock is supported. Card Stock Texture Smooth Normal Rough Specifies the relative texture of the card stock loaded in a specific tray Note: Normal is the factory default setting...
User Manual
Page 76
...paper loaded in a specific tray Notes: • Rough is the factory default setting. • Settings appear only if the custom type is supported. Specifies the relative texture of the custom paper loaded in a specific tray Notes: • Normal is the factory default setting. • ... Normal Heavy Transparency Weight Light Normal Heavy Definition Identifies the relative weight of the paper loaded in a specific tray Note: Normal is supported. Understanding printer menus 76 Specifies the relative texture of the colored paper loaded in a specific tray Note: Normal is the factory default...
...paper loaded in a specific tray Notes: • Rough is the factory default setting. • Settings appear only if the custom type is supported. Specifies the relative texture of the custom paper loaded in a specific tray Notes: • Normal is the factory default setting. • ... Normal Heavy Transparency Weight Light Normal Heavy Definition Identifies the relative weight of the paper loaded in a specific tray Note: Normal is supported. Understanding printer menus 76 Specifies the relative texture of the colored paper loaded in a specific tray Note: Normal is the factory default...

